|
|
Post by 1dave on Dec 6, 2017 16:44:16 GMT -5
@ockjunquie you asked for it, here it is - as far as the weather would let me go for this year. Several years ago a gardening neighbor showed up with a bunch of pallets and within a couple of hours built a raised grow-box for me. He gave me 4-way entry pallets so it stood 40" tall.- 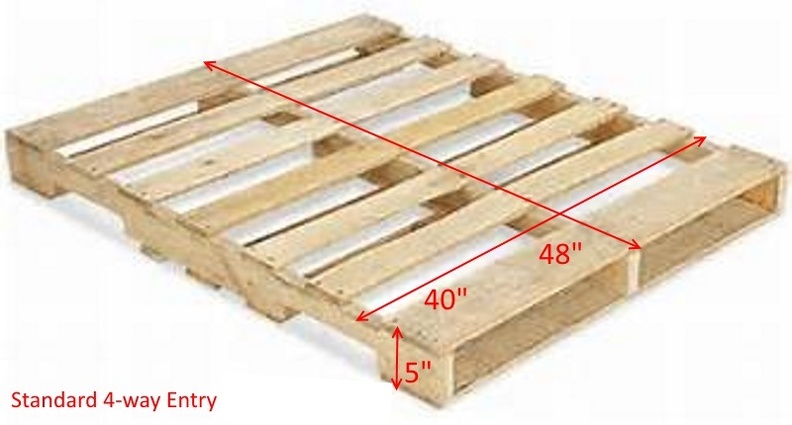 He cut out half of the bottom slats to provide a shelf for those to be used as sides.  Unfortunately this fall it leaned to the west and fell over.  I decided to re-build it with modifications so that won't happen again. I started with a half section and staggered the rest for strength and added bottom spacers and cross bracing below the beds.   The spacing allowed me to build in a space to hold tools and a breadboard type pull-out work table. At this point I remembered that 40" was a tad too tall and began cutting 3" off the top. I also built a door on the far end to store longer stuff like rakes and hoes. 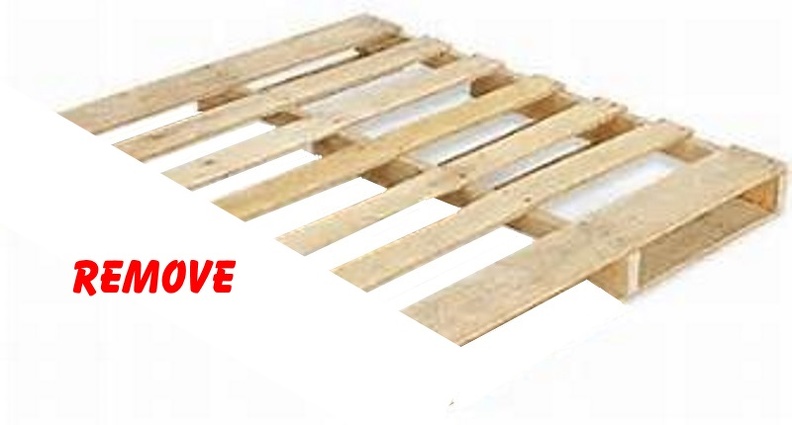 IF I had purchased the pallets AI would have chosen the second type - "Two Way Entry Close boarded, No Base Board. It would have saved the next step - closing up all those gaps. 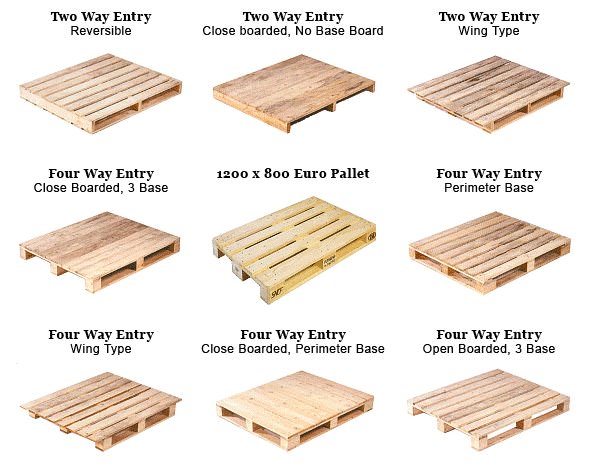 I covered the sides and bottom with 6' cedar fencing, but had to drill 3/8" holes in the bottom to insure drainage. 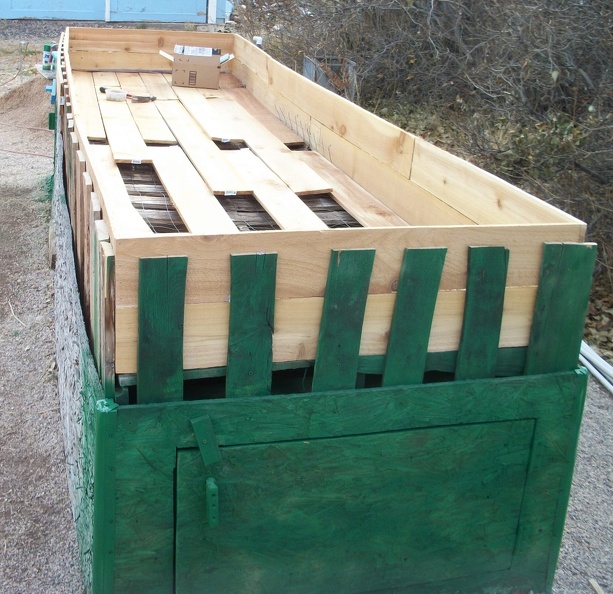 |
|
|
|
Post by captbob on Dec 6, 2017 17:20:36 GMT -5
Very ambitious project, but I don't understand. - NOT a gardener!
Why go through that effort and expense? Is a raised bed somehow better than just growing at ground level?
Is it to keep out pests like rabbits from eating your produce?
I could see if the local soil is poor quality that something to put better dirt in would be beneficial, but that could be done at ground level with some cinder blocks as a dirt container. Cinder blocks wouldn't rot - ever.
Seems all that wood would attract termites & roaches - 'least here in Florida, and the wood would eventually rot.
That upper box wood looks like soft pine, which wouldn't last a year here.
Just curious why you went to all that trouble, over a ground level bed.
|
|
|
|
Post by rockjunquie on Dec 6, 2017 17:23:14 GMT -5
Thanks! My brother collects pallets and makes all kinds of things. I'm gonna show him this.  |
|
|
|
Post by rockjunquie on Dec 6, 2017 17:24:11 GMT -5
Very ambitious project, but I don't understand. - NOT a gardener! Why go through that effort and expense? Is a raised bed somehow better than just growing at ground level? Is it to keep out pests like rabbits from eating your produce? I could see if the local soil is poor quality that something to put better dirt in would be beneficial, but that could be done at ground level with some cinder blocks as a dirt container. Cinder blocks wouldn't rot - ever. Seems all that wood would attract termites & roaches - 'least here in Florida, and the wood would eventually rot. That upper box wood looks like soft pine, which wouldn't last a year here. Just curious why you went to all that trouble, over a ground level bed. Raised beds are huge back savers. |
|
|
|
Post by taylor on Dec 6, 2017 21:38:17 GMT -5
Raised beds are also popular where the ground is too hard to dig without extreme motivation...Arizona caliche!
|
|
Deleted
Deleted Member
Member since January 1970
Posts: 0
|
Post by Deleted on Dec 6, 2017 23:38:25 GMT -5
Raised beds can be a mixed blessing.
Here in So Cali they work for hot weather crops like tomato's and peppers, but they shorten the season for things like potatoes and lettuces. They get hot too fast, and increase water requirements...
For Dave, it also allows him to garden without "stoop work". Good design for him indeed! Woot!
|
|
|
|
Post by 1dave on Dec 7, 2017 0:33:25 GMT -5
Very ambitious project, but I don't understand. - NOT a gardener! Why go through that effort and expense? Is a raised bed somehow better than just growing at ground level? Is it to keep out pests like rabbits from eating your produce? I could see if the local soil is poor quality that something to put better dirt in would be beneficial, but that could be done at ground level with some cinder blocks as a dirt container. Cinder blocks wouldn't rot - ever. Seems all that wood would attract termites & roaches - 'least here in Florida, and the wood would eventually rot. That upper box wood looks like soft pine, which wouldn't last a year here. Just curious why you went to all that trouble, over a ground level bed. Raised beds are huge back savers. Exactly! Something strange happens when you pass the 75 mark. What my friend did in a couple of hours took me 3 months to replicate. But why not make it nicer? A problem is that some of the pallets had 3/4" slats and others 1/2" and most of them were badly beat up when they first arrived. "You can't make a silk purse out of a sow's ear" as the saying goes, but I love working with my hands AND it keeps me off the streets rolling drunks at night. More tomorrow. |
|
|
|
Post by spiceman on Dec 7, 2017 0:50:16 GMT -5
Pallets are very useful
I built a compost bin.
The staggered boards on the sides, lets air a moisture inside.
I used metal coat hangers to attach all four corners.
Easier to remove the skids when the compost is ready to use.
I make many other things from skids
Because it free wood and very hard.
|
|
|
|
Post by 1dave on Dec 7, 2017 9:47:49 GMT -5
Gizmo Giznaznick Trinket! I accidentally missed the insert image, went to Add Attachment, and wiped out everything. Have to start over. hope i can remember what I wrote. This time I'm doing a bit at a time. captbob "That upper box wood looks like soft pine, which wouldn't last a year here." No, that is cedar fencing. Raised beds can be a mixed blessing. Here in So Cali they work for hot weather crops like tomato's and peppers, but they shorten the season for things like potatoes and lettuces. They get hot too fast, and increase water requirements... For Dave, it also allows him to garden without "stoop work". Good design for him indeed! Woot! And the knees! hard to kneel and almost impossible to stand back up is what forced me to retire 18 years go. Having run out of a project, I decided to convert the grow-box into a greenhouse. I purchased a bundle of 10 1/2" EMT, 1 stick of 3/4" EMT and 4 8' lengths of treated 2X4's. The 3/4 was cut into 10" lengths to accept the 1/2" hoops, the wood drilled every 30" for the hoops. the sides were drilled and pierced with 3 1/2" deck screws to secure them and keep the 1/2" from sliding down in any farther.  I made 5" spacers for the ends, 7 1/2" spacers for the sides - 4X4's for the joints. I covered the bottom sides with 2'X8' strand board to keep the critters out. A "greenhouse" has to be green, so I sprayed it with "Meadow Green."  As for the conduit, there are lots of companies making benders. I like the Benfield because of the Blue Arrow, Star, AND the lines showing what degree of bend you have reached. With the measured distance behind you, place the measured distance behind you for perfect back to back bends. For stubs in front of you, add 5 inches to the length and place that mark on the arrow. The end hoops (to keep our common 75mph winds from telling up the covers) were easy. two 90's the desired distance apart, and they went into the 3/4 sleeves clear to the floor. Next the side end hoops and mid hoops took some adjusting. With the benders I used on the job I made bends of 15, 22 1/2, 30, 45, and 60 o, found the exact center of the bend, placed them back in the bender and filed and identified each point. I never got around to doing that with my old Richards bender at home, so I made some guesses. Instead of 5", I added 3 1/2" for a 60 and used the "A" for approximate center of 30 o bends on the Richards bender. 1/2" EMT is forgiving BUT NEVER BEND IT ON A SOFT SURFACE OR WITHOUT YOUR FOOT HARD ON THE HEEL OF THE BENDER OR IT WILL KINK! With thousands of bends in the past, I have encountered some defective conduit that split along the seams no matter how careful you were. A bend can be slid an inch or so along the pipe by standing on the short side and pushing a little out of the bend, then standing on the long side and pulling a little bend back in.  For the end hoops I decided on three 60 o bends, one in the center(30 for each side - 60 + 30 = 90) and 2 for the down turn. They are standing up in the photo below. The mid hoops (Sideways in the photo below)were more demanding. I placed the cross connectors in the center of each one and secured them with large eye-bolts (to support the future lines for lifting and lowering the covers) to secure them. I found the threads were too short to keep them from wobbling around so had to flatten the cross connectors about 1/4" with a punch. smaller eye-screws were added later at strategic points. a 30 o bend was made as close as possible to each cross connector and the rest proceeded as with the end hoops.  |
|
|
|
Post by orrum on Dec 7, 2017 10:27:34 GMT -5
Great job Dave!!! Bet it's cold there now. We r wintering in Quartzsite Az and loving the Roadrunner Gem and Lapidary Club. Look up on our newsletter what all we get to do Dave.
|
|
|
|
Post by 1dave on Dec 7, 2017 11:42:32 GMT -5
Great job Dave!!! Bet it's cold there now. We r wintering in Quartzsite Az and loving the Roadrunner Gem and Lapidary Club. Look up on our newsletter what all we get to do Dave. Is there more than this? qrgmc.org/  |
|
|
|
Post by orrum on Dec 7, 2017 16:43:22 GMT -5
That's us Dave!#!
|
|
|
|
Post by 1dave on Dec 8, 2017 8:57:06 GMT -5
With the hoops & ridgepole in place it was time to install the overhead sprinkler system. The old one from the bed was too wide to fit on the clothes hangers I used to support the system from the ridgepole so I had to cut it way down. I used 3/4" PVC garden hose connections (much smaller than PVC unions!)on both ends of the supply pipe to the distribution section I had just rebuilt so I can easily take it apart.  Now to modify the old feed to the new system. I was planning on cutting it down and inserting a couple of 45 o couplings, but looking at it I guessed I could use my heat gun to bend it to fit. That is much easier to do on a hot 100 o summer day than a 50 o fall day, but I gave it a bit of a go.  Without the kneeler board and side bars to help me stand back up I'd never get anything done. Surprise surprise, it had a fit! The air was so cool I didn't even need the wet rags I had prepared.  |
|
jamesp
Cave Dweller 
Member since October 2012
Posts: 36,154
|
Post by jamesp on Dec 8, 2017 11:40:24 GMT -5
You are an animal Dave.
An old fox plumber taught me the hot air gun trick for bending PVC.
|
|
|
|
Post by 1dave on Dec 9, 2017 7:44:19 GMT -5
Rigging - I inserted 1/2' dowels into the ridgepole and ran a screw through the north and south hoops to hold it all together. the end hoops required some screw holes to hold the tops of the covers and eye-screws for rigging - especially the south hoop where the cover control board would be located. The south hoop also had the top offset out 2" for rigging clearance.  I was going to use heavy twine for rigging, but remembering how fast it deteriorates in the weather and sunshine, I decided to go with fishing line. 10# would easily handle it but I found colored 100# line and went with it to keep from getting confused. I used blue for the cold North and green for the warm south. Yellow for the bright morning east and Orange for the setting sun west.  I used sewing machine bobbins to keep them separated. They are 1/2" wide so I used eye-screws 9/16ths apart to keep them in place. I had rods from an ancient wood extension ladder to run through the eye-screws and bobbins. The eye-screws are just deep enough to press the bobbins firmly against the board so the line cannot escape. a nail worked well to tighten them.  Now for the knots! Fishing line knots are notorious for sliding lose, so here are some that have been developed over the centuries. 1. the Davy Knot  2. the Noose Knot  3. the Uni Knot - a fisherman's favorite 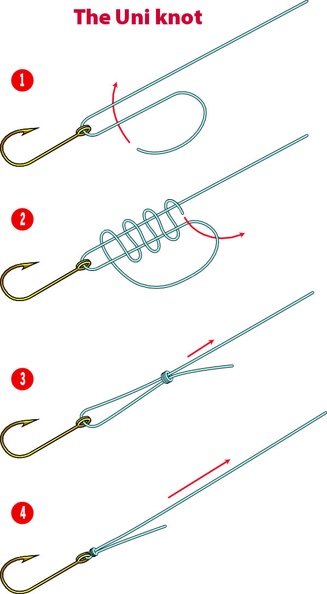 4. which is like the Hangman's Noose!  First lines  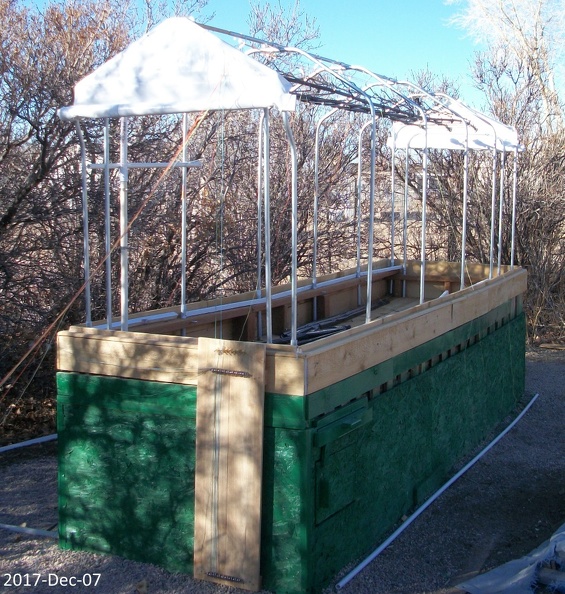 |
|
|
|
Post by MrP on Dec 9, 2017 9:17:36 GMT -5
Great job...................MrP
|
|
|
|
Post by parfive on Dec 9, 2017 13:56:04 GMT -5
You gonna sell trinkets at the mall in the off-season?
|
|
|
|
Post by 1dave on Dec 9, 2017 14:04:40 GMT -5
You gonna sell trinkets at the mall in the off-season? Never have, never will. |
|
|
|
Post by spiceman on Dec 9, 2017 14:06:43 GMT -5
Fishing line.
I use fishing line to sew when strength is needed. Spider wire works great, or most any braided line.
Mono... Deteriorates over time from weather, sun rays.
Most knots don't work very well with braided line but use a drop of super glue on the knot, preventing
It from slipping. The problem is solved.
I race remote control sail boats and use fishing line to control the sails. Braided line has zero stretch,
Use a small diameter and its lite too.
Go fishing
|
|