Post by 3rdrockfromthefun on Jul 1, 2012 15:11:25 GMT -5
First of all I should say that this piece was entirely inspired by Helene's (Lapidary / Gemstone Community Forum) opalite KCC entry a few contests ago. You know, it drove me nearly insane trying to figure out not only what she had done exactly (hard to be certain, for me anyway, from the pics posted), but how.
To make matters more difficult I have only two flat laps - not a real deal wheel in site here. I had been practicing agate twists a bit (more on that in a later post) in an attempt to give more depth to flat lapped cabs, given they have the 'concave handicap', and when I saw Helene's cab something snapped in my head and I set out on a mission to at very least study curvature and lines (reflected lines will rat you out every time if your curves lack uniformity) - my weakest area when it comes to basic flat lap cabbing.
Also, having been enthralled as a child at the concept of 'The Moebius Strip', a surface with only one side; perhaps the only human way I know of to catch a very blurry, but tangible, emulation of infinity that one can hold in their hand, I had been thinking it would be neat to make a cab that, I hope anyway, captured some of the essence of that thrill I felt over those silly pasted together strips of paper.
While this surface, the parallel of the surface of the strip, does not connect it's terminal points, everything else in between is ground in one swath (has one side) over and over through all of the normal steps right up to polishing. Tricky at best as it's difficult to hold one's hand steady over a flat lap while turning in 90 degree increments, going over curves etc.
I am still knee deep in this study and hope to post more results, some I hope as stark - others frankly boring but some not too bad cabs have resulted thus far - but for now here is the first one I started with.
I hope this wasn't too boring or dry but for anyone wondering, I have not been behind the school smoking cigarettes with the girls for the past couple of weeks. No no; I have been deep in with a study of curvature and uniformity and perhaps one day I'll be making ovals that look like Krystee's water droplets (I drool at every single one of her cabs, she is such a perfectionist and so very good at all of this.
Enjoy if you're still awake and, as always, I am grateful for and very open to critique and feedback.
--
Rough Source: Catmandewe (Tony the Great) - and this was pittance compared to some of what he sent! Everyone seems to be ranting on Tony's rock, I'm one of them - he's sells only the best.
--
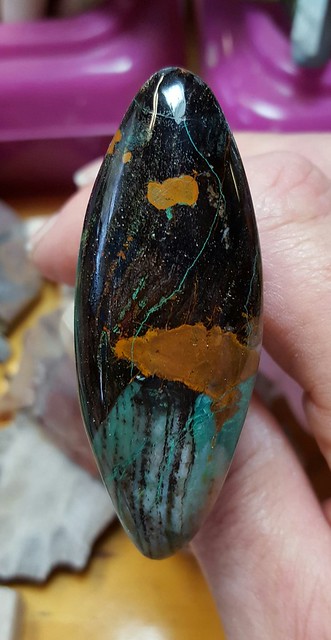
FRONT VIEW

BACK VIEW / SIDEWAYS TO SHOW CURVATURE

SIDE VIEW

TOP VIEW - MEETING OF PATHS (They wrap one another like clasped hands)

Let's follow the grind path - it begins with one of the clasps (see above) and ends on the other.
1 - STARTING DOWN THE TOP OF THE BACK SIDE...

2 - AROUND THE NECK...

3 - DOWN THE BACK...

4 - TO THE CURVE AT THE BASE...

5 - TURN 90 DEGREES...

6 - HEAD BACK UP THE SIDE (This frames the face)...

7 - COMPLETE THE FRAMING...

8 - TURN A FURTHER 90 DEGREES...

9 - 'ROUND THE ENTIRE FRONT...

10 - WHICH LANDS US RIGHT WHERE WE STARTED
To make matters more difficult I have only two flat laps - not a real deal wheel in site here. I had been practicing agate twists a bit (more on that in a later post) in an attempt to give more depth to flat lapped cabs, given they have the 'concave handicap', and when I saw Helene's cab something snapped in my head and I set out on a mission to at very least study curvature and lines (reflected lines will rat you out every time if your curves lack uniformity) - my weakest area when it comes to basic flat lap cabbing.
Also, having been enthralled as a child at the concept of 'The Moebius Strip', a surface with only one side; perhaps the only human way I know of to catch a very blurry, but tangible, emulation of infinity that one can hold in their hand, I had been thinking it would be neat to make a cab that, I hope anyway, captured some of the essence of that thrill I felt over those silly pasted together strips of paper.
While this surface, the parallel of the surface of the strip, does not connect it's terminal points, everything else in between is ground in one swath (has one side) over and over through all of the normal steps right up to polishing. Tricky at best as it's difficult to hold one's hand steady over a flat lap while turning in 90 degree increments, going over curves etc.
I am still knee deep in this study and hope to post more results, some I hope as stark - others frankly boring but some not too bad cabs have resulted thus far - but for now here is the first one I started with.
I hope this wasn't too boring or dry but for anyone wondering, I have not been behind the school smoking cigarettes with the girls for the past couple of weeks. No no; I have been deep in with a study of curvature and uniformity and perhaps one day I'll be making ovals that look like Krystee's water droplets (I drool at every single one of her cabs, she is such a perfectionist and so very good at all of this.
Enjoy if you're still awake and, as always, I am grateful for and very open to critique and feedback.
--
Rough Source: Catmandewe (Tony the Great) - and this was pittance compared to some of what he sent! Everyone seems to be ranting on Tony's rock, I'm one of them - he's sells only the best.
--
FRONT VIEW
BACK VIEW / SIDEWAYS TO SHOW CURVATURE
SIDE VIEW
TOP VIEW - MEETING OF PATHS (They wrap one another like clasped hands)
Let's follow the grind path - it begins with one of the clasps (see above) and ends on the other.
1 - STARTING DOWN THE TOP OF THE BACK SIDE...
2 - AROUND THE NECK...
3 - DOWN THE BACK...
4 - TO THE CURVE AT THE BASE...
5 - TURN 90 DEGREES...
6 - HEAD BACK UP THE SIDE (This frames the face)...
7 - COMPLETE THE FRAMING...
8 - TURN A FURTHER 90 DEGREES...
9 - 'ROUND THE ENTIRE FRONT...
10 - WHICH LANDS US RIGHT WHERE WE STARTED


 WoWzers!! Amazing and beautiful work!!


