|
|
Post by mohs on Jul 2, 2012 10:23:37 GMT -5
that's a really fine escherian grind !
I've tried and haven't figured it out
rock on
Ed
|
|
|
|
Post by victor1941 on Jul 2, 2012 21:44:22 GMT -5
Your cab is absolutely stunning. After having read the other comments and having looked at other designs I would say if you could make it there are other skilled artisans within our group for the difficult step of mounting.
Victor 1941
|
|
|
|
Post by talkingstones on Jul 3, 2012 5:01:45 GMT -5
Beautiful piece! It has a real liquid quality that is very intriguing!!! Well done!
Cathy
|
|
|
|
Post by 3rdrockfromthefun on Jul 3, 2012 8:37:41 GMT -5
PURITY vs AESTHETICSInitially I cabbed a piece following some very strict guidelines. Primarily that the entire cab be essentially one face and that it be cabbed with each grind being one single swath across that face. Secondly I'd wanted there to be something special about it apart from the study - that the face be framed in some manner than might, in some universe by some person at very least, be seen as relevant to Helene's opalite cab where she ran a grind around it to create a sort of peeled away framing effect (or so that's how I saw it - and was terrifically impressed by it). Pretty rigid. Taking the results of that piece and free-forming a cab without any rules other than the abstract 'it should look kind of the similar' I cut another piece as a more expressive image of 'that shape'. I ground it in mirror image of the first to satisfy the rock, a piece of orbed Bruneau Jasper I received from Sir Tony (catmandewe). Here are the results: FRONT  BACK - I thought I had a min-reflection shot of this - can't find it...  TOP  BOTTOM  RIGHT SIDE  LEFT SIDE  NOTE - This is the most translucent piece of Bruneau I have ever seen - wow!  I'm not sure how well I did, in concept, but if you consider what it is that makes you like some cabs and dislike others I think you know what I'm talking about when I say "there's just something about that shape...". I don't think I'll be going 'Close Encounters' anytime soon and shaping my mashed potatoes like this, or any other cab, but we seem to connect strongly to simple geometries and to both sharp/straight lines and smooth graceful curves. Since those lines and curves are what I am trying to find resolution with in all of this, and with shapes like this - I can at least I did my best for now.
|
|
zarguy
fully equipped rock polisher
 Cedar City, Utah - rockhound heaven!
Member since December 2005
Posts: 1,791
|
Post by zarguy on Jul 3, 2012 11:53:46 GMT -5
Good stuff Frank.
You're getting it now. Think outside the template!
Now I feel validated when I make my 2-sided cabs, freeform cabs, polished-on-all-sides uh, uh, things, for lack of a better description.
Lynn
|
|
|
|
Post by 3rdrockfromthefun on Jul 3, 2012 16:16:52 GMT -5
Oh Lynn, indeed! I do all my cabs two sided or no side at all! :nono:  |
|
Minnesota Daniel
freely admits to licking rocks
 A COUPLE LAKERS
Member since August 2011
Posts: 891
|
Post by Minnesota Daniel on Jul 3, 2012 21:52:11 GMT -5
Cabochon Theory 101. You need to work on the DVD. (You thought we were smoking with the girls back there?)
|
|
mc2
fully equipped rock polisher
Member since April 2009
Posts: 1,147
|
Post by mc2 on Jul 3, 2012 22:15:54 GMT -5
Wow! That is nice!!! Yea, it would take a very skilled and creative wire artist to show that one off to its' best. I would not have a clue. I really really do like what you done there, creative and skilled!!
Mike
|
|
|
|
Post by 3rdrockfromthefun on Jul 4, 2012 7:12:46 GMT -5
I read that when I first woke up Daniel and it did not compute (thought you were telling me to go back to school with the girls - huh?) - but, folgers be thanked, I am now on the same page! Thanks man!
|
|
|
|
Post by 3rdrockfromthefun on Jul 4, 2012 8:24:55 GMT -5
THE TWISTIn my first post I said I would get back to the agate twist. Let's talk about that. Several months ago, right after I got my first flat lap and had done a few basic shapes, I got kind of discouraged because I was unable to do concave surfaces. You'd be surprised at just how much of a limitation that is. Still, there are things that can be done on a flat lap that almost defy one's sense of physics while actually in the act. Sure - a twist - no big deal. But when you're sliding a curly thing around on your flat lap and it's 'fitting' - well, kinda cool. Here's one I did using the waterline portion of a waterline agate: SIDE - SKINNY  END A  END B  END ON    SIDE - FAT  BACKLIT  Probably the most important thing I learned is that 45 degrees yields the most visually 'twisted' cab in appearance:  Any lesser degree and the twist is difficult to see. Any more than that and it loses the look of a twist and looks like you just cabbed a rod with two different directions of heads/tail on it. And so I call it a 1/8th twist (1/8th == 360d / 45d). It's obviously not a new concept so there's probably already a name for it but I had to call it something. -- For those with flat laps who might be interested - here's the pattern (are you sitting?):  That's a SiC honing stick - it's larger than the agate slice I started with and the lines are much easier to see on it. Otherwise it's the exact shape of the agate I started with for the twist shown. The pattern on the other side looks identical. The lines running down the sides mate to the lines crossing diagonally over the ends. You have to visualize an imaginary plane running through the rectangle from the lines on one side to the lines on the other - like a sheet of paper slicing through it. Then you remove all stock save for a few millimeters on either side of that plane, round it off and presto - twist. You'll end up with a 1/4 twist - cabbing a 1/8th twist is not so terrible once you do a few of these but it's not that intuitive straight away so I recommend the 1/4 twist pattern to begin with. Slice it in half and you get two 1/8th twists. As you cut be sure and keep the entire thing parallel to your lapping surface. When you're finished the entire thing sits flat (though the offset weight will pull it to one side). Another way of think of it is to pretend that you're making it inside of a tube and that it fits the tube at both ends and middle at all times (which it would). -- This came to mind when I was going over curvature and uniformity of lines and, as you can see, it's quite curvacious. See how uniformly the light follows that curvature at all points? This is important to me - big time. I think nothing distracts and disappoints me more than planar disparity in reflections (ripples and bumps and skews...) coming from a cab I've made. Especially when I bang my head against the wall trying to get those reflections to look right - because they are literally a reflection coming off a surface that distorts them according to the uniformity of that surface. What's that you say...? Ridges? ...
|
|
|
|
Post by NatureNut on Jul 4, 2012 10:52:37 GMT -5
How beautiful. I'd love to wrap it.
Jo
|
|
|
|
Post by 3rdrockfromthefun on Jul 4, 2012 10:58:33 GMT -5
How beautiful. I'd love to wrap it. Jo Would you do in exchange for the piece? (I don't sell - I give away everything I make - hobby is all) I'd love to see it. If so PM your address and I'll send it off to you. |
|
|
|
Post by 3rdrockfromthefun on Jul 7, 2012 11:35:10 GMT -5
CROSSING PATHSFor my final installment in this teeny bit of a study of 'Curvature and Uniformity' I wanted to show one more technique I use to add a little pizazz and curvature to a cab that would otherwise simply be a rectangle. The technique involves crossing primary grind paths to yield the patterns that emerge at the fringes of convergence. It's easier explained by visual demonstration, so here's a rectangular shaped obsidian cab on which I ground a path from side to side followed by a path from top to bottom. I had a hell of a time getting a picture of this until I dragged a second, out of focus, light into the mix. THE PATTERN  THE POLISH  THE SHEEN - This is Davis Creek OB obtained from Hand-2-Mouth Mining  THE TRANSLUCENCY  To do this properly on a flat lap you must grind one direction completely followed by the other direction completely - at every grit level. I recommend polishing it that way as well. Also, I picked a gray sheen because I happened to already have one oriented perfectly parallel to the front/back - saved me a lot of work as I wanted this to be uni-color sheen to avoid distraction, however, and the pictures doing show this, there is a distinct chatoyant quality to the material so it's a lot more exiting n real life. Thanks for peeking in on my little world - hope the picture show was at least fun!
|
|
Deleted
Deleted Member
Member since January 1970
Posts: 0
|
Post by Deleted on Jul 7, 2012 13:47:50 GMT -5
You and I must think alike. I have made this type also and I have to say that you have a skill level second to none. It is extremely difficult to get the corners to come out even and yours look perfect, I am still working on the learning curve and on most of them I end up just making them rounded because the corners will not even up. My hat is off to you.
Jim
|
|
|
|
Post by 3rdrockfromthefun on Jul 7, 2012 14:38:59 GMT -5
Thanks Jim!
Not sure if this helps but I always flip cabs over quite frequently (no matter the shape) so that my left and right hand are trading off the same sides of the cab. I find if I don't do this frequently my cabs come out skewed to one side. I think it's partly because my hands do not apply pressure equally but also because one side of the cab is always closer to the outside of the lap disc (which grinds it faster). It's a little more time consuming but since I started doing it I have almost no problems with symmetry.
|
|
|
|
Post by rockjunquie on Jul 7, 2012 17:20:32 GMT -5
This has been a mind twisting thread! Thank you so much! I love them all. ;D I'm trying to wrap my brain around the idea of doing these. Since I'm such a newbie who barely handles and oval, you can imagine how my head hurts! LOL!! The wire wrapper in me is trying to figure out how to wrap them. Talk about a challenge!!
|
|
|
|
Post by tntmom on Jul 7, 2012 21:20:00 GMT -5
Frank, you are a Master! Your' skill blows my mind! THANK YOU SOOOOOO MUCH, my mind needs to be blown sometimes!!!! (Keeps things fresh  ) |
|
|
|
Post by 3rdrockfromthefun on Jul 8, 2012 4:02:34 GMT -5
Thanks so much rj, these are my solution to my having a difficult time with things like ovals, lol... my alternate ways to get curves! Krystee - Queen of the all elusive water-droplet oval - thank you so much for taking time to comment on my little ditties here, it means a lot to me |
|
|
|
Post by 3rdrockfromthefun on Jul 10, 2012 16:47:37 GMT -5
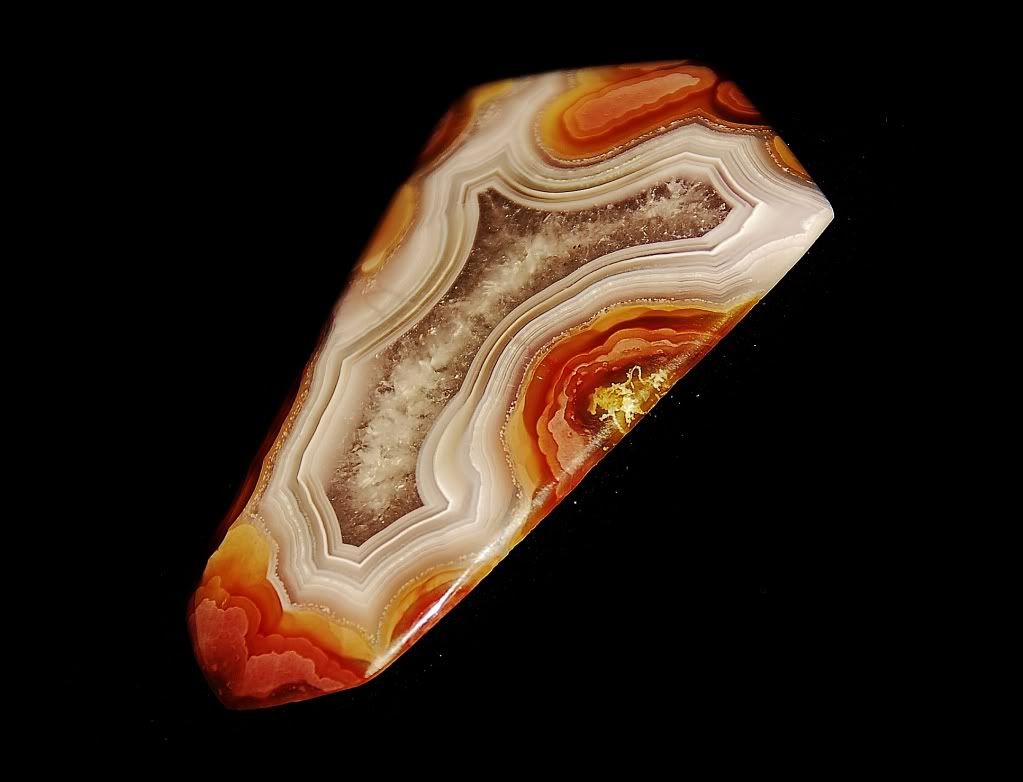
OKAY - ONE MOREThis is a piece of Montana agate that is nicely botryoidal and has a fortification formation with a tiny corner of waterline banding within. NOTE: This is not Iris Agate - any colors you see in the banding are artifacts such as colors behind the piece or lensing of the light due to curvature of the psuedo-facets (I believe that's what you call those?). Trust me - I spend a lot of time going through all of my agate looking carefully for the iris effect - thus far no joy. This is actually the third permutation of this piece, a free-form worry-stone I initially made by hand with diamond files and sandpaper. That rendition had mud-like inclusions (the ones that look like little floating islands) that I left half exposed on the fringes. Bad move - fractures began forming around the exposed portions of the inclusions and were heading inward. Next I simply shrunk it, carving out the inclusions, but never got around to polishing it. I was looking at the turtle back lensing yesterday and an idea struck - most likely because I've had this pseudo-faceting on the brain lately. It is in need of re-polishing. Again - trust me - there are lots of small scratches on it's surface. For some reason they don't seem to show (or not so much anyway) in the pictures, so - I figured I'd go ahead and post some as this is what'll look like in person when it is re-polished. UPDATE 1: Almost forgot to include the grind paths used to make this - that was kind of the whole point. UPDATE 2: This was done, except for the polish which was done with a dremel and 14K diamond, on a combination of hard and soft flat laps (faceting discs followed by diamond sanding discs). 0  Looks like a fish to me - you? 1 FRONT-LIT  2  3  4 BACK-LIT  5  And I just now found a picture of this piece when it was in transition from form 1 to 2 - notice a size difference? Well now it's a cab! 6  Thanks for looking!
|
|
unclestu
Cave Dweller  WINNER OF THE FIRST RTH KILLER CAB CONTEST UNCLESTU'S AGUA NUEVA AGATE
Member since April 2011
Posts: 2,298
|
Post by unclestu on Jul 10, 2012 21:41:01 GMT -5
Frank,
This has had to be one of the more interesting threads I have read. I have visualized cabs in my minds eye with a thre dementional quality by virtue of curves and twists and you put that to stone.
Great job!!!!!
Stu
|
|


 )
)