jamesp
Cave Dweller 
Member since October 2012
Posts: 36,557
|
Post by jamesp on Mar 4, 2013 8:37:59 GMT -5
These Rio Grande agates were cut 30 at a time.Basically concreted together using diamond saw friendly sand less grout and poured into an 8 inch plastic pot.Once hard,then saw.Pebbles were small but high grade agates,woods and jaspers. 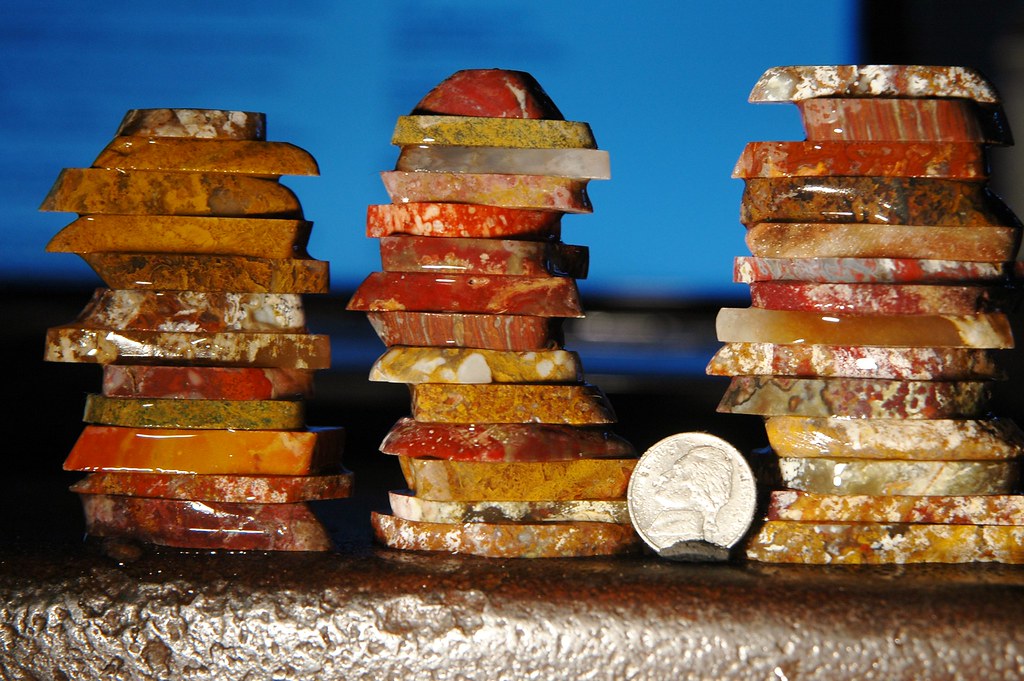 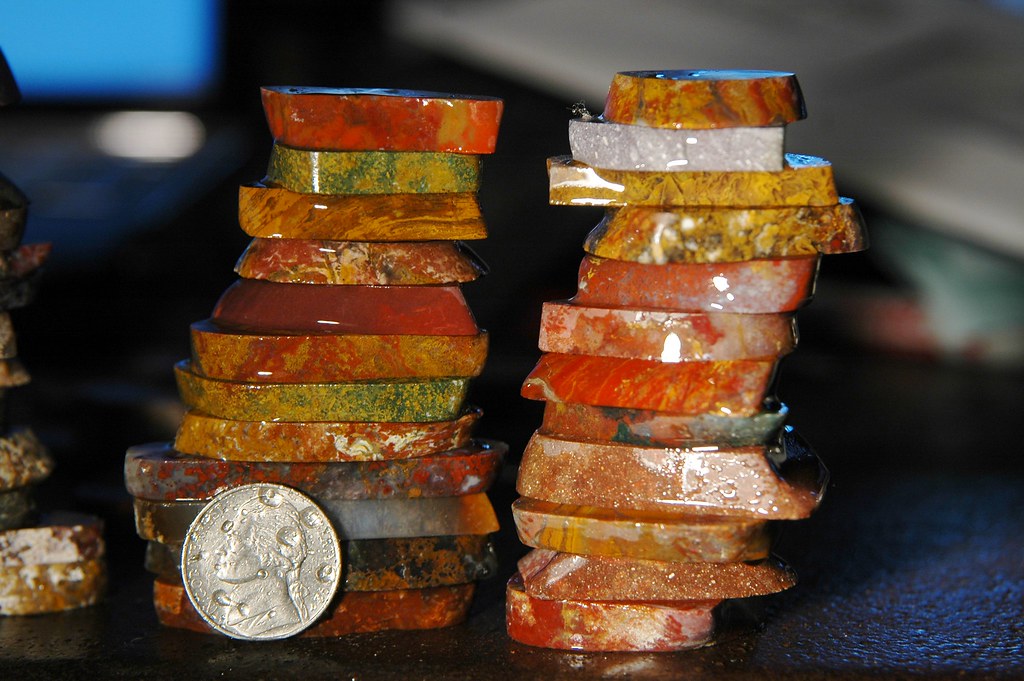 |
|
|
|
Post by beefjello on Mar 4, 2013 8:50:26 GMT -5
Cool method and looks like some great stuff there!
|
|
jamesp
Cave Dweller
Member since October 2012
Posts: 36,557
|
Post by jamesp on Mar 4, 2013 9:17:55 GMT -5
Probably washed down from your neighborhood Brain.Only after you got the best while it was in Arizona!
|
|
Deleted
Deleted Member
Member since January 1970
Posts: 0
|
Post by Deleted on Mar 4, 2013 9:34:18 GMT -5
I had forgotten about that method so thanks for the reminder. What cement to sand mix do you use? Or do you by the bags with no gravel?
Jim
|
|
milto
starting to spend too much on rocks

Member since January 2010
Posts: 162
|
Post by milto on Mar 4, 2013 9:38:40 GMT -5
Little more details if possible, sounds like a great idea for the smaller pieces you might want one or two slabs out of.
How do you keep them oriented correctly for the cut you want, did you grease the bucket first, was it hard to vice up a 8 inch slab, how thick was your final slab.
Thanks for any ideas I surely would be interested in trying this technique.
milto
|
|
milto
starting to spend too much on rocks
Member since January 2010
Posts: 162
|
Post by milto on Mar 4, 2013 9:39:28 GMT -5
Oh yea how did you get the cement to come off so cleanly from the rocks?
milto
|
|
|
|
Post by Pat on Mar 4, 2013 10:52:41 GMT -5
Beautiful slabs and photos. Cool trick!
|
|
|
|
Post by phil on Mar 4, 2013 11:11:10 GMT -5
How badly did you sludge up your oil? Everytime we did that, we needed oil changes and filtering!
|
|
jamesp
Cave Dweller
Member since October 2012
Posts: 36,557
|
Post by jamesp on Mar 4, 2013 12:11:36 GMT -5
I ended up making a wood form that was 6 inches x 8 inches x 10 inches long.That easily fit in the 18 inch saw vice.Mix the tile grout in a 5 gal bucket.Pour some in the form.Lay a layer of rocks on the bed of grout the way you want them to cut.Cover them w/grout.Add more rocks,add more grout etc etc.So you would cut 6" x 8" slabs whatever thickness you set your saw to.Next time i would make the form the shape of a trapazoid so that it was more the shape of the saw blade. It has to be stronger than plaster of paris to keep the rock cemented in place.... The grout is tile grout.There are 2 kinds of tile grout to concern about.Joints less tha 1/8 joints bigger than 1/8.Use less than 1/8,also called-i can't remember(non sanded?)- Joints bigger than 1/8 is sanded grout.It uses sand as the aggregate.Small joints need tiny aggregate so they use a saw lubricant called polymers(probably polyethylene saw dust).You can use the sand but your saw blade may wear due to sand sanding it...I got it at Lowes in a 10 or 20 pound bag(brand was Maffet,Moffet again i can't remember).It may make your saw oil funny,but never caused any problem with my oil . The polymer grout is not a problem if you tumble them.I think i sawed within 48 hours to keep grout a little soft(again i can't remember).I tumbled all these slabs.DO NOT soak agate in muratic acid. I think i sawed about 80 pounds of these.They are stored for the future:>I guess.But i did it a bunch and had great reliability. The smaller agates of the Rio Grande were of very high quality and were the hardest of the hardest.And the variety is incredible.I may have one of the largest variety of Rio Grand agates,jaspers and woods because of this system.Small slabs of course.Will photograph one day-all of them individual so Mel can ID every one of them:> Here is the old round form i used.It was a polyethylene nursery pot with no holes-cut it off the pour.Never took pics of the rectangular slab system.It was much more dense in agates. www.flickr.com/photos/67205364@N06/sets/72157631927601357/Great way to get cab blanks Phil-The brand of grout from Lowes-ah,it is Mapei.The Mapei did less damage.Not much more than my limestone covered native fossilized coral.But i do not care because of the production way out weighed any gooped oil. |
|
|
|
Post by Drummond Island Rocks on Mar 4, 2013 12:48:40 GMT -5
thats cool, never seen that done.
so are your two photos up top after tumbling or how do you get all the grout off if you were to want to cab the little slabbetes ?
chuck
|
|
jamesp
Cave Dweller
Member since October 2012
Posts: 36,557
|
Post by jamesp on Mar 4, 2013 13:13:22 GMT -5
Cab away Chuck.Your diamond wheels will laugh at the grout.I did not tumble those stacks after cutting them,i tumbled them before cutting and the grout came off easily because of the smooth surface.Like 16 pounds of pebbles for 3 days with 1 cup of grit.You can see the white patina on some of them.I bought back about 1000 pounds of these pebbles.Only 25% were high grade.Only made one trip,now i can pick better-the uglier some patinas the prettier the innards.The gravels were bigger as you went up the hill.Some lower hill tops were coated with 1-2 inch pebbles-perfect for this process.It is a very efficient cab slab maker.Need bigger cabs-use bigger pebbles.
The sand less polymer grout did not stick much.The sanded grout is basically cement and very sticky when dry.Keep in mind-grout fills the spaces.It is the thin set mortar that is so sticky cause it holds the tiles down.Do not use thin set-but if you are going to tumble fairly heavy it is OK.I soak in vinegar a few days to nuetralize the alkalinity before tumbling....But the rocks snap out of the grout fairly easy-and really easy if you saw before it gets to hard.
This is a friendly process.i found it user friendly.I tried a lot of concretes and grouts.
|
|
|
|
Post by Drummond Island Rocks on Mar 4, 2013 13:19:43 GMT -5
Thanks for the extra info! I might have to start printing some of these threads and make a binder to keep all these great ideas for future projects.
Chuck
|
|
jamesp
Cave Dweller
Member since October 2012
Posts: 36,557
|
Post by jamesp on Mar 4, 2013 13:21:20 GMT -5
|
|
Deleted
Deleted Member
Member since January 1970
Posts: 0
|
Post by Deleted on Mar 4, 2013 13:35:18 GMT -5
dang. You have a table made from meteorite! Look at the pitting from the heat during entry into the atmosphere! That is some neighborhood you moved in to! Great buy for sure. Man I wish I had enough meteorites laying around that I could make tables. |
|
jamesp
Cave Dweller
Member since October 2012
Posts: 36,557
|
Post by jamesp on Mar 4, 2013 15:29:32 GMT -5
That is the kitchen table Scott.It is somthing i found and welded legs to.The pits come fast here in the humidity of the SEast.I did not see many meteorites with that much pitting
|
|
quartz
Cave Dweller
breakin' rocks in the hot sun
Member since February 2010
Posts: 3,352
|
Post by quartz on Mar 4, 2013 23:21:16 GMT -5
Always thinking, we like the idea, and thanks for the rock show. Lots of oohs and ahhs from ma and I.
Larry
|
|
jamesp
Cave Dweller
Member since October 2012
Posts: 36,557
|
Post by jamesp on Mar 5, 2013 1:04:14 GMT -5
Thanks Larry.I know smart people.
|
|
Deleted
Deleted Member
Member since January 1970
Posts: 0
|
Post by Deleted on Mar 5, 2013 7:58:37 GMT -5
Ok, you cut up tons of rock and then do what with it? Display it in huge glass containers, give it away, sell it  You are quite enterprising and entertaining. Thanks for the schooling. Jim |
|
Deleted
Deleted Member
Member since January 1970
Posts: 0
|
Post by Deleted on Mar 5, 2013 11:50:18 GMT -5
Just fooling around Jim. Nice kitchen table.
|
|
jamesp
Cave Dweller
Member since October 2012
Posts: 36,557
|
Post by jamesp on Mar 5, 2013 13:03:18 GMT -5
Obviously compliments drives me a lot.I am always show and telling.Have always like to try awkward or challenging.Thanks Larry Thanks Jim Thanks Scott.Three great compliments right there.I am not secretive.Others have shared w/me and i intend to do the same.The more ya give the more ya get
|
|


