|
|
Post by agatewhisperer on Sept 27, 2020 21:22:49 GMT -5
|
|
|
|
Post by Peruano on Sept 28, 2020 6:23:55 GMT -5
Now to fabricate a guard for the belt that allows you to lift the saw table when needed. That belt is awfully close to the work surface.
|
|
|
|
Post by agatewhisperer on Sept 28, 2020 6:46:56 GMT -5
Now to fabricate a guard for the belt that allows you to lift the saw table when needed. That belt is awfully close to the work surface. Yeah agreed. |
|
herb
spending too much on rocks

Member since November 2011
Posts: 444
|
Post by herb on Sept 28, 2020 8:56:43 GMT -5
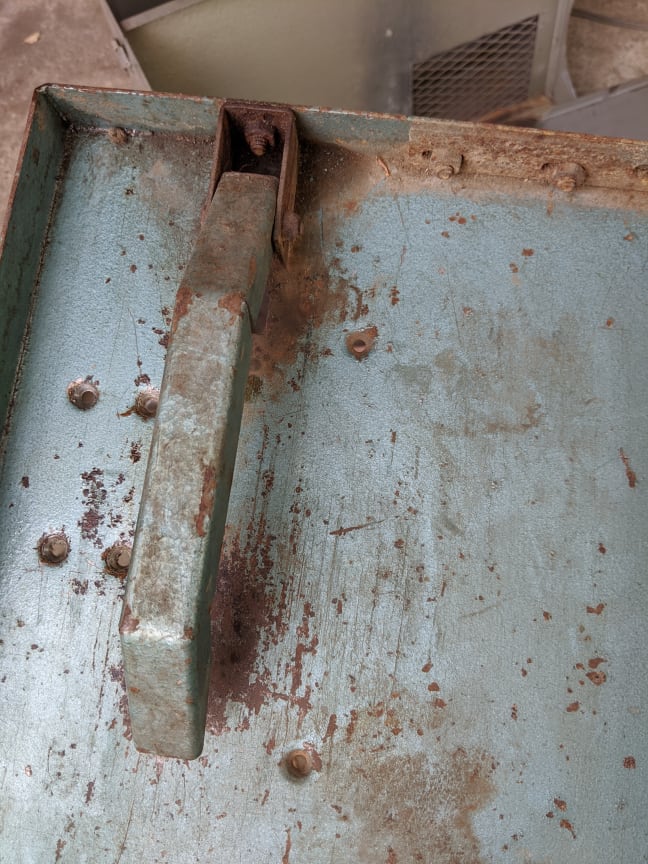
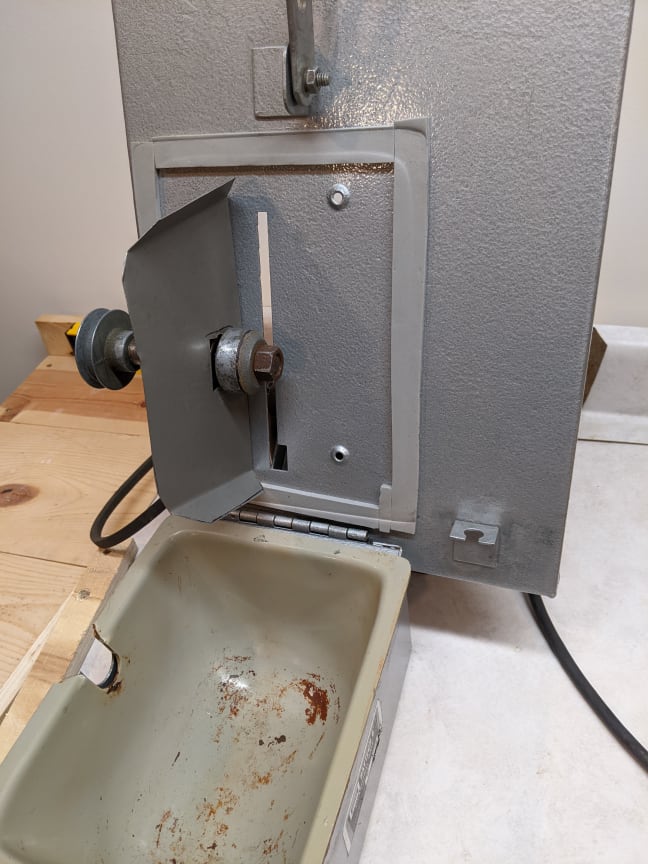
My 10 inch raytech saw has a hinged cover that protects you from the belt. I think the 2 holes shown on the side view pic are were the guard was attached. On mine, there is also a hole between the pulley and the back of the unit for a threaded post that holds the cover in place.
|
|
|
|
Post by Peruano on Sept 29, 2020 14:33:07 GMT -5
The only other thing that is lacking is a splatter/spray shield for the front of the saw. If the front ledge does not have holes for pointing a tin or plexiglass plate there, there is a great H - shaped aluminum flashing used in shower surrounds that when cut to appropriate length can hold such a shield in place and allow its easy removal when necessary for big rocks or cleaning. I posted a photo of the flashing a long time ago on this forum.
|
|
EricD
Cave Dweller  High in the Mountains
Member since November 2019
Posts: 1,142
|
Post by EricD on Sept 30, 2020 8:05:19 GMT -5
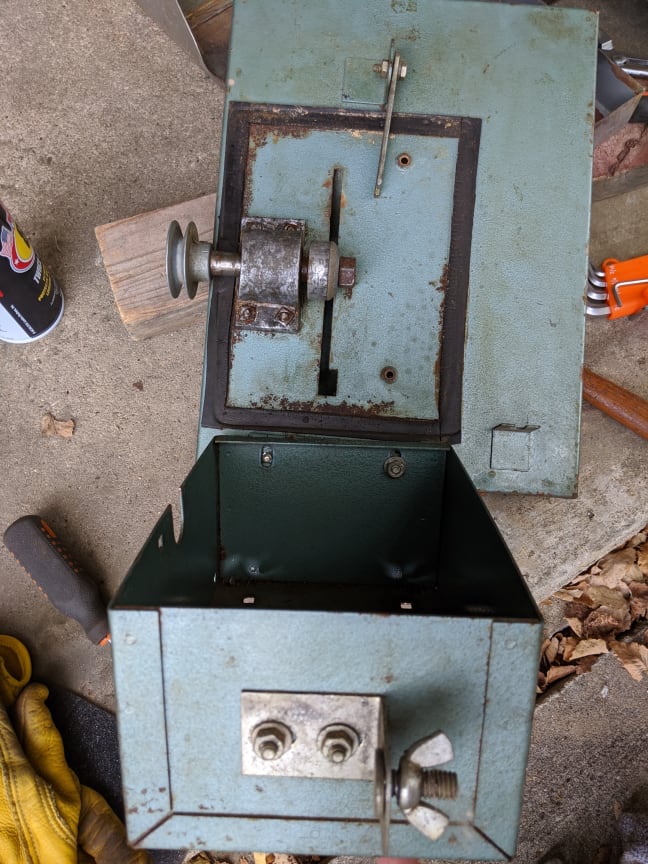
I notice you decided to put it together without the coolant baffle, like the last person to have it apart.
Any specific reason?
I would think it would keep stuff from splashing around as much near the arbor cutout in the reservoir, as well as keeping the bearings mostly out of the splash.
|
|
|
|
Post by agatewhisperer on Sept 30, 2020 20:49:19 GMT -5
I notice you decided to put it together without the coolant baffle, like the last person to have it apart. Any specific reason? I would think it would keep stuff from splashing around as much near the arbor cutout in the reservoir, as well as keeping the bearings mostly out of the splash. you caught me. I have a piece of material to use for that purpose but i didn't get there yet. I'd be very appreciative if anyone has some larger/ more detailed pictures to show the baffle, and specifically how it connects to the housing. There are a few pictures of it in place online but I need a little more detail/ close ups of how it goes around the shaft and how it sits under the bearing housing. |
|
herb
spending too much on rocks
Member since November 2011
Posts: 444
|
Post by herb on Oct 1, 2020 14:44:20 GMT -5
agatewhisperer here is what the baffle looks like on my 10 inch saw. This same or similar design should work for your 6 inch saw. First pic shows my saw could use some cleaning :-) , but also shows the baffle from the front or blade side. Basically the baffle is bent around the front and back of the blade to catch the oil and muck as it spins off the blade.  Raytech 10" Baffle Front Raytech 10" Baffle Front by Shiny Objects, on Flickr Second pic shows the back side of the baffle. The top has a bend in it so it can be mounted using the same holes as the housing for the arbor shaft.  Raytech 10" Baffle Back Raytech 10" Baffle Back by Shiny Objects, on Flickr The big circular cut out is so the saw blade flange that is fixed to the shaft can fit thru and then there is a smaller rectangular cut out above the circular cut out for the arbor shaft. You have to assemble/mount the baffle and arbor with the blade off. To figure out the exact dimensions you need for the baffle, your best bet is probably to get a sheet of heavy weight paper (or paperboard like from a cardboard cereal box) and experiment with cutting and folding that before you start playing with a piece of metal.
|
|
|
|
Post by agatewhisperer on Oct 1, 2020 16:17:40 GMT -5
herb - thank you! This really helps. That larger circle cutout answers one of the questions i had with trying to make one.
|
|
EricD
Cave Dweller
High in the Mountains
Member since November 2019
Posts: 1,142
|
Post by EricD on Oct 1, 2020 19:25:43 GMT -5
I notice you decided to put it together without the coolant baffle, like the last person to have it apart. Any specific reason? I would think it would keep stuff from splashing around as much near the arbor cutout in the reservoir, as well as keeping the bearings mostly out of the splash. you caught me. I have a piece of material to use for that purpose but i didn't get there yet. I'd be very appreciative if anyone has some larger/ more detailed pictures to show the baffle, and specifically how it connects to the housing. There are a few pictures of it in place online but I need a little more detail/ close ups of how it goes around the shaft and how it sits under the bearing housing.
herb did a nice job of showing one installed, but it's a little different on the L-6S. I assume the flange washer would need to be removed to install it, but I am uncertain on that point... it may just slide right through. $25 seems reasonable when it comes down to all the bends, holes, and the opening for the arbor shaft. |
|
bfield
off to a rocking start
 Sooooonnnn! Rockhound for many years (since age 4), SMS Club member
Member since February 2019
Posts: 4 
|
Post by bfield on Oct 5, 2020 11:19:11 GMT -5
Thanks for all the info! I have a couple of machines that need this de-rusting, cleaning, refurbishing to be done to them. Looking forward to getting them done! I've also been "lurking" on the site for a couple of years now but have found some VERY good information - so thanks to all!
I've been a rock hound for many, many years and have more rocks than I will EVER cut - but gotta try! I am a member of the Sacramento Mineral Society - which has a large warehouse with all the equipment so I haven't had to set my machines up (and still organizing the garage to do that!) in order to create my cabochons. Still don't have the 8" king cabber I want but - several other machines (2 wheel one, plus cutters, buffers, tumblers, flatlaps, trimsaw etc.). Spacing everything, cleaning, de-rusting and treating with rustoleum is next. I have an outdoor shed with rocks and oil saw and tile saws so those are taken care of. I have a 2 car garage (with w/d in it) and still want to park the car...suggestions are welcome!
|
|
bfield
off to a rocking start
Sooooonnnn! Rockhound for many years (since age 4), SMS Club member
Member since February 2019
Posts: 4
|
Post by bfield on Oct 5, 2020 11:24:17 GMT -5
p.s. depending on whether "pitting" is ok - I've found a really great de-ruster is straight vinegar - but it can cause pitting. I also use navel jelly, wire brushes and steel wool, comet. Haven't tried baking powder or salt yet and I do see there are several other products out now.
|
|
|
|
Post by agatewhisperer on Feb 28, 2021 23:18:19 GMT -5
|
|
hummingbirdstones2
fully equipped rock polisher
 Vince A., 1958-2023
Member since August 2018
Posts: 1,461
|
Post by hummingbirdstones2 on Mar 1, 2021 9:05:50 GMT -5
Nice looking saw! Your "before" pics might even look better than ours. But that's one of the best trim saws anywhere.
I saw on the other thread that you had gotten info from Scott Ent. on the arbor assemblies. Splash guards are still showing as available here:
If you made the baffle, though, you should be able to fab a splash guard that would work. Just start with the "hem" that slips over the front lip of the table and then make the other bends after that. I made a belt guard (of sorts - but it keeps my fingers out of the belt) the same way. It fits over the side lip of the table so I can just pull it off there whenever I might need to.
|
|
|
|
Post by agatewhisperer on Mar 1, 2021 11:40:55 GMT -5
Nice looking saw! Your "before" pics might even look better than ours. But that's one of the best trim saws anywhere.
I saw on the other thread that you had gotten info from Scott Ent. on the arbor assemblies. Splash guards are still showing as available here:
If you made the baffle, though, you should be able to fab a splash guard that would work. Just start with the "hem" that slips over the front lip of the table and then make the other bends after that. I made a belt guard (of sorts - but it keeps my fingers out of the belt) the same way. It fits over the side lip of the table so I can just pull it off there whenever I might need to.
Oh thanks for mentioning the splash guard. I didn't even think of that yet. I'm excited to use it but can see my pinky getting chopped off with the belt being so close. Any chance you could send a pic of your diy belt guard? I'm looking for some ideas of what's worked for others... |
|
hummingbirdstones2
fully equipped rock polisher
Vince A., 1958-2023
Member since August 2018
Posts: 1,461
|
Post by hummingbirdstones2 on Mar 1, 2021 18:06:23 GMT -5
Heh. This was a "proof of concept" that was meant to be replaced by a full-size version. It worked well enough for what I do that it's still there.
An "open hem" to slip over the side rail of the table. Just like the splash guard.
A "closed hem" - sheet metal is bent back upon itself to form the wall between the belt and saw table.
90 degree bend to form the top.
90 degree bend to form the outside wall.
Keeps my pinkie out of the belt when slabbing or trimming - that's why I've never built the "real" one to replace it.
|
|
|
|
Post by agatewhisperer on Mar 1, 2021 21:32:22 GMT -5
Heh. This was a "proof of concept" that was meant to be replaced by a full-size version. It worked well enough for what I do that it's still there.
An "open hem" to slip over the side rail of the table. Just like the splash guard.
A "closed hem" - sheet metal is bent back upon itself to form the wall between the belt and saw table.
90 degree bend to form the top.
90 degree bend to form the outside wall.
Keeps my pinkie out of the belt when slabbing or trimming - that's why I've never built the "real" one to replace it.
Thanks!! That makes a lot more sense seeing it. Hopefully get some time to try making one this weekend. |
|
|
|
Post by agatewhisperer on Mar 20, 2021 12:23:36 GMT -5
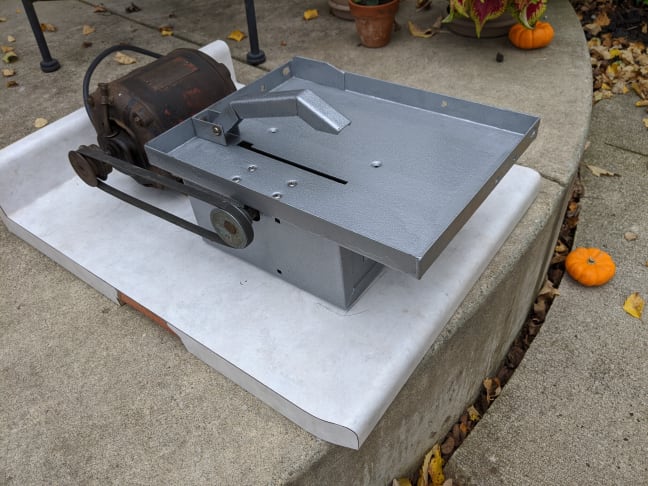
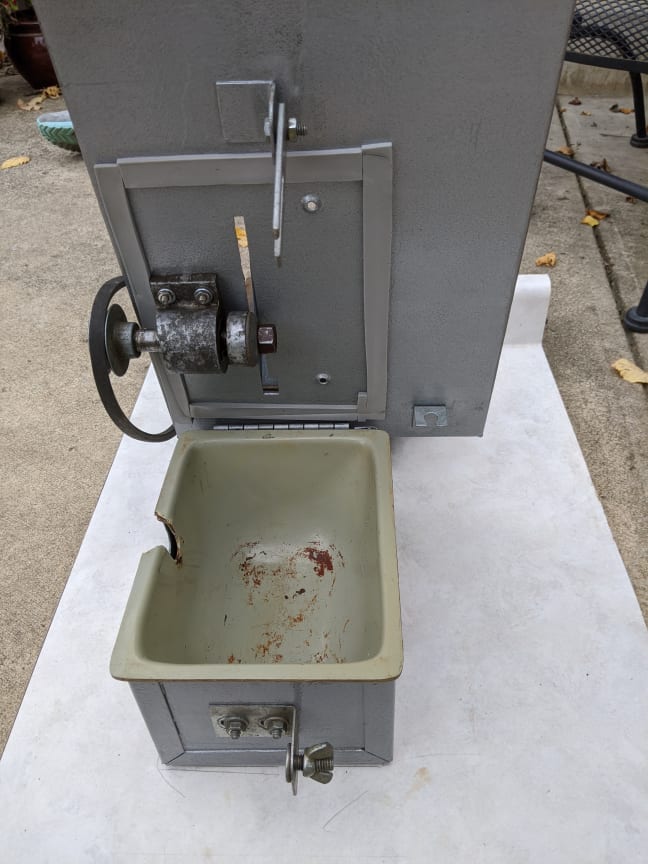
I had some time to finish this up. Seems to work pretty good. Excited to use it without losing a finger! I'll probably add a piece on the bottom to hold it down while in use and can pivot away when lifting the table. hummingbirdstones2 - thanks again for the picture it really helped. 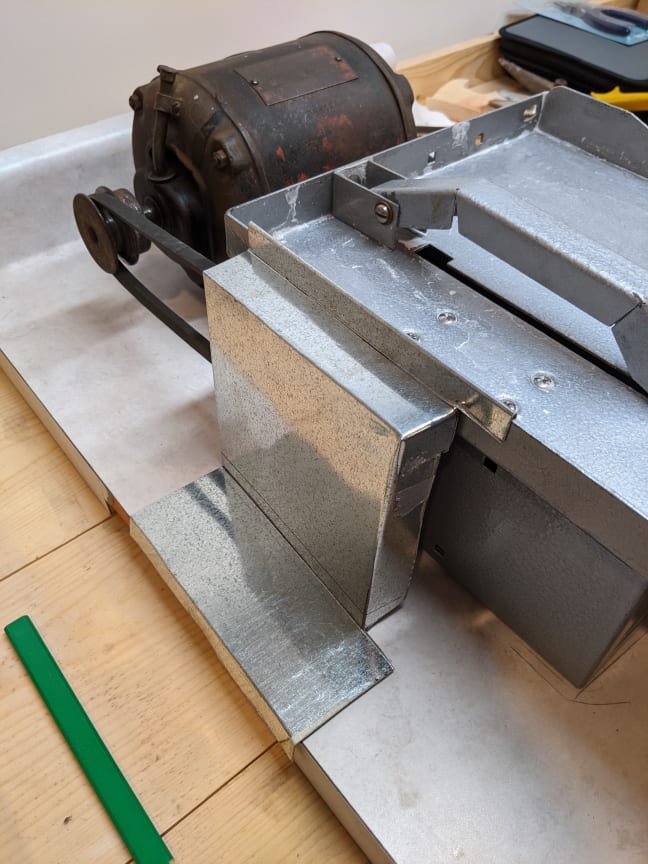  |
|
|
|
Post by Peruano on Mar 20, 2021 15:46:53 GMT -5
Looks great. A simple lip, or ledge on the bottom piece would keep the vertical shield from spreading laterally and allow it to lift when you lift the saw table to empty the pan or clean it. That is if the shield was fastened to the edge of the table, or if you just have it clipped on the edge of the table and can lift the shield away to lift the table, it would be a functional and efficient system. I worked enough around old time farmers who suffered lost digits and more from unguarded vbelts or chains on farm machinery. I have a great respect for rotating machinery parts.
|
|