callmerob
starting to spend too much on rocks
  I really like a dirt road
Member since September 2019
Posts: 146
|
Post by callmerob on Jan 26, 2021 20:10:50 GMT -5
A friend of mine is a sculptor who does free-form work in serpentine - a green rock, soft, with false-jade veins, quite pretty, California state rock. Here are two of his free-form sculptures, about soccer ball and US football sized... 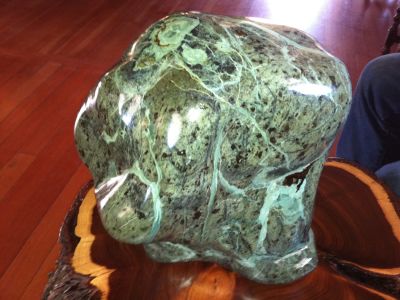 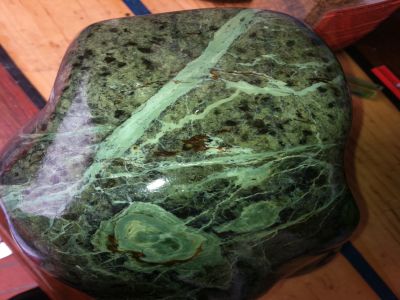 One of the best deposits is an exposed hillside in San Luis Obispo. Serpentine is found in a variety of locations in San Luis Obispo county. It is also loaded with asbestos, so much so that the Air Quality Management District (AQMD) of San Luis Obispo county usually requires lots of watering to remediate airborne dust when trenching, excavating, or grading on your own property. I drove up to SLO and found some serpentine to make spheres. These pieces here are small, dark, no obvious jade veins, but I thought they were worth a first try. The middle piece was sawn into a cube, then into the octahedral shape, points were hand ground off to round the corners a little. Blue nail polish on the flats to visualize the surface of the sphere for grinding - when all the blue spots are gone, it's round. 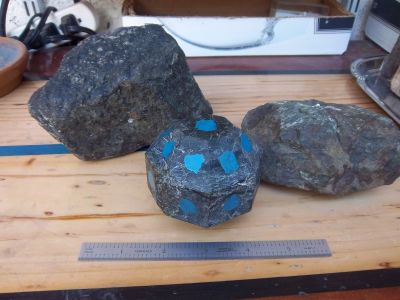 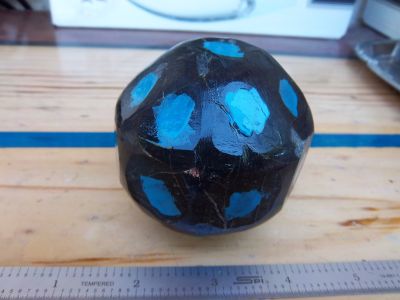 I built the sphere grinder from ideas on the internet, but it's a toy machine. Seriously - with toy motors, output shaft geared to 60 rpm, 12 volts DC, 12 dollars each. Mounted on a pivot arm with a compression spring on each side. Built with hand tools only. Parts from Home Depot, Amazon, 8020. Water drip for wet grinding - 1 drop every 2 or 3 seconds. Grinding pads are plastic impregnated with diamond grit in steps from 50 grit to 3000 grit, velcro backed - typically used for grinding and polishing kitchen&bath granite or marble countertops. It has made maybe a dozen spheres - up to softball size 3.5" granite, and it has worked remarkably well for 3 years of intermittent use. 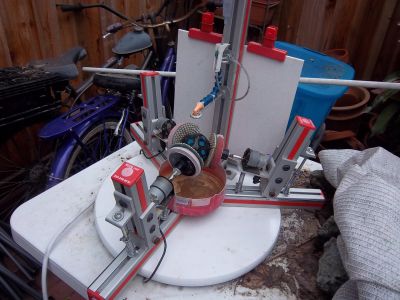 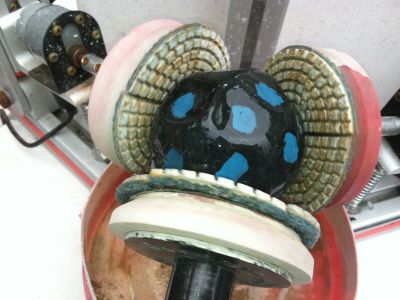 res.cloudinary.com/dgpm0t1qm/raw/upload/v1611709202/tdnhevyn8goxwqkhjrx2.webloc res.cloudinary.com/dgpm0t1qm/raw/upload/v1611709202/tdnhevyn8goxwqkhjrx2.weblocOops! Sorry. That didn't work. It's a link to amazon 12vdc gear motors, 60 rpm. .......... www.amazon.com/gp/product/B072N84JX7?pf_rd_r=GNZEA1T9WN6E788XZH5T&pf_rd_p=5ae2c7f8-e0c6-4f35-9071-dc3240e894a8&pd_rd_r=2e3f0960-1b00-4905-866d-88d6f0bea130&pd_rd_w=SVYbE&pd_rd_wg=iUmdB&ref_=pd_gw_unkWoohoo! It's ugly, but it worked. Copy&Paste. Duh, Robbie. ........... Final polish is 1-micron cerium oxide powder, wet into a paste, on plain rayon buffing pads. This sphere is about the size of a tennis ball - 2.5" diameter (64mm). It looked like a dumb dark rock until about 2000 grit when interesting features and character began to appear. After final polish, and in sunlight, it really pops. Took about 40 hours, half sawing, half grinding. Photos are not exactly color-true with my old phone camera. It is really green and quite pretty. 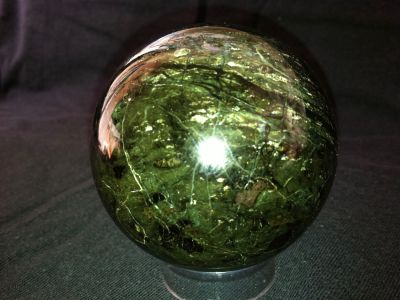 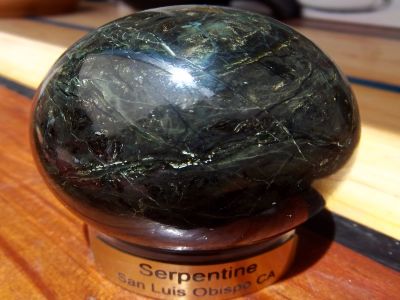 Hope you like it.  |
|
Brian
fully equipped rock polisher
  
Member since July 2020
Posts: 1,512
|
Post by Brian on Jan 26, 2021 21:03:37 GMT -5
That turned out great! That really brought out a lot of character in that stone!
|
|
|
|
Post by jasoninsd on Jan 26, 2021 21:26:19 GMT -5
callmerob - Where do I start? First and foremost thanks for taking the time to put this post together! The pics of those sculptures your friend made are breathtaking! (No pun intended due to the asbestos! LOL) And the sphere machine you made is astounding! Really really cool! I remember seeing a homemade sphere machine on YouTube awhile back. Very similar to yours, but yours looks a lot more "professional".  And then there's the final product sphere you posted! That material just pops - even with your phone camera! I had to show my wife that one - she loved it too! 
|
|
callmerob
starting to spend too much on rocks
  I really like a dirt road
Member since September 2019
Posts: 146
|
Post by callmerob on Jan 26, 2021 21:40:46 GMT -5
Thanks for your comment, Brian.
I wanted to use some of the more visually interesting pieces of serpentine that I have, but this first one was more of a test of the material to see if soft spots would cause uneven grinding and out-of-roundness. Turned out ok, though, in spite of the second picture which looks oblong, but is not. Ancient iPhone 4.
|
|
callmerob
starting to spend too much on rocks
  I really like a dirt road
Member since September 2019
Posts: 146
|
Post by callmerob on Jan 26, 2021 21:55:58 GMT -5
Thanks, Jason. I'm delighted y'all liked it. My sculptor friend named the first sculpture "Elephant Man" because from one angle it looks like a distorted face. The other one is still just "football".  The little sphere machine uses cheap toy 12 volt DC motors, but works pretty well. I struggled to find treadmill or Xerox motors like everybody says you need, but tried these cheapies. They work. 30 rpm has tons of torque, 60 rpm has plenty of torque. 60 rpm really tosses the preform around, and tries to throw the rock out of the machine, but I didn't grind much of the corners off. Just angled the grinding pads back a little to help catch the rock until it settled down. Got lucky too.  |
|
Brian
fully equipped rock polisher
  
Member since July 2020
Posts: 1,512
|
Post by Brian on Jan 27, 2021 9:52:15 GMT -5
Thanks, Jason. I'm delighted y'all liked it. My sculptor friend named the first sculpture "Elephant Man" because from one angle it looks like a distorted face. The other one is still just "football".  The little sphere machine uses cheap toy 12 volt DC motors, but works pretty well. I struggled to find treadmill or Xerox motors like everybody says you need, but tried these cheapies. They work. 30 rpm has tons of torque, 60 rpm has plenty of torque. 60 rpm really tosses the preform around, and tries to throw the rock out of the machine, but I didn't grind much of the corners off. Just angled the grinding pads back a little to help catch the rock until it settled down. Got lucky too.  I’ll echo jasoninsd’s comments about your sphere machine. I caught myself pricing out some the other day just for fun and realized the commercially available ones are way out of my league for a project to try. The homemade ones look like a viable option. I don’t think I’ve seen one that used the diamond polishing pads before. I was a little scared off by the cups and pipe fittings of other sphere machines, but I will have diamond polishing pads on the way for another project I’m working on, so that got me thinking again. Are those 4” pads that you are using? How long do they last for you when making spheres? Fair warning, I may be back with (many) more questions as my brain processes the possibilities. 🙂 |
|
callmerob
starting to spend too much on rocks
  I really like a dirt road
Member since September 2019
Posts: 146
|
Post by callmerob on Jan 27, 2021 14:13:00 GMT -5
Glad you like the machine, Brian. Ask any questions you want.  The diamond pads are 3” diameter, and as you can see, they are almost touching (interfering) with each other. Thus this tennis ball size sphere is fast approaching the lower size limit. A smaller preform will fall through the pads. I’d like to build a smaller machine to grind golf ball size spheres using 2” pads, smaller table base, and only 1” size aluminum extrusion. I too was not happy with the cost of pre-made grinding cups, and I didn’t want to mess around with an oxyacetylene torch and diamond brazing rods to DIY. Those cups are more aggressive to be sure, but I’m not in a hurry or needing production efficiencies. The plastic pads are good enough for me to make pretty spheres. Most of the material removal is done with the coarsest pad at 30 or 50 grit, so that is the one that will wear out first. It’s ok to cut up a worn out pad into pie shaped pieces and stick them back on the velcro pads. The outside parts of the pads see almost no use, so there’s plenty to go around. Also there are very thick pads (>3/8”) roughing pads for concrete grinding that look interesting to me, though they would require reseting the pivot arm positions between roughing and finishing. Or would require a dedicated roughing machine. The finishing pads are only removing enough material to erase the scratches caused by previous coarser grit, so they go faster between grit changes. The scratches are hard to see, so I just pick an arbitrary time like 1 hour or so and call it good enough. I can post a few more pictures of the machine if you’re interested. |
|
|
|
Post by oregon on Jan 27, 2021 16:13:18 GMT -5
I can post a few more pictures of the machine if you’re interested. I worked with similar motors with several robotics teams, They would figure out ways to bust the gear boxes... There are several vendors that sell planetary gear versions, with huge torque ratings. never had students bust a gear box again. Lots of different RPM choices... several vendors, eg www.gobilda.com/yellow-jacket-planetary-gear-motors/#series_5203
put some larger pics up when you get a chance, always thought using some of these on a sphere grinder would be viable...
|
|
Brian
fully equipped rock polisher
  
Member since July 2020
Posts: 1,512
|
Post by Brian on Jan 27, 2021 16:38:19 GMT -5
Glad you like the machine, Brian. Ask any questions you want.  The diamond pads are 3” diameter, and as you can see, they are almost touching (interfering) with each other. Thus this tennis ball size sphere is fast approaching the lower size limit. A smaller preform will fall through the pads. I’d like to build a smaller machine to grind golf ball size spheres using 2” pads, smaller table base, and only 1” size aluminum extrusion. I too was not happy with the cost of pre-made grinding cups, and I didn’t want to mess around with an oxyacetylene torch and diamond brazing rods to DIY. Those cups are more aggressive to be sure, but I’m not in a hurry or needing production efficiencies. The plastic pads are good enough for me to make pretty spheres. Most of the material removal is done with the coarsest pad at 30 or 50 grit, so that is the one that will wear out first. It’s ok to cut up a worn out pad into pie shaped pieces and stick them back on the velcro pads. The outside parts of the pads see almost no use, so there’s plenty to go around. Also there are very thick pads (>3/8”) roughing pads for concrete grinding that look interesting to me, though they would require reseting the pivot arm positions between roughing and finishing. Or would require a dedicated roughing machine. The finishing pads are only removing enough material to erase the scratches caused by previous coarser grit, so they go faster between grit changes. The scratches are hard to see, so I just pick an arbitrary time like 1 hour or so and call it good enough. I can post a few more pictures of the machine if you’re interested. Thanks for the additional information! I would certainly like to see more pictures of your setup. I read through quite a bit of the sphere making forum when I first discovered RTH but got discouraged by the skills required to make some of the machines I saw. Your machine has given me new hope! |
|
callmerob
starting to spend too much on rocks
  I really like a dirt road
Member since September 2019
Posts: 146
|
Post by callmerob on Jan 27, 2021 17:07:28 GMT -5
I can post a few more pictures of the machine if you’re interested. I worked with similar motors with several robotics teams, They would figure out ways to bust the gear boxes... There are several vendors that sell planetary gear versions, with huge torque ratings. never had students bust a gear box again. Lots of different RPM choices... several vendors, eg www.gobilda.com/yellow-jacket-planetary-gear-motors/#series_5203
put some larger pics up when you get a chance, always thought using some of these on a sphere grinder would be viable...
Thanks for your comment. The motors in my Amazon link above advertise "metal gears" not plastic, so that's reassuring. I haven't busted a gearbox either - even roughing a granite preform which finished at 3.5" diameter. It's the largest heaviest one I've done, and the preform was really beating on the machine. I lost count, but machine time on that sphere alone was well over 100 hours. Like I said, it's a toy, but it works. The motors are cheap enough to be disposable at $12 each. Given cheap manufacturing and poor quality control, I expected the motors to die right away, but they didn't. If (when) they do, I'll take them apart to diagnose if the failure was electrical (like the motor windings burning out) or mechanical (like a gearbox failure). I'll see about some more photos of the machine. |
|
|
|
Post by jasoninsd on Jan 27, 2021 18:22:08 GMT -5
callmerob - I'm definitely interested in seeing additional pics as well! I'll also echo what Brian said, the way you built this, it seems to be less intimidating when considering the possibility of copying...I mean emulating the build! 
|
|
callmerob
starting to spend too much on rocks
  I really like a dirt road
Member since September 2019
Posts: 146
|
Post by callmerob on Jan 27, 2021 19:15:18 GMT -5
Thanks for the encouragement, Brian. Let's see if I can get the Quick Reply to upload photos. Water drip is a juice bottle with an actual medical IV drip. Amazon has it. Drilled a hole in the bottle lid and crammed the IV drip into it, with some double sticky tape to seal it. Perfect drip control. Drilled a 3/4" hole in the bottle bottom for a refill port, and plugged it with a wine cork to keep out bugs and dirt. Drilled a small hole through the cork for an air vent. The nozzle end of IV tubing goes into some Loc-Line coolant parts that I already had, but any stiff tubing will work. At 60 rpm the sphere gets wet, pads don't fling water, and the mud drips off the sphere into the Folgers coffee can. 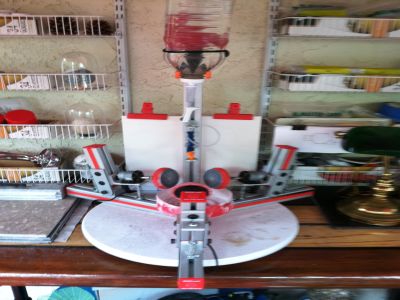 Finishing the Granite Planet - a chunk of Yosemite granite that fell off HalfDome - with 1500 grit pads. Next up is 2000 grit. I keep all the pads in ziplock bags for cleanliness and because cutup pads lose their grit identifying numbers. Cleanliness is important with all, especially the 1-micron buffing pads. 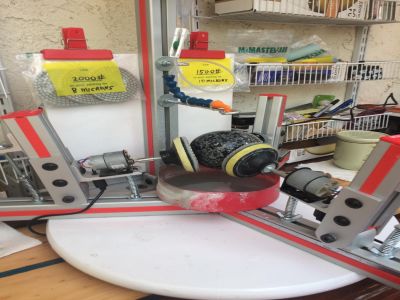 12-volt motors require 12-volt power. I cut off the plug on the output end and soldered directly to the motors, though I did keep the fat doodad on the wire. I really think one power supply would be sufficient for all 3 motors. 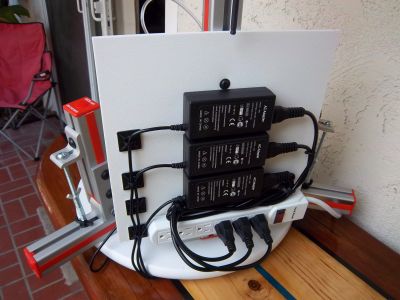 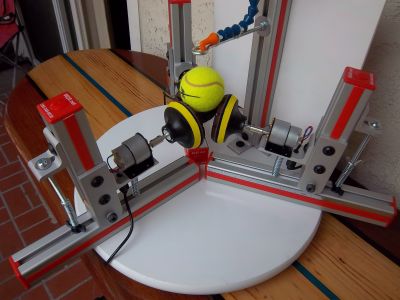 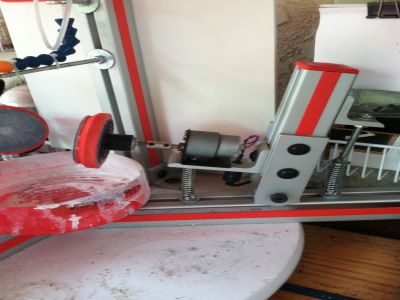 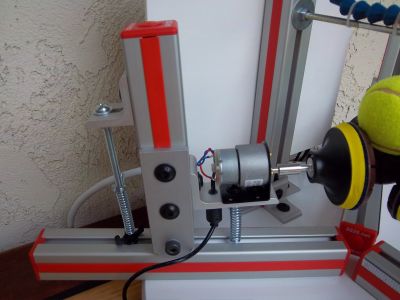 Sorry some of the photos are weirdly distorted. Cloudinary presets are about 300 or so for photos. Maybe the difference between the old camera and the old phone. Hopefully y'all can see the details well enough. Any other questions are welcome. Jasoninsd, feel free to "emulate" all you want LOL. I realize the 8020 aluminum extrusion is pricey, especially when you need 3 of everything, but the whole machine is still cheaper than one of those treadmill / Xerox motors. And it all really could be built with 2x4s and door hinges, but I would probably sand & varnish it because I'm like that.  Call it a mockup or proof-of-concept and just build one.  |
|
Brian
fully equipped rock polisher
  
Member since July 2020
Posts: 1,512
|
Post by Brian on Jan 27, 2021 21:13:51 GMT -5
Thanks for the encouragement, Brian. Let's see if I can get the Quick Reply to upload photos. Water drip is a juice bottle with an actual medical IV drip. Amazon has it. Drilled a hole in the bottle lid and crammed the IV drip into it, with some double sticky tape to seal it. Perfect drip control. Drilled a 3/4" hole in the bottle bottom for a refill port, and plugged it with a wine cork to keep out bugs and dirt. Drilled a small hole through the cork for an air vent. The nozzle end of IV tubing goes into some Loc-Line coolant parts that I already had, but any stiff tubing will work. At 60 rpm the sphere gets wet, pads don't fling water, and the mud drips off the sphere into the Folgers coffee can.  Finishing the Granite Planet - a chunk of Yosemite granite that fell off HalfDome - with 1500 grit pads. Next up is 2000 grit. I keep all the pads in ziplock bags for cleanliness and because cutup pads lose their grit identifying numbers. Cleanliness is important with all, especially the 1-micron buffing pads.  12-volt motors require 12-volt power. I cut off the plug on the output end and soldered directly to the motors, though I did keep the fat doodad on the wire. I really think one power supply would be sufficient for all 3 motors.     Sorry some of the photos are weirdly distorted. Cloudinary presets are about 300 or so for photos. Maybe the difference between the old camera and the old phone. Hopefully y'all can see the details well enough. Any other questions are welcome. Jasoninsd, feel free to "emulate" all you want LOL. I realize the 8020 aluminum extrusion is pricey, especially when you need 3 of everything, but the whole machine is still cheaper than one of those treadmill / Xerox motors. And it all really could be built with 2x4s and door hinges, but I would probably sand & varnish it because I'm like that.  Call it a mockup or proof-of-concept and just build one.  Thank you so much for the extra pictures, Rob! I love how you set up that drip line. Everything about that build just makes sense. I could see it being done in wood, but that aluminum extrusion really looks sharp and probably makes it much easier to adjust for fine tuning. Are each of the motor mounts attached to a hinged pivot at the bottom? And are those springs fore and aft of the mount? |
|
Fossilman
Cave Dweller 
Member since January 2009
Posts: 20,726 
|
Post by Fossilman on Jan 28, 2021 11:20:41 GMT -5
Excellent workmanship.....
|
|
callmerob
starting to spend too much on rocks
  I really like a dirt road
Member since September 2019
Posts: 146
|
Post by callmerob on Jan 28, 2021 20:03:20 GMT -5
Brian, The drip? Yeah back during Vietnam I was an Air Force Medic. I can set an IV drip in my sleep. The machine needs drip control, so that was my go-to idea.  www.amazon.com/gp/product/B003VP2MR0/ref=ppx_yo_dt_b_asin_title_o00_s00?ie=UTF8&psc=1 www.amazon.com/gp/product/B003VP2MR0/ref=ppx_yo_dt_b_asin_title_o00_s00?ie=UTF8&psc=1Here are photos & links for the 80/20.inc parts… Extrusion…I ordered these pieces precut to length 12” & 6” for a few bucks extra. If you just buy a stick and cut it yourself with a hacksaw, it’s harder to get a straight cut and filing all the ragged burrs inside the end is a real bugger. The 80/20 factory makes cuts accurately and deburrs beautifully., but they take a long time in shipping. 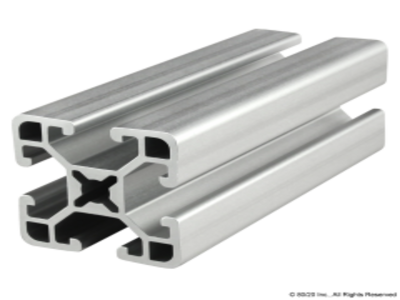 8020.net/1515-uls.html 8020.net/1515-uls.htmlPivot…80/20.inc has soooo many sizes & styles, so be familiar with descriptions and part numbers. This pivot is for the 15XX series extrusion, pivots 180 degrees, and pivots parallel to the long axis of the extrusion to which it’s mounted (called 0 degrees, as opposed to 90 degrees which pivots perpendicular to the long axis). The base block of the pivot has bosses which stand proud of the bottom surface and key into the slot of the extrusion to which it is mounted, so it stays square, and you can’t mount it the other way. Look carefully at their CAD drawings to see the full-rounded top of the base block. 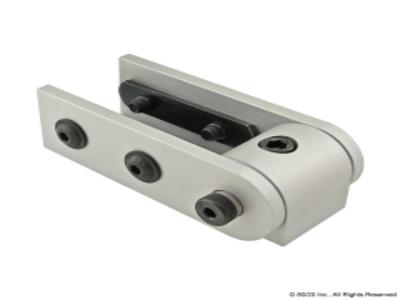 8020.net/4380.html 8020.net/4380.htmlBracket 1…  8020.net/4376.html 8020.net/4376.htmlBracket 2…  8020.net/4376.html 8020.net/4376.htmlBolt & T-slot nut 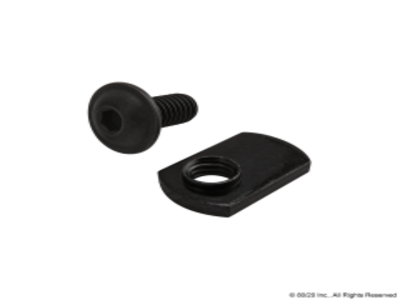 8020.net/3320.html 8020.net/3320.htmlPlease see this photo for compression springs. … 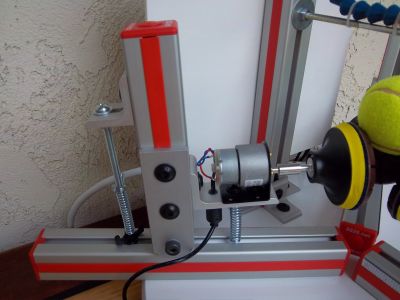 I used 1/4-20 bolts. and springs from the hardware store - about 3/8” inside diameter, 3”long on the outboard side, 2”long inboard I think. On the long horizontal extrusion, a 1/4-20 carriage bolt (domed head, square shank key) is inverted in the t-slot, held with a wing nut. It receives the outboard 3” spring and is easy to tighten and loosen - location is infinitly adjustable. The top of the spring has another wing nut to compress the spring, and balance the compression between the two springs, and set the general lay-back angle of the grinding pads. I preset all 3 grinding pads equidistant from the theoretical center of the sphere / inboard end of the horizontal extrusion with a good ruler, and adjust a generous lay-back angle at first so that the rough preform is hopefully not ejected from the machine, though the motion of the pivot arms may be quite abrupt, even violent. It eventually settles down as the preform is ground more round. Some sphere machines use bungees/springs around the top of the pivot arms. This machine puts both springs on the pivot arm and in direct opposition to each other. |
|
callmerob
starting to spend too much on rocks
  I really like a dirt road
Member since September 2019
Posts: 146
|
Post by callmerob on Jan 28, 2021 20:05:26 GMT -5
Excellent workmanship..... Thank you. After a lifetime working as a machinist, I appreciate your comment.  |
|
Brian
fully equipped rock polisher
  
Member since July 2020
Posts: 1,512
|
Post by Brian on Jan 28, 2021 21:17:16 GMT -5
Brian, The drip? Yeah back during Vietnam I was an Air Force Medic. I can set an IV drip in my sleep. The machine needs drip control, so that was my go-to idea.  www.amazon.com/gp/product/B003VP2MR0/ref=ppx_yo_dt_b_asin_title_o00_s00?ie=UTF8&psc=1 www.amazon.com/gp/product/B003VP2MR0/ref=ppx_yo_dt_b_asin_title_o00_s00?ie=UTF8&psc=1Here are photos & links for the 80/20.inc parts… Extrusion…I ordered these pieces precut to length 12” & 6” for a few bucks extra. If you just buy a stick and cut it yourself with a hacksaw, it’s harder to get a straight cut and filing all the ragged burrs inside the end is a real bugger. The 80/20 factory makes cuts accurately and deburrs beautifully., but they take a long time in shipping.  8020.net/1515-uls.html 8020.net/1515-uls.htmlPivot…80/20.inc has soooo many sizes & styles, so be familiar with descriptions and part numbers. This pivot is for the 15XX series extrusion, pivots 180 degrees, and pivots parallel to the long axis of the extrusion to which it’s mounted (called 0 degrees, as opposed to 90 degrees which pivots perpendicular to the long axis). The base block of the pivot has bosses which stand proud of the bottom surface and key into the slot of the extrusion to which it is mounted, so it stays square, and you can’t mount it the other way. Look carefully at their CAD drawings to see the full-rounded top of the base block.  8020.net/4380.html 8020.net/4380.htmlBracket 1…  8020.net/4376.html 8020.net/4376.htmlBracket 2…  8020.net/4376.html 8020.net/4376.htmlBolt & T-slot nut  8020.net/3320.html 8020.net/3320.htmlPlease see this photo for compression springs. …  I used 1/4-20 bolts. and springs from the hardware store - about 3/8” inside diameter, 3”long on the outboard side, 2”long inboard I think. On the long horizontal extrusion, a 1/4-20 carriage bolt (domed head, square shank key) is inverted in the t-slot, held with a wing nut. It receives the outboard 3” spring and is easy to tighten and loosen - location is infinitly adjustable. The top of the spring has another wing nut to compress the spring, and balance the compression between the two springs, and set the general lay-back angle of the grinding pads. I preset all 3 grinding pads equidistant from the theoretical center of the sphere / inboard end of the horizontal extrusion with a good ruler, and adjust a generous lay-back angle at first so that the rough preform is hopefully not ejected from the machine, though the motion of the pivot arms may be quite abrupt, even violent. It eventually settles down as the preform is ground more round. Some sphere machines use bungees/springs around the top of the pivot arms. This machine puts both springs on the pivot arm and in direct opposition to each other. Thank you so much for identifying all of the parts, Rob! I couldn't quite figure out how the springs were attached, so your explanation was extremely helpful. The more I look at the pictures, the more impressed I am with how you built it. I had been thinking that wood may be a good option, but the extrusion looks far superior. Looks like I will be playing around with those links you provided... |
|
|
|
Post by jasoninsd on Jan 28, 2021 21:30:57 GMT -5
Brian, The drip? Yeah back during Vietnam I was an Air Force Medic. I can set an IV drip in my sleep. The machine needs drip control, so that was my go-to idea.  www.amazon.com/gp/product/B003VP2MR0/ref=ppx_yo_dt_b_asin_title_o00_s00?ie=UTF8&psc=1 www.amazon.com/gp/product/B003VP2MR0/ref=ppx_yo_dt_b_asin_title_o00_s00?ie=UTF8&psc=1Here are photos & links for the 80/20.inc parts… Extrusion…I ordered these pieces precut to length 12” & 6” for a few bucks extra. If you just buy a stick and cut it yourself with a hacksaw, it’s harder to get a straight cut and filing all the ragged burrs inside the end is a real bugger. The 80/20 factory makes cuts accurately and deburrs beautifully., but they take a long time in shipping.  8020.net/1515-uls.html 8020.net/1515-uls.htmlPivot…80/20.inc has soooo many sizes & styles, so be familiar with descriptions and part numbers. This pivot is for the 15XX series extrusion, pivots 180 degrees, and pivots parallel to the long axis of the extrusion to which it’s mounted (called 0 degrees, as opposed to 90 degrees which pivots perpendicular to the long axis). The base block of the pivot has bosses which stand proud of the bottom surface and key into the slot of the extrusion to which it is mounted, so it stays square, and you can’t mount it the other way. Look carefully at their CAD drawings to see the full-rounded top of the base block.  8020.net/4380.html 8020.net/4380.htmlBracket 1…  8020.net/4376.html 8020.net/4376.htmlBracket 2…  8020.net/4376.html 8020.net/4376.htmlBolt & T-slot nut  8020.net/3320.html 8020.net/3320.htmlPlease see this photo for compression springs. …  I used 1/4-20 bolts. and springs from the hardware store - about 3/8” inside diameter, 3”long on the outboard side, 2”long inboard I think. On the long horizontal extrusion, a 1/4-20 carriage bolt (domed head, square shank key) is inverted in the t-slot, held with a wing nut. It receives the outboard 3” spring and is easy to tighten and loosen - location is infinitly adjustable. The top of the spring has another wing nut to compress the spring, and balance the compression between the two springs, and set the general lay-back angle of the grinding pads. I preset all 3 grinding pads equidistant from the theoretical center of the sphere / inboard end of the horizontal extrusion with a good ruler, and adjust a generous lay-back angle at first so that the rough preform is hopefully not ejected from the machine, though the motion of the pivot arms may be quite abrupt, even violent. It eventually settles down as the preform is ground more round. Some sphere machines use bungees/springs around the top of the pivot arms. This machine puts both springs on the pivot arm and in direct opposition to each other. Extraordinarily invaluable post!!! Thank you so much Rob!  |
|
callmerob
starting to spend too much on rocks
  I really like a dirt road
Member since September 2019
Posts: 146
|
Post by callmerob on Jan 28, 2021 22:32:08 GMT -5
Brian and jasoninsd, thank you for your enthusiasm.  I'll still suggest considering 2x4s and door hinges due to cost. Maybe some variation with no extrusion, but a plywood / plastic kitchen cutting board base plate with rows of threaded holes. Of course I'd still paint/varnish wood for water resistance and because sexier. The first hurdle I faced was how to draw 3 lines on the base plate at 120 degrees apart. I had to review my high school geometry on how to trisect a circle. And since I'm burning photo bandwidth, I'll point again at the Granite Planet which finished at 3.5" diameter. This toy machine made that. 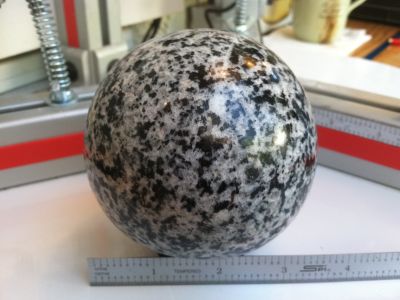 |
|
Brian
fully equipped rock polisher
  
Member since July 2020
Posts: 1,512
|
Post by Brian on Jan 29, 2021 9:22:39 GMT -5
Impressive results for a toy!
As much as I enjoy working with wood, I don’t know if I would be satisfied knowing what else is possible. Besides, I think I actually have some aluminum extrusion sitting around from when I built my router table. It’s not nearly as fancy as the extrusion you used, but may work just fine for the bottom rails.
|
|


