|
|
Post by talkingstones on Feb 27, 2012 20:11:38 GMT -5
My husband and I finally got up the courage to get the Lot-O going. After a concerted effort building the tower, painting the top and then placing it on a rubber mat for a van floor, we stuck the machine on tonight, added the cutting scraps that I have been saving from the unknown jasper and some willow creek along with a pile of ceramic fill. I rinsed and drained them in the drum, added the grit, plugged it in and... both of us just stood there waiting for the noise...which didn't really happen! Anyway, here are the first picts of the vibe in action. I'm thinking I may need more grit but am going to wait till tomorrow for that. My Lot-O in first tumble...    Okay...still photos just don't do it justice but it's a lot of fun to watch and I can't wait to see the results! Cathy |
|
|
|
Post by susand24224 on Feb 27, 2012 20:31:14 GMT -5
Good job! It looks like you followed Connrock's basic model. So did I--and it worked perfectly. Lots of photos to follow, I hope?
Susan
|
|
|
|
Post by talkingstones on Feb 27, 2012 20:56:30 GMT -5
Win, lose or draw, I'll try to get it up here! The tower is great and we did follow Connrock's advice...kind of. I couldn't handle filling the blocks, so we bought 4" thick patio blocks and stuck them together with silicon stuff. The guys at the lumber yard are pretty amused by all of this but there is a morbid curiosity around town about how all of this comes out!
|
|
Jon
starting to shine!

Member since June 2011
Posts: 41
|
Post by Jon on Feb 28, 2012 0:26:02 GMT -5
I just got mine up and running this last week too. One tip, remove the yellow note above the motor if you haven't already. After running a couple hours, the motor heat had caused the red plate to warm up enough that it started smelling like hot glue gun.
I mounted mine on a regular cement block with the holes in it. It seems completely solid, but I can hear a faint low frequency hum around the house when its running and I'm thinking maybe the open space in the block allows it to reverberate enough to allow the hum to be amplified.
I also quickly decided to order a second barel for polishing so that I don't have to deal with cleaning the main barrel so well.
|
|
|
|
Post by helens on Feb 28, 2012 0:46:45 GMT -5
Very kewl!!! I think you have it a bit overfilled tho? I can't really tell from the photo. You're supposed to fill it just above the top of round part, where it starts to come back in. That's what shawn at the rockshed told me. It gives the rocks a bit more room to move.
It's a great unit tho, I love mine:).
|
|
|
|
Post by talkingstones on Feb 28, 2012 6:31:26 GMT -5
This is after 12 hours. There is a nice thickish sticky slurry coating on the stones which seem to be rounding a little bit. I'm running this from stage 1 so that I can see how it does. At this point, I am thinking it will need until tomorrow. I have a couple of little pieces of the unknown jasper I may throw in as well, but the rest of it is just cutting scraps of willow and unknown jasper. Jon, I'll definitely go down and remove the paper and Helen, it looks fuller than it is. I went above the line on the barrel but below where it starts to curve back in by quite a bit. It is running during the photos though so that might be why it looks so full. I am really amazed at how little grit and water it takes and how quiet it is! We did add the half cap full of water, and I thouht that was too much. Next stage I think I will try without it. Anyway, here's this morning's progress!  Cathy |
|
|
|
Post by talkingstones on Feb 28, 2012 6:32:55 GMT -5
Looking at the photo, I'm thinking we definitely added too much water....  Cathy |
|
|
|
Post by connrock on Feb 28, 2012 8:30:15 GMT -5
Hi Cathy,,,
You don't have to fill the blocks with concrete and I don't know where that idea came from.It wouldn't hurt to do it but it's not necessary.
You mentioned a "rubber mat for a van floor" and I'm not sure what you mean there?
The best way to tell if the barrel is over loaded is that the rotation of the rocks will slow down a lot.If the rocks keep rotating all is well so don't worry about that.
It's hard to tell from the photos but it looks to me like you have a lot more ceramic media the rocks in the barrel?Nothing wrong with that but just wondering why?
It's pretty easy to tell when you have too much water.
The rotation of the rocks will slow down dramatically and the sound will also change.
Best way to learn this is to do a test load with no grit.
Keep adding water until you see what I'm talking about.
The barrel will kind of "hunker down" and the rocks will slow right down.
From the looks of the 12 hour photo I believe the "slurry" you're seeing is more like the media being ground up then the rocks.
Again I "think" this may be due to the load not having many rocks in it to begin with???
A rock slurry will be gray and what I'm seeing in the 12 hour photo is a milky white slurry.
I try not to use ceramic media much because it gets ground down pretty fast and being retired it becomes a bit costly so I smash up white quartz,,,only because I have a lot of it,,,and use that as a filler.
I also use bits and small pieces of scrap from my trim saw or just about anything else I can find or break up instead of the ceramic media.
What size grit did you start with and how much of it?
-----------------------------------------------------------------------------------
On another note,,,,
Right now I have a load going and it consists of pretty odd shaped pieces.
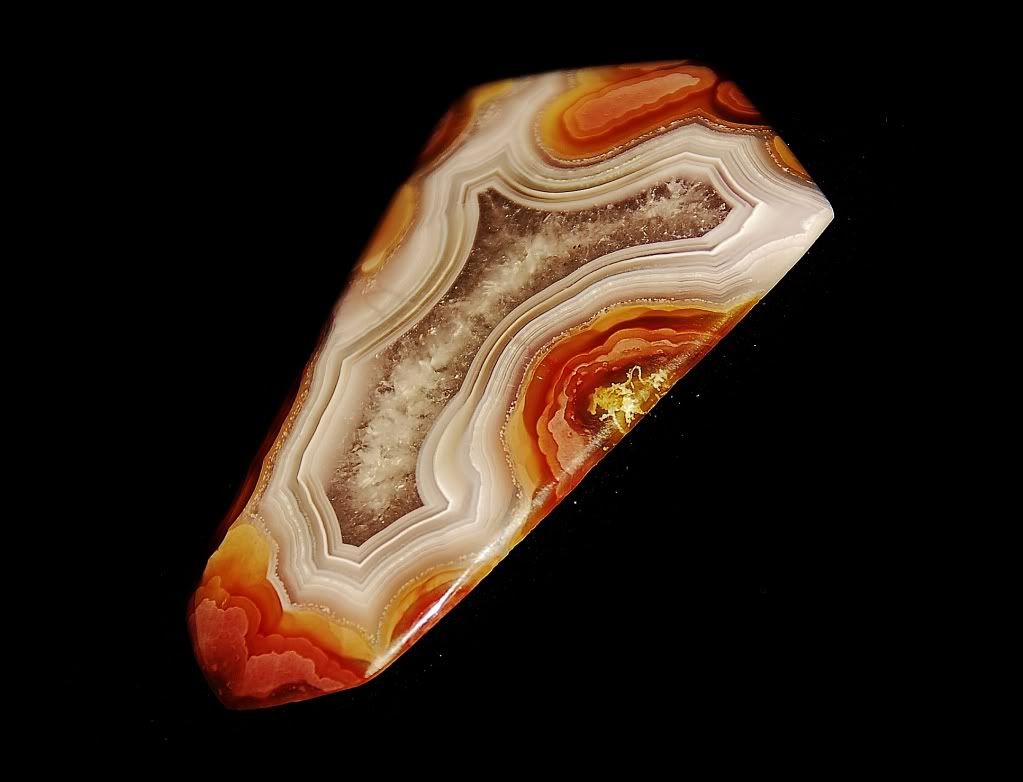
One piece is a slab about 3/16"-1/4" thick and it's length barely fits in the barrel top to bottom.It's a VERY beautiful slab of Cathedral Agate that I just couldn't bring myself to cab.
Two of the other pieces are petrified wood that will be specimen pieces.
Hard to explain what they look like but if you made a HUGE hamburger about 2" thick and cut it in 1/2,,that would be close to what they look like! LOL
I also have a few specimen pieces of Montana Agate both in slab form and "face cut" rough.
I know there other "stuff" in there but I can't remember what they are right now.
I have the white quartz in there as a filler,,,as usual and hope to get the load into 1000 today,,,,,but it may just keep running another day or so depending on what I'm doing around here.
The thing is that the L-O-T is VERY versatile and you can get some pretty awesome things done in it,,,,and I've tried just about all of them! LOL
Good luck and keep us posted.
connrock
|
|
|
|
Post by talkingstones on Feb 28, 2012 9:11:20 GMT -5
Hi Connrock, Thanks for the response! A lot of good information and things to think on here. This batch is a test batch which is why so much ceramic stuff. I've got an unknown jasper that has some great pictures in it which I'm making quite a few preforms with. I ran three scraps through the Lortone with a mixed batch and there was a lot of yellowing in the early stages. This batch is the rest of the cutting scraps from that, and it is really close in color to the ceramic media, and some willow creek scraps. Total volume is about a cup of scrap.
Have to run to work. Will get back to this tonight!
Thanks
Cathy
|
|
|
|
Post by talkingstones on Feb 28, 2012 22:52:48 GMT -5
Not feeling so great tonight so I'll try to say it with more pictures than words... Connrock, this is the van mat... 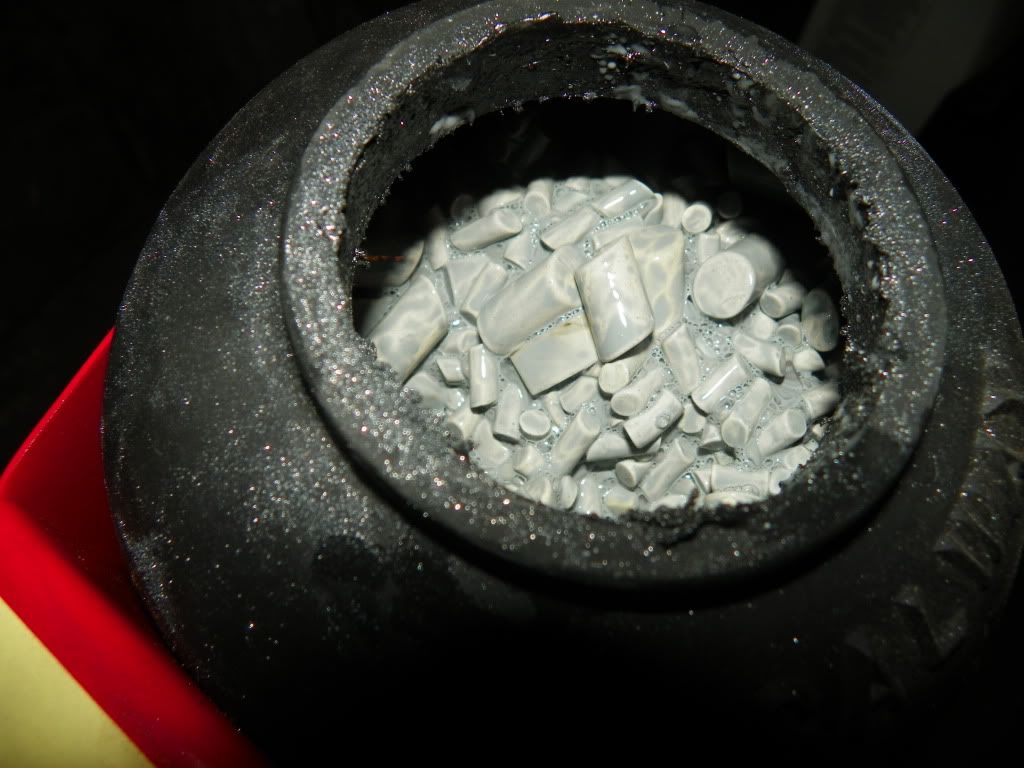 The test scraps 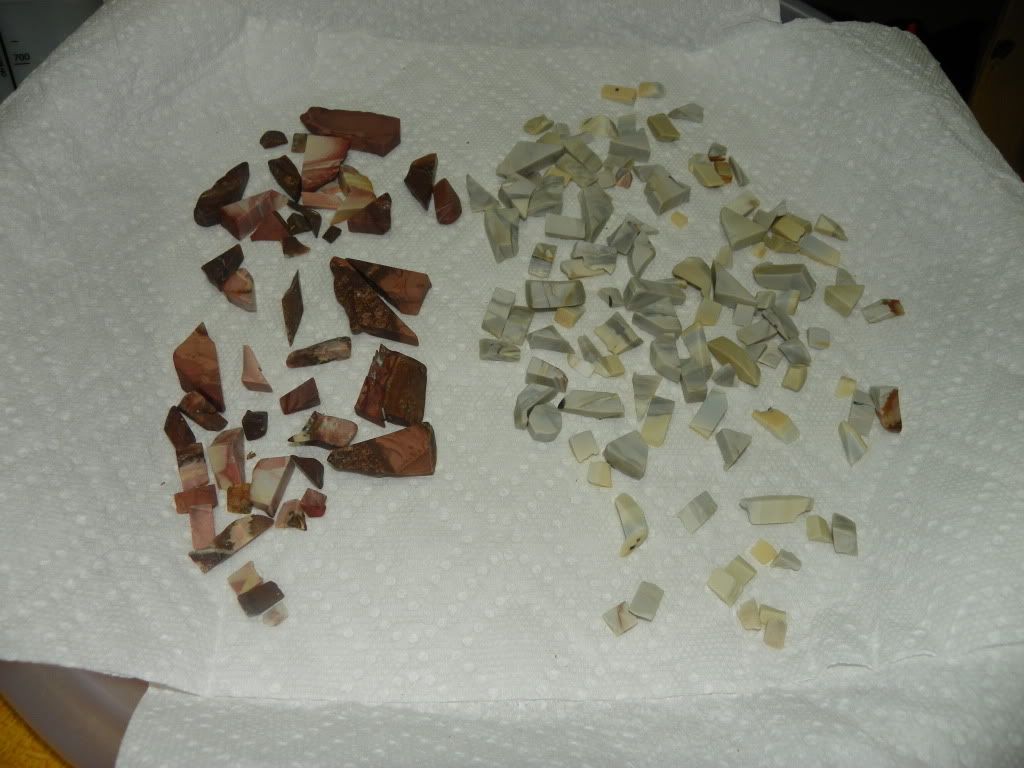 Willow 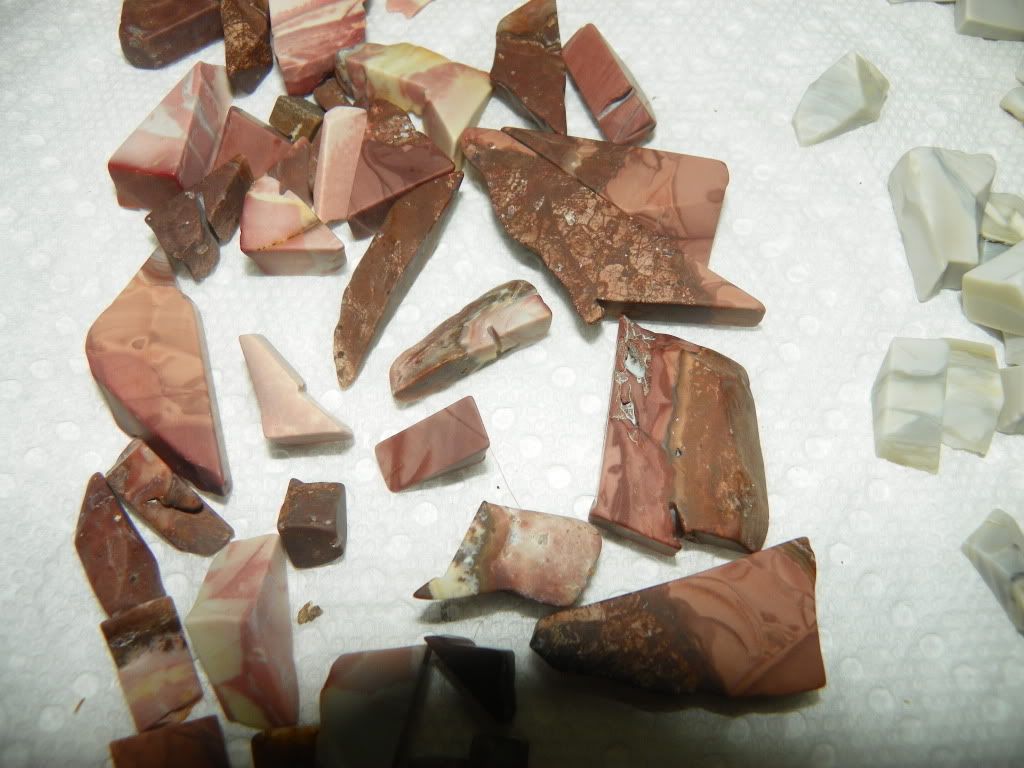 Unknown Jasper 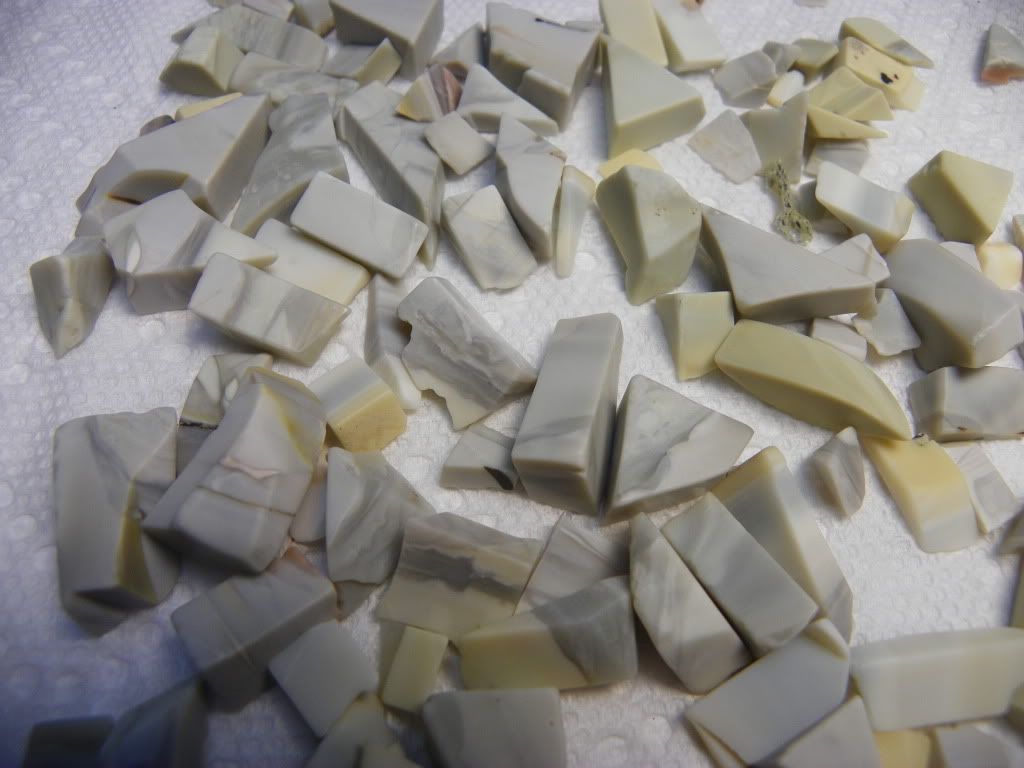 Unknown with hand finished cabs for color comparrison 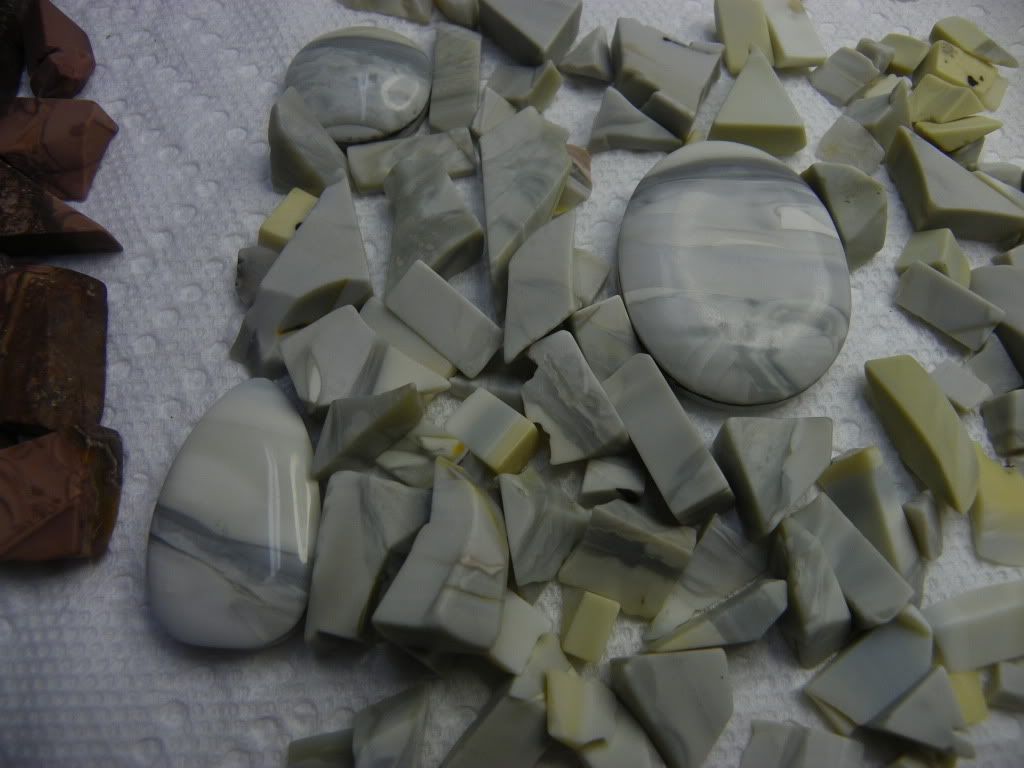 Adding some that I preformed 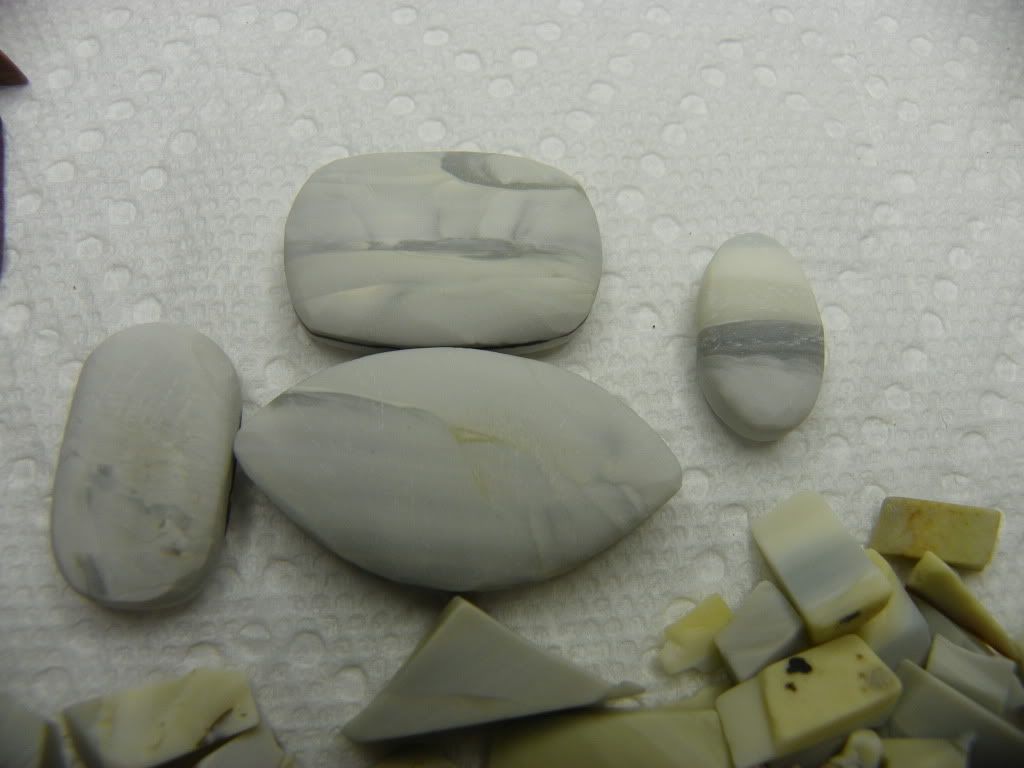 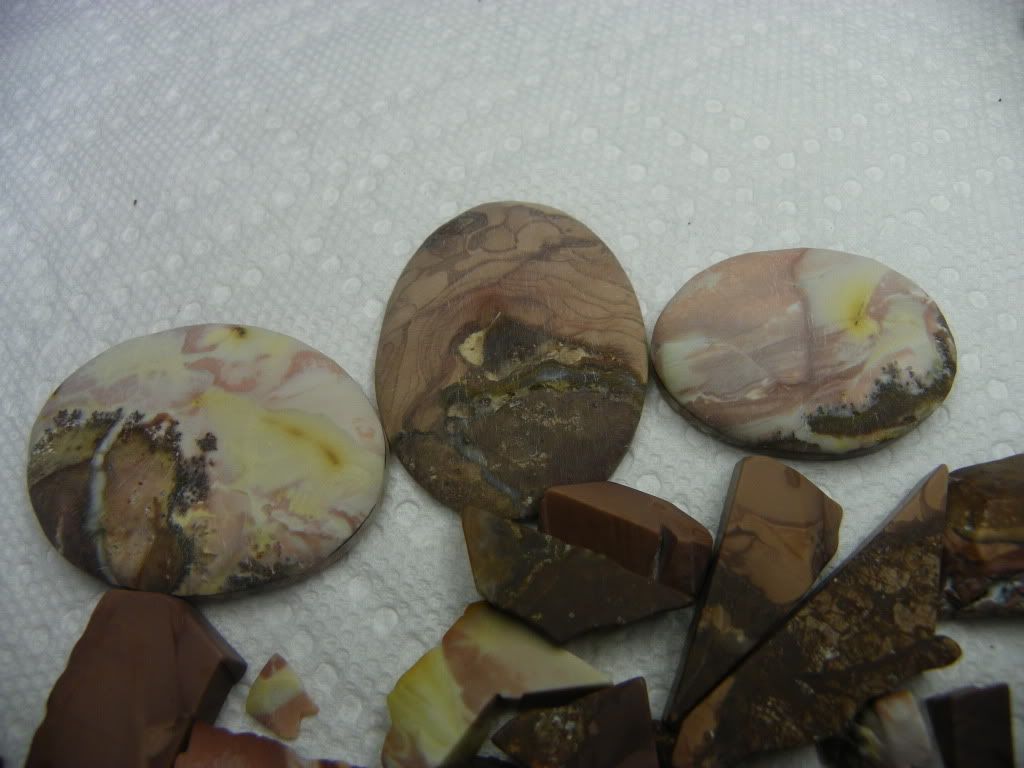 A little worried about the pitting on this one 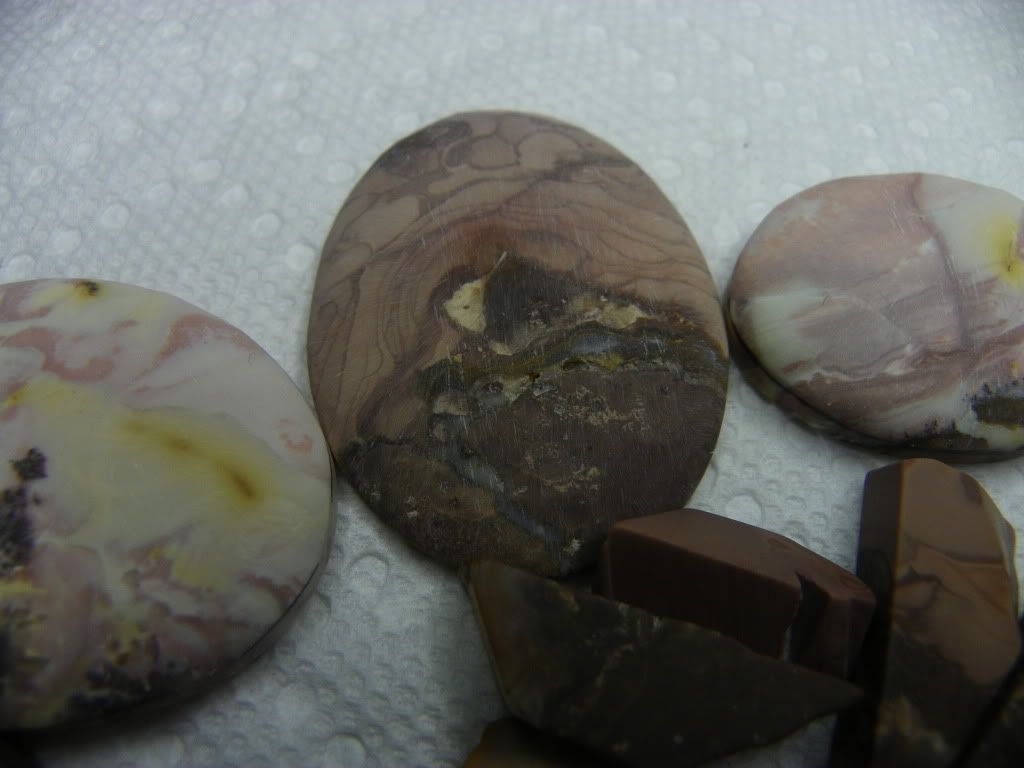 Running second day of stage one without adding 1/2 cap full of water 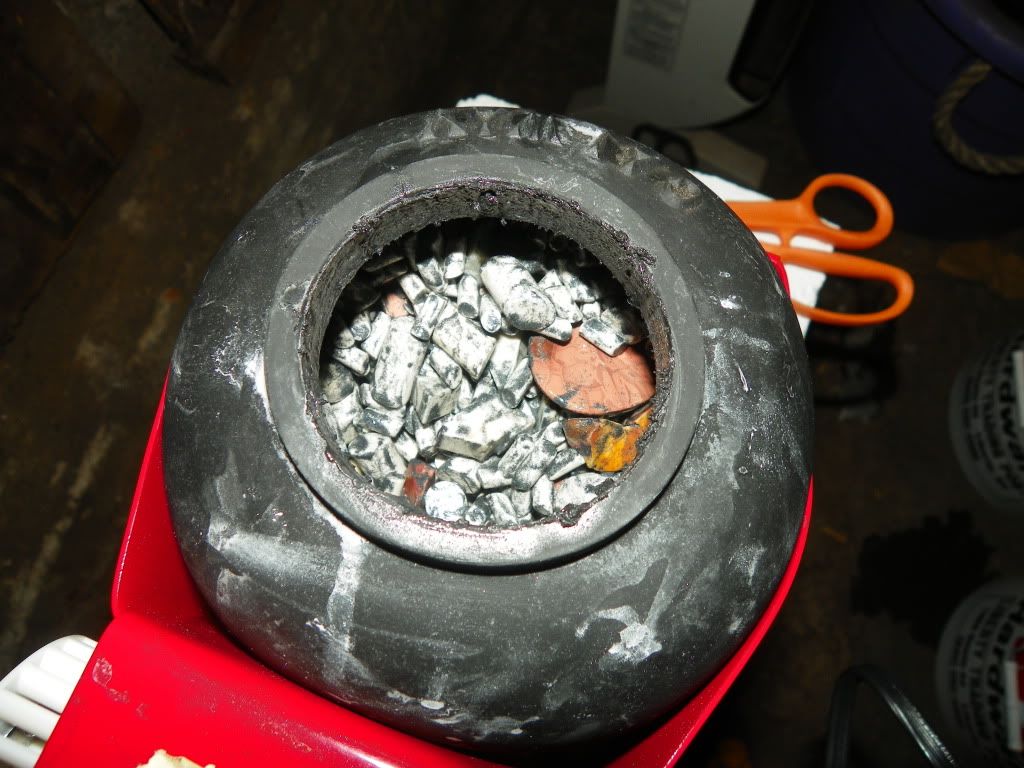 Overall I'm happy with what's happening. Grit is at 200 for stage 1. I'm seeing a slight color change, mainly a graying of the blues in the Unknown Jasper. Willow is doing very nicely! Will see where we are in the morning. Thanks, Cathy |
|
|
|
Post by talkingstones on Feb 28, 2012 22:54:18 GMT -5
Oops...This is the van mat... 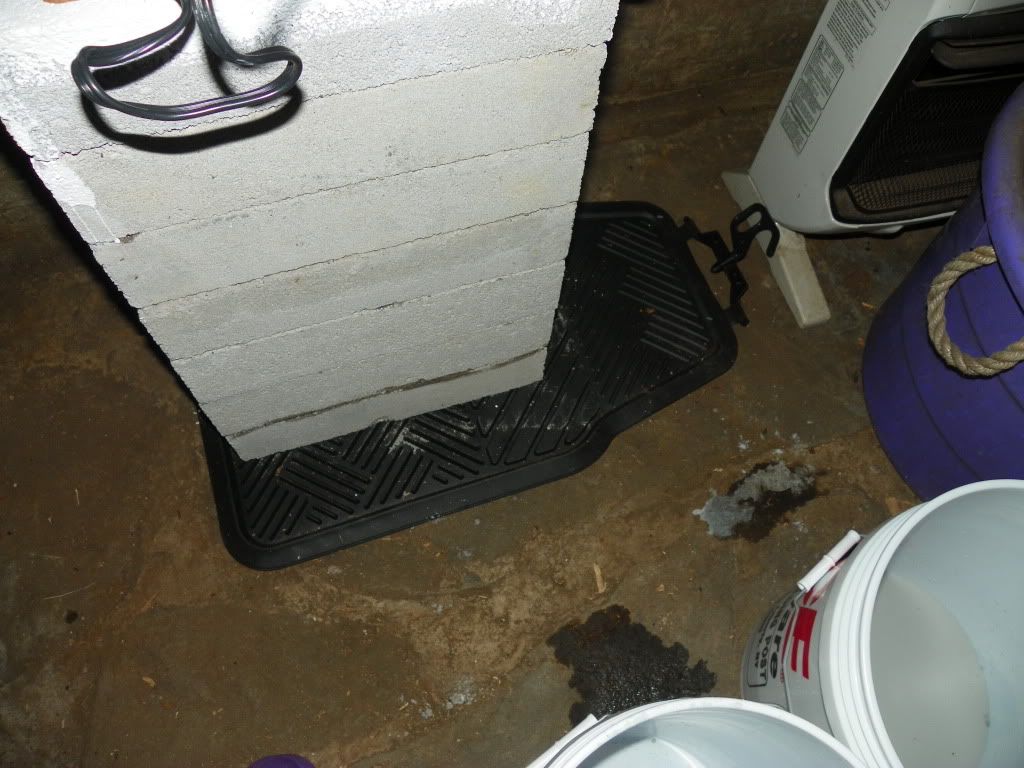 Sorry about that... Cathy |
|
|
|
Post by connrock on Feb 29, 2012 8:25:22 GMT -5
You had me going there with the 1st van mat photo! LOL
I can't really say if that mat makes a difference in the action of the tumbler but suspect it may be absorbing some of the vibration.
You may want to try it with and without the mat?
You last photo looks pretty dry and you DO NOT want any of your rocks to dry out.If the rocks dry out they WILL get impacted with grit?slurry/polish and look terrible.
If you use a water spray bottle it's better then trying to guage the amount of water with the red cap.
You just give the load a squirt and let it rotate,,,,squirt rotate,etc,etc,etc until the load looks wet enough.
Also when you are satisfied with how the rocks look and are getting ready to wash everything,,,,put a tablespoon of powdered laundry soap like Dreft in by sprinkling it on the rocks as they rotate.
The load will begin to dry out so you will have to squirt water on the rocks until you see the load get wet enough again.
If you do this it will help clean-up a lot and the soap also gets impacted into any flaws which makes them much easier to clean up.
I'm a BIG fan of using a lot f powdered laundry soap,,,
connrock
|
|
|
|
Post by susand24224 on Feb 29, 2012 16:32:48 GMT -5
Hi, Cathy,
I hope you're feeling better. I followed Connrock's instructions with my new Lot-O and they worked great. However, I had trouble getting the soap off my rocks (I attribute this to my water softener, which Connrock doesn't have.) So--in addition the the Dreft at the end of the cycle before I dumped and cleaned, I added about 3/4ths cup of water. It works great for me.
|
|
|
|
Post by talkingstones on Feb 29, 2012 19:10:10 GMT -5
Hi Guys, Susan, we were snowed in today so I did get a chance to rest and am feeling better than I was. Thanks! I wasn't able to get the dreft so I sliced some Ivory off of a bar, liquified it and added a tablespoon of borax while spraying in water to keep the rocks wet. Worked great and turned a gallon for washing into a squirts from the sprayer! I ran into a coupe of problems with the Willow Creek cabs, which really surprised me! I think it might have to do with the size of the cabs as they are big. Anyway, here are today's photos... This morning's slurry  This evening's scrap  Willow cabs... This one did pretty well with only a few pits developed  This one did not do well with a well and some serious pitting developed next to the white vein  This one, the pitting seems to be filling in... go figure...  And these guys are doing much better than I thought they would but are smaller than the Willows  Love this one!  I'm thinking at this point about pulling the Willow cabs as I can probably fix or recut the one. The thing is, the one I was worried most about is actually doing better, so I may keep that in. Thoughts and input appreciated! Cathy |
|
|
|
Post by susand24224 on Feb 29, 2012 21:23:02 GMT -5
They're looking good. You just had some soft spots in those cabs--happens sometimes.
|
|
|
|
Post by Jack ( Yorkshire) on Mar 1, 2012 3:50:34 GMT -5
Hi Cathy,
That last photo is how it should look a silver grey IF it looks a dull grey(and the rotation will be s-l-o-w ) add a couple of sprays of water
Starting (Stage 2 )I fill my Lot"O" right up to the top with the motor running to observe the rock movement
The photo of 28/2/12 is what it is lik 5 mins into the run after adding grit soap borax.
The Mat ? I dont think is of any use
To get te best action the Lot"O" has to be absolutly secure to the top stone to get the best vibration/ to movement of the mass of stones
A nice selection of rocks (photographing good also )
Thanks for showing you progress
As I always say in my Computer group "A problem NOT shared, is a problem NOT solved "
Jack
Yorkshire UK
|
|
|
|
Post by helens on Mar 1, 2012 4:11:30 GMT -5
Looking great Cathy!! Connrock and Susan have done way more loads than I have, so it's great that they are helping you through this!
I was such a basketcase on my first tumble, it was a bit like waking up to feed the baby, I couldn't sleep, every 2 hours or so, I'd jump up to open my Lot-O and check on my rocks... LOL! But as weird as that sounds, I had a lot of fun:). The first batch is the best, every day is a surprise!
|
|
|
|
Post by connrock on Mar 1, 2012 8:19:32 GMT -5
Cathy,,, The size of the Willow Creek cabs doesn't have anything to do with their outcome. The W/C cabs have soft areas that are pitted and are now being "eroded" in the process.Tumbling cabs of this nature will only bring out the worst in them and it's better to do this type of material solely on a grinder/polisher. You can see that the material in your "unknown" jasper and the cabs cut from it is a much more "solid" material with no "pattern separations" or soft pitted areas. You can see that this piece of petrified wood could be tumbled forever and you will never get rid of all the flaws in it.  Although this piece of petrified wood came from a different location you can see that it is solid,with no flaws/pits and came out fairly well,,,  This slab has some beautiful colors and patterns but it is full of flaws,pits,etc. This material would be hard to cab even on a grinder/polisher due to it's flawed,,,hard/soft areas,,,, This type of material would have to be stabilized in order to work it.  The W/C cabs pitted areas will retain slurry and polish which will make them look terrible. If you'll notice that the piece of petrified wood in the 1st photo has a lot of pitted areas all over it. You'll also notice that there is no slurry or polish left in these flawed areas. I don't do a "traditional" type of burnish with flawed,pitted rocks because it only erodes and washes out these problem areas even more and they look terrible after they dry out. Unfortunately some of the most beautiful rocks we tumble have these flaws/pits and in may cases are either thrown out or put to the side somewhere. Keeping the grit/slurry/polish out of these flaws should start right in the beginning and not left for the burnish stage. I eluded to the fact that I'm a "soap lover' in an earlier post to you. In order to keep slurry,etc,etc out of these flaws I let them get impacted with huge amounts of powdered laundry soap,,,,bar sap shavings will work just as well. During my 1st 220 stage I add a lot of soap about 1 hour before I wash the rocks/barrels out. During the 400,500, or what ever you use for the next stage,,,,I start putting in the soap a day before I wash the rocks and add a good amount of it about an hour before washing. During the 1000 grit/Tripoli it's soap city from the git go and again a good amount before washing.The same is true during the polish stage but,,,,,,, Using this "soap" method during the 1000/Tripoli run I seldom even put the rocks through a polish stage because they are awesome! I know people are probably tired of seeing this photo but it's a very good example of what the rocks can look like after a good 1000/Tripoli run,,,,, and NO polish stage,,,,  Here's another of a different type of rock done the same way,,,,,  I hope some of this helps you a little! Good luck,,,,,,,,, connrock |
|
unclestu
Cave Dweller  WINNER OF THE FIRST RTH KILLER CAB CONTEST UNCLESTU'S AGUA NUEVA AGATE
Member since April 2011
Posts: 2,298
|
Post by unclestu on Mar 1, 2012 9:02:46 GMT -5
Hi Cath,
Just want to say that I have found this thread very informative and thank you for starting it. I have never tumbled yet. Just have done cabbing however tumbling is on my lbucket list. Along with all the other things you can do with rocks LOL
I have a question pertaining to a statement Comrock made.
If a stone is so pitted that it should be stabilized, after it has been stabilized can that stabilized piece be tumbled?
Thanks Comrock or whoever provides the answere to this question.
Stu
|
|
|
|
Post by talkingstones on Mar 1, 2012 22:11:27 GMT -5
Hi All and thanks for the input! Connrock, it helps a lot! I put two of the Willows through stage two but am pulling them at this point. I did do the soap on this stage, and Jack, I did the borax and soap at the end. This run was 600 grit. I've got to go up and check to see what I have up there for the next stage. I have one clean barrel left but before I go there, here are end of stage 2 photos. Questions at the end. Stu, Thanks and I'm finding it very informative too! I'm kind of doing the bucket list as I go these days. Lol! That way I'm sure I get to it! :-) Photos! The slurry soap and borax mix.  Rocks when they came out before cleaning.  After rinsing  After sorting  Problem child    Other problem child  Camera shy tonight but hope you can see the details this brought out      Okay, question... How does one "stabalize" a stone? I'd rather not loose that piece of Willow. Is there a way to fill in that vein with something and continue with a hand grinding to finish it? The smaller and lighter one I think I'll be able to grind it to a shine. Okay, onto the soap, grit and borax stage... Had a rough day today so I'm going to gather the materials tonight and start it in the morning. I'm going to use the same drum for the burnishing/prepolish stage and then start a clean one for polishing...if necessary! :-) As always, your input is helping enormously and is greatly appreciated! |
|


 Al Falfa


