How to make a cab pendant (70 images)
Dec 24, 2013 20:52:17 GMT -5
connrock, deb193redux, and 7 more like this
Post by Tom on Dec 24, 2013 20:52:17 GMT -5
Dear group,
When my daughter came home for Christmas I told her one of her presents was going to be a silver pendant. The thing was I had not make it yet. I got her to pick out a stone and a shape. I did not think it would be done for Christmas but I managed. She picked out the copper colored Gold stone.
If you think this should be pinned go ahead if not let it go the way of the Dodo. There are definitely better tutorials on the net. This one shows you the flaws and mistakes that a newbie makes though, and that has some importance. I am a novice smith to say the least, there is a member at our club and he gives smithing lessons. They consisted of 4 two to three hour sessions, we made a hammered silver pendant and ear rings, an 18 by 25 oval pendant, a 18 by 25 oval ring and the last lesson was a free for all. These lessons helped a lot, I had already made a pendant and ring before taking the lessons. The interweb is a vast resource for us.
I used a Nikon D-80 under 5000k lamps with minimal editing done. Resizing the image and at times brightness or auto color correction. I used Irfanview (the best little freeware image edit program IMO). If I was to make a masterpiece I would use Gimp, freeware basically the same as photoshop
Pre form marked and shaped.
Back

Front

Don't forget to make a back bevel, this is important as it prevents chipping and to allow the stone to set properly in the bezel. As you will see.

I dop using Special T and dowel with a deck screw perfectly centered. The stone will not fall off after a minute or two, if you are impatient you can use an accelerant. On a recent post someone said they leave them overnight, this is not necessary with Special T.


I make a girdle mark. (should have been done before dopping.)

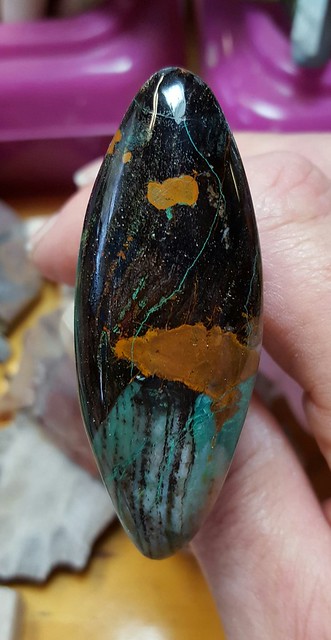
Finished cab

I apply heat to the shank of the screw and the cab will come off easy, use only as much heat as is required. Remember some stones don't tolerate heat.


Scrape or sand off the glue residue.

Ok now to the silver. Wrap your bezel strip around your cab, make sure its tight to the edges. Cut the strip a bit longer than necessary then file the edges flat. Don't remove to much silver.

Make sure the ends are flush and fit tight together.

Make sure the strip fits the stone nicely. I have a small gap in the bezel strip, it is better to have the bezel a bit tighter than looser. It easier to make the bezel bigger by stretching, to make it smaller you need to cut and re-solder

I give the joint a nice tight squeeze with flat nosed pliers.

I use sheet solder and now I cut a pallion of hard solder. I use solder cutters but snips work just fine.

There are different ways to close the bezel strip, I put mine in a helping hand with the joint DOWN. Flux joint area and put the pallion on the joint. Don't forget flux! You do not need to flux the entire strip if you are using fine silver, if you are using sterling silver flux the entire ring to prevent fire scale.

If you think you are seeing that the strip is not flush you are not seeing things, I did this one on purpose to show you how to get rid of the imperfection.

Heat up the entire bezel, constantly move the torch or you will melt the silver, using an 00 tip on my acetylene/air torch.


This joint looks bad but is mechanically secure. Notice the joint ends don't line up.

Into the pickle pot.

Always use copper tweezers and rinse pickle off. If you use other metal you can plate your silver copper colored. My pickle recipe is so simple, almost fill your pickle pot with white vinegar and heat it up a bit, add pickling salt until no more will dissolve in the vinegar. This is a "green" pickle and can be discarded however. You don't need a pickle pot just use a plastic bowl with a lid, but make sure you heat it up in the microwave before using. Hot pickle works at least 10 times faster than cold.

I used a file to do a rough smoothing:)

Using your bench block or anvil gently hammer the bezel to make it sit flat on the block, turn over frequently as required.

Now using sand paper, this is 220 grit, sand the bezel edges down. Important note my fingers are keeping a constant pressure over all of the bezel. Sand using a figure 8 pattern and change the bezel position lots. I want to remove some silver to fix the uneven joint I made but I want to make sure the bezel stays level.

Make sure your stone fits the bezel ring nice, push it through in both directions several times. This will work harden the silver and ensure the stone will fit.


Mark out your bezel on sheet silver, I used 24 gauge for this.

u
Don't forget to use burr lube on your saw blade, cut out the piece of silver for the back. Make sure you make it bigger than the bezel ring. I have not broke a blade in a long time, practice using your saw and the lube is essential.


Clean the sheet and bezel ring with Acetone, try not to touch the pieces after cleaning. Then put the acetone away from your soldering area.


Unless you are using fine silver for the plate, flux the entire plate front and back to prevent fire scale. Fire scale is the copper molecules that are brought to the surface with heat.

Cut a bunch of solder pallions out of medium solder and place on the inside of the ring as shown. Make sure each piece touches the plate and the ring.


I had a spot where the ring was not in contact with the plate so I weighted the ring down with some steel. You should avoid this if possible as the steel acts like a heat sink. I really really heated up the steel. Heat up the carbon block, the base and the ring, constantly moving the torch. Do this in the semi dark and watch the pallions color. You should see it change color then puddle then flow all around the ring. Use your torch on the outside of the ring, solder follows the heat and will totally seal the ring to the base. After soldering let it cool a bit then put it in the pickle. I used the 0 tip of the torch for this step.


I cheated and used snips to trim off extra metal.

You can use a file and sanding sticks or a rotary tool to even up the edges.


I use this kit and other things as well to smooth silver, I used this kit for this pendant. This is a good thing to buy.


This is the edge and polish after the rotary tool with the advant edge kit, its mirror smooth.

While the silver is in the pickle you can make your bail, the sky is the limit here.


Disaster strikes! I should have went back to the 00 tip I ended up melting the end of the bail off.

When given lemons make lemonade. I reshaped the bail and used it anyway.

A trip in the pickle again and some buffing.


Set your stone in place, you should not have to force it.

Some of the tools I use to set the stone.

This stone has rounded corners so I set the sides and ends first. I used the bezel setting tool for this, others like a bezel roller. Note the 4 crimps. If this had square corners I would have done the corners first. If you don't you end up with extra metal at the corners.

Now I pushed in the corners, then set the stone all the way around.


Then I burnished the edges down with a burnishing tool. Note the curve is up, I was taught that this is the correct way, I use the tool both ways:) Burnishing work hardens the edges and give a great shine.


After an overnight ride in my tumbler with water, Dawn soap, plastic pellets and stainless shot. This really should have been shinier, but it is what it is.

A trip to the buffing machine, first tripoli then wash well, then red rouge polish. The scratches you see in the image are hard to see with the pendant in hand but really should be buffed out. Another option is a matt finish using a piece of scotch brite.

Finished pendant.


When my daughter came home for Christmas I told her one of her presents was going to be a silver pendant. The thing was I had not make it yet. I got her to pick out a stone and a shape. I did not think it would be done for Christmas but I managed. She picked out the copper colored Gold stone.
If you think this should be pinned go ahead if not let it go the way of the Dodo. There are definitely better tutorials on the net. This one shows you the flaws and mistakes that a newbie makes though, and that has some importance. I am a novice smith to say the least, there is a member at our club and he gives smithing lessons. They consisted of 4 two to three hour sessions, we made a hammered silver pendant and ear rings, an 18 by 25 oval pendant, a 18 by 25 oval ring and the last lesson was a free for all. These lessons helped a lot, I had already made a pendant and ring before taking the lessons. The interweb is a vast resource for us.
I used a Nikon D-80 under 5000k lamps with minimal editing done. Resizing the image and at times brightness or auto color correction. I used Irfanview (the best little freeware image edit program IMO). If I was to make a masterpiece I would use Gimp, freeware basically the same as photoshop
Pre form marked and shaped.
Back

Front

Don't forget to make a back bevel, this is important as it prevents chipping and to allow the stone to set properly in the bezel. As you will see.

I dop using Special T and dowel with a deck screw perfectly centered. The stone will not fall off after a minute or two, if you are impatient you can use an accelerant. On a recent post someone said they leave them overnight, this is not necessary with Special T.


I make a girdle mark. (should have been done before dopping.)

Finished cab

I apply heat to the shank of the screw and the cab will come off easy, use only as much heat as is required. Remember some stones don't tolerate heat.


Scrape or sand off the glue residue.

Ok now to the silver. Wrap your bezel strip around your cab, make sure its tight to the edges. Cut the strip a bit longer than necessary then file the edges flat. Don't remove to much silver.

Make sure the ends are flush and fit tight together.

Make sure the strip fits the stone nicely. I have a small gap in the bezel strip, it is better to have the bezel a bit tighter than looser. It easier to make the bezel bigger by stretching, to make it smaller you need to cut and re-solder

I give the joint a nice tight squeeze with flat nosed pliers.

I use sheet solder and now I cut a pallion of hard solder. I use solder cutters but snips work just fine.

There are different ways to close the bezel strip, I put mine in a helping hand with the joint DOWN. Flux joint area and put the pallion on the joint. Don't forget flux! You do not need to flux the entire strip if you are using fine silver, if you are using sterling silver flux the entire ring to prevent fire scale.

If you think you are seeing that the strip is not flush you are not seeing things, I did this one on purpose to show you how to get rid of the imperfection.

Heat up the entire bezel, constantly move the torch or you will melt the silver, using an 00 tip on my acetylene/air torch.


This joint looks bad but is mechanically secure. Notice the joint ends don't line up.

Into the pickle pot.

Always use copper tweezers and rinse pickle off. If you use other metal you can plate your silver copper colored. My pickle recipe is so simple, almost fill your pickle pot with white vinegar and heat it up a bit, add pickling salt until no more will dissolve in the vinegar. This is a "green" pickle and can be discarded however. You don't need a pickle pot just use a plastic bowl with a lid, but make sure you heat it up in the microwave before using. Hot pickle works at least 10 times faster than cold.

I used a file to do a rough smoothing:)

Using your bench block or anvil gently hammer the bezel to make it sit flat on the block, turn over frequently as required.

Now using sand paper, this is 220 grit, sand the bezel edges down. Important note my fingers are keeping a constant pressure over all of the bezel. Sand using a figure 8 pattern and change the bezel position lots. I want to remove some silver to fix the uneven joint I made but I want to make sure the bezel stays level.

Make sure your stone fits the bezel ring nice, push it through in both directions several times. This will work harden the silver and ensure the stone will fit.


Mark out your bezel on sheet silver, I used 24 gauge for this.

u
Don't forget to use burr lube on your saw blade, cut out the piece of silver for the back. Make sure you make it bigger than the bezel ring. I have not broke a blade in a long time, practice using your saw and the lube is essential.


Clean the sheet and bezel ring with Acetone, try not to touch the pieces after cleaning. Then put the acetone away from your soldering area.


Unless you are using fine silver for the plate, flux the entire plate front and back to prevent fire scale. Fire scale is the copper molecules that are brought to the surface with heat.

Cut a bunch of solder pallions out of medium solder and place on the inside of the ring as shown. Make sure each piece touches the plate and the ring.


I had a spot where the ring was not in contact with the plate so I weighted the ring down with some steel. You should avoid this if possible as the steel acts like a heat sink. I really really heated up the steel. Heat up the carbon block, the base and the ring, constantly moving the torch. Do this in the semi dark and watch the pallions color. You should see it change color then puddle then flow all around the ring. Use your torch on the outside of the ring, solder follows the heat and will totally seal the ring to the base. After soldering let it cool a bit then put it in the pickle. I used the 0 tip of the torch for this step.


I cheated and used snips to trim off extra metal.

You can use a file and sanding sticks or a rotary tool to even up the edges.


I use this kit and other things as well to smooth silver, I used this kit for this pendant. This is a good thing to buy.


This is the edge and polish after the rotary tool with the advant edge kit, its mirror smooth.

While the silver is in the pickle you can make your bail, the sky is the limit here.


Disaster strikes! I should have went back to the 00 tip I ended up melting the end of the bail off.

When given lemons make lemonade. I reshaped the bail and used it anyway.

A trip in the pickle again and some buffing.


Set your stone in place, you should not have to force it.

Some of the tools I use to set the stone.

This stone has rounded corners so I set the sides and ends first. I used the bezel setting tool for this, others like a bezel roller. Note the 4 crimps. If this had square corners I would have done the corners first. If you don't you end up with extra metal at the corners.

Now I pushed in the corners, then set the stone all the way around.


Then I burnished the edges down with a burnishing tool. Note the curve is up, I was taught that this is the correct way, I use the tool both ways:) Burnishing work hardens the edges and give a great shine.


After an overnight ride in my tumbler with water, Dawn soap, plastic pellets and stainless shot. This really should have been shinier, but it is what it is.

A trip to the buffing machine, first tripoli then wash well, then red rouge polish. The scratches you see in the image are hard to see with the pendant in hand but really should be buffed out. Another option is a matt finish using a piece of scotch brite.

Finished pendant.