Intheswamp
Cave Dweller 
Member since September 2015
Posts: 1,910 
|
Post by Intheswamp on Nov 14, 2015 9:30:11 GMT -5
Well, $5 for a regular v-belt vs. $25 for a Harbor Freight link belt...?? Now, if a single ~60" belt would work for both the jack pulley end and the posi-traction end that might be worth the investment...but unfortunately the link belts are too short for that.  I don't think the rubber band will work...seems heavy, but still for continuous use it seems like it would be short-lived. I'll just try to find a cogged belt that will work...20-21 inches should do it... |
|
jamesp
Cave Dweller
Member since October 2012
Posts: 36,169
|
Post by jamesp on Nov 16, 2015 2:22:54 GMT -5
Well, $5 for a regular v-belt vs. $25 for a Harbor Freight link belt...?? Now, if a single ~60" belt would work for both the jack pulley end and the posi-traction end that might be worth the investment...but unfortunately the link belts are too short for that. I don't think the rubber band will work...seems heavy, but still for continuous use it seems like it would be short-lived. I'll just try to find a cogged belt that will work...20-21 inches should do it... Auto Zone laughs at me when I roll my tumbler in the store and go thru their v-belts. They just give me the long stick and let me pull the belts till ones are found that fit. As long as they are put back where found. You can use a fatter 'B' belt on the posi, it can be quite loose and still not slip. They are so stiff that they dig into the groove even when fairly loose. Mower shops have the 'B' belts. lots of short ones. They are so tough you can cut them to length, drill a couple of holes thru the top of the belt to the center and stitch them butt to butt. Or screw through the top and bolt a 1.5 inch sheet metal the width of the belt to them-two short wood screws on each side. Posi drive slow and very little torque. For the faster motor pulley a skinny automotive grade 'A' belt should last 600 years. That tumbler will never abuse thin gauge v-belt like a alternator or auto A/C will. Auto junkyards often have mountains of v-belts. No one buys them. When glueing 6 inch PVC coat both pipe and fitting heavy and put the together fast and be ready to press hard, like set it on the ground and stand on it. Do not wait after applying glue to both sides. should it dry a bit they may not slide all the way down. I put a piece of wood down on the ground and another piece ready for the top in case it needs pounding on with a 4 X 4 or treated wood fence post. When gluing them heavy pipes in the field a back hoe is often used to push the fitting on. Like a 12 inch pipe fitting takes a crap load of force to slide on after pouring the glue on it. I don't paint the glue on, I pour it on thick and spread it thick and quick with an old 2-3 inch paint brush. Fill the gusset pockets of the 4-6 bushing with good non-water soluble clear GE Silicon. The shoulder in the bushing can wear thru to the gusset pockets on some 4-6 bushings. Put the caulk tube down your pants for 15 minutes or in the oven @ 110F to warm it up so the silicon will flow good. I stick under a sleeping hound dog for an hour. Car dash w/direct sun etc. Best to warm bushing too, but the hound complains about it. 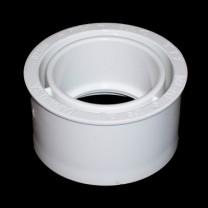 You will have a smoking tumbler Ed. |
|
jamesp
Cave Dweller
Member since October 2012
Posts: 36,169
|
Post by jamesp on Nov 16, 2015 3:28:06 GMT -5
Mixed fasteners not allowed by the International Code of Rock Tumbler Design. I hate digging around trying to find one of those star drivers, granted they don't strip like a phillips.  |
|
Intheswamp
Cave Dweller
Member since September 2015
Posts: 1,910
|
Post by Intheswamp on Nov 16, 2015 7:41:38 GMT -5
Well, that old, seasoned, treated southern pine wasn't exactly flat and straight. I used the screws to pull it up as snug as I could. As for as removing the screws...the only way that they're coming out is if I throw the tumbler on a burn pile and they fall out of the ashes.  As for as the ICRTD goes, I adhere to the SRCRTD (Southern Redneck Code of Rock Tumbler Design), a renegade group of grassroots tumbler builders. |
|
Intheswamp
Cave Dweller
Member since September 2015
Posts: 1,910
|
Post by Intheswamp on Nov 16, 2015 7:59:39 GMT -5
Thanks for the info on the belts, Jim. That helps me understand the drive and posi pulleys working differently. I'll get as close as I can with the posi belt and call it good. Naturally the drive belt will have some adjustment to it so I'll get it close enough for horseshoes (grenades might be too much variance). I've been looking at this calculator to figure belt lengths. How does it compare to your real-world experience?... Belt and Pulley CalculatorYeah, I've gotta get a grip on gluing the 6" stuff up....that's bigger than any pvc that I've worked with befoe. Speed seems of the essence. Looks like I need to buy a bigger can of glue. Do you use the primer? Fittings will be new but pipe will be scuffed up older stuff...not to bad, but will need washing up and maybe a little surface sanding, but really not too bad. I'm thinking of forgoing the sanding for fear of reducing the pipe dimensions. That picture looks like the bushings that I have. I'll check the pockets out and see how thick the plastic is going to be there. I think I'll opt for the car dash rather than down the pants...I don't need a defective caulking tube causing...problems.  |
|
jamesp
Cave Dweller
Member since October 2012
Posts: 36,169
|
Post by jamesp on Nov 16, 2015 10:16:12 GMT -5
Belt calculator. only do real world fitting on v-belts. If it is an a belt I cut one down an old one to exact needed length, and then take it buy one that length.
Problem with v belts is that they have many cross sections and types-metric, automotive, industrial. They ride deep or shallow in the grove changing the length a lot.
if you have adjustment on belt length like the motor then you can cut a 3/8 inch rope and get darn close.
Coming back to me now, I first fitted the posi belt by moving the shaft spacing till it snugged up on the posi belt.
Then sized and purchased the motor belt. That is how I got the posi belts to fit so good.
I guess I was never concerned if the shaft spacing was 5-7 inches center to center. I knew it would run with posi easily. Had no choice in my mind.
|
|
jamesp
Cave Dweller
Member since October 2012
Posts: 36,169
|
Post by jamesp on Nov 16, 2015 10:28:41 GMT -5
Looking at this photo, the shaft closet to you could be moved closer to you to take up slack in the posi belt. I used bolts and drilled a series of holes so the pillar blocks could easily be bolted down in 3/4 inch increments on that shaft closest to you. You will be fine with wider/narrower shaft spacing. Yes it will run fine there but you can widen/lessen the spacing to meet the belt. Once you got it all secure get a dang marksalot and write the size of that darn belt down on the box so you will have it for the next set of shafts. The next set of shafts are easy because you just copy the first set. 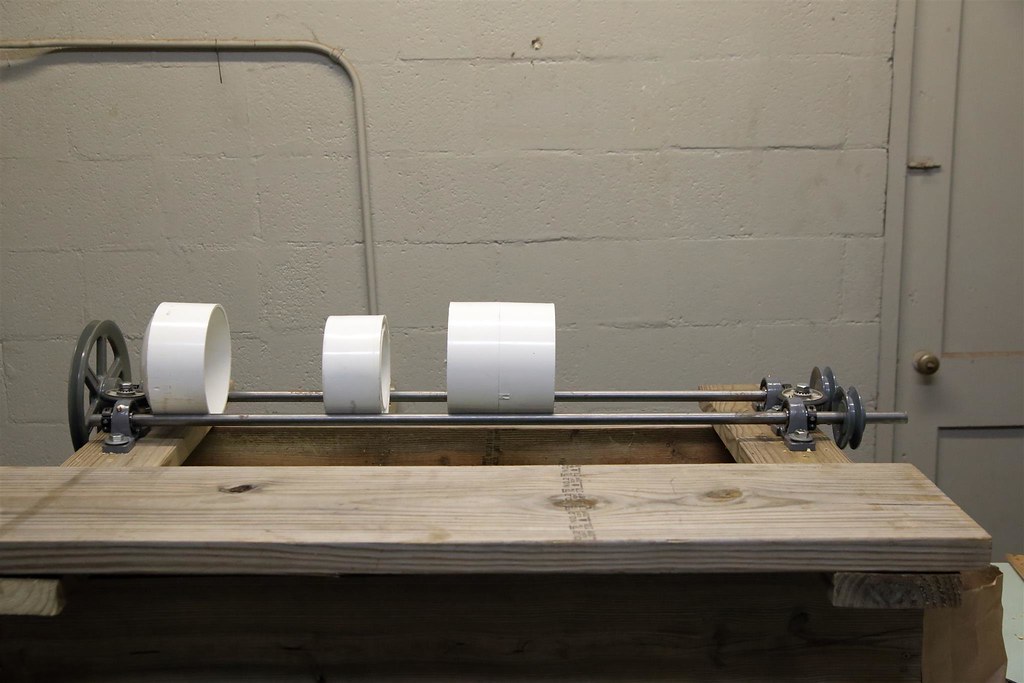 |
|
jamesp
Cave Dweller
Member since October 2012
Posts: 36,169
|
Post by jamesp on Nov 16, 2015 10:50:51 GMT -5
When you ad the next set of shafts you mount the power takeoff shaft first to get the pulley tight for it. That would be the third shaft from left in photo. Then mount the last(4th shaft from left) to pull tension on posi belt. The second set of shafts as seen in the photo is a 50% reduction on the second set-6 inch pulley to 3 inch pulley(shafts 2 + 3 from left).  |
|
jamesp
Cave Dweller
Member since October 2012
Posts: 36,169
|
Post by jamesp on Nov 16, 2015 10:55:45 GMT -5
When doing final assembly I would apply anti-sieze compound at the pillar blocks-shafts since our southern humidity has a way of rust welding all metal connections together.
Rust visible on shaft ends in above photo. Make sure you grind off those extrusion lumps on the couplings so it will not lub-dub.
I use as many of those taper lock bushings as possible since rust does not effect their removal.
|
|
Intheswamp
Cave Dweller
Member since September 2015
Posts: 1,910
|
Post by Intheswamp on Nov 16, 2015 18:00:03 GMT -5
Ended up using a 22", 4L belt...non-cogged. Slipped it on the pulleys, then the pulleys on to the shafts...extended shaft first then I pulled against it to get it to go over the second shaft. Nice snug fit. It sits kinda deep into the V. I'd rather have had a cogged belt, but I took what I could get at the time. Will put some anti-seize (pepto bismol?) on the bearing/shaft connection...but how? Paint the shaft and slide it into the bearing and call it good enough? I would imagine the pulleys need anti-seize on them, too? Gotcha on the mold marks on the fittings...had to do that with the 4" barrel. The posi-traction setup is turning the fittings even with the protrusions. Before I put the belt on and only one shaft was turning the fittings would stop turning when the extrusions hit the shaft...now with two shafts turning the fittings just bump right over the extrusions. Even in this simple example I'd say the posi-traction shaft makes a big difference, thanks for recommending it Jim...I'm glad I went with it. I'll still grind the mold marks/extrusions off, though. |
|
Intheswamp
Cave Dweller
Member since September 2015
Posts: 1,910
|
Post by Intheswamp on Nov 24, 2015 16:23:48 GMT -5
A couple of short video clips... Is the belt too loose? I'll have to re-drill to get it more snug...it seems to be pulling good as it is BUT...there's no load on it yet. By a non-scientific stopwatch approach I'm spinning that 6" cap at 46rpm. Looks like the unloaded amp draw is around 2.15amps with wattage running around 160 watts....unloaded, mind you. |
|
jamesp
Cave Dweller
Member since October 2012
Posts: 36,169
|
Post by jamesp on Nov 26, 2015 9:29:48 GMT -5
Excellent. Grab the shafts with your hand and see if you can make the belt slip. With that much rap around the pulleys I doubt it.
The end rollers may have to be looked at. As mentioned, I wish the caps were flat faced for a better end roller contact.
Liking the round O-ring tire around the end roller.
Stout tumbler Ed. I have a dedicated grease gun sitting next to my machine. If you install guards remember to allow access to the grease fittings.
Should you add another set of shafts you will find it much easier. And you now know the size of the posi belt.
Get that machine set up with 2 sets of shafts and end to end barrels and you will get a workout recharging and doing clean-outs.
Lots of tumbles in your future.
Be sure to run the barrels about 25 RPM for the second set of shafts for finishing grits.
|
|
Intheswamp
Cave Dweller
Member since September 2015
Posts: 1,910
|
Post by Intheswamp on Nov 26, 2015 12:07:11 GMT -5
Now I've gotta figure out where to set it up. Simply running unloaded it is fairly quiet. With the fittings rolling it's rather loud. Does a loaded barrel run fairly quiet other than the avalanche? Looking at some options...would like to have it here at the house, but kind of shy on somewhere to put it out of sleeping range...maybe have a place, we'll see. I grabbed the shaft a few times and so far I haven't bogged it down so maybe it's ok. Once I load a barrel the "proof will be...in the barrel", I suppose. I thought I was set on my pvc pipe for now. Started on one barrel, glued an end cap on then looked at the other couple of feet of the pipe...crack running down most of it...stopped just shy of the piece I cut off. I may yet buy a full stick of it from the plumbing house...I mentioned them buying part of it back at a discount and they seemed open for that...a 20' stick I just don't need, but...I guess it won't spoil, either...it's just expensive. The end rollers were just hitting every now and then against that end cap...they turn freely. My only concern is that with a clothes-dryer the rollers are in constant contact with the drum and no "scuffing" is involved. With the barrels they may scuff some...will have to see about their longevity. Gotcha on the grease gun. Holding off the extra shafts for now...gotta get this once populated first. Btw, remember your dismay about me possibly changing motor turn direction. I did change it. The clockwise motor rotation would have created a "pincher" situation between the near shaft and the roll-off table. I simply switched two leads in the motor to reverse the direction...nice, simple wiring for this motor. Opted for the "LO" line hookup and getting around the above stated 46rpm. I simply bent the wires into hooks, ran solder into the wire to make a non-fraying wire connection and shazamm!!!...we're rolling!!! |
|
jamesp
Cave Dweller
Member since October 2012
Posts: 36,169
|
Post by jamesp on Nov 27, 2015 5:19:52 GMT -5
If you get a vibe you may think about running the second set of shafts at same fast speed.
The vibe will keep up with two sets of shafts, all coarse grinding.
I changed the pulley to the second shaft set to run fast too since I got a vibe.
And the vibe still sits around waiting for 4 barrels to rough.
Most Lowes in Atlanta carry 10' sticks of 6" sch 40 PVC. Look up Southern Pipe/APEX and other pipe houses.
They may carry 10 footers or cut you a section from 20'.
glad you used a wider 2" x 6" on the ends. gives more space to mount the end rollers.
Mine used to be real loud till I went with the clay slurry. That made it run much quieter. No matter, it is far from the house.
Those barrels are pretty loud.
I see what you are saying about a pinch point, rotation reversal successful.
You must have extended those motor connections in the hard to reach motor terminals, ha, those are a bear.
|
|
jamesp
Cave Dweller
Member since October 2012
Posts: 36,169
|
Post by jamesp on Nov 27, 2015 9:49:11 GMT -5
Ed, this is an 8" PVC barrel that has been in service for 2 years. I never did caulk down in the bushing gussets, noticed it started leaking yesterday. Light coming through edge showing breach and thin area at shoulder. No problem putting a half inch of good non-water soluble clear GE silicon caulk($6/tube) in the pockets. The old school stuff, real sticky and drys like hard rubber. This was a drainage bushing, the 6" PVC bushings are much thicker.  |
|
Intheswamp
Cave Dweller
Member since September 2015
Posts: 1,910
|
Post by Intheswamp on Nov 27, 2015 11:25:07 GMT -5
I will be using the big tumbler for (at least for the present time) coarse tumbling. It will feed a single-barrel Loto. One thing about it, to double capacity will be *much* less expensive than building from scratch. 38" of shaft is good for now...I've gotta be able to feed the barrels, too.  Lowes around here do not carry 6" pvc pipe...nor fittings. I got my fittings from a Southern Pipe location about 40 miles from me...they said they only sale 20' pieces. The salesman talked like the "boss" might be interested in buying back some of the 20' stick being as they get calls from people (like me) for short pieces. He also said they'd cut it for me...I wonder if that meant cutting into 15-20 pieces.<grin> The only problem with the 2x6's is that if you spread the shafts very far the barrels might bottom out at the edge of the wood...but, with the spread I've got the rollers at now there's no problem. The wider boards give a lot of support and area to work with...not crowded at all. I'll have to figure on where to set the tumbler up at. I could leave it downtown and let folks there worry with it (if it ends up being too noisy). I'll just have to wait and see what noise level it achieves. I like silence around the house. Yeah, that pincher situation had me concerned. That particular Surplus Center motor is very user-friendly...simply swap a couple of blade-connections and the rotation direction is reversed. Contacts for power connections are straightforward...definitely want to use a socket on those small nuts...needle-nose pliers on the blade contacts. Easy. The picture of the 8" bushing worn through is about what I've imagined happening...the design is good for holding water pressure...not so good for abrasive wear. I'll be sure to get some silicone and fill the holes...cheap insurance. I'm still thinking about using some ShoeGoo to glue some tractor tube rubber in the end cap, if it works it works, if it doesn't then no big loss. I'm impressed with how well the ShoeGood has been holding in the smaller 4" barrel. Nothing ventured, nothing gained. |
|
Intheswamp
Cave Dweller
Member since September 2015
Posts: 1,910
|
Post by Intheswamp on Nov 27, 2015 11:37:58 GMT -5
I glued up a cap and 6" pipe assembly and also a coupling/bushing/4"pipe assembly figuring I would glue the assemblies together later. When I bought the fittngs they only had a single 6" cap so I had to wait on the second cap. The cap I glued up was the first one...comparing it to the newer one it is probably 1/8" thinner...it also had two mold mark nipples that protruded inward at the end of the cap maybe 1/4" and it doesn't say anything about Sch40 on it, but the new one does. Kinda makes me wonder what's going on there...seems pvc pipe of the same schedule should be the same thickness...  I wonder if I want to wed my good ($25)bushing/coupler assembly to this slightly thinner cap/pipe assembly? I cut the pipe to basically give me a ~15# barrel (at 75% capacity). So, if that slightly thinner cap wears through prematurely (I really think it'll last a long time) I can cut the cap off (shortens the barrel three inches) and glue a heavier cap on it...which would still yield over 8# of coarse tumbled rocks. |
|
jamesp
Cave Dweller
Member since October 2012
Posts: 36,169
|
Post by jamesp on Nov 28, 2015 22:05:06 GMT -5
Return that cap. Go with the thicker one Ed.
|
|
Intheswamp
Cave Dweller
Member since September 2015
Posts: 1,910
|
Post by Intheswamp on Dec 19, 2015 16:21:55 GMT -5
Touching back here...
Jim, I'll hang on to it for a backup. I did find the thicker one I think you are talking about....got it a Lowes...the Fernico (thinner) one came from HD. I did take the thicker one and glued a circle of inner tube to it...should add a year or three to it's life. I also went ahead and glued a circle of inner tube to the end cap figuring it'll help it's life especially since it's the thinner cap. I need to come up with some more pvc pipe...I may just bite the bullet and buy a 20' stick of it and sell back part of it to Southern Pipe.
Game plan is to have a load tumbling in the Money Pit when I leave work Christmas Eve.
|
|
Intheswamp
Cave Dweller
Member since September 2015
Posts: 1,910
|
Post by Intheswamp on Dec 22, 2015 18:36:31 GMT -5
It's ALIVE!!!!!! Well, the Money Pit Tumbler is rolling rocks as we speak!!!! Here's the scoop... I measured the barrel capacity by filling it with water (two gallon milk jugs full...more or less) so drawing on the knowledge I gained from the advanced ciphering courses I took along with the Evelyn Woodhead Sped Reddin' courses I figured 75% full would be a jug and a half of rocks (how ya like that measurement captbob ...you're gonna love the other ones!!! ). A jug and a half of the tumble sized rocks weighed in at 16 pounds. I added to this one large drink cup from Hardees (NASA instrument approved) of the small fillers that I bought at Lowes...these weighed in at 3.6 pounds wet for a total of 19.6 pounds of rocks. As I filled the barrel I tilted it at a 45-degree or sharper angle to lessen chance of rocks busting each other up. I would put in a couple of handfuls of rough, add a handful of filler and top that with several tablespoonfuls of Kingsley's #80 grit...rinse, repeat...so a pretty good mix throughout. Ended up with 20 healthy tablespoons of #80 grit in the barrel. To this I scientifically ciphered that the Hardees cup looked about right to hold the amount of water I needed...glug, glug, glug...done!!! I then tightened the reinforced rubber capt to the mouth of the barrel and set it on the tumbler. After some experimenting to see which way the barrel was going to travel I got the proper end (pvc cap end) positioned so that it would move up against one of the stand-off rollers. All seems well. The one thing that I have determined so far.....that pvc barrel is LOUD!!!!!! I did line the pvc end cap with inner tube rubber and also I reinforced the rubber cap with the inner tube rubber, but I did not line the barrel. I've got it in my shop at work right now, but I'm seriously considering moving it to an unused room in the back of the building (I'll have to run some electricity in there)...the century-old air compressor is loud enough itself, I don't need to add to the din. The next big barrel *will* be lined with inner tube material!!! Summation: 16 pounds of rough 3.6 pounds (one large plastic Hardees drink cup) of wet filler (Lowes pea gravel) 20 healthy tablespoons of Kingleys #80 grit 1 large palstic Hardees drink cup of water I put the Watts-Up meter inline with the tumbler and it is showing using 2.05 amps with the 20 pound load of rocks (I don't know how much the barrel weighs...I'd think ten to fifteen pounds. jamesp how much do you think it weighs? It's rolling at 46rpm. Anyhow, we're making noise, er, I mean tumbling with the Money Pit!!!!!!!!!!! 16 pounds of rough...quartzite, quartz, pet wood, ? 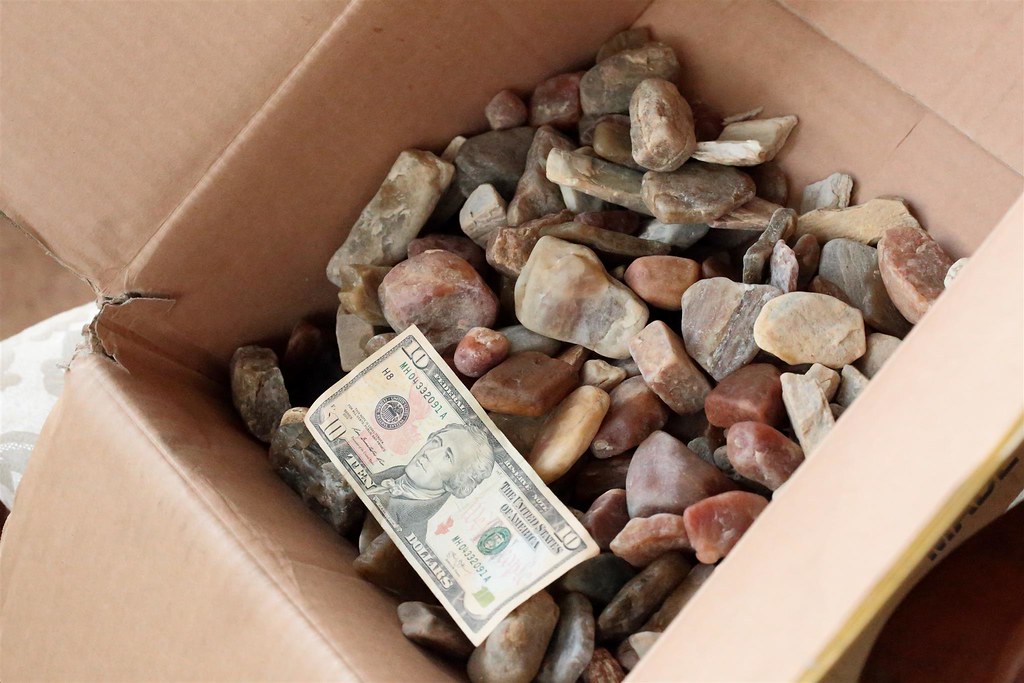 IMG_9461a (Custom) IMG_9461a (Custom) by Intheswamp, on Flickr A high-tech NASA certified measuring device filled with the Lowe's filler...  IMG_9463aJPG (Custom) IMG_9463aJPG (Custom) by Intheswamp, on Flickr A close-up of the filler (for what it's worth )... 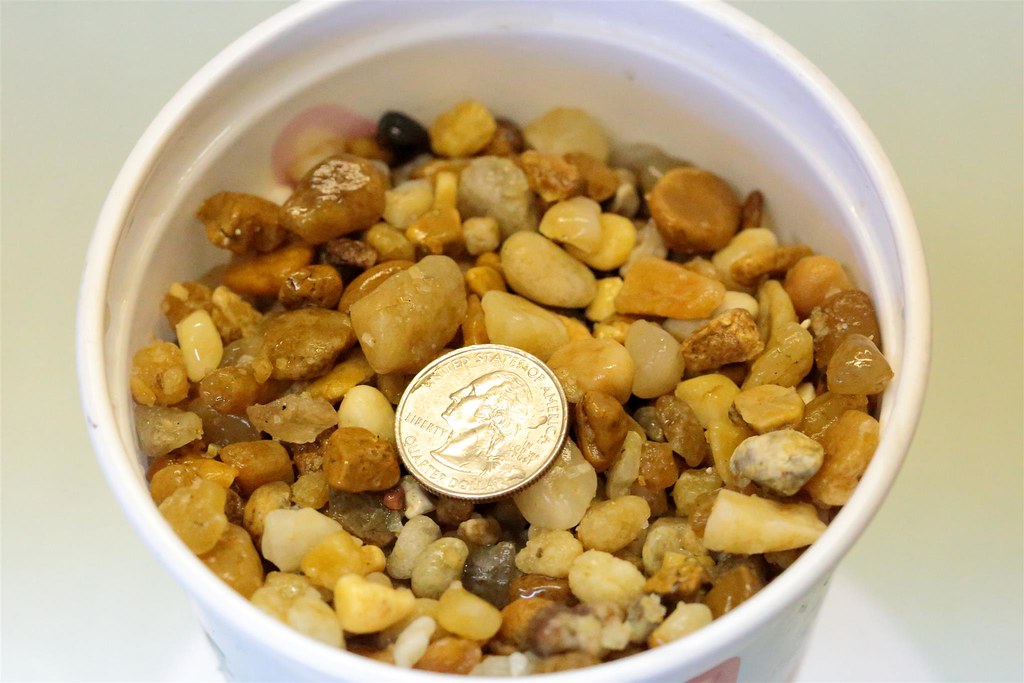 IMG_9464a (Custom) IMG_9464a (Custom) by Intheswamp, on Flickr |
|


 I wonder if I want to wed my good ($25)bushing/coupler assembly to this slightly thinner cap/pipe assembly? I cut the pipe to basically give me a ~15# barrel (at 75% capacity). So, if that slightly thinner cap wears through prematurely (I really think it'll last a long time) I can cut the cap off (shortens the barrel three inches) and glue a heavier cap on it...which would still yield over 8# of coarse tumbled rocks.


