Wooferhound
Cave Dweller  Lortone QT66 and 3A
Member since December 2016
Posts: 1,426 
|
Post by Wooferhound on Nov 26, 2018 16:26:08 GMT -5
It took a few minutes to load because there are so many 3 GB pictures
|
|
Wooferhound
Cave Dweller
Lortone QT66 and 3A
Member since December 2016
Posts: 1,426
|
Post by Wooferhound on Nov 26, 2018 12:20:58 GMT -5
You should design Grit Recovery into a cleanout sink.
|
|
Wooferhound
Cave Dweller
Lortone QT66 and 3A
Member since December 2016
Posts: 1,426
|
Post by Wooferhound on Nov 25, 2018 21:06:30 GMT -5
I have only used Cerium Oxide polish in the 2 years that I have been tumbling and have always had great results. With the barrel 80% full and using 1/3 volume of plastic beads, I could get a good polish in 3 days but would always let it run for a whole week. A couple of types of rocks got a Matt Shine using CO and I plan to try and polish them again later in AO
I just got an order from Rock Shed with some Aluminum Oxide like y'all have bee recommending all the time. I did polish some rocks with AO 80 once but they ran for 3 weeks in it. A couple of types of rocks got a Matt Shine using CO and I plan to try and polish them again later in AO.
|
|
Wooferhound
Cave Dweller
Lortone QT66 and 3A
Member since December 2016
Posts: 1,426
|
Post by Wooferhound on Nov 22, 2018 13:16:10 GMT -5
And a cute little tabletop kiln in there too . . .
|
|
Wooferhound
Cave Dweller
Lortone QT66 and 3A
Member since December 2016
Posts: 1,426
|
Post by Wooferhound on Nov 21, 2018 18:52:27 GMT -5
Here is a video about making Photochromatic glass (changes brightness with light intensity). Contains huge information about making glass from scratch using Rock Tumblers to mix the ingredients . . .
|
|
Wooferhound
Cave Dweller
Lortone QT66 and 3A
Member since December 2016
Posts: 1,426
|
Post by Wooferhound on Nov 19, 2018 16:50:17 GMT -5
I would believe that the Vibe Tumbler needs to be bolted to a Mass (cement block) to have something to work against to push the rocks around. But these Isolators would be used between the Mass (cement block) and the table to help prevent the vibration from transfering and reduce the noise. Low frequency vibrations like these will transfer a long way if you don't try to control it. Plus a large flat surface like a countertop will amplify the vibration like a drum. Carpet Pad works well as a Vibration Isolator.
|
|
Wooferhound
Cave Dweller
Lortone QT66 and 3A
Member since December 2016
Posts: 1,426
|
Post by Wooferhound on Nov 19, 2018 9:05:54 GMT -5
Mount the Vibe down with Vibration Isolators
|
|
Wooferhound
Cave Dweller
Lortone QT66 and 3A
Member since December 2016
Posts: 1,426
|
Post by Wooferhound on Oct 30, 2018 15:34:14 GMT -5
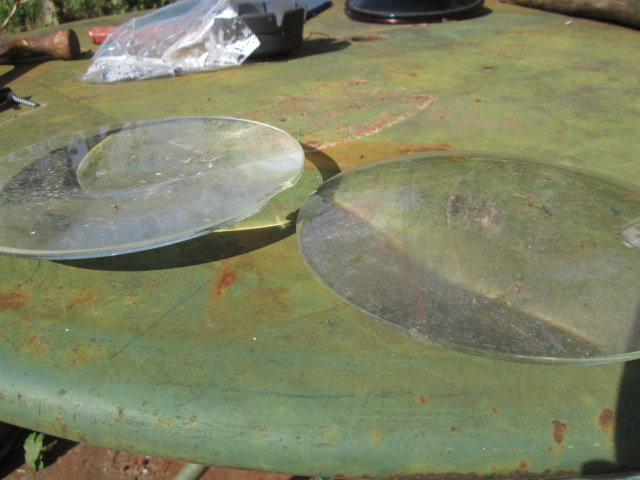
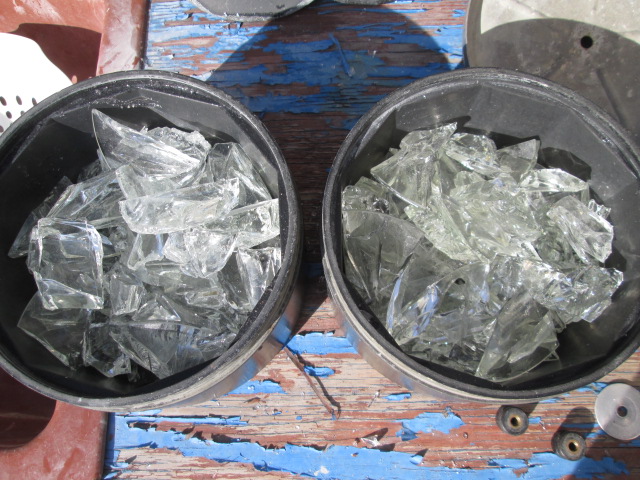
I started my third batch of theater lighting glass today.
These lighting lenses are much thicker than the glass that I had been tumbling before. Clear and smooth. Flat on one side, curved on the otherside.
The lenses were placed into a Freezer Bag and pounded with a chisel to make the squarest chunks possible then loaded it all into both barrels of my QT66 tumbler for at least a week rolling in 30 grit with slurry starter.
|
|
Wooferhound
Cave Dweller
Lortone QT66 and 3A
Member since December 2016
Posts: 1,426
|
Post by Wooferhound on Oct 29, 2018 7:43:07 GMT -5
Some pink Cerium Oxide came in the first Grit Kit that I ever ordered. It worked so good that it is the only polish that I have used in my 2 years of tumbling. Gets a pretty good shine in 3 days and a super shine after a week rolling in a full QT66 tumbler with half plastic beads. and you don't need to use very much either, 2 or 3 tablespoons in a 6 pound barrel.
|
|
Wooferhound
Cave Dweller
Lortone QT66 and 3A
Member since December 2016
Posts: 1,426
|
Post by Wooferhound on Oct 24, 2018 17:04:16 GMT -5
Hot Melt Glue is your friend
|
|
Wooferhound
Cave Dweller
Lortone QT66 and 3A
Member since December 2016
Posts: 1,426
|
Post by Wooferhound on Oct 23, 2018 21:40:53 GMT -5
|
|
Wooferhound
Cave Dweller
Lortone QT66 and 3A
Member since December 2016
Posts: 1,426
|
Post by Wooferhound on Oct 8, 2018 8:53:37 GMT -5
I think it would be hugely interesting to cut a slab horizontally instead of vertically to create a radial circular pattern. Also for backlight photography that eliminates the Light Source, look for "Darkfield Illumination". This will allow you to make backlit photos with a Black Background.
|
|
Wooferhound
Cave Dweller
Lortone QT66 and 3A
Member since December 2016
Posts: 1,426
|
Post by Wooferhound on Sept 28, 2018 11:59:51 GMT -5
I got my first tumbler on Christmas Eve 2 years ago and had it rolling that night. I've had a tumbler running nonstop during that time. Did cleanouts weekly without fail. Been having too much fun and enjoy this forum intensely.
But now I have 50 pounds of polished rocks and my wife groans everytime a new batch comes out of polish. My smaller 3A tumbler has not been plugged in for months. I did a cleanout today after 4 weeks rolling in stage-1. Haven't done much collecting lately, mostly easy to get landscaping stones.
I'm thinking that if I had a way to use or sell the rocks that the interest could be stronger again ?
|
|
Wooferhound
Cave Dweller
Lortone QT66 and 3A
Member since December 2016
Posts: 1,426
|
Post by Wooferhound on Sept 18, 2018 20:19:31 GMT -5
You don't need filter material, just use the different White Balance settings on your camera. It looks like you have it set to AUTO because that light looks several different colors in all the pictures. You should not use the Auto setting and lock it to Daylight or Incandescent so that the camera does not try to Color Correct based on the color of the material you are photographing. Try all the White Balance settings and use the one that gives you the truest colors. Another thing is to blackout the areas of the light that does not have your glass on it. The areas of Uncovered light will cause the camera to under expose your subject.
Excellent advise woofer. The uncovered areas does freak out the light sensor AND throws glare badly. Photos with a high end iPad and I need to educate myself on adjusting white balance, no problem with the DSLR. To my surprise the darn box the LED skylight light came in did post wavelength at 4000, nice to know datum for WB adjustments. Thanks for the tips. White Balance settings include: Sun, Incandescent, several Florescent, Cloudy, Metal Halide and other such light sources. The 4000 figure for your light is called Color Temperature (not wavelength) and is directly related to White Balance.
2700 - standard orange looking incandescent 3000 - Warm white incandescent 4000 - Cool White 5000 - Natural Sunlight (12 noon)
6000+ Bluer sunlight (when the sky seems Exceptionally Blue) The lower the number, the more orange the light is. Higher numbers indicate more Blue light.
Anything higher than 6000 is unnatural blue sunlight Take a different picture using all the white balance settings (make notes), View the photos and look for the Truest Colors, the WB setting that you used for that photo should be the setting you use everytime that you use that Light Source
I never use AUTO White Balance because you never know what setting the camera will choose for you. But then you need to set it every time based on what you see. Note that your computer Monitor will never display the total colors that humans can see.
My job is Theatrical Lighting and I'm big in photography, so I do this everyday. I have to Color correct my lighting to work for photography, and I Color Correct my photography based on the Light Source. It may not be so easy for folks that don't know much about Color Correction.
Next weeks lesson ... Exposure Settings . . .
|
|
Wooferhound
Cave Dweller
Lortone QT66 and 3A
Member since December 2016
Posts: 1,426
|
Post by Wooferhound on Sept 17, 2018 16:10:04 GMT -5
You don't need filter material, just use the different White Balance settings on your camera. It looks like you have it set to AUTO because that light looks several different colors in all the pictures. You should not use the Auto setting and lock it to Daylight or Incandescent so that the camera does not try to Color Correct based on the color of the material you are photographing. Try all the White Balance settings and use the one that gives you the truest colors.
Another thing is to blackout the areas of the light that does not have your glass on it. The areas of Uncovered light will cause the camera to under expose your subject.
|
|
Wooferhound
Cave Dweller
Lortone QT66 and 3A
Member since December 2016
Posts: 1,426
|
Post by Wooferhound on Sept 17, 2018 7:27:15 GMT -5
I've come across two articles relating to the amount of water to add to my tumbler, one says just to add enough to cover the rocks and the other article says to only fill the tumbler to 1 inch below the rocks. Less Water is Faster Grinding More water is Slower Grinding It's your choice . . .
|
|
Wooferhound
Cave Dweller
Lortone QT66 and 3A
Member since December 2016
Posts: 1,426
|
Post by Wooferhound on Sept 16, 2018 19:44:08 GMT -5
Personally in stage 1, I use 3/4 cup grit in each of my two 6 pound barrels and get great results. But in cleanout, I have a grit recovery system that saves anything bigger than 500 grit.
|
|
Wooferhound
Cave Dweller
Lortone QT66 and 3A
Member since December 2016
Posts: 1,426
|
Post by Wooferhound on Sept 16, 2018 17:55:31 GMT -5
More grit is faster grinding
Less grit is slower grinding
It's your choice . . .
|
|
Wooferhound
Cave Dweller
Lortone QT66 and 3A
Member since December 2016
Posts: 1,426
|
Post by Wooferhound on Sept 9, 2018 14:09:07 GMT -5
I sell on eBay fairly frequently, but I know how much I want for the items and always post good deals. I don't play games accept offers, but I have a hard time telling eBay that. The Offer check box is hard to find or labeled funny. I always state in the description that I Do Not Accept Offers.
Last month I offered $325 for a $350 item and was accepted.
|
|
Wooferhound
Cave Dweller
Lortone QT66 and 3A
Member since December 2016
Posts: 1,426
|
Post by Wooferhound on Sept 7, 2018 13:00:33 GMT -5
Three years ago I was planning to move to a different house, so I had disassembled my Solar Power System and stored it in the shed that the gear had been setup around. So it's been 3 years and I am realizing that I am staying here in this house, and now I am putting everything back up. The old system was arranged around a shed that was at the opposite end of the house from the location that I was actually using the power at my computer desk in the living room. The wire to carry the power from the batteries was over 110 feet long. I have re-purposed this wire to carry AC power for the computer and entertainment system. The decision was made to move the Solar Power to the other side of the house so I don't need to run another long expensive wire along the house. The main power wire will be less than 20 feet long in this rebuild. I'm already pretty far along with this project and I may be using some power from it in a few days.  The Solar Panels were originally mounted on the shed on the lefthand side of this picture. Charge control and the batteries were inside the shed and there were four 12 gauge wires going all the way across the back of the house to my computer desk on the lower righthand side of the place. I'm not sure why I did it that way instead of what I am doing now as everything is much simpler this time.  Everything is now on the side of the house. I'm in the middle of a large neighborhood so the system is between two houses facing directly South. The main power cable to the Point Of Use will be less than 20 feet long this time compared to 110 feet from the shed.  I had to spend half a day clearing this area, not used at all, only go there to cut the grass. Placed brick on the ground to help keep the wood dry then built the cabinet on top. This is everything so far, and at this point it's a stand-alone 12 volt battery charger. There will be some doors added to the front openings. In this location it does not get full Sun till 10:30am because of a nearby Crepe Myrtle tree that really needs a good trimming. The tilt of the panels is easy to adjust, but think I'll set it on the Fall Equinox September 22 and leave it there year round as these Amorphous panels don't seem to be sensitive to angle very much. There will be 4 more solar panels added on each side of the fence to help get more Sun in the morning and evening. Might be mildly concerned about theft since it's on the ground now.  The electrics are inside the cabinet. Two Trojan T-105 batteries are inside the picnic cooler providing 12 volts at 225 amphours. The cooler is propped open for Summer ventilation. The cabinet itself has plenty of airflow. I made all of the electronics from scratch. The box on the left provides fused inputs and outputs to the battery. Center box is a power combiner with ten 4 amp solar inputs, Two 10 amp 50 volt bridge rectifier inputs and a 10 amp 1000 volt bridge rectifier input. Righthand box is Charge control using a 2 stage Dumpload controller which is capable of about 300 watts of dumping into some 10 ohm resisters. Still need to put a hole through the cement block on the house to get a wire through to a power distribution box so I can actually use some of that power. At this time I have 150 watts of panels and this system is designed to provide 12 DC power and I use the power that way. Everything runs on 12 volts. Radio, TV, Lights, Fan, Modem, Router,Phone Charger, Laptop, Etc. I have a 400 watt inverter available for the refrigerator in case of a power outage. I expect that I save about $3.oo a month on my electric bill, but when the power goes out it is priceless. If you want more detailed information about the components you can visit this link to the previous installation of this system in the shed. Or you can ask anything you would like about this system. timmythy.home.mindspring.com/re-power.htm |
|


 Drifting along with the tumblin' tumbleweeds
