Post by Deleted on Aug 28, 2009 12:17:24 GMT -5
Of all of the lapidary projects I have done, doublets & triplets are my absolute favorite. When done properly, they can be fairly time consuming but are very rewarding in the end. Recently, I have had a number of requests for a tutorial. The following is a step by step guide to how "I" make them. There are different methods but this will give you the basic idea.
WHAT IS THE PURPOSE OF DOUBLETS & TRIPLETS?
#1 When you have a valuable/rare material that is too thin to cab and yet you do not want to waste it/scrap it. For instance, a very thin, but brilliant piece of Spencer Opal. In this case, you would sandwich the opal in between a sturdy back piece and an optical quartz cap. This would protect the fragile opal but still allow you to see the flash through the optical quartz. This would be called a triplet, as it has three pieces of material.
#2 When you have inclusions set in a clear agate base that you would like to highlight further. For instance, a white plume with a piece of dark colored material behind it suddenly "pops" out at you in a very three dimensional manner. This would be called a doublet, as it has two pieces of material.
MATERIAL SELECTION
BACK PIECE
The back of your doublet or triplet can really be any material you choose. It should be sturdy though, not real soft. The point of this piece is to provide stability and also be of a color that will highlight the main material of your project. For example, If I am making a white plume doublet, I will usually put a dark or black colored material behind it. A common material used is basanite.
MAIN MATERIAL (FOCAL POINT)
The material you are wanting to highlight will either go on top (doublet) or in the middle (triplet). Either way, this piece must be thin. REALLY IMPORTANT: The material you choose must have a very clear base color. If the base is cloudy, milky, etc. Your backpiece will not show through, which defeats the purpose entirely. This is also why its important for it to be sliced thin. The thinner you cut and cab it, the more the inclusions will show up and the back piece will show through.
OPTICAL QUARTZ
Optical quartz is used as a "cap" or top on a triplet. This material is perfectly transparent so that your main piece will show through.
TUTORIAL
Ok folks, so here we go. In this tutorial I am making a triplet. My back piece is basanite. The focal point is a piece of brilliantly colored red moss agate. The cap is optical quartz.


The moss agate was sliced very thin on my trim saw. A ruler to show you just how thin.


IMPORTANT! Your slices MUST be flat lapped on any surface that will be epoxied. Dont just assume your pieces are "flat enough". Without the lapping, the multiple pieces will not adhere well. Also, the epoxy will collect in the uneven spots and will spoil the look of the cab when finished (thicker spots of glue could show up as dimples/bubbles etc).
Since Dennis has the Ameritool flat lap, I had him smooth out my slices for me. He was in a panic thinking he was going to break the moss agate, can you tell? LOL


You can already see how a contrasting colored back piece can really highlight inclusions.

Now, all of our pieces have been lapped, and they are ready to assemble. I generally try to grind out the preforms prior to gluing. Or at the very least, I use tile nippers to get the general shape. I do this rather than gluing slabs and then cutting and rough grinding as I figure it is less stress on the assembled pieces.

To assemble the pieces, you will need the following: Acetone for cleaning the slices prior to gluing. Epoxy 330 for gluing the slices together, something to mix the epoxy on ( I used a little square of foil), something for stirring and applying the epoxy ( I used a kabob skewer), paper towels for cleaning excess epoxy and for padding in between the materials and a vice, and a small vice or clamps.


1. Clean the slices with acetone. Make sure your hands are free of skin oils as well and try to NOT touch the slices any more than you have to.
2. Mix a small amount of epoxy 330 according to instructions. With this product, you have about 15 minutes before its starts to set. You could use other types of glues. I just use this one because I know it dries clear.
When mixing, try not to produce small bubbles as these could affect the look of the cab. Stir very slowly.
3. Apply a thin layer of epoxy to the back piece, on the lapped surface. Spread the epoxy so as not to produce bubbles.
4. Add your main "focal" piece to the back piece. I have found that the less "sliding" that you do with the pieces, the less change of having bubbles or other imperfections in the finished cab. Place one end of the slice on the back piece so that it is sitting vertical, then slowly lower the slab onto the other piece, without sliding.
If you are working with a doublet, this step would be done. In the case of a triplet, you now have to repeat the above steps with your optical quartz cap. That means that you should have flat lapped BOTH sides of your main piece.
What you end up with, should look like this:


I then wrap the pieces in a paper towel and put them in some sort of vice or clamp. Do not apply to much pressure or your could break the thin delicate pieces! Just enough pressure to hold them together and force any excess epoxy out. Check frequently until the epoxy sets, in case the pieces have slid around. I generally leave mine to sit like this overnight.


Once dry, you can start cabbing as you normally would. The only thing to be careful of, is that you do not grind completely through your cap and into the middle piece (if you are doing a triplet). Also, if you are making a doublet, you will want to cab the top piece as thin as possible. The thinner it is, the more you will see the contrasting colored back piece.


See how thin the optical quartz is being cabbed?

This one isnt completely finished, as I wanted to get the tutorial to you all ASAP. But this gives you the general idea.

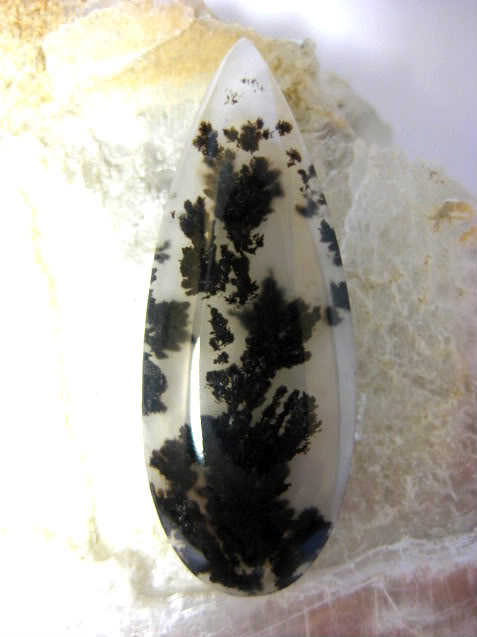
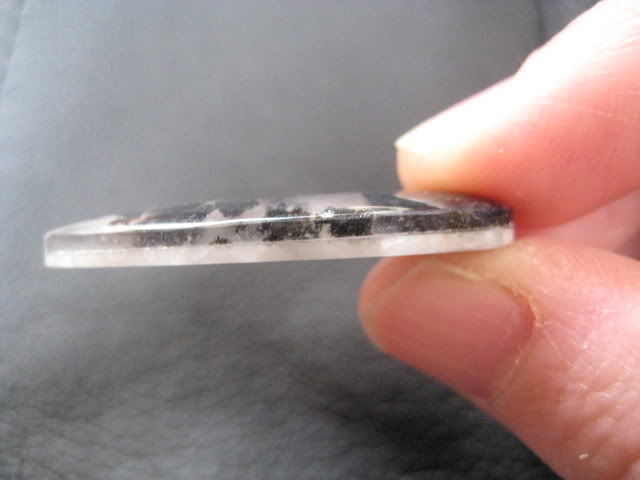
And here is a doublet I previously posted. This was the one my sister wore at here wedding. Black plume agate with a quartz back piece.


I hope you enjoyed this tutorial and I hope it helps someone when it comes time to make an assembled cab. Enjoy!
Shannon
WHAT IS THE PURPOSE OF DOUBLETS & TRIPLETS?
#1 When you have a valuable/rare material that is too thin to cab and yet you do not want to waste it/scrap it. For instance, a very thin, but brilliant piece of Spencer Opal. In this case, you would sandwich the opal in between a sturdy back piece and an optical quartz cap. This would protect the fragile opal but still allow you to see the flash through the optical quartz. This would be called a triplet, as it has three pieces of material.
#2 When you have inclusions set in a clear agate base that you would like to highlight further. For instance, a white plume with a piece of dark colored material behind it suddenly "pops" out at you in a very three dimensional manner. This would be called a doublet, as it has two pieces of material.
MATERIAL SELECTION
BACK PIECE
The back of your doublet or triplet can really be any material you choose. It should be sturdy though, not real soft. The point of this piece is to provide stability and also be of a color that will highlight the main material of your project. For example, If I am making a white plume doublet, I will usually put a dark or black colored material behind it. A common material used is basanite.
MAIN MATERIAL (FOCAL POINT)
The material you are wanting to highlight will either go on top (doublet) or in the middle (triplet). Either way, this piece must be thin. REALLY IMPORTANT: The material you choose must have a very clear base color. If the base is cloudy, milky, etc. Your backpiece will not show through, which defeats the purpose entirely. This is also why its important for it to be sliced thin. The thinner you cut and cab it, the more the inclusions will show up and the back piece will show through.
OPTICAL QUARTZ
Optical quartz is used as a "cap" or top on a triplet. This material is perfectly transparent so that your main piece will show through.
TUTORIAL
Ok folks, so here we go. In this tutorial I am making a triplet. My back piece is basanite. The focal point is a piece of brilliantly colored red moss agate. The cap is optical quartz.


The moss agate was sliced very thin on my trim saw. A ruler to show you just how thin.


IMPORTANT! Your slices MUST be flat lapped on any surface that will be epoxied. Dont just assume your pieces are "flat enough". Without the lapping, the multiple pieces will not adhere well. Also, the epoxy will collect in the uneven spots and will spoil the look of the cab when finished (thicker spots of glue could show up as dimples/bubbles etc).
Since Dennis has the Ameritool flat lap, I had him smooth out my slices for me. He was in a panic thinking he was going to break the moss agate, can you tell? LOL


You can already see how a contrasting colored back piece can really highlight inclusions.

Now, all of our pieces have been lapped, and they are ready to assemble. I generally try to grind out the preforms prior to gluing. Or at the very least, I use tile nippers to get the general shape. I do this rather than gluing slabs and then cutting and rough grinding as I figure it is less stress on the assembled pieces.

To assemble the pieces, you will need the following: Acetone for cleaning the slices prior to gluing. Epoxy 330 for gluing the slices together, something to mix the epoxy on ( I used a little square of foil), something for stirring and applying the epoxy ( I used a kabob skewer), paper towels for cleaning excess epoxy and for padding in between the materials and a vice, and a small vice or clamps.


1. Clean the slices with acetone. Make sure your hands are free of skin oils as well and try to NOT touch the slices any more than you have to.
2. Mix a small amount of epoxy 330 according to instructions. With this product, you have about 15 minutes before its starts to set. You could use other types of glues. I just use this one because I know it dries clear.
When mixing, try not to produce small bubbles as these could affect the look of the cab. Stir very slowly.
3. Apply a thin layer of epoxy to the back piece, on the lapped surface. Spread the epoxy so as not to produce bubbles.
4. Add your main "focal" piece to the back piece. I have found that the less "sliding" that you do with the pieces, the less change of having bubbles or other imperfections in the finished cab. Place one end of the slice on the back piece so that it is sitting vertical, then slowly lower the slab onto the other piece, without sliding.
If you are working with a doublet, this step would be done. In the case of a triplet, you now have to repeat the above steps with your optical quartz cap. That means that you should have flat lapped BOTH sides of your main piece.
What you end up with, should look like this:


I then wrap the pieces in a paper towel and put them in some sort of vice or clamp. Do not apply to much pressure or your could break the thin delicate pieces! Just enough pressure to hold them together and force any excess epoxy out. Check frequently until the epoxy sets, in case the pieces have slid around. I generally leave mine to sit like this overnight.


Once dry, you can start cabbing as you normally would. The only thing to be careful of, is that you do not grind completely through your cap and into the middle piece (if you are doing a triplet). Also, if you are making a doublet, you will want to cab the top piece as thin as possible. The thinner it is, the more you will see the contrasting colored back piece.


See how thin the optical quartz is being cabbed?

This one isnt completely finished, as I wanted to get the tutorial to you all ASAP. But this gives you the general idea.

And here is a doublet I previously posted. This was the one my sister wore at here wedding. Black plume agate with a quartz back piece.


I hope you enjoyed this tutorial and I hope it helps someone when it comes time to make an assembled cab. Enjoy!
Shannon


