quartz
Cave Dweller  breakin' rocks in the hot sun
Member since February 2010
Posts: 3,341
|
Post by quartz on Oct 18, 2011 22:50:52 GMT -5
VERY NICE BUILD, my compliments.
|
|
geomorph
starting to shine!

Member since May 2011
Posts: 28
|
Post by geomorph on Oct 19, 2011 22:36:56 GMT -5
Awesome grinder Tyler! Nice work. Nate Thanks Nate. So far so good! |
|
geomorph
starting to shine!
Member since May 2011
Posts: 28
|
Post by geomorph on Oct 19, 2011 22:38:41 GMT -5
Totally awesome homemade rig! That bad boy looks like it would just crank out cabs like their's no tomorrow. Can't wait to see some works of art come off this schizzling rig! I have already blasted through a bunch of geodes that I had been waiting to grind and polish. I have also done several pieces of incredible wood from the Blue Forest in Wyoming. This machine makes short work of everything. I love it. |
|
geomorph
starting to shine!
Member since May 2011
Posts: 28
|
Post by geomorph on Oct 19, 2011 22:39:10 GMT -5
VERY NICE BUILD, my compliments. Thanks Quartz. |
|
mia
starting to spend too much on rocks
 As you travel on thru life, whatever be your goal. Keep your eye upon the donut, not upon the hole.
Member since January 2011
Posts: 150
|
Post by mia on Oct 19, 2011 23:55:50 GMT -5
Amazing! Very professional looking, should give you years of satisfaction! I wish mine was that big!
|
|
|
|
Post by christopherl1234 on Oct 20, 2011 0:03:12 GMT -5
Pretty sweet set up. Will you please share more on how you fabricated the hoods? Specifically did you use any type of form, relief cuts, did you use any glue or silicone? Your hood look really clean. I had Mike machine me a shaft earlier this year and I will need to make trays and a hood for it so any information would be very helpful when the time come for me to put my machine together. Thank you
|
|
geomorph
starting to shine!
Member since May 2011
Posts: 28
|
Post by geomorph on Oct 20, 2011 1:01:30 GMT -5
Pretty sweet set up. Will you please share more on how you fabricated the hoods? Specifically did you use any type of form, relief cuts, did you use any glue or silicone? Your hood look really clean. I had Mike machine me a shaft earlier this year and I will need to make trays and a hood for it so any information would be very helpful when the time come for me to put my machine together. Thank you Thanks for your interest Christopher. Bonding the Lexan is a breeze, as long as you have the correct solvent adhesive. It is a clear liquid that is applied with a hypodermic syringe. The result is basically a weld that creates a single piece. It is nearly instantaneous. I just determined some dimensions that I thought would work by holding the tape measure up to the wheel on the shaft and bending it to the form I wanted. I then read the distances along the tape where my bends occurred. On the tops, for example, I cut a piece to the correct width (minus the thickness of the sides, which were added later), then I drew lines at 5" and 12" from the front lip. I clamped the piece, on the 5" line, between two straight boards and heated the Lexan on the side toward the front lip until it was soft enough to bend. I just eyeballed the angle on the first one. It is something substantially less than 90 degrees. If you miss, it is easy to heat it a little bit more so that you can adjust the angle. I repeated the same procedure at the 12" line, but heated the side away from the front lip to make sure that the top dimension was wide enough to avoid touching the wheel. This second angle was a full 90 degree bend. After the tops are bent, I just welded the sides on and trimmed away the excess material. It makes a nice box. I am vacationing in Moab, Utah for a couple of days. When I get back I will take more photos to show how the boxes are fitted together. Perhaps my explanation will make more sense when accompanied by a few pics. Cheers, Tyler |
|
bentiron
noticing nice landscape pebbles

Member since September 2011
Posts: 85
|
Post by bentiron on Oct 24, 2011 16:43:53 GMT -5
Where did you get the shaft for your machine? For me that would be the biggest cost. I have a motor, wood and access to bearings but not to a shaft unless that is something one just buys from Grainger.
That is sure a beautiful machine that you built. :drool:
|
|
rocpup
spending too much on rocks
Pink Limb Iris
Member since March 2011
Posts: 465
|
Post by rocpup on Oct 28, 2011 14:36:50 GMT -5
Great project. There was a time when it was cheaper to buy the complete machine than to build one. In my opinion Diamond Pacific is pricing themselves right out of business. Although they have the rock machines to dream for. Don
|
|
zarguy
fully equipped rock polisher
 Cedar City, Utah - rockhound heaven!
Member since December 2005
Posts: 1,791
|
Post by zarguy on Nov 2, 2011 23:55:05 GMT -5
Tyler, awesome machine! It validates the ideas that went into my 10 wheel arbor.
If you get down south to Cedar City, drop by & I'll help you find some of the agate we have here. You may have to wait until spring though.
Lynn
|
|
jason12x12
freely admits to licking rocks

Member since October 2011
Posts: 798
|
Post by jason12x12 on Nov 3, 2011 3:06:39 GMT -5
big really nice machine!!probably 5 gal buckets fill too fast. When i cut water runs faster than i realize. Next thing i know im spillin again. I found my permanent magnet dayton half horse dc variable control at a garage sale for 15.00 and about tooted myself when i found out replacement cost.
|
|
geomorph
starting to shine!
Member since May 2011
Posts: 28
|
Post by geomorph on Nov 7, 2011 12:14:14 GMT -5
Where did you get the shaft for your machine? For me that would be the biggest cost. I have a motor, wood and access to bearings but not to a shaft unless that is something one just buys from Grainger. That is sure a beautiful machine that you built.  I just purchased 60 inches of cold-rolled steel from a local machine shop and had them tap the ends with 1/2 inch holes (reverse on left end). I also had them cut in a keyway for the pulley pin because I didn't want any slippage there. I think it cost me about $60 for the shaft, but it has been a while since I bought it and I could be remembering wrong. I know it wasn't too expensive. Cheers, Tyler |
|
geomorph
starting to shine!
Member since May 2011
Posts: 28
|
Post by geomorph on Nov 7, 2011 12:17:50 GMT -5
Tyler, awesome machine! It validates the ideas that went into my 10 wheel arbor. If you get down south to Cedar City, drop by & I'll help you find some of the agate we have here. You may have to wait until spring though. Lynn Thanks Lynn. Your info was very helpful. I might take you up on the collecting offer. Is that dendritic agate? On a side note, did I just buy a 20" Highland Park from your partner in Washington... perhaps? I think he said he collected with someone named Lynn from Cedar City. Just wondering. Cheers, Tyler |
|
geomorph
starting to shine!
Member since May 2011
Posts: 28
|
Post by geomorph on Nov 7, 2011 12:21:07 GMT -5
Great project. There was a time when it was cheaper to buy the complete machine than to build one. In my opinion Diamond Pacific is pricing themselves right out of business. Although they have the rock machines to dream for. Don I agree. I would put this machine up against anything out there. It is so nice to have room to work on a larger piece without grinding away my knuckles. I could easily fit more wheels on it, but will probably just add the 14000 and 50000 under the hoods, and then get some carving wheels for the sides, where it is easy to put them on and off. I like the space. Cheers, Tyler |
|
zarguy
fully equipped rock polisher
Cedar City, Utah - rockhound heaven!
Member since December 2005
Posts: 1,791
|
Post by zarguy on Nov 10, 2011 1:45:28 GMT -5
Tyler,
Small world! Yes, that saw belonged to my partner & me. I hope you enjoy it. Bruce said it cut very smoothly & was enjoying it's use until it was sold.
Lynn
|
|
zarguy
fully equipped rock polisher
Cedar City, Utah - rockhound heaven!
Member since December 2005
Posts: 1,791
|
Post by zarguy on Nov 23, 2011 0:40:00 GMT -5
Tyler, I'm in the process of building an 8" machine. It will have 8 wheels, with 4 hard wheels between a pair of bearings & two 3" wide expando drums on each end. I like your idea of supporting the ends of the shaft with bearings. Did you do anything different than me to compress all of the spacers & wheels? Can you show us a detail picture of the bolts & spacers at the ends of the shaft. I want to see how you solved that issue. 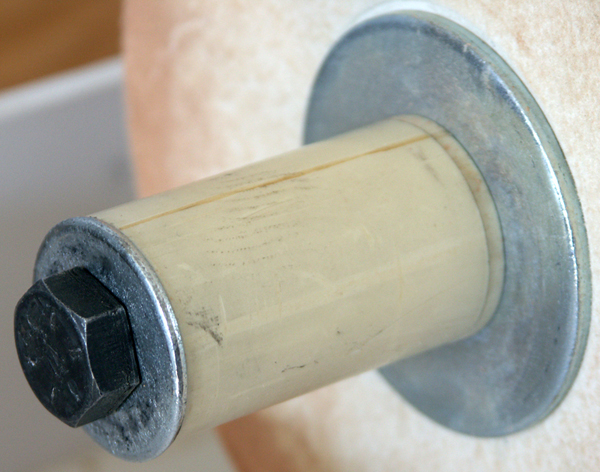 Lynn |
|
geomorph
starting to shine!
Member since May 2011
Posts: 28
|
Post by geomorph on Dec 19, 2011 11:59:21 GMT -5
Lynn,
Sorry for the slow response. I have been away for a while. I actually used collars between the bearings to compress and hold the wheels from spinning on the shaft. They are simple 1" collars with two set screws. I just use a pry bar to get enough pressure on the spacers and then tighten the collar screws. I thought it would be too difficult to tighten the entire stack at once, given the four bearings. This way, each space between bearings is independent of the others, at least as far as compression is concerned.
BTW - I sent you a private message with my contact info. Give me a call and we can talk about it.
|
|