|
|
Post by helens on Apr 23, 2012 0:13:06 GMT -5
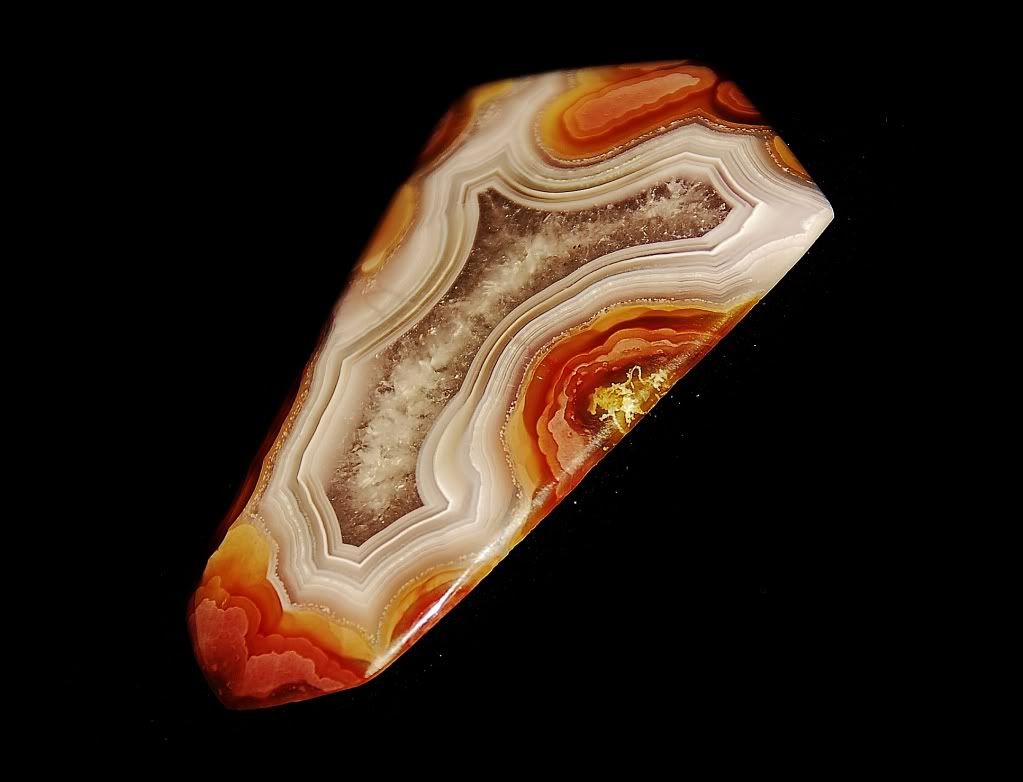
Polishing slabs had been something driving me nuts. I don't have a flat lap or a grinder, so I can't try any of the 'normal' methods. There's no way to display a slab without polishing, because you can't run and wet it to show anyone in your living room, or mount it on anything and then rewet either. So this was driving me nuts, and I think I found the perfect solution:)!!! 1. I hand sanded the slabs so they didn't have really obvious cut lines or lumps with 220 for about 1 minutes each, then washed and dried them very well. 2. Then I PAINTED them with an epoxy that is basically the same as Hyxtal, but a LOT cheaper, because I found the chemical manufacturer, ha! I will probably get sued if I say what it is, so I'm not going to. But this should work with ANY epoxy, and of course, Hyxtal. 3. After painting it with epoxy, I WIPED IT OFF immediately. This way, there was no ugly paint lines, or overly thick piece of plastic looking coating on the slab. It looks FANTASTIC!!! First, the giant mess I made today:  Here's Front - painted and back - unpainted on Dan's Rolling Hill Dolomite: 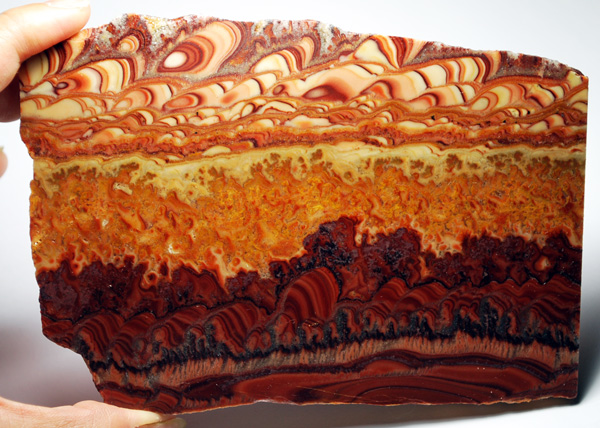  Front and Back on Dan's unusual WildHorse Jasper (he said this was a rare piece that came out of the mine - look at the crazy waves!):   Closeup detail of Dan's Mexican Lace Agate, front and back (unpainted):   Whole painted piece:  Here's a piece of I THINK Snakeskin jasper (NOOO idea) from Paul's 'odd pieces'. This is GORGEOUS when wet, and after tumbling... it lost shape, got a bit undercut, and simply could not polish completely after not one, but 2 tumble runs at the polish stage. It's beautiful stuff tho. unpainted, and after 2 tumbles (everything else in the tumbles were very shiny... only this wasn't):  Painted:  Tony's Picasso Marble painted:  Tony's Varigated Tigereye painted (note the velvety texture of NOT polishing it, yet got full chantoyancy and color:)):  I do NOT know if this will work with regular epoxy, but you can try it. It will work with Hyxtal. Nice thing about this is, it gives you full wet stone colors, you have the original stone texture, and wiping it off takes all the excessively 'fake shine' off that you'd have from painting something with epoxy. This is fantastic for druzy spots and plume too (as you can see from the closeup). Added benefit is that the epoxy is about the best stabilizer for cracks you can get, so if you want to cut and cab later, it's already stabilized:). After I've done a full range of testing, maybe I'll offer a coop for everyone to save money in a few weeks if anyone's interested (because I'm still swamped with my online class and need to catch up on glasswork first). This is hyxtal, not regular no UV epoxy or resin... no yellowing, will last almost as long as the rock itself. I'll post details if I do it. |
|
Deleted
Deleted Member
Member since January 1970
Posts: 0
|
Post by Deleted on Apr 23, 2012 8:04:49 GMT -5
hahahaha Whomever said "cheaters never prosper" did not see those. The rolling hills is awesome. I could see me using that to stabilize some of my slabs. I have had the idea that if I need to stabilize it is easier to just move on to the next rock because there so many others. NOW I realize that there are some rocks that I can not toss out because they have some fractures even though I have thousands of rocks.
There will probably be some purists that will say "oh my no, you should not do that and change the stone by chemical means" but what the hell "they are your rocks" and it looks soooo easy. When you get time for this coop let me know.
It is not the pink and black ring. hahaha
Jim
|
|
grayfingers
Cave Dweller 
Member since November 2007
Posts: 4,575 
|
Post by grayfingers on Apr 23, 2012 9:16:00 GMT -5
That looks really nice! I use spray polyurethane on conglomerate rocks that are not hard enough to polish. As long as the product used does not yellow, it is a great way to go. And, if someday you want to make something from the slabs you still can.
|
|
|
|
Post by helens on Apr 23, 2012 11:35:45 GMT -5
LOL! It's not cheating, Jim, not everyone and his mom has a full garage full of equipment!!! It's called finding a creative solution to a problem:). I couldn't solve my polish problem the way you guys can, I don't have the equipment. But I could solve it another way:).
Hand sanding slabs takes forever, and you don't get a great polish anyway til you get up to 14,000 grit, and while it's doable with a dremel... one slab is a huge amount of surface area and time to polish. This solution works, and as Gray said, you can still use the slab later.
I would not use spray polyurethane for the yellowing. I would not stabilize with store bought epoxy because of yellowing and longevity. Many years ago, I glued a Normal Rockwell plate with crazy glue, stuck back on the wall and forgot about it. Last year, the piece just fell off by itself!
You have any super old costume jewelry that was glued? It just falls off eventually. You know those pieces were glued with 'jewelry glue' or a strong craft glue. That's OK for a glue I guess, because you can always reglue, but stabilizing a piece and having it crumble or yellow is a bigger problem.
The reason Hxtal works so effectively is because it is UV protected and a very long polymer that doesn't break down as fast as other plastics. Epoxy is still the longest lasting glue.
I wouldn't do this with anything but UV protected Epoxy...
|
|
|
|
Post by deb193redux on Apr 23, 2012 11:46:35 GMT -5
Always nice to see rock again after it passes thorugh my hands. Glad you are enjoying them.
I think I would have also done a 600g before putting on the epoxy, but looks like you got good results.
|
|
|
|
Post by FrogAndBearCreations on Apr 23, 2012 11:54:51 GMT -5
you know that the stuff they sell in Home Depot to re-finish granite and marble counter tops might work well too!
|
|
|
|
Post by helens on Apr 23, 2012 12:11:02 GMT -5
Daniel... I am in LOVE with this rolling dolomite!!! Actually, I'm in love with most of the slabs you sent... you have exquisite taste in patterns and colors!!
Diane, I have granite in my house, and most of those 'granite finishes' will not actually give the 'wet' colors... soon as it dries, the original granite color is back:P. THIS stuff keeps the color! Also, those are not meant to last forever... it's not epoxy, and it will yellow. They are meant to be ground off and refinished every year or 2.
If I spend the time and money to matt and frame rocks... I am NOT remounting them in a year or 2, I want them to last decades or longer without yellowing or getting any brittle effects. So a bit more up front work with the right materials, and I can feel confident that I did the best I could to make it last.
The most comparable to this is windshield repair kit. You mix the 2 parts together, and smear it across the rock, it would work exactly the same, and you don't need the vaccum.
I wanted to mention something too... this isn't really polishing the slab. There is no mirror finish... it looks exactly as the slab looks, scratches, lumps, dents, holes and all... EXCEPT it's kept the color:). So this is not a substitute for a fully polished cab or carving ... any lumps and bumps or obvious knife marks will be visible through it... more visible even (see the top right corner of the varigated tiger eye... the rock had a sort of fuzzy finish from cutting... it's STILL got the fuzzy finish from cutting, just the wet colors).
Turned side to side, cut marks, gouges in the rock, saw marks are all visible (that's why I sanded first). Now that's because I wiped the rock off after painting it on... if you leave it thick to settle, it will take level out the uneven areas a bit... but then you have a sort of fake looking artificial shine, which is not that attractive, and can't really compare to a true polish.
Wiping it off gives you a very natural look, but you should still get the surface smooth before you do it. Think of this method as color preservation, not a true polish:). I wanted the surfaces to be a little matt, if I'm framing specimens, I like the option of putting them under glass, so I wanted a satiny finish that will show the piece no matter the lighting. Without a full polish, you will not get the colors to show up in your stone without wetting, and you can't display a piece that you have to wet for people to look at... so this was a great solution:).
|
|
|
|
Post by Pat on Apr 23, 2012 12:57:38 GMT -5
You can also use a bit of liquid dish washing soap with a bit of water and rub into the slab. Slab will stay wet for a long time, but not forever. Wipe on; wipe off.
Another way is to coat with Future liquid wax.
Your rolling hills is spectacular, but so are a few others!
|
|
unclestu
Cave Dweller
WINNER OF THE FIRST RTH KILLER CAB CONTEST UNCLESTU'S AGUA NUEVA AGATE
Member since April 2011
Posts: 2,298
|
Post by unclestu on Apr 23, 2012 13:44:40 GMT -5
Very nice result with those slabs. As far as the stabilization effect, to correctly stabilize your slabs you must first heat the slabs. Doing so draws the stabilizing agent deep into the slab filling all of the microscopic freactures. There are some great tutorials on this as well as the other forum that go into grest detail. This is a topical stabilization and if the stone should be in need of more extensive stabilization that might be hard to accomplishe as the stone has now been sealed.
Stu
|
|
|
|
Post by FrogAndBearCreations on Apr 23, 2012 13:50:42 GMT -5
Helen, have you tried to do a double coat on them?
I would think that after the first coat fully cures that a quick 2nd coat would give a bit more depth to them
|
|
|
|
Post by helens on Apr 23, 2012 14:17:41 GMT -5
Stu, you are right, I know heating the stone would help. These particular slabs are pretty hard, and don't really need stabilizing, I just wanted the wet color:). For stabilizing, heating the stone is the way to go, and there's a lot of directions online for this. I'm not sure how close this epoxy is to opticon, I will have to look into it... the key here is the longevity. Plastics/Polymers/Resins/Epoxy are not the same. I wonder how long Opticon has been in use for to know how long it stays stable for? I need LONG TERM stability because what I actually got this for was not rocks... it was for this:  -- ROUGH, unpolished opals set in glass. Because there are fake opals set into glass, I want matrix to show that these are real opals, and I didn't want to polish them:P. LOL! My glass will last eons, opals can last eons, I don't want some junky cheap glue that turns it all yellow because the amount used is so tiny anyway. Saving pennies here costs many dollars in the long run in lost reputation. This may not matter so much with slabs, but it will if it turns the slabs yellow or cloudy later. Diane, I got some paper toweling stuck on the Tony pieces when wiping (which I only saw from the pix! LOL!), so I sanded with a 2500 to get them off without damaging the finish too much. I'm going to apply a 2nd coat on those, and also do more slabs (Tony slabs this time, so you can see some of his owyhees too). I want to do all my jaspers first, then move to the odder ones, mostly because I have to hand sand them all a bit first (ALL saw marks show!!), and that's a time thing. But sanding to 220, or even as Daniel suggested 600, sure beats having to go all the way to 14,000 and spending longer and longer rubbing:)! I can only do a few at a time right now because of my time limitations, but I will definitely post the next batch for you to see:). Plus, I still need to show some of Christopher1234's gorgeous slabs, and I haven't done those yet:). |
|
Deleted
Deleted Member
Member since January 1970
Posts: 0
|
Post by Deleted on Apr 23, 2012 14:22:28 GMT -5
It is too cheating. You should have to pay for all the equipment like the rest of us. hahaha And, my shop is only seven feet by twelve feet, not a full garage, but it is part of the house so heating and cooling keeps me going year round. I will move into the garage when I start making tons of money. Yeah right, I can see that happening in my dreams.
How expensive is this stuff?
Jim
|
|
billg22
spending too much on rocks

Member since November 2011
Posts: 451
|
Post by billg22 on Apr 23, 2012 14:24:12 GMT -5
I need to try this idea.
|
|
|
|
Post by helens on Apr 23, 2012 14:35:30 GMT -5
Well Hxtal costs $50 for a finished 3.5 oz of epoxy (that's 2 oz of part A and 1.5 oz of part B). Windshield repair epoxy costs $10 for about 3 grams or so?
I can get this for roughly $6 / oz (not counting activator, but that doesn't count in the price anyway), but that's in a gallon, and I'd have to break it up into smaller bottles for a coop for RTH. That's why I'm not doing the coop just yet, I have to do a bunch of work (order bottles and product, make labels, write directions for use), and I do not have time yet.
I'm thinking with all costs, it should come out to around $15 or so for the exact same amount as the $50 Hxtal (2 oz main part, 1 oz activator), but I have to price everything first, plus shipping, so it might be a bit more, but even with repackaging, I don't think it will hit 1/2 the price of Hxtal. It may even be less than $15, depending on how cheap I can find bottles and shipping costs.
And there is NO shelf life, so long as the 2 parts are not combined, it will sit on a shelf indefinitely (but if it's cold, it might crystalize like honey... which you fix by just warming in hot water and stirring). Once combined, you have a rock. Also, you should wear rubber gloves, I found nothing to take this stuff off the hands, it doesn't seem to get dissolved by acetone, alcohol or soap and water. Mess clean up is drying and scraping/sanding it off:P. Also, you use a TINY amount at a time.
|
|
Fossilman
Cave Dweller
Member since January 2009
Posts: 20,709
|
Post by Fossilman on Apr 23, 2012 14:35:48 GMT -5
I'm in the process of sanding some petwood someone cut for me.They burned the wood or stained it!!I haven't any power equipment either....
This looks like a solution to my problem also........Thanks
|
|
|
|
Post by helens on Apr 23, 2012 14:40:43 GMT -5
Oh, and that's my objection to Opticon... reading that some people stored their opticon and it YELLOWED in the container in a year or 2. If it is yellowing while stored, what did it do to the rocks it was applied to? That's why I didn't seriously consider Opticon.
|
|
|
|
Post by helens on Apr 23, 2012 14:44:06 GMT -5
If you try to find something at Home Depot or anywhere else (EPOXY!) make sure you buy UV protected epoxy!!! (that's the cost right there). Plastics break down in UV, that's the nature of the beast. Think plastic garbage bags or plastic bottles after 10 years, even buried.
If you can find a UV protected 2-part EPOXY at a local store, post it for everyone please:). Super glue is NOT the same thing, it deteriorates in a few years too.
|
|
|
|
Post by helens on Apr 23, 2012 14:53:18 GMT -5
It is too cheating. You should have to pay for all the equipment like the rest of us. hahaha And, my shop is only seven feet by twelve feet, not a full garage, but it is part of the house so heating and cooling keeps me going year round. I will move into the garage when I start making tons of money. Yeah right, I can see that happening in my dreams. Jim Jim you crack me up:). Even if I paid for all the equipment you guys had, I would have to keep it running!!! So I have to think of new ways to do everything WITHOUT the heavy equipment:P. Now, when I figure out how to make a cab without a cabbing machine, will let you know too:P. heheh. |
|
unclestu
Cave Dweller
WINNER OF THE FIRST RTH KILLER CAB CONTEST UNCLESTU'S AGUA NUEVA AGATE
Member since April 2011
Posts: 2,298
|
Post by unclestu on Apr 23, 2012 17:56:52 GMT -5
Stu, you are right, I know heating the stone would help. These particular slabs are pretty hard, and don't really need stabilizing, I just wanted the wet color:). For stabilizing, heating the stone is the way to go, and there's a lot of directions online for this.
I just thought I would mention it because a nube would get the wrong idea from what you wrote because it was not entirely correct. In your post you wrote:
"Added benefit is that the epoxy is about the best stabilizer for cracks you can get, so if you want to cut and cab later, it's already stabilized:)."
I admire your ability to think out of the box and solve a problem with what material you have at your disposal.
Stu
|
|
|
|
Post by helens on Apr 25, 2012 0:33:33 GMT -5
Thanks Stu:). I painted some more slabs, and taking the time to show off some of Tony's owyhee slabs I got from him... WOW they are fantastic!!! If you need more owyhee, Tony still has some big beautiful slabs! He posted these in the buy/sell section some time ago, I just now am getting them fixed up:). I love these!! Also, I did more sanding... I went 220 grit, then 600 grit as Daniel recommended... I think it helped:). My favorite, it's not really an owyhee, it's a Nimbre Apache Rhyolite with an amazing picture that looks like a topo map:  All the below are Tony's Owyhees:   Back of above so you can see unpainted (which is still awsome... I may even like this side better)   My other favorite, this is the 'odd' one everyone thought was so neat... I thought it would be small, it's 5" x 6"!!  Back side:  There's a few more, but these are what I painted so far. For Diane, here's 2nd coat after 2500 sanding to get rid of all the paper towel lint I left on the first coat:  back, unpainted:  And the varigated tigereye w/ 2nd coat (the chantoyancy on this is crazy... you flip it around and it changes!):  Thanks for looking:). |
|