cherdarock
starting to spend too much on rocks

Member since December 2012
Posts: 140
|
Post by cherdarock on Jan 5, 2013 22:20:53 GMT -5
I can do a quick photo tutorial showing how to add a grinding mod to your trim saw, provided it is water cooled, and has a table that covers the sump with screws.  This would allow you to "cheat" or shape stones prior to tumbling. (cheat means you grind stones prior to polish to remove blemishes and make stones perfect in short order) My trim saw is an oil type, but I am versed in this. LMK, I'll do it and you can judge for yourself. |
|
Geoff
spending too much on rocks
Please add 1074 to my post number.
Member since December 2012
Posts: 446
|
Post by Geoff on Jan 6, 2013 1:17:08 GMT -5
Teach me oh great one
|
|
|
|
Post by Jugglerguy on Jan 6, 2013 8:13:54 GMT -5
I'd like to see that too!
|
|
cherdarock
starting to spend too much on rocks
Member since December 2012
Posts: 140
|
Post by cherdarock on Jan 6, 2013 13:55:48 GMT -5
I will do it in installments.  lol (greaaaat... like a t.v. program.) First get your measures, Overall length, width, measure the sides to the blade slot, distance btw. screw holes. So you HAVE them. ;D This mod is for simple aluminum water trim saws, with a half inch blade arbor and water sump. Essentially, you are doing three things here: 1) producing a second table that will allow a thicker disk to poke through 2) making a disk with a diamond studded side for very fast and remarkably precise ROUGH grinds prior to tumbling 3) Making a splash cover that allows access to the disk while containing the water carried up with the wheel. **NOTE** We will do the cover last. You CAN check to see if the splash guard you have will contain the splash, once you put the grinding set-up together. If the splash is excessive, the new cover will reduce it to the trimsaw table. What you DON'T want is any spritz/spray/splash making friends with the motor. (unless it is sealed) Open frame motors and water have a romance that is electrifying! lol... O.K.! ACTUAL increase in splash shouldn't be that great. The things that might cause excessive splash will be noted during the posts. To begin, you will need a 1/4" to 3/8" thick piece of plexiglas or Lexan, that is larger than the table on the trim saw. You can also use 1/8" to 1/4" thick aluminum sheet or plate. Next, remove your trimsaw table. With it off, can you place it flat on a surface, or is there something on the bottom preventing this? Let me know what it is. I will go take a couple pics. |
|
|
|
Post by Jugglerguy on Jan 6, 2013 14:17:08 GMT -5
Why should the plexiglas or Lexan be larger than the table on my saw? It seems like it should be the same size. My saw has a short edge all the way around that catches the water. This would prevent a larger table from being mounted and would prevent the water from draining back into the reservoir.
|
|
cherdarock
starting to spend too much on rocks
Member since December 2012
Posts: 140
|
Post by cherdarock on Jan 7, 2013 4:05:56 GMT -5
;D Juggler is champing at the BIT!. plastic will be trimmed to size... Crusty 35 year old 6" trimmer. HP, (Highland Park) Oil type. THIS SAW IS FOR ILLUSTRATIVE PURPOSES 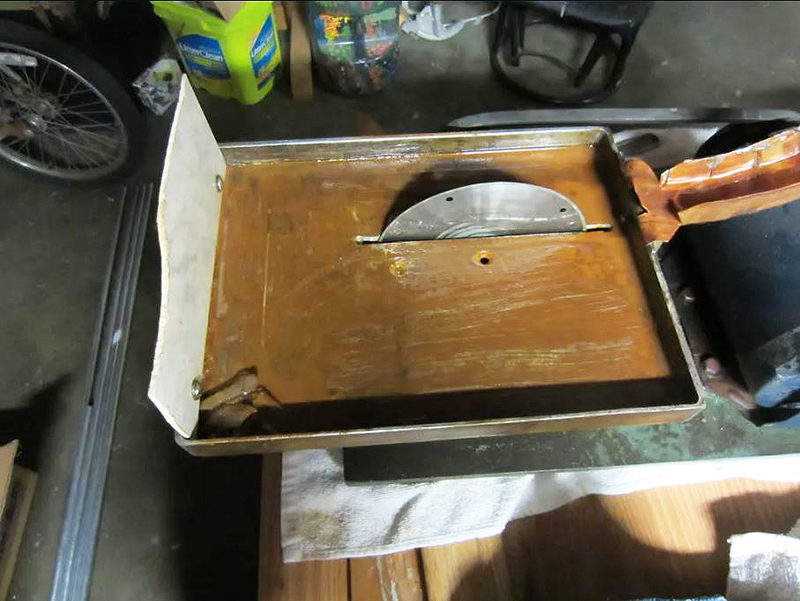 Juggler, you have a saw that is different by virtue that the table attaches to the inside of the tray. Take the table off, and using it as your template, mark the outline on the plexi/lexan. If you have a table/tray that you detach from the sump, you will remove it, and use it as a template. This next picture shows the slot already drawn wider, which I will explain, but essentially, you should have something like this: 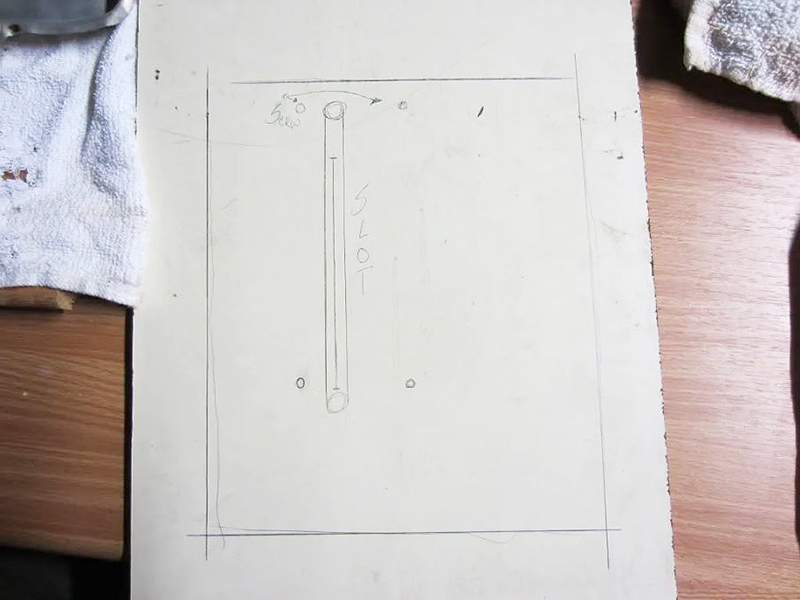 Trace out the mounting holes and the slot opening, and the table, (table/tray) determine the center of the slot opening, and draw a line down the middle. This represents where the blade sits, and thus where the shoulder is located on the arbor. This next photo will show: looking down at the arbor, while the blade is still mounted.  Now this is IMPORTANT: stand in front of the saw. There is the NUT SIDE of the blade, (Mine it is on the right) and there is the SHOULDER SIDE that the nut holds the blade against, (Mine is left of the blade) Look to see if there is any threaded arbor beyond the nut. If you have more than 3/16ths of thread beyond the nut, you will make your slot wider to the nut side like this: measure 5/16ths to the nut side of the center line. This will make your original 1/8-3/16th wide slot 7/16ths to 1/2" O.K. it is late I have to sleep. Tomorrow we will cover the rest of the table mod. BUT! Juggler Guy, with your saw, you are almost done with the table. I will have to post extra instruction for those who need a tray/table combo, but I will alert you to that which pertains to your saw. now is a good time for questions, but confine them to what I have explained or showed so far, yah? g'nite  |
|
|
|
Post by deb193redux on Jan 7, 2013 8:38:47 GMT -5
One note is that this is only for saws with arbor completely below the table. Some have the arbor centered on the table, and that would be different.
Just show a pic of what you are doing. Table designs and sizes and shapes and gutters ... etc vary enough that folks will need to consider how to adapt your mod for their saw.
|
|
The Dad_Ohs
fully equipped rock polisher
 Take me to your Labradorite!!
Member since September 2012
Posts: 1,860
|
Post by The Dad_Ohs on Jan 7, 2013 12:02:03 GMT -5
This is definitely interesting stuff... don't know if I will do it or not, but I am really enjoying the reading/photos and if nothing else I will keep this for a future mod reference.
Thanx Cherdarock
|
|
herchenx
Cave Dweller 
Member since January 2012
Posts: 3,360
|
Post by herchenx on Jan 8, 2013 0:07:50 GMT -5
People around here are TOO DANG COOL!
|
|
cherdarock
starting to spend too much on rocks
Member since December 2012
Posts: 140
|
Post by cherdarock on Jan 8, 2013 2:04:23 GMT -5
THAT is the headache yes? The infinite variety of saw design... Yes, the arbor should be below. Though I am looking at a friend's "blade over" trim saw to modify it. If we go for it, I will post that too. |
|
cherdarock
starting to spend too much on rocks
Member since December 2012
Posts: 140
|
Post by cherdarock on Jan 8, 2013 4:03:44 GMT -5
O.K.! We now have the arbors with excess thread covered. If we look at my set up, third photo, there is NO extra thread. The amount of room I have is for blades, and not much more. WHAT NOW??? If you only have enough thread for a blade and the nut that holds it, there are ways around it, and so lets look back to the slot we have traced, and we center 7/16ths of an inch 1/16th to the nut side. Easy to do, 3/16ths to the shoulder side, 1/4" to the nut side side of center line. NOW! The slot needs to be able to fit a 6 inch disk. For simplicity, we will make the slot for 6 inch. Juggler Guy, you have a 6/8 inch saw. What you, and anyone else who has a multi blade size saw, want to do is MOUNT A SIX INCH BLADE onto the arbor, and snug the nut. Put the table back onto the saw, mark along the slot where the blade edges are, and add 1/4" more to each of those. See photo below: 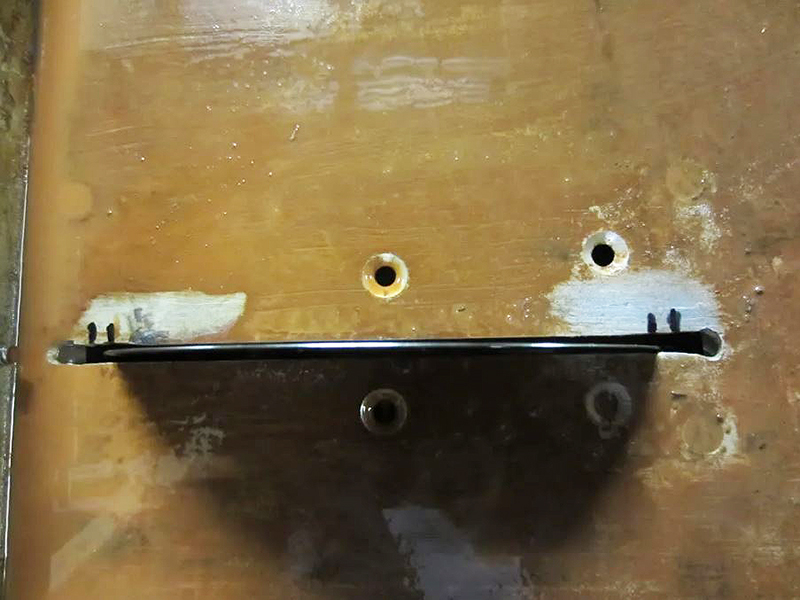 Take the table back off, and again, use as a template, transfer the marks to the ends of the slot on the second table. Remove the template/table. Now mark each end of the slot with circles that fit inside the slot, (see second photo above) The circles indicate where your holes will go to facilitate cutting a slot. O.k.TABLE/TRAY SAWS. So far we have a flat table, but that won't contain the water! Making a custom tray is fine if you like spending hours doing stuff like that. WE WANT TO GRIND SOON AS POSSIBLE! Lets make it simple. Head to the kitchen, or the thrift store, dollar general, and getcha one of these:  This is an aluminum bake sheet. You can also use a plastic tray. P.M. me if a plastic tray is your only choice. This bake sheet is soft, and it is the same size as my saw tray. 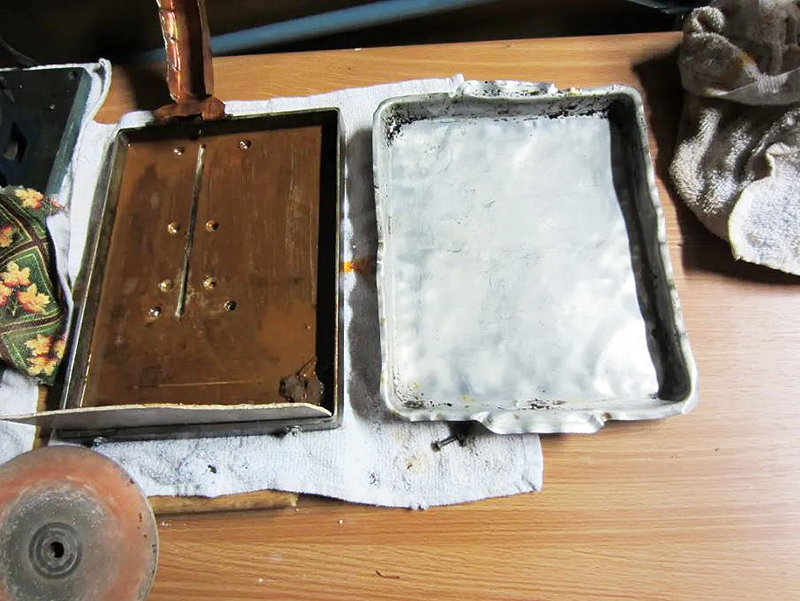 You can find these in various sizes. Make sure it is aluminum, and soft enough to bend very easily. I can cut this bake sheet with a pair of fiskar scissors (Fiskar is a brand.) I have pictures of this being cut with scissors. The tray alone is too flimsy to use as your table/tray without a little backing under it. Cut the table we marked, drill the holes for the screws, and drill the holes at each end of the slot. Use a jigsaw to cut the slot sides from hole to hole. Check the fit of the flat table to the saw, then if the holes line up, Table only, admire how the table looks in the tray, and open a beer. TABLE/TRAY mods: Remove blade, put new table back on, then set the aluminum tray on the table, lift BOTH off as a set, and keeping them together, turn over and set down. The tray is now under the flat table. Use the newly cut and drilled table as your template, and mark the bottom of the bake sheet with the screw holes and slot. Drill the holes, cut the slot. On the flat table, using silicone, put a circle around each hole and all the way around the slot on the flat table. set the table on the saw, line it with the holes. Set the tray on, use the screws to clamp the tray to the table. Let it dry. Pull table and trim silicone from the slot. Any questions, ask or PM. Bed time  |
|
robsrockshop
has rocks in the head

Member since August 2012
Posts: 715
|
Post by robsrockshop on Jan 9, 2013 22:37:00 GMT -5
I thought I was the only one that used kitchenware. LOL.
|
|
cherdarock
starting to spend too much on rocks
Member since December 2012
Posts: 140
|
Post by cherdarock on Jan 11, 2013 1:00:35 GMT -5
;)Kids toys, kitchen pans, pirate's pegleg too'
Making something out of something,
is my favorite thing to do!
OKIE DOKIE!!!
LETS find a grinder disk, and make it awesome!
***NOTE***
The "grinder disk" I am going to use, and that I recommend, endorse, prefer, WhAtEvEr... IS availiable through "Johnson Bros. Lapidary"
The disk is actually a 6" faceting disk, it costs $20.00 & comes in a decent number of grits, and is very, very cost effective when you are rough shaping stones.
I prefer this disk to my galaxie wheel for hearts because I can produce heart shapes FAST! I use a 100 grit, light pressure, and you will want to dop your stones, because shaping DOES require control.
I will elaborate on shape grinding for tumble, BUT lets look at some PiCtUrEs! ;D
My next post will show you disks, and the final mod will be for a splash cover.
|
|
|
|
Post by Jugglerguy on Jan 11, 2013 6:45:42 GMT -5
Could you link to the exact disk you prefer?
|
|
NDK
Cave Dweller
Member since January 2009
Posts: 9,440
|
Post by NDK on Jan 12, 2013 16:09:37 GMT -5
Here's some more info to help y'all with this project. Plastic cutting board (a few dollars at walmart) also works well for a new saw top.  I purchased my lap disks from rocklady. Great quality and good prices too. rocklady1.com/Nate |
|
|
|
Post by Jugglerguy on Jan 12, 2013 18:14:24 GMT -5
That's good to know, because I went to the local glass shop yesterday and was shocked at the price of Lexan. They wanted $30 for a piece of 3/8 inch that was about 8 by 13 inches. I didn't buy it. I'll go check out the cutting boards at Walmart.
|
|
spicer m
spending too much on rocks
Member since October 2008
Posts: 337
|
Post by spicer m on Jan 12, 2013 22:56:30 GMT -5
Nate
love Your plastic conduit saw gaurd
Mike
|
|
NDK
Cave Dweller
Member since January 2009
Posts: 9,440
|
Post by NDK on Jan 12, 2013 23:27:15 GMT -5
Thanks Mike. I'm not trying to steal the spotlight here, just like to show there's more than one way to skin a cat. Sorry for the hijack, Nate |
|
cherdarock
starting to spend too much on rocks
Member since December 2012
Posts: 140
|
Post by cherdarock on Jan 13, 2013 3:15:06 GMT -5
NDK IS AWESOME! The cheaper the BETTER! I have to apologize, I am not flaking on you folks I promise. I have a nieghbor who has M.S. and the cold really does a number on him. He is unable to get out of bed, and he lives alone. Whenever this happens, I take care of him. You never know how good you got it till' it is gone... As soon as I can, I will be posting. Got the pics, just got no time. HOPEFULLY tomo will be slow enough. O.k. it is bed time me hearties. NDK Thank you again for the input. LEXAN is quite spendy, but it has that unbreakable strength too.... PLEXI is good also, but the cutting board ROCKS! g'nite |
|
|
|
Post by Jugglerguy on Jan 13, 2013 7:40:58 GMT -5
Hey cherdarock,
Take your time. I'm in no hurry at all. Taking care of your neighbor is way more important that grinding up rocks.
|
|

 This would allow you to "cheat" or shape stones prior to tumbling.


 lol (greaaaat... like a t.v. program.)


 You're down here in the bilges with the wharf rats. You will get more mileage above on the upper decks.