|
|
Post by Drummond Island Rocks on Jan 20, 2016 14:16:29 GMT -5
I was sitting here at work today working on a cad design for a automotive assembly machine and realized my software has a sheet metal module. The prong setting that I was discussing with Pat rockjunquie and micellular came to mind so I spent some time on a concept drawing. We actually we fabricate some of our own small brackets from sheet metal so we design the brackets in 3D then provide a flattened version of the sheet metal to a local outsource company and have them laser cut. Here's what I came up with. possibilities are endless. 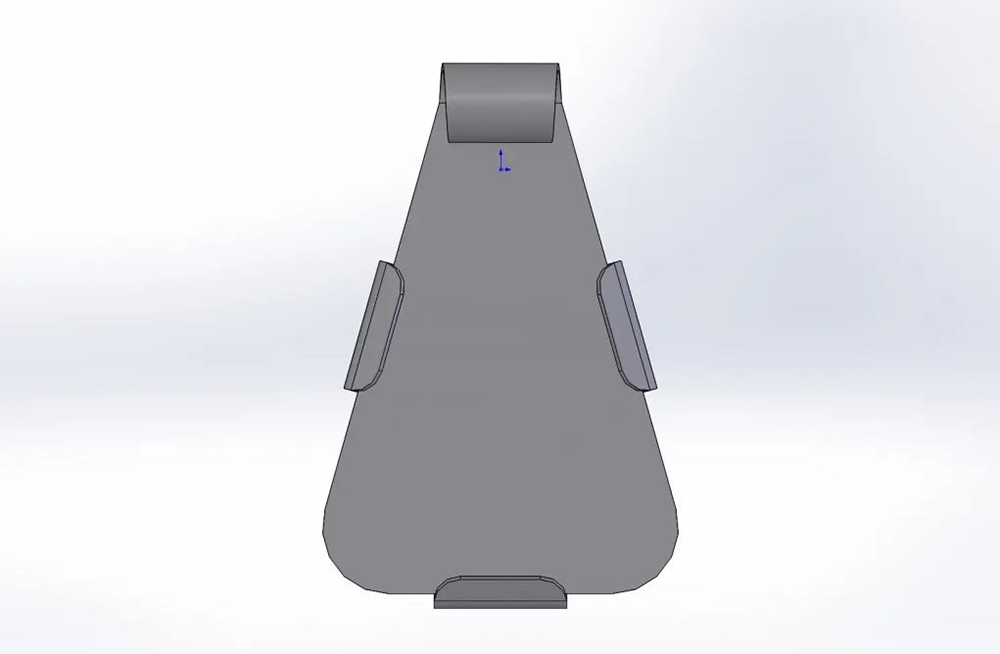  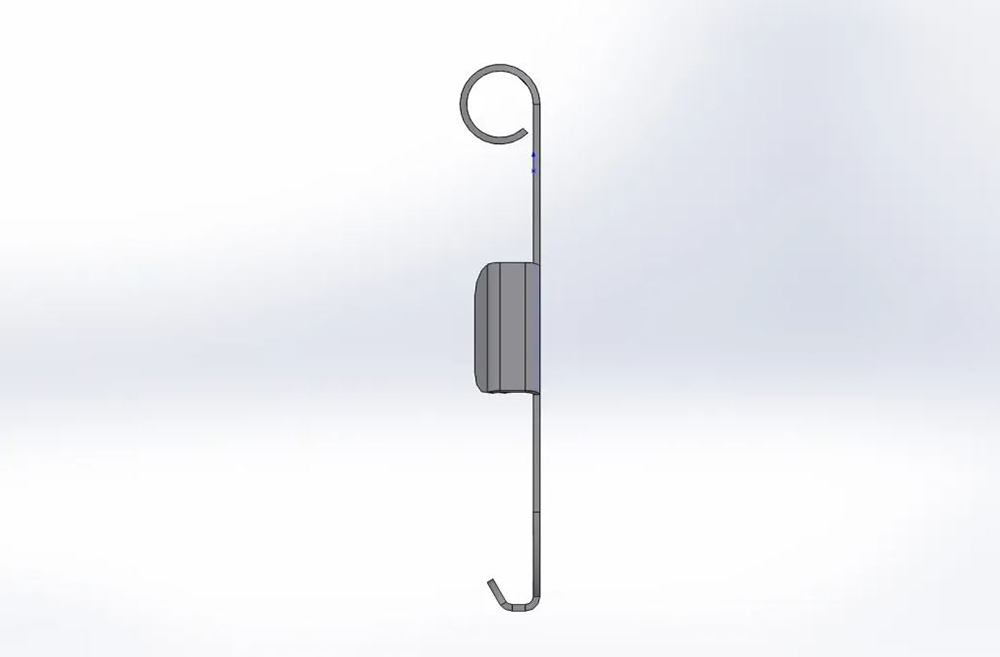 The drawing on the left is what it would look like after being cut and has dashed lines where the bends need to happen. 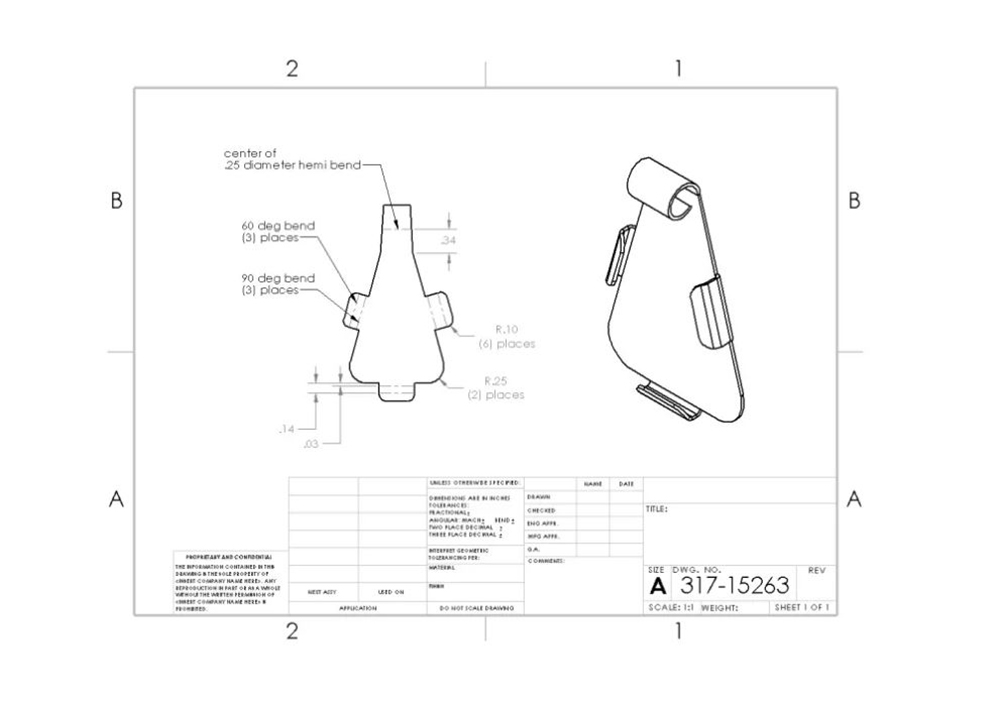 Oh and this is the machine design I was working on when I got side tracked today. The teal area is a car part and this particular machine punches some holes in it right after it is molded. Designed from scratch from the floor up. 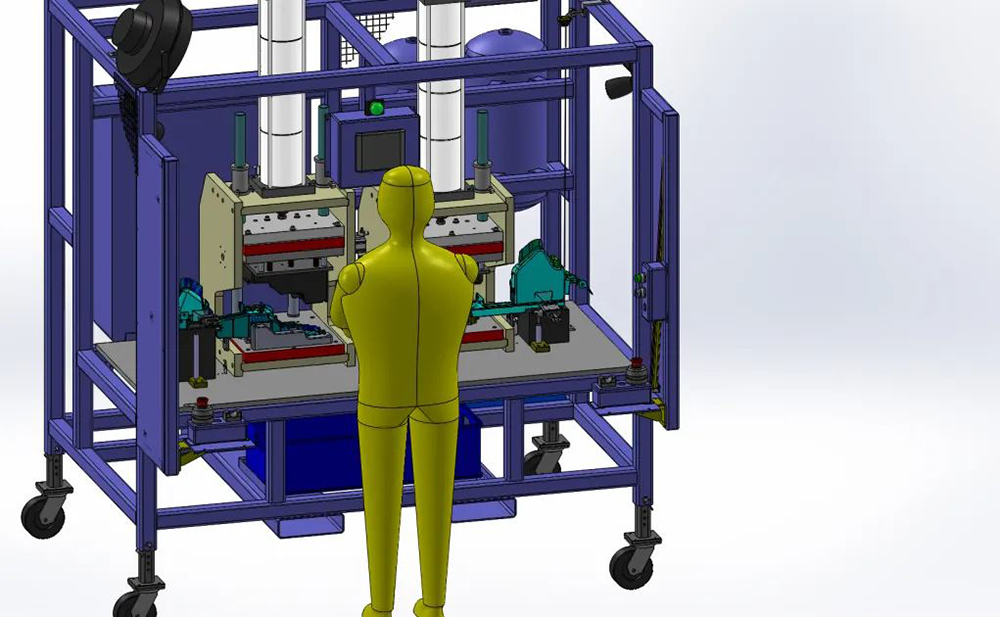 Chuck |
|
|
|
Post by rockjunquie on Jan 20, 2016 15:43:32 GMT -5
Dang, Chuck, I'm impressed! It looks like you have the general idea locked up.  Now you just gotta get your hands dirty.  Are you going to cut a cab with that shape in mind or is that just an example? |
|
|
|
Post by Drummond Island Rocks on Jan 20, 2016 15:48:43 GMT -5
I do things very calibrated in general so I am thinking I could do most of the metal work first and cut the cab to fit. No different then fitting a cab to a store bought bezel or onto my wine stopper blanks. Could be the wrong approach but only one way to find out. The cad project broke up my boring day so it was worth doing.
Chuck
|
|
|
|
Post by rockjunquie on Jan 20, 2016 15:53:46 GMT -5
I'm a big fan of working to your strengths. If that's the way you want to do it, then by all means, do it. It's a little unorthodox, but I don't see why it wouldn't work. PB is down right now, but I have a new piece to post which shows another way to do the tabs. Should have it up soon. |
|
|
|
Post by Drummond Island Rocks on Jan 20, 2016 15:56:52 GMT -5
I'm a big fan of working to your strengths. If that's the way you want to do it, then by all means, do it. It's a little unorthodox, but I don't see why it wouldn't work. PB is down right now, but I have a new piece to post which shows another way to do the tabs. Should have it up soon. I have been having a really hard time uploading to photobucket the last few days. Chuck |
|
micellular
has rocks in the head
 Rock fever is curable with more rocks.
Member since September 2015
Posts: 640
|
Post by micellular on Jan 20, 2016 15:58:20 GMT -5
Super cool Chuck! What program do you use? My boyfriend's a mechE and has solidworks. rockjunquie - there's Flickr and Imgur...  |
|
|
|
Post by Drummond Island Rocks on Jan 20, 2016 16:00:36 GMT -5
Super cool Chuck! What program do you use? My boyfriend's a mechE and has solidworks. I use multiple cad programs here at work but Solidworks is what the sheet metal models are done in. The sheet metal functions are not very friendly though. Chuck |
|
|
|
Post by rockjunquie on Jan 20, 2016 16:17:55 GMT -5
Super cool Chuck! What program do you use? My boyfriend's a mechE and has solidworks. rockjunquie - there's Flickr and Imgur... I had been using my own domain, but for some reason I can't get my ftp program working, either. I can get to my site no prob, but filezilla can't reach my files. |
|
ol3m3
noticing nice landscape pebbles

Member since September 2006
Posts: 85 
|
Post by ol3m3 on Jan 20, 2016 17:32:17 GMT -5
Not to be negative, but it is much easier to do the cab first and fit the setting to the cab. Just finished setting stones in three cast rings, it involved a lot of grind a little then see what you've got then back to grind a bit more in another spot till the stone would fit the bezel, after the stones were fitted go back and finish the cabs. Not an experience I want to do every day. You can have a general idea of the setting and the cab that goes into it, but unless you are very good at cabbing the size will vary from the concept.
|
|
|
|
Post by rockjunquie on Jan 20, 2016 17:43:28 GMT -5
Well, filezilla just flat out won't work and coreftp won't give me a url, so I got an ftp addon for firefox- works a charm. Anyway, I posted the inside out tab. |
|
|
|
Post by toiv0 on Jan 20, 2016 20:31:31 GMT -5
Pretty cool cad use. I am impressed
|
|
|
|
Post by Pat on Jan 20, 2016 20:47:33 GMT -5
That looks like fun! Wow!
|
|
|
|
Post by pauls on Jan 20, 2016 22:11:18 GMT -5
I would be putting a sizable hole in the back too, saves precious metal, cost and weight. Translucent stones lets light through and if it flips over while wearing you can see the back of the stone.
I agree with what has been said about making the setting to fit the stone, generally, but I think this nice design gives a fair bit of leeway as far as sizing a stone. I really like it.
I do a few repair/replacement stones for a local jeweller and they are a real pain to get the size right.
|
|
|
|
Post by Drummond Island Rocks on Jan 20, 2016 22:27:46 GMT -5
ol3m3 paulsCalibrated cabs is kinda my thing. I am sure I have made over a thousand cabs and I would bet less then 10 of those were freeforms. My background started in woodworking then moved to metal machining with tolerances in the thousandths of an inch. I kind of treat my rocks the same way. one order for 50 calibrated cabs 2.5" x 2" each and everyone ground to match a pre-purchased blank   Thanks for looking Chuck
|
|
|
|
Post by Drummond Island Rocks on Jan 26, 2016 15:52:30 GMT -5
rockjunquie micellularWhat method are you gals using to draw/transfer your pattern on the copper? I printed my CAD patterns at 100% scale and was thinking about rough cutting around the printed shape then using packing tape to hold it onto the copper but then after it is cut out the template would fall off and there would not be anything on the copper as a master. I could print them on sticker paper but wonder if that is a good option. Chuck
|
|
|
|
Post by rockjunquie on Jan 26, 2016 15:55:11 GMT -5
rockjunquie micellular What method are you gals using to draw/transfer your pattern on the copper? I printed my CAD patterns at 100% scale and was thinking about rough cutting around the printed shape then using packing tape to hold it onto the copper but then after it is cut out the template would fall off and there would not be anything on the copper as a master. I could print them on sticker paper but wonder if that is a good option. Chuck I print my design, cut it out and glue it to the metal with a kid's stick glue- you can also use rubber cement. Leave the paper on when you cut. |
|
|
|
Post by Drummond Island Rocks on Jan 26, 2016 16:02:16 GMT -5
rockjunquie micellular What method are you gals using to draw/transfer your pattern on the copper? I printed my CAD patterns at 100% scale and was thinking about rough cutting around the printed shape then using packing tape to hold it onto the copper but then after it is cut out the template would fall off and there would not be anything on the copper as a master. I could print them on sticker paper but wonder if that is a good option. Chuck I print my design, cut it out and glue it to the metal with a kid's stick glue- you can also use rubber cement. Leave the paper on when you cut. Thanks Tela- Will try that. I was just thinking that they sell printer paper with adhesive backing but if an elmers glue stick will work I'll go that route. Chuck |
|
|
|
Post by rockjunquie on Jan 26, 2016 16:03:28 GMT -5
I print my design, cut it out and glue it to the metal with a kid's stick glue- you can also use rubber cement. Leave the paper on when you cut. Thanks Tela- Will try that. I was just thinking that they sell printer paper with adhesive backing but if an elmers glue stick will work I'll go that route. Chuck Let it dry well and make sure you get a good layer on the edges. Works for me. |
|
|
|
Post by Drummond Island Rocks on Jan 26, 2016 16:05:31 GMT -5
Thanks Tela- Will try that. I was just thinking that they sell printer paper with adhesive backing but if an elmers glue stick will work I'll go that route. Chuck Let it dry well and make sure you get a good layer on the edges. Works for me. Next question How do you hold the copper piece while cutting these intricate shapes? special vise or are you guys holding by hand? I ordered a few supplies including the hammer you recommended. Looks like a handy tool to have anyway. Chuck |
|
|
|
Post by rockjunquie on Jan 26, 2016 16:09:12 GMT -5
Let it dry well and make sure you get a good layer on the edges. Works for me. Next question How do you hold the copper piece while cutting these intricate shapes? special vise or are you guys holding by hand? I ordered a few supplies including the hammer you recommended. Looks like a handy tool to have anyway. Chuck Most jewelers use a bench pin, jeweler's saw and hands, but if you don't have a pin, then hold it by hand while bracing it against something to support the work. You could use the top of a vise- just cover the vise with masking tape or something so it doesn't scratch up the metal. Keep the line that you are cutting close to what ever you are using to brace. Did you get a jeweler's saw? |
|


 Now you just gotta get your hands dirty.
  Are you going to cut a cab with that shape in mind or is that just an example?


 You're down here in the bilges with the wharf rats. You will get more mileage above on the upper decks.