|
|
Post by Jugglerguy on Feb 9, 2016 20:12:00 GMT -5
I just made a jig that I'm pretty excited about. I'm using iit to make Pandora style beads. I've made a grand total of three beads without the jig and the first jig bead is not finished yet. I just had to show someone. My friend makes and sells a lot of these beads. His method is to use a core bit to cut the outside, big circle. Then he uses a series of about three bits to make the inside hole. He starts small and then uses large burrs to make the hole the proper size. He does this because it's easier to center the hole by starting small. There was a write up on his method in a lapidary magazine a couple years ago. Maybe it was a jewelry magazine, I'm not sure. Drummond Island Rocks does it the opposite way. He starts with the proper sized core bit to drill the center, small hole. Then he grinds the outside circle freehand on his cabber. This is the method that I tried. My first three attempts looked ok, but were a little lopsided and the hole wasn't perfectly centered. I don't have the cabbing ability that Chuck has. Here is my first non-jig attempt. It doesn't look too bad, but it's really not that good. 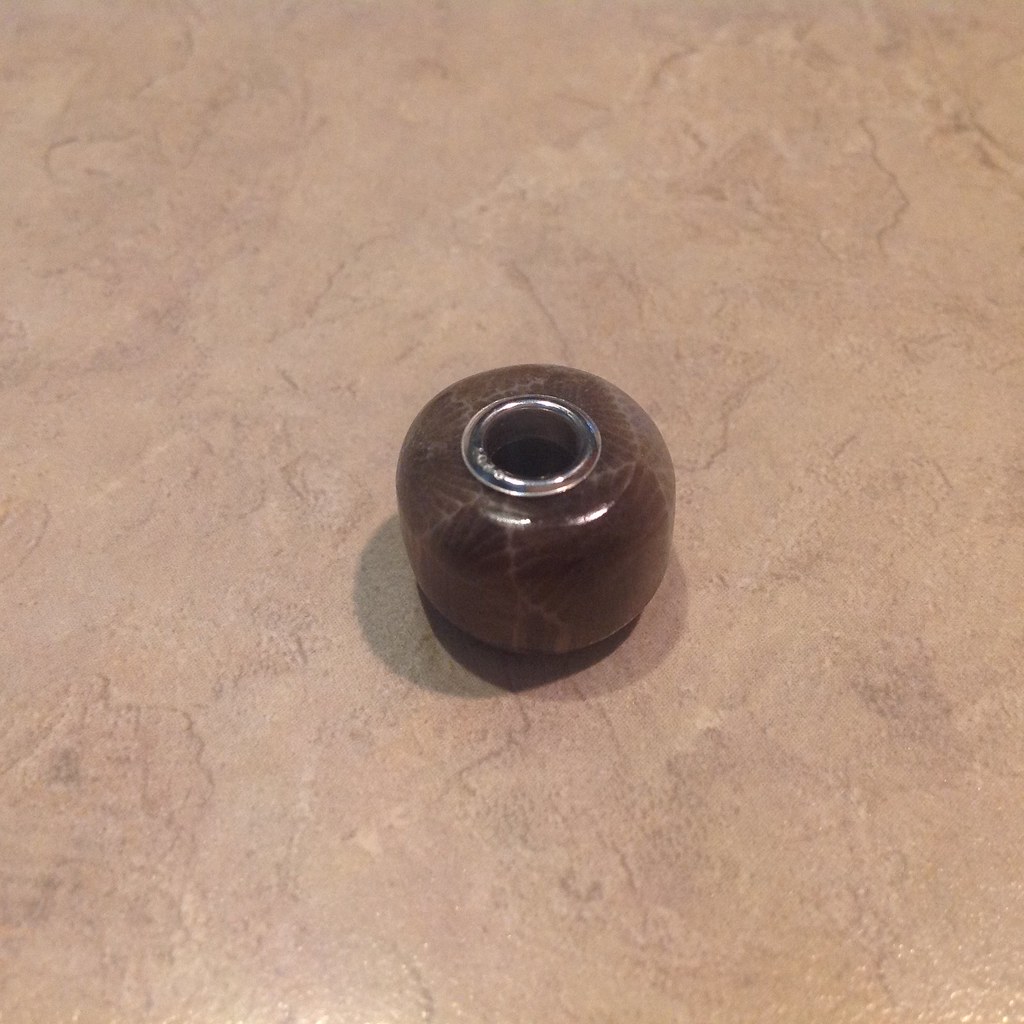 Here's my jig. 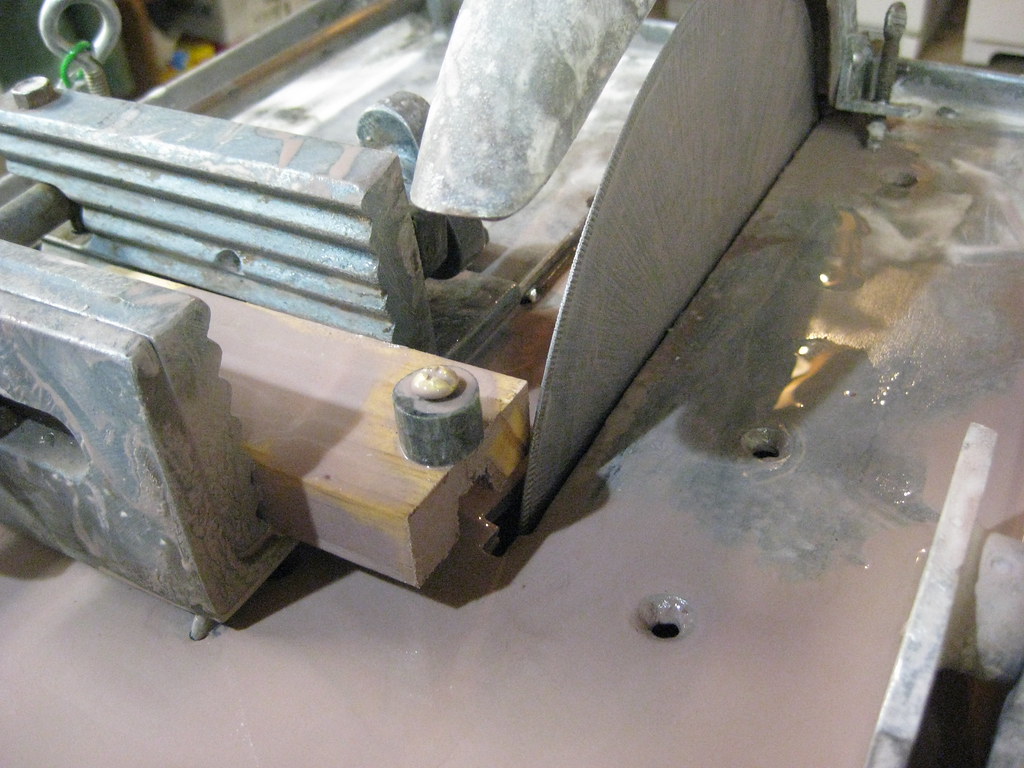 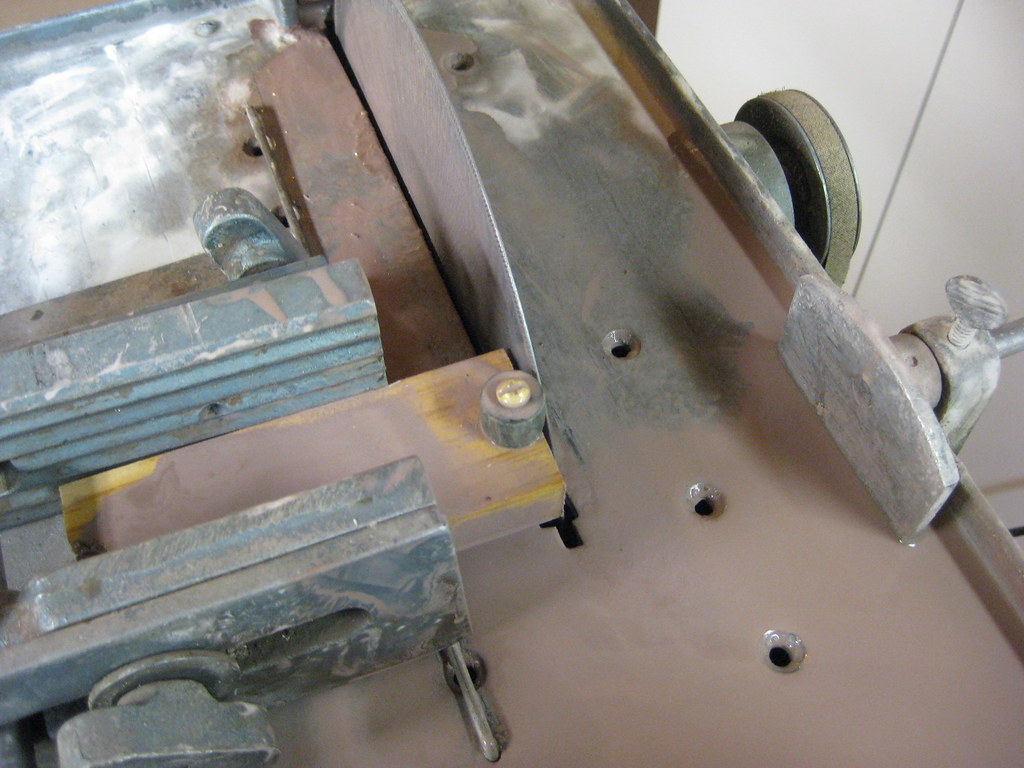 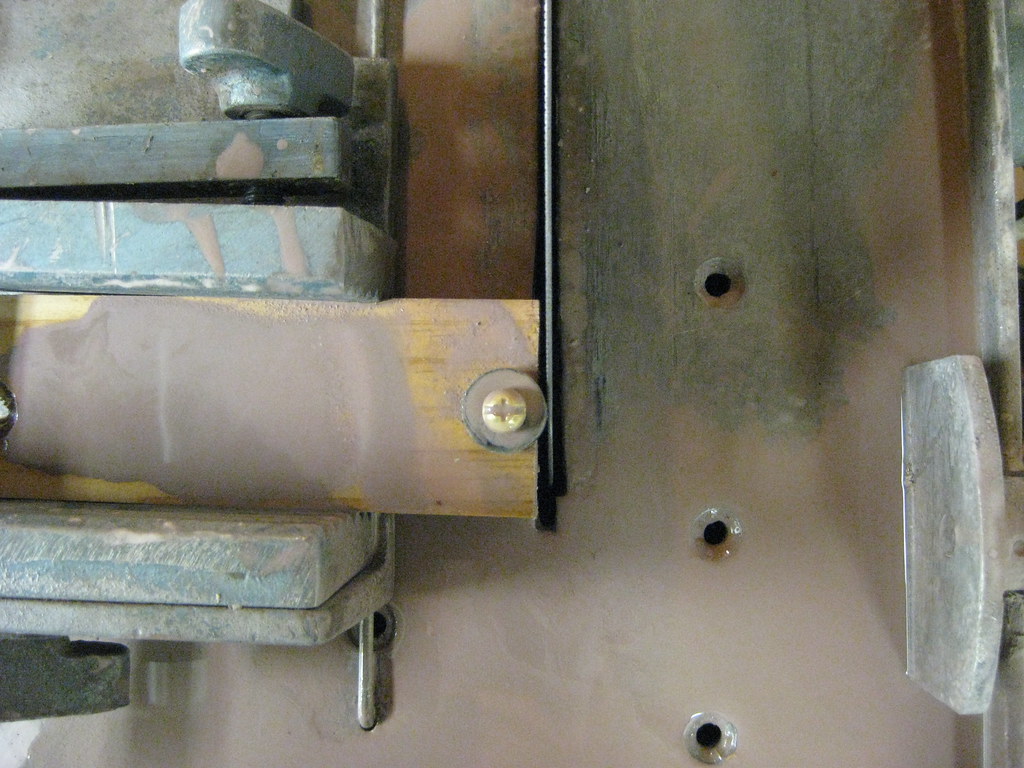 My jig is just a piece of wood with a T-nut in the bottom. I put a bolt through the hole in the bead and clamp the hole thing in my vice. Then I can move the rock through the saw several times, cutting the rough shape of the bead. after cutting the corners off, eventually I can just spin the bead to round it off. The only problem I see right now is that I'll be wearing the left side of my blade more than the right. I'll have to flip the blade over occasionally. The jig makes a perfect circle with the hole perfectly centered. I'll still have to finish it on my cabber, but that will be much easier now that the circle is more perfect. Back to the basement to play with it more. Wheeee! |
|
|
|
Post by mohs on Feb 9, 2016 20:25:48 GMT -5
That really interesting
what if you did it with longer bolt
so the bead freewheeled on the bolt arbor
and held it up to a grinding wheel?
|
|
|
|
Post by Drummond Island Rocks on Feb 9, 2016 20:29:46 GMT -5
Very cool jig you got there Rob. I seen a similar setup for a cabbing machine recently. Same concept as far as holding the bead centered then spinning the bead around at the grinding wheel. A proper sized shoulder bolt is the best option for something like this. The threads go into your t-nut then there is a perfect smooth diameter shaft to spin the bead on. We use them for lots of applications at work.  Chuck |
|
|
|
Post by cobbledstones on Feb 9, 2016 21:25:45 GMT -5
nice work. I also make beads around the whole to get everything centered. I like the use of the saw. I have a similar setup on my 80 grit wheel.
would like to her about your grommet source and the size of the hole
|
|
|
|
Post by Drummond Island Rocks on Feb 9, 2016 21:31:56 GMT -5
Jugglerguy - Does your lortone cabber have the aluminum jig mount on it? The LU6X came with an aluminum mount for attaching jigs. Would be easy to adapt a quick arm for what you are trying to do.  Chuck
|
|
|
|
Post by Jugglerguy on Feb 9, 2016 21:40:47 GMT -5
mohs, the bead needs to be turned by hand. Otherwise, it would just spin itself to a flat spot and sit there. Drummond Island Rocks, where would one find a shoulder bolt of a very specific size? I think my hole is 3/16. I ended up with a #10 bolt from Home Depot. It's a tad small, but I just push the bead toward the blade as I spin it. I have a question for you, Chuck. I'm having trouble holding the bead when polishing it on my flat lap. I've been using a dowel that I chucked in my drill and sanded to a taper. I just jam it in the bead hole. The problem is that it is difficult to get it on straight and stay there. Eventually the bead peals back some wood on the dowel and I have to resand it. I know you did something similar, but did you find a way to keep the bead on securely and straight? I tried putting the bead on a bolt with a rubber washer and nuts on either side, but the nut stuck out too far on the end.
|
|
|
|
Post by Jugglerguy on Feb 9, 2016 21:45:43 GMT -5
cobbledstones, I bought the grommets from Kingsley North I think. Might have been eBay though. I believe the hole is 3/16. The bead source will tell you the hole size. The grommets are sterling silver, but pretty cheap. Can you show me a picture of your setup? Drummond Island Rocks, I do not have that jig mount. Is there just one, nothing on the other side? My first thought was to rig up something on the cabber, but it seemed harder to do.
|
|
|
|
Post by Drummond Island Rocks on Feb 9, 2016 21:47:29 GMT -5
Can't help you with that one. I had all the same issues you did with the dowels but I only made a handfull and they did not move well so I never bothered to try any different methods. My wife did like them though and she don't like much of my rock jewelry so it was worth it.
Chuck
|
|
|
|
Post by Drummond Island Rocks on Feb 9, 2016 22:04:39 GMT -5
|
|
|
|
Post by Jugglerguy on Feb 9, 2016 22:10:41 GMT -5
|
|
|
|
Post by cobbledstones on Feb 9, 2016 22:12:21 GMT -5
Jugglerguy here is my setup, a re-purposed fly tying vice. It allows for adjustment of all the compound angles, and i use spent bits for mandrels 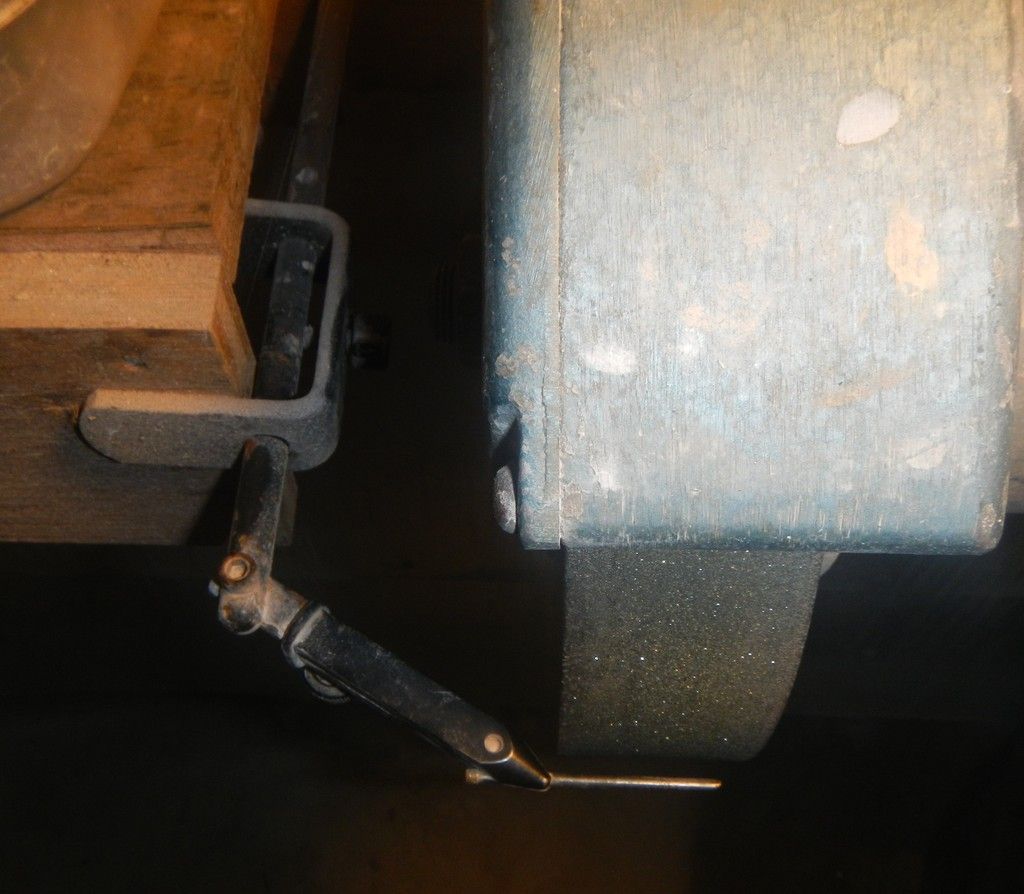
|
|
|
|
Post by Jugglerguy on Feb 9, 2016 22:22:14 GMT -5
That's a great idea. Thanks!
|
|
jamesp
Cave Dweller 
Member since October 2012
Posts: 36,562
|
Post by jamesp on Feb 10, 2016 7:56:51 GMT -5
Very clever use of the saw. Brilliant.
Rotating the rock by hand works.
Or a dowel from above attached to the rock some how. Maybe with a rubber tube on the end of a dowel.
A small diameter bearing below the rock. A tiny Lazy Susan.
Or a hole in the board, and a dowel with a axle sticking out of it to fit through the hole in the bead and into the hole in the board.
Just trying to figure away to turn the bead from above in a oil bath slab saw with a dowel sticking up through a small hole in the saw enclosure.
|
|
|
|
Post by Jugglerguy on Feb 10, 2016 12:23:08 GMT -5
Very clever use of the saw. Brilliant. Rotating the rock by hand works. Or a dowel from above attached to the rock some how. Maybe with a rubber tube on the end of a dowel. A small diameter bearing below the rock. A tiny Lazy Susan. Or a hole in the board, and a dowel with a axle sticking out of it to fit through the hole in the bead and into the hole in the board. Just trying to figure away to turn the bead from above in a oil bath slab saw with a dowel sticking up through a small hole in the saw enclosure. I'm using water in my saw, so oil isn't an issue. If you found a way to rotate the bead from outside a hood, you would also have to be able to move the vice forward and backward too. When I spin the bead, the saw only contacts about 1/4 of the bead from top to bottom. I have to move the vice ahead slightly and rotate again. It takes several adjustments to get it all done. |
|
jamesp
Cave Dweller
Member since October 2012
Posts: 36,562
|
Post by jamesp on Feb 10, 2016 12:33:10 GMT -5
Very clever use of the saw. Brilliant. Rotating the rock by hand works. Or a dowel from above attached to the rock some how. Maybe with a rubber tube on the end of a dowel. A small diameter bearing below the rock. A tiny Lazy Susan. Or a hole in the board, and a dowel with a axle sticking out of it to fit through the hole in the bead and into the hole in the board. Just trying to figure away to turn the bead from above in a oil bath slab saw with a dowel sticking up through a small hole in the saw enclosure. I'm using water in my saw, so oil isn't an issue. If you found a way to rotate the bead from outside a hood, you would also have to be able to move the vice forward and backward too. When I spin the bead, the saw only contacts about 1/4 of the bead from top to bottom. I have to move the vice ahead slightly and rotate again. It takes several adjustments to get it all done. Hard to beat using your fingers. I see your point, but look at the results. And using just a small saw w/water. It is the simplest and cheapest way to make a rock ornament. Did you come up with the idea Rob ? |
|
|
|
Post by Jugglerguy on Feb 10, 2016 16:39:06 GMT -5
No, I just applied a woodworking technique to this situation. I have a really old, used flat lap that came with a bunch of plywood circles to be used with various sand papers and polishes. I wanted more, so I was trying to find the best way to make them with tools I had. I ended up using my table saw to make perfect plywood circles. I adapted that idea for my beads.
|
|
|
|
Post by Drummond Island Rocks on Feb 11, 2016 6:59:45 GMT -5
Hey Rob. Take a look at this link. The hardware used on the beads looks solid all the way through the bead unlike ours that have a large gap in the center of the stone. I really like the second photo with the pattern too. www.artisansnewlondon.com/store/p36/OH-_Ohio_Flint.htmlChuck |
|
|
|
Post by Jugglerguy on Feb 11, 2016 12:20:52 GMT -5
I wonder where those come from. The nice thing about a grommet on each side (that don't connect) is that the bead can be any length. I cut my slabs thick, drill the inside hole, round off the outside with my jig, then grind the end to remove any blowout from the drill (that was your idea). This results in beads that vary a bit in length. Using the hardware in your link would require more precisely sized beads. With that second, patterned insert, blowout wouldn't be a problem because it would be covered up by the large diameter insert.
|
|
|
|
Post by cobbledstones on Feb 11, 2016 12:28:15 GMT -5
there is a press that takes metal tubing (that you cut to length) and creates a flange on both sides around the bead. I looked into it a long time ago will have to see if I can find that. The lampwork glass folks use it. |
|
|
|
Post by Jugglerguy on Feb 11, 2016 12:30:21 GMT -5
I just reread Chuck's link. It says those sterling inserts are hand stamped, so I guess I won't be buying them.
|
|