batemmaman
off to a rocking start

Member since April 2016
Posts: 6 
|
Post by batemmaman on Apr 5, 2016 13:25:26 GMT -5
Hi guys, i'm brand new to this, my rock tumbler just came today and i loaded it up (and did my best to follow the instructions) but i just wanted to ask for any advice/knowledge i should know about this hobby. I got this tumbler and it came with it's own rocks for me to use. Is there anything specific i should know about this tumbler? Are the instructions correct or is there something else i need to know? I'd also like to ask where the best place to find rocks is? Should i just go to my local park/walking trails and search until i find cool ones? Thanks for any help >.> |
|
|
|
Post by Drummond Island Rocks on Apr 5, 2016 13:52:45 GMT -5
Welcome to the forum and you picked a nice starter tumbler. Your instructions may be ok for how to load your barrel and how much grit to add but the amount of time that it says to run the first stage is usually way off. You should fill the barrel about 70-75 percent full of rocks then add water to the bottom of the top level of rocks. For stage one you should add one tablespoon of grit per pound of rock. There is no set amount of time for stage one. Stage one is a continuous cycle where each week you clean out the rocks and inspect them. Any rocks ready for stage two are set aside and replaced with more rough rocks to bring the barrel back to 70-75 percent full. You will keep doing this every week until you have enough rocks set aside to make a full load of stage two. Basically when you add three pounds of rough rock some may be much rougher then others so they will not all be ready at the same time. The supplied instructions are usually pretty good for the rest of the stages. If you get anxious and do not have enough rocks ready for stage two you can add filler material like plastic pellets or ceramic media to make up the difference. As far as what rocks to pick up let us know what area you are in. Finding your own rocks is always fun but ordering dependable rocks that are known to tumble very well is sometimes best for beginners. This is one of the best places for tumblers and supplies like rough rock www.therockshed.comAnd this is another great resource for grit and supplies www.kingsleynorth.com/Chuck |
|
Intheswamp
Cave Dweller 
Member since September 2015
Posts: 1,910 
|
Post by Intheswamp on Apr 5, 2016 15:57:48 GMT -5
The first tip I'll give you is to listen to what Chuck says...he's one of the best tumblers here on the forum. As for hunting for rocks... My personal favorite place is gravel bars on creeks and rivers...I have to drive an hour or two to get to the gravel bars being as in my immediate area we have some of the most wonderful mud and muck, but sadly no rocks...it is what it is.  Like Chuck said, share with us your general area and I'm sure folks will put you on to some hunting grounds or ideas. The MP1 is a 2-pound tumbler so I would be somewhat picky about what I put in it to tumble...in other words make the best use of your time by using rocks that you really want to polish or either rocks that are already "river rounded". Rocks that are already smooth and round get finished quicker than do crushed, sharp edged rocks which can take a long time to smooth and round. But, if there is a rock that you really like and the only way you can get it is buying it online and crushed, well, you do what you gotta do. Also, in regards to hunting, gravel pits/yards are cool if you can get access to them. I usually check the landscaping rocks out at Home Depot and Lowes just to see if they have something interesting...only found interesting rocks one time, and they were so-so, but it's fun looking. Rocks are where you find them (kinda like gold)...  |
|
batemmaman
off to a rocking start
Member since April 2016
Posts: 6
|
Post by batemmaman on Apr 5, 2016 16:39:43 GMT -5
I have a few rivers near me so that's where i figured i would go, i don't know what we have here (in iowa) but i'm assuming there's probably at least some cool rocks i could find. For now i'll probably stick to buying rocks and just keeping my eyes out for any i find. When they ones i bought are finished i'll look them over and decide which ones i like best and maybe look for some more like that. Thanks for both of your help!
(PS i noticed my barrel is leaking (just a little) i was wondering if i put the lid on or if it's always just going to leak slightly?)
|
|
johnnymac1969
starting to spend too much on rocks
 I Like A Rolling Stone
Member since January 2016
Posts: 139
|
Post by johnnymac1969 on Apr 5, 2016 18:45:05 GMT -5
Welcome to the forum! I am also fairly new to this hobby (4 months) and have learned SO much from the kind people on this site (Chuck is one of my favorites).
- Keep asking questions and take notes.
- Buy separate equipment for each stage (strainers, buckets, tablespoons, etc).
- Get an additional barrel specifically for the POLISH stage!
- Buy large ceramic media. They are great for filler and cushioning.
- If you organize your supplies on shelves, keep the polish on the top shelf, Stage 3 below, and so on.
- Personally, I get (buy) most of my rocks from my local rock shop and/or eBay. I like what I like and I don't have the time to search for rocks.
- Stage 1 sucks and takes a ton of patience. I've had some rocks in Stage 1 for several months now.
- I have a Lortone 33B and the barrel(s) have NEVER leaked. Not sure what to say about your MP1 leaking.
- Read and print out this…http://www.skeenastormstones.com/uploads/1/3/2/4/13243124/rock_tumbling_tutorial_for_beginners_rev7-18-09.pdf
(this gave me enough confidence to get started and gave me the basic knowledge I needed. After awhile, you will learn tricks of your own)
- Have fun and post pics!!!
|
|
|
|
Post by Drummond Island Rocks on Apr 5, 2016 19:07:23 GMT -5
One more thing. If you are expecting nice smooth pit free, fracture free, semi-flawless rocks then the grit kit that came with your tumbler will not get you through the first batch. If you are just going to run stage one for a couple weeks and move the rocks on no matter what they look like then it may be enough but if you run stage one for four to six weeks like is probably needed you will run out. Invest in a few pounds of 60/90 grit next time you are placing an order. Your first couple batches will give you an idea of how much of each grit and polish to keep on hand.
Chuck
|
|
|
|
Post by rockjunquie on Apr 5, 2016 19:08:32 GMT -5
Welcome to the forum! I don't tumble, but I do know we have some first class tumblers here. Chuck doesn't like to brag, but he's a world champion tumbler. |
|
Fossilman
Cave Dweller
Member since January 2009
Posts: 20,711
|
Post by Fossilman on Apr 5, 2016 19:21:46 GMT -5
Welcome to the forum.......................Old rockhounder here,but a newbie on tumbling too...This forum has great words of advice for tumbling...
Plus the more you tumble,the better you get.............Thumbs up
|
|
|
|
Post by Jugglerguy on Apr 5, 2016 19:27:15 GMT -5
Hi Batemmaman, welcome to the forum. I have two Lortone tumblers (33B and QT66) and a Thumler's AR2 that has barrels similar to yours. My Lortones have never leaked. I've worn out a couple rubber lid gaskets, but even then they don't leak. The Thumlers tumbler is much newer, but I've had some slight leaking issues too. I first replaced the plastic lid, but it still leaked. Then I replaced the rubber O-ring around the perimeter of the lid. That seemed to do the trick. When the barrels have leaked, they seem to seal themselves with slurry after leaking a small amount, so it's not a huge deal. I have an old washcloth under my barrels to catch any leaks.
I can't say that I'm impressed with the Thumlers barrels compared to the Lortone barrels. I know that there are some people on this site that swear by Thumlers tumblers, but I'm not sure if they just like the larger barrels that have a different design.
|
|
|
|
Post by Jugglerguy on Apr 5, 2016 19:27:59 GMT -5
Welcome to the forum! I don't tumble, but I do know we have some first class tumblers here. Chuck doesn't like to brag, but he's a world champion tumbler. He brags a little. |
|
|
|
Post by rockjunquie on Apr 5, 2016 19:30:27 GMT -5
Welcome to the forum! I don't tumble, but I do know we have some first class tumblers here. Chuck doesn't like to brag, but he's a world champion tumbler. He brags a little. OK, but only a smidgen. |
|
indiana
spending too much on rocks
Member since October 2015
Posts: 285
|
Post by indiana on Apr 5, 2016 20:00:20 GMT -5
Welcome to the forum! (Your barrel should not be leaking)
|
|
Intheswamp
Cave Dweller
Member since September 2015
Posts: 1,910
|
Post by Intheswamp on Apr 5, 2016 21:40:13 GMT -5
Welcome to the forum! I don't tumble, but I do know we have some first class tumblers here. Chuck doesn't like to brag, but he's a world champion tumbler. He brags a little. I couldn't help but grin about this...knowing ya'll two.... |
|
batemmaman
off to a rocking start
Member since April 2016
Posts: 6
|
Post by batemmaman on Apr 5, 2016 21:44:32 GMT -5
Okay it was leaking because i had the lid on wrong but it's all good now! I'm buying more course grit now, but i was wondering what exactly they should look like when they're done with the course? How will i know when to move on to the next step? Thanks for your help!
|
|
|
|
Post by Jugglerguy on Apr 5, 2016 21:57:01 GMT -5
It's up to you how they should look. To me, they look flawless. No cracks or holes. Cracks and holes can carry grit to the next stage. Besides that, they're disappointing in the final product. I've never regretted taking the extra time to remove them. I have regretted not removing them. The cost is a longer tumbling time. Many of my rocks spend weeks or months in the rough stage. You might not be as picky as I am, but if you're moving things along with holes in them, take the time to really clean those holes out well.
|
|
|
|
Post by Drummond Island Rocks on Apr 5, 2016 22:12:58 GMT -5
Rule of thumb is that whatever your rocks look like when you move them to stage two is what they will look like at the end only shinier. If your rocks have flaws or pits at the end of stage one they will still have flaws and pits after polish. Very little actual material is removed in stage 2 thru 5. It is up to you to decide what you want your rocks to look like in the end. Some folks like a more natural look and do not spend all the extra time rounding and smoothing every flaw. pet wood day one 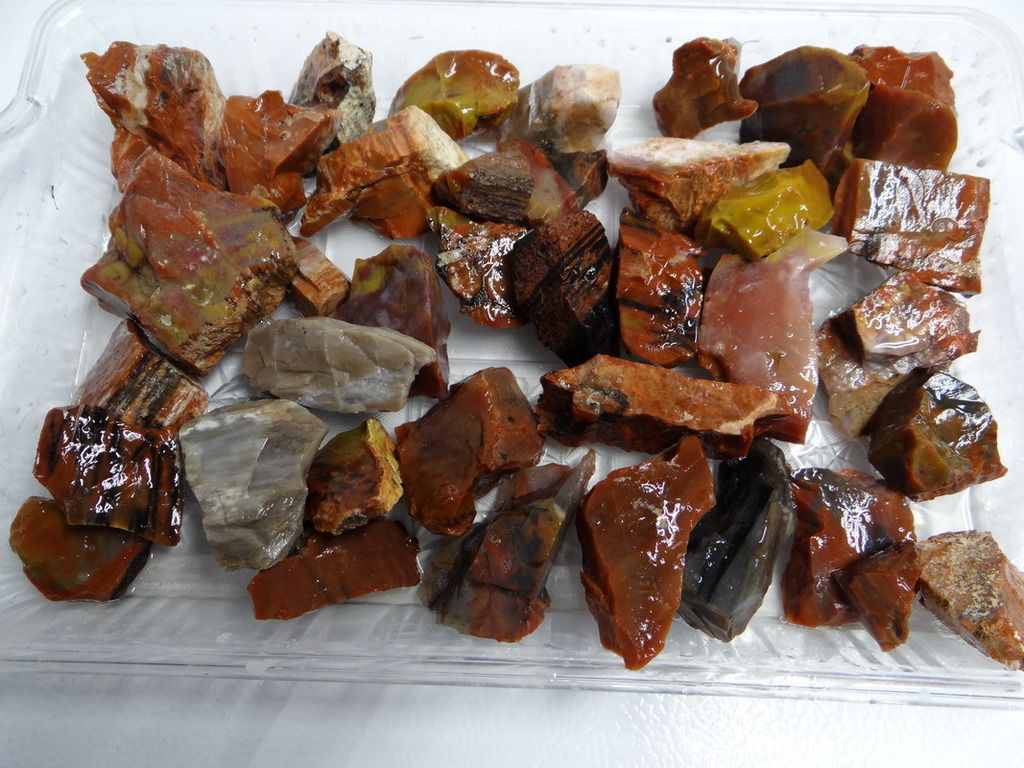 Same exact pet wood shown wet at the end of stage one. These pieces are ready for stage two now.  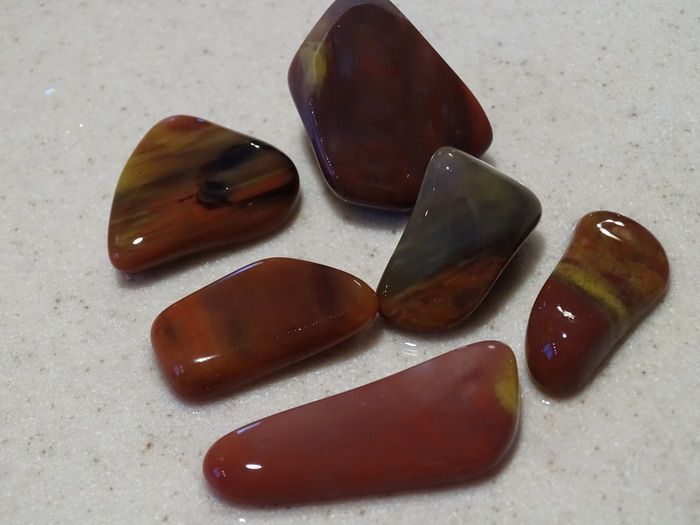 Chuck |
|
batemmaman
off to a rocking start
Member since April 2016
Posts: 6
|
Post by batemmaman on Apr 5, 2016 22:14:23 GMT -5
Okay that makes sense thank you
|
|
|
|
Post by Drummond Island Rocks on Apr 5, 2016 22:19:46 GMT -5
Kind of like taking a log with the bark still on it and trying to sand it smooth. You would need a whole bunch of sheets of really rough sandpaper to get the bark and knots all knocked down then just one sheet each of the finer grits to sand the scratches left by each previous grit.
Chuck
|
|
|
|
Post by spiceman on Apr 5, 2016 22:28:58 GMT -5
Look at You Tube, it has lots of good ideas. A video also helps a problem. The people here will walk you through it only if you ask.
You Tube shows filling the cracks or digs with super glue after the first stage. But in the end...
It's up to you to say they need tumbled more or they go to next step.
But always ask because the knowledge here is unreal.
|
|
|
|
Post by spiceman on Apr 5, 2016 22:33:47 GMT -5
But... Those rocks are perfect. Good example.
|
|


 Like Chuck said, share with us your general area and I'm sure folks will put you on to some hunting grounds or ideas.