huskeric
spending too much on rocks

Member since May 2016
Posts: 353 
|
Post by huskeric on Jul 11, 2016 15:23:54 GMT -5
The first time I looked at this forum, the idea for this barrel popped into my head, but my tiny brain took some time to process it and turn it into an actual "thing." I wanted to make a barrel out of rubber for noise characteristics, but I also wanted to make sure that there was some means of "stirring things up" in the barrel as it rotated. So I started out with this... Fernco flexible PVC 6" cap x2 Fernco flexible PVC 6" connector 2' of 6" PVC (cut down to about 8" or so) This could be done with other sizes of PVC as well. I started out by marking out my PVC pipe and then taking my RotoZip to it to cut out the following: 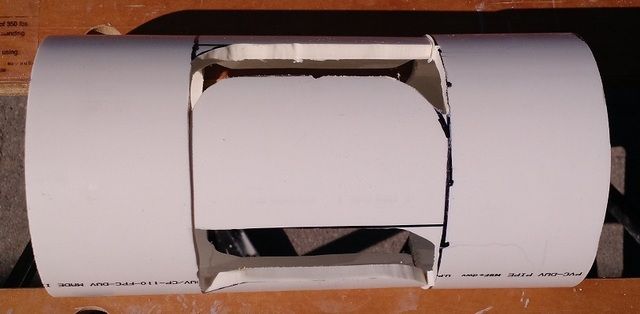 So the center section wasn't quite narrow enough to be covered by the rubber connector, so I had to shorten the augers. I started out trying to heat the PVC with a torch, which I quickly learned was "less than optimal." My neighbor loaned me his heat gun, and it was the ticket. I clamped a steel ruler into the PVC to shape the augers. So at this point, my two pieces of PVC look like this: 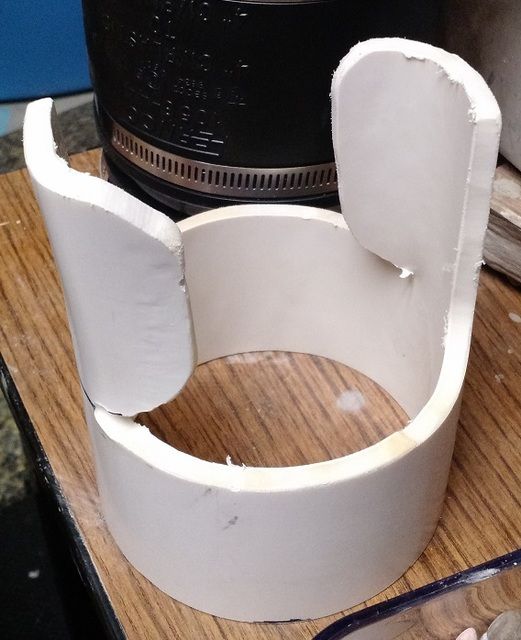 Then my plan is to use PVC cement to glue one of the caps on, and then to glue the connector over one side, then the other. At that point, I will have a solution that looks like this, sans hose clamps. 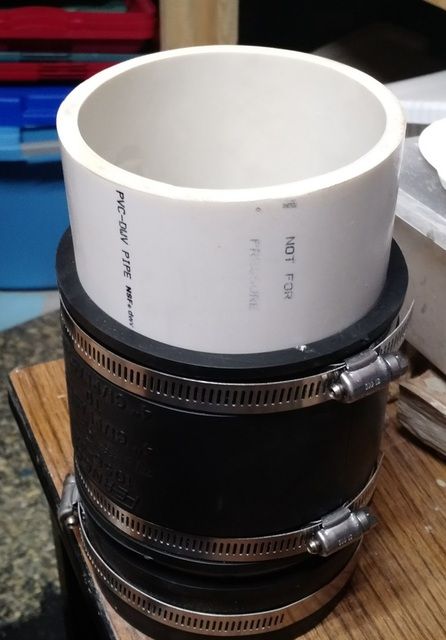 And here is a view of what my rocks will have to look forward to... 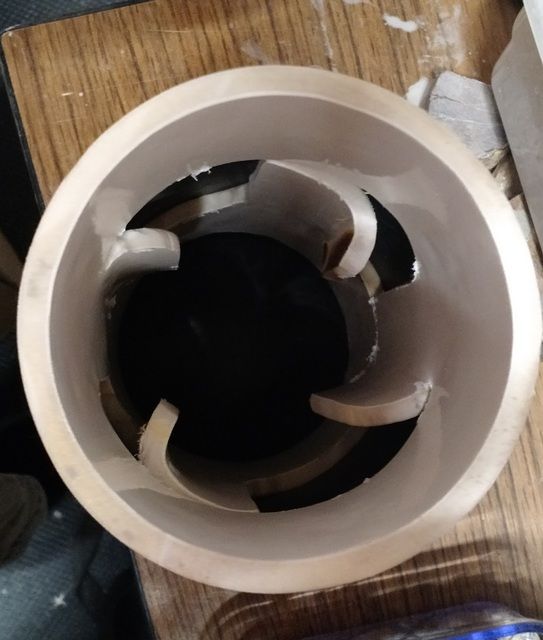 I don't know how loud it will be, because I realize that there is still a LOT of PVC exposed to the rocks, but it shouldn't be too bad. I have yet to figure out how I'm going to keep the lid side of this attached whilst tumbling. I may see if I can find some O-rings to put around this that will shim it out to where the pipe clamp is a non-issue. I plan to use this probably only for stage 1 polishing. A variation on this could be to keep your PVC solid and just cut the segments where you want augers. You could make fewer augers, more augers, and you could make them either more- or less-aggressive. Heck, you could just cut slots into the PVC, and then you'd have grooves that would serve as augers. Well, I am interested to hear your thoughts. If this has been done a million times already, I unintentionally copied, because this was truly an original idea (at least to me). Thanks! |
|
huskeric
spending too much on rocks
Member since May 2016
Posts: 353
|
Post by huskeric on Jul 12, 2016 22:00:17 GMT -5
OK, quick update. It is 4" PVC, not 6". I wish this was the first time I had ever over-estimated how big something was... =)
|
|
Deleted
Deleted Member
Member since January 1970
Posts: 0
|
Post by Deleted on Jul 14, 2016 14:05:32 GMT -5
And how does it roll over the clamp screw housings?
|
|
huskeric
spending too much on rocks
Member since May 2016
Posts: 353
|
Post by huskeric on Jul 14, 2016 14:28:57 GMT -5
And how does it roll over the clamp screw housings? Wellll.... That's an interesting question. I was going to see if the PVC cement would make it water-tight, and it didn't, so I am going to try one of a few things: First I'm going to use some marine silicone and re-seal everything and test it for water-tightness again. If that doesn't work (or maybe even if it does), I bought some 1/2" vinyl tubing and couplings to put a "roller" of sorts around the outside, so that will shim out the entire thing and bring it back to being round on the tumbler. I also looked at some alternative clamping solutions, i.e. plumber tape, heavy-duty cable ties or even velcro strapping that can be put on tightly but with a lower edge profile. I don't want to put too many "moving parts" on this solution, because every single one of them is a potential point of failure. In my case, I can really probably eliminate "potential" from that last sentence. What do you think of the concept? If I come up with a more elegant way to clamp it all together, I'll share some pics. I think if I were to do it again, I would start by not cutting it into two pieces, and just make cuts into the PVC with the Roto-Zip and then use the heat gun. I would also make slightly less-aggressive augers. |
|
|
|
Post by captbob on Jul 14, 2016 15:08:44 GMT -5
Interesting. That's some good ol' American MacGyvering right there!
Will be fun to watch your progress.
|
|
jamesp
Cave Dweller 
Member since October 2012
Posts: 36,562
|
Post by jamesp on Jul 14, 2016 15:12:17 GMT -5
Wow !!
|
|
jamesp
Cave Dweller
Member since October 2012
Posts: 36,562
|
Post by jamesp on Jul 14, 2016 15:14:31 GMT -5
curious why the kickers ??
|
|
Deleted
Deleted Member
Member since January 1970
Posts: 0
|
Post by Deleted on Jul 14, 2016 16:03:22 GMT -5
curious why the kickers ?? +1 Seems likely to add impact damage to the list of issues. |
|
jamesp
Cave Dweller
Member since October 2012
Posts: 36,562
|
Post by jamesp on Jul 14, 2016 19:35:33 GMT -5
Slighter kickers in PVC barrels make sense. Especially in 8-10-12 inch pipe because there is more slippage in bigger pipe.
Even 6 inch has slippage.
I prefer a gentle roll, sliding avalanche to what seems to maximize rubbing. Just theory though.
|
|
|
|
Post by pauls on Jul 15, 2016 2:27:49 GMT -5
When I was using PVC pipe for barrels I would put the heat gun on a spot till it was soft and just push it in so I would have a series of tennis ball sized lumps that worked as kickers, Gave up on that because the lumps were the first thing to wear through.
|
|
jamesp
Cave Dweller
Member since October 2012
Posts: 36,562
|
Post by jamesp on Jul 15, 2016 6:16:25 GMT -5
When I was using PVC pipe for barrels I would put the heat gun on a spot till it was soft and just push it in so I would have a series of tennis ball sized lumps that worked as kickers, Gave up on that because the lumps were the first thing to wear through. You can dice up pipe of the same size as your barrel and 'PVC glue' them to the inside of the barrel. Say 1.5" X 1.5" squares, pick your shape... Gentle but effective. A good PVC glue bond is a tough bond. Double wall sch 40 6 inch pipe barrel: I sawed a strip out of 6 inch pipe along the length and fit it into another 6 inch pipe. (Think roll pin) Boiled it in water before sleeving it. Used no glue. Double wall pipe. Heavy little barrel. Sawed some 1 inch long lengths and slid(forced) them down the sleeve at boil to help form it. Then cut them off. It traps grit but perfect for barrel wearing coarse grind. Or you can saw smaller 2-3 inch lengths, cut a gap, and slide them in outer barrel in a stacked fashion. Best to boil them. Stagger the gaps to stagger constant out of round' over full length when doing a single sleeve. Again, no glue. Do all this before adding end cap and reducer end for 4 inch opening. Wife's hot air hair gun will really soften PVC, just takes time. Pre heating by boiling best. Roll pin:  |
|
huskeric
spending too much on rocks
Member since May 2016
Posts: 353
|
Post by huskeric on Jul 15, 2016 11:03:27 GMT -5
OK, so that's exactly what I was looking for! Thank you to all of you! I thought for stage 1, the giant augers would help the process, but if you think it would cause more harm than good, that's better to know before I use it and ruin a batch of rocks. I am going to probably scrap that PVC and try something a little more gentle.
My original idea was to use the rubber connector as the barrel because it is pretty cheap and it would be quieter than solid PVC. Then I thought it wouldn't create enough tumbling action because it's so smooth, so I went with the nuclear option, apparently. I will swing the pendulum back the other way, dial down the agitators and post some new pics.
Thanks again to all! I would rather learn from your combined knowledge/experience than purely from my own mistakes.
|
|
|
|
Post by oregon on Jul 15, 2016 13:34:28 GMT -5
anyone ever try a barrel with an end plugs like:  if you leave the rubber coupler sleeve on this barrel, or put two sleeves on for a longer barrel (sans hose clamps) , add two end plugs (only $6.46 for 4" on Home depot's website) the rubber sleeve should give enough clearance so the end plugs aren't riding on the bars... |
|
quartz
Cave Dweller
breakin' rocks in the hot sun
Member since February 2010
Posts: 3,352
|
Post by quartz on Jul 15, 2016 23:18:09 GMT -5
Another 4" barrel method: Get a round end cap, cut the portion [length] that would normally go over the barrel material in half. This gives a shortened cap and a ring. Glue the cap to one end of the barrel stock and the ring to the other, leaving a bit of the barrel protruding from the ring, 1/8" is plenty. This makes both ends of the barrel the same diameter and allows the use of the end plug oregon pictured above. The end of the barrel that goes into the cap should be beveled on the inside so as to not make a grit/rock trap. |
|
huskeric
spending too much on rocks
Member since May 2016
Posts: 353
|
Post by huskeric on Aug 16, 2016 18:19:06 GMT -5
I am going to try (emphasis on TRY) a new solution, one that is as simple as it is prone to failure. =) I am going to test just the 4" pipe with JUST the rubber caps. No hose clamps, instead, I'm going to test out cutting some VERY small 'V' slots into the lip of the cap and then use some heavy-duty velcro cinch straps. the "thought" is that the velcro will pull the "V" slots closed and help to form a seal. The cinch straps are very low-profile, so they will not get in the way of the motion of the barrel (at least I don't believe). I know this doesn't have a ton of value with out pictures, but I suspect most can visualize what I'm thinking about.
I realize the potential for failure, but I *believe* that the weight of the barrel on the caps will also help to hold them on. On top of that, I could put some of the plastic guide washers onto the idler shaft to prevent lateral motion, which would also help prevent the caps from coming off (in my head).
If it works, it would be about the cheapest/simplest way to build a barrel on your own. I was also thinking about taking that rubber junction sleeve (it can't be reused because it was cemented onto the PVC and it will stretch/tear coming off) and cutting thin strips and cementing them into the PVC so that I have a little bit of something for the rocks to grab onto while tumbling.
Interested in hearing feedback, honest feedback. Be brutal. =)
|
|
huskeric
spending too much on rocks
Member since May 2016
Posts: 353
|
Post by huskeric on Aug 16, 2016 18:24:38 GMT -5
On a somewhat related note, has anyone tried making a replacement barrel out of high-strength liquid mold making rubber? I don't know if it would be any cheaper than just buying replacement barrels, but I'm curious to know if anyone has tried it.
|
|
quartz
Cave Dweller
breakin' rocks in the hot sun
Member since February 2010
Posts: 3,352
|
Post by quartz on Aug 16, 2016 23:20:41 GMT -5
You need to price that liquid>rubber stuff, my experience with it showed it to be very expensive.
|
|
Deleted
Deleted Member
Member since January 1970
Posts: 0
|
Post by Deleted on Aug 16, 2016 23:40:46 GMT -5
jamesp style PVC barrels are like $50 and last at least 2 years of very hard duty. Why re-invent this particular wheel?
|
|
|
|
Post by pauls on Aug 17, 2016 5:52:11 GMT -5
Speaking of wheels.
I have been told that Go Kart tyres are great for tumbler barrels. They must be racing tyres. Ordinary ones are too soft on the sidewalls. Get two plumbing plungers and feed a bolt through the bit where the handle goes and bolt them in place over the wheel rim hole.
|
|
jamesp
Cave Dweller
Member since October 2012
Posts: 36,562
|
Post by jamesp on Aug 18, 2016 7:05:02 GMT -5
Time will tell when fooling with tumbler barrels.
Early wear thru on the center of the end cap or the shoulder of a reduction was my worst problems.
Leakage at connections #2. Used all PVC to PVC glued joints as they were designed on the big joints.
Gas pressure blowing caps #3. Used Fernco rubber caps at the smaller open end that would bulge as soon as gas started building, i.e. early warning detection.
Used double band clamps on gaseous loads. Have removed the clamps and have the cap shoot 50 feet in the air on many occasions.
Gained a respect for the abuse a tumbler barrel receives, especially in coarse grind.
|
|