|
|
Post by pauls on Oct 14, 2016 2:41:09 GMT -5
Nice build.
Constructive criticism not pickin on you.
I would be concerned that those bearings are too exposed to the grit and water, you will notice the ones that captbob posted have the bearings outside the wet area. We have a couple of machines at the club that have bearings in the wet. The bearings are constantly being replaced, even well sealed agricultural bearings don't last all that long and they aren't cheap.
|
|
ronm
off to a rocking start

Member since July 2016
Posts: 16 
|
Post by ronm on Oct 17, 2016 18:19:38 GMT -5
Well tried the cab machine today, but first after all the suggestions I finally added the bearing protection  I used a couple of plastic jugs I had laying around. After the first run I now know things that I need to do 1. Add a water diverted to each wheel to spread the water out across the entire wheel. Mostly what I see on the Internet is some sort of webbing strap, so I'm on the hunt for that 2. I need to maybe add a splash guard to the front of the wheels (the webbing may eliminate the need for this item 3. Add the LED lighting Issues: to resolve in cabbing machine 2.0 1. Deeper base unit for catching the water on the front 2. Not cut the flat on the shaft as deep as I think it is causing a slight vibration due to the shaft not being in balance. Does not affect the machine just something for others to think about Otherwise the DW and I made our first cab and we are very happy with the machine. The wheel spacing is great, as is the height of the wheels. The cleanup process really is quite simple, water hose does it all, which is not an issue as I am using the machine outside. I will post additional photos as I upgrade and add in the next few days Thanks to everyone for their suggestions, and posting their builds on the site which saved me tons of trial and error. Ron ND5T |
|
ronm
off to a rocking start
Member since July 2016
Posts: 16
|
Post by ronm on Oct 18, 2016 11:35:40 GMT -5
Added the water diverter (old sling) and tried a rock and everything is good. I will not need the splash guard  Ron |
|
NDK
Cave Dweller 
Member since January 2009
Posts: 9,440
|
Post by NDK on Oct 18, 2016 11:38:46 GMT -5
What an awesome build. Nice work! I use the webbing on my machine too. It works well enough, but I saw a post once by Drummond Island Rocks where he uses T's to spray the water on his wheels. I believe he just plugs the ends then drills several holes to wet the whole width of the wheels. Been considering trying that myself. |
|
zarguy
fully equipped rock polisher
 Cedar City, Utah - rockhound heaven!
Member since December 2005
Posts: 1,791
|
Post by zarguy on Oct 18, 2016 12:58:36 GMT -5
ronm, It's great to see your progress. Trial & error, that's the key. Now,let's see some cabs! Lynn
|
|
mydistraction
off to a rocking start
Member since October 2016
Posts: 1
|
Post by mydistraction on Oct 23, 2016 9:58:33 GMT -5
Ronm, you have a great looking machine. (GREEN with envy!!!) I would suggest changing the webbing to rubber sheet that extends at least 1/2 in past both edges of your wheels. The rubber won't trap/retain grit and the wider piece will help reduce spray. I used pieces of heavy farm implement inner tube that I bought at Tractor Supply.
|
|
ronm
off to a rocking start
Member since July 2016
Posts: 16
|
Post by ronm on Nov 13, 2016 15:12:22 GMT -5
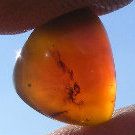
The rubber sounds interesting, I may try that. For now the webbing is working so I can still cab while I continue to build. Today I mounted the switch and added some foam padding on the front edge.  my first cab, can't tell you what it is, just something I found in Colorado in some tailing pile in the middle of nowhere.  |
|
ronm
off to a rocking start
Member since July 2016
Posts: 16
|
Post by ronm on Nov 13, 2016 15:23:54 GMT -5
Here is the total so far. We don't know what we are doing so we just try to make our rocks shiny, sometimes that equates to just smaller.  |
|
ziggy
spending too much on rocks

Member since June 2016
Posts: 483 
|
Post by ziggy on Nov 13, 2016 22:17:01 GMT -5
Here is the total so far. We don't know what we are doing so we just try to make our rocks shiny, sometimes that equates to just smaller. My husband built a cabber too. Amazingly, he also uses the same collar with a hole tapped for a cut off screw trick that you used. On his machine, he only uses two collars. They drive the two outside wheels. Then, he cut some pvc strips just wide enough to fit in the wheel slots and epoxied them to the pvc spacers between the wheels to drive the other two wheels on the shaft on each side. The strips fit into the wheel slots just like the collar screw does. So, one collar drives three wheels on each side of the cabber. In this way, he made it quick and easy to change wheels without having to unscrew a locking nut on the end of the shaft and could get away with using a straight piece of shaft with no machining needed. 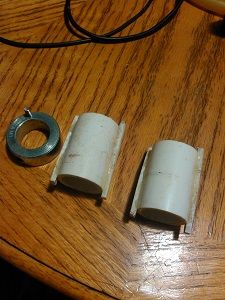 He also made the wheel covers out of five gallon water jugs held to the base with velcro. The bearings sit in a completely dry area in between the two wheel covers with the drive pulley between them. Additionally, a removable (from the jug) plastic guard surrounds the shaft and open end where the shaft passes through the jug and assures that no water gets to the bearings. He hung a single piece of denim cloth to cover all three wheels on each side and distribute water across the wheels and prevent over spray. In the picture below you can see my daughter using one side of the cabber. The wheels are off the right side in this pic. The denim is hanging down over all three wheels at once. The water is gravity fed from the same kind of water jug the wheel covers are made from. The waste water runs out the dispenser valves that were made to originally get water from the jug to the cup just below the handles. All he had to do was order some 5/8" rubber hose and stick it in. Each water supply has it's own shutoff/on valve. A hole was drilled in the water reservoir with a funnel inserted for easy refills. 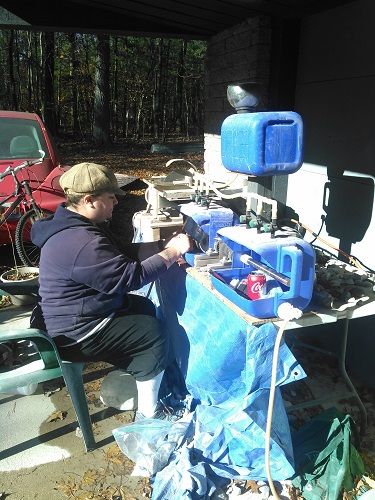 |
|
ronm
off to a rocking start
Member since July 2016
Posts: 16
|
Post by ronm on Nov 14, 2016 10:19:49 GMT -5
Your cab machine looks great, I offset the bearings so I can only tighten 2 wheels with the locking collars at a time. Somehow I surmised that I had to spread out the pillar block bearings, don't really know if it was necessary.
Thanks for the input
|
|
ziggy
spending too much on rocks
Member since June 2016
Posts: 483
|
Post by ziggy on Nov 14, 2016 14:24:04 GMT -5
Your cab machine looks great, I offset the bearings so I can only tighten 2 wheels with the locking collars at a time. Somehow I surmised that I had to spread out the pillar block bearings, don't really know if it was necessary. Thanks for the input The 1" bearing quality shaft allows for the bearings to be where they are. There is no real vibration from the lack of end bearings or the bearings not being further apart. They are actually 5 3/4" apart. 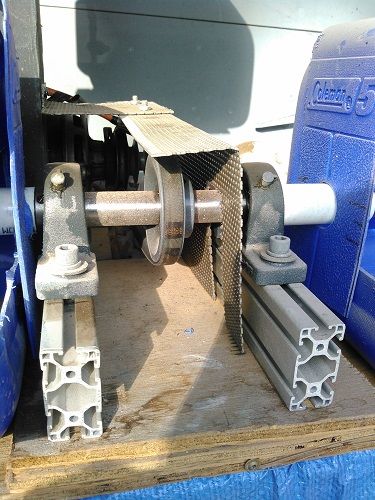 He could have probably put them even closer to each other than they are now but didn't need more shaft with his wheel cover design. 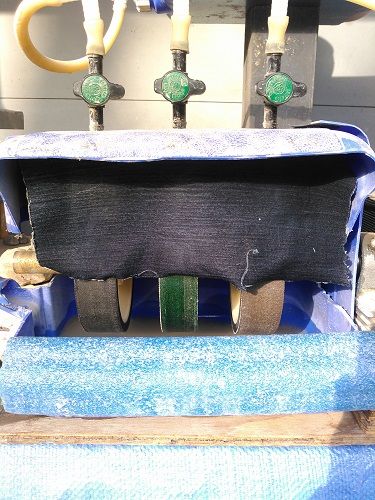 I was really surprised that you used the same collar drive screw thingy that my husband was using. Great minds think alike. He just eliminated some of the extra collars and took the bearings completely out of the wet zone. 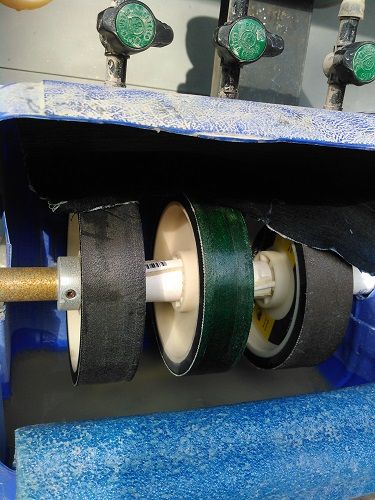 |
|
ronm
off to a rocking start
Member since July 2016
Posts: 16
|
Post by ronm on Nov 14, 2016 19:46:08 GMT -5
Thanks for the pics, I like the denim hanging in front to eliminate any spray off the wheels. I may have to incorporate that into mine if the water becomes a problem. The thingy for the wheels was a matter of necessity, due to the wheels having the slots it seemed like an easy fix, I had to drill holes into the hard wheels as they don't have slots for the pins.
Ron ND5T
|
|
ziggy
spending too much on rocks
Member since June 2016
Posts: 483
|
Post by ziggy on Nov 15, 2016 10:35:27 GMT -5
The thingy for the wheels was a matter of necessity, due to the wheels having the slots it seemed like an easy fix, I had to drill holes into the hard wheels as they don't have slots for the pins. Ron ND5T My husband always had to fix engineering mistakes and think on the fly for solutions to problems that were not thought about by the engineers when building machines. Every machine his company built was basically a one off or a variation on a more standard base model. He brought those same skills when it comes to the cabbing machine. Looks like you are great at the same thing. You chose the easiest solution by drilling the hole in the hard wheel. Smart. My hubby said he was impressed by your engineering skills. |
|
Deleted
Deleted Member
Member since January 1970
Posts: 0
|
Post by Deleted on Nov 15, 2016 11:26:45 GMT -5
Fantastic!
Are the struts u used for frame stainless as well?
|
|
ziggy
spending too much on rocks
Member since June 2016
Posts: 483
|
Post by ziggy on Nov 15, 2016 12:01:29 GMT -5
Fantastic! Are the struts u used for frame stainless as well? The way you covered your bearings was genius, I forgot to mention. Simple and quick. Those Unistruts are good in the water for a while, but Unistrut does make that stuff in stainless if he is not using it already. If it is PG or HG galvanized/plated stuff you probably should replace down it the road with SS. What he has on it really doesn't look like stainless. Unistrut also makes stainless hardware (nuts, bolts, etc.) for their stainless Unistrut which also would be a good investment. If he is using the PL variety, then it is just oiled surface applied to the raw steel during the rolling process and probably won't last even a year without significant corrosion. Only being a 6", 6 wheel unit, my hubby didn't want corrosion issues and simplicity and low cost was top priority so the complete lack of any framework in the pans was designed out and cheapo water jugs were repurposed as wheel covers. He has a dedicated buffing wheel so that isn't included on his machine. The only frame on his design is two pieces of 80/20 that the pillow blocks mount to. If he was building a big 8" cabber like yours, he probably would have leaned more towards something like you have there. He mentioned that he might like to stack two low grit wheels together like you did. Should be no problem with this using his design as well. Your machine looks like it will be an awesome one  |
|
Deleted
Deleted Member
Member since January 1970
Posts: 0
|
Post by Deleted on Nov 15, 2016 12:45:19 GMT -5
ziggyI just looked on the ipad. The cut ends of the strut are beginning to rust already. This will be a maintenence issue down the road. I love Ziggy us of 5 gallon bottles for housings! Using the original cap/spigot for drainage is genius! Both builds are superior and really going to make the user a lot of fun times! Woot!
|
|
ziggy
spending too much on rocks
Member since June 2016
Posts: 483
|
Post by ziggy on Nov 15, 2016 19:35:05 GMT -5
Looks like he used UHMW polyethylene blocks to mount the bearings on and raise them up. Is that what that is? Nice touch. Also really like the flexible coolant supply. Those snap together gems are a bit pricey for my hubbies bargain basement build but they look great on yours. Cool thing is they make all kinds of nozzle pieces, although, to get the most out of the fan shaped ones you need more flow than would normally be required for cabbing and it might be a mess.  Hubby wonders if ronm has built machines for a living. |
|
ziggy
spending too much on rocks
Member since June 2016
Posts: 483
|
Post by ziggy on Nov 17, 2016 22:38:43 GMT -5
Hubby's drive "gears" for lack of a better name were re-glued with proper PVC cement after the epoxy that was working ok failed upon removal of the gears from the machine. Took the spacers off and the epoxy just let go. The PVC cement works great (as it should.) |
|
ronm
off to a rocking start
Member since July 2016
Posts: 16
|
Post by ronm on Nov 21, 2016 23:42:09 GMT -5
Well I will try to address some of the questions
The unistrut is galvanized, and was free so that's what I used. The hardware used was stainless in some places and cad in others. Simple change out if I ever get my hands on a couple of pieces.
The water lines are cheap, eBay 12 for $12 free shipping if I remember right
Yes the bearings are mounted on poly, again something I had
By trade I was an oilfield Electrician, but I have always worked on everything my entire life.
We are really enjoying the machine.
I just purchased a used 70's era 18" saw and going thru that now should make my first cut with it tomorrow.
Ron ND5T
|
|


 Serious thought goes into a Chat Box v.2 post. "It Ain’t Easy"


