rykk
spending too much on rocks

Member since September 2011
Posts: 428 
|
Post by rykk on Jun 1, 2014 23:43:07 GMT -5
I'm not sure if the size of the lap disk makes a difference or not. It would depend on how big the slab is, I reckon.
I have a Covington belt sander and haven't have much success with big slabs with it. I'm talking *big* slabs over 5-6 inches in any dimension. The belt is only 3" wide, so there's always a good bit of the slab hanging out when you grind. The sander was given to me used and didn't have a flat piece of metal backing the belt between the two rollers so I made one, myself, for it. I found that having the flat hard against the back of the belt (Yes, I rounded the edge of the metal) made a nasty whacking sound every time the joint in the belt went past. Seemed like a not so good thing, so I moved it away a little. The problem now is that, when you press a slab onto the flat, the two rollers are at a slightly higher level and you end up sanding just the upper and lower edges of the slab. It makes the working part of the belt into sort of a flattened "V". The two rollers are bare metal with no rubber sleeve on them, so there's always a lot of banging on the slab when I try to grind there. It grinds well but I've had more than a few of my best, most prized slabs break in half along unseen fracture lines from all the rattling while trying to bevel the edges. I don't think the Covington is supposed to have any sort of rubber, "expando" type of sleeve on the rollers because I don't see one in their pix. Hopefully, someone reading this knows about belt sanders and will spot if I'm wrong.
IMO, most all lapidary grinding equipment is geared towards small to very small workpieces like cabs. Except for slab saws, big polishing heads, and the larger vibratory laps. BTW - I've found that, on very long slabs, it helps to arrange the others in the pan so that the long one has no choice but to rotate sideways around the pan rather than lengthwise. Makes for a shorter distance between the fresh grit and the center of the slab.
C-ya,
Rick
|
|
rykk
spending too much on rocks
Member since September 2011
Posts: 428
|
Post by rykk on Jun 1, 2014 17:43:26 GMT -5
Yep - y'all are right - switch the hot wire. My bad. Both ways work, one is safer.
Rick
|
|
rykk
spending too much on rocks
Member since September 2011
Posts: 428
|
Post by rykk on Jun 1, 2014 17:30:10 GMT -5
From what I've read in the past and some experience with a spinning lap, it is very difficult to get the center of a good sized slab to polish with one of those. It's one of the main reasons I bought a vibe lap in the first place. It has to do with the fact that, as you move out from the center, the effective speed of the disk goes up in terms of not rpm but linear inches per second. You can rotate the slab but the the center is always in the middle area of the disk and that's why it's a problem. At least that's what I've read more than once here and have heard on other forums.
C-ya,
Rick
|
|
rykk
spending too much on rocks
Member since September 2011
Posts: 428
|
Post by rykk on Jun 1, 2014 2:53:05 GMT -5
So, nobody knows if this stuff might be Last Chance rather than Carey? It really is as red as the pix show. I'm rarely stumped about a rock's ID but maybe I'll try the proper/ID page.
C-ya,
Rick
|
|
rykk
spending too much on rocks
Member since September 2011
Posts: 428
|
Post by rykk on Jun 1, 2014 2:45:51 GMT -5
I'm surprised you couldn't get a flat slab with a jiggle pan (vibrating lap). Typically, a vibe lap is the only good way to get a flat slab. Large slabs can be a bit more difficult in the center than small ones. Here's some tips on getting big ones flat:
1) Use 60/90 grit. I've tried 80 grit and it stinks at grinding compared to 60/90. Wastes a LOT of time. Add maybe 3 more tbsp of 60/90 a few hours into the grind and run for at least 15 hours.
2) Make sure to bevel the edges of the slab all the way around. The bigger the slab, the more you may have to bevel. This allows grit to migrate in to the center of the slab better. Maybe pick the slab up every few hours and set it down again to let fresh grit to the middle. Don't know if this last bit really helps but I do it anyhow.
3) Make sure to place adequate weight on top of the slab. A big slab needs a lot of weight - 3-4lbs+ sometimes. Lead ingots like the Lyman mold kinds that bullet casters/reloaders and folks who cast fishing weights are ideal. There's a lot on Ebay.
4) Make sure that the rocks/slabs are circling around the pan at a rate that's not super slow. This assures that the slabs are constantly getting newer grit under them. If they sit too long in one place, the grit under them wears down and can become too fine to make much of a dent in an un-flat or heavily saw marked rock.
To get them rotating well, you have to make sure to have plenty of slabs in the pan. A rule of thumb I read somewhere was "fill the pan totally, then remove one or two rocks". At the very beginning, all of the slabs will jitter around chaotically like someone walking on marbles but the rotation should start fairly soon. Sometimes you have to play "traffic cop" and reposition the rocks to get good rotation. There can be some rocks that don't want to play nice and try to go in the opposite direction of the others by spinning the other way. Most times, all you have to do is rotate that rock 180 degrees and set it back in and the merry-go-round begins.
Anyhow, hope some of this helps - C-ya,
Rick
|
|
rykk
spending too much on rocks
Member since September 2011
Posts: 428
|
Post by rykk on May 29, 2014 23:47:30 GMT -5
BTW - Do you have an ohm meter? That would help a ton.
Rick
|
|
rykk
spending too much on rocks
Member since September 2011
Posts: 428
|
Post by rykk on May 29, 2014 23:44:40 GMT -5
Sure would be nice to be able to see the switch and from different views but I'll take a preliminary stab with what little visual info there is. This is assuming that the screw at the "B" contact is a different color from the other two. That would mean that "B" is for a ground connection and you'd connect the green wire that "should" be in the 110Vac power cord there. But don't connect that anywhere until after the switch is working. Also, are you POSITIVE that the feed motor runs on AC? If, so...
1) Take all 3 of the Black wires and wire nut them together.
2) Take the White wire of the 110Vac power cord and connect it to "TR".
3) Connect the remaining two White wires (one from the main motor, one from the feed motor) to "TL".
Flipping the toggle switch away from "TR" should connect "TL" and "TR" and that would be your "on" position. If it works backwards, just rotate the switch so that it turns off when the string is pulled. If this works, then connect the Green wire to "B".
If the "B" screw/contact is not a different color from the other two and/or the first method doesn't work, then wire it this way:
1) Take all of the Black wires and wire nut them together.
2) Take the White wire of the 110Vac power cord and connect it to "B".
3) Connect the remaining two White wires (one from the main motor, one from the feed motor) to "TR".
In this case, flipping the toggle switch away from "TR" should connect "TR" and "B" and that would be your "on" position. If it works backwards, just rotate the switch so that it turns off when the string is pulled or move the two wires on "TR" to "TL". Find a chassis ground point or screw and connect the Green ground wire from the 110Vac power cord there.
Good luck,
Rick
|
|
rykk
spending too much on rocks
Member since September 2011
Posts: 428
|
Post by rykk on May 25, 2014 2:31:45 GMT -5
Roy - Yeah, I leaned 90% toward the Donny but figured I'd toss in another green one just in case I was wrong - lol
Rick
|
|
rykk
spending too much on rocks
Member since September 2011
Posts: 428
|
Post by rykk on May 24, 2014 1:58:34 GMT -5
Here's a Highland Park flange for a 24". As seems usual for almost every lapidary site I've ever been to, it is woefully/lazily lacking in details, so it doesn't tell you the diameter. Aaaaarrrrgh!
C-ya,
Rick
|
|
rykk
spending too much on rocks
Member since September 2011
Posts: 428
|
Post by rykk on May 24, 2014 1:51:30 GMT -5
The green t-egg looks like either a Donnybrook or maybe a "Killer Green" bed t-egg.
C-ya,
Rick
|
|
rykk
spending too much on rocks
Member since September 2011
Posts: 428
|
Post by rykk on May 23, 2014 3:57:37 GMT -5
Search for "esciguy" - y'all have spelled it wrong...
Rick
|
|
rykk
spending too much on rocks
Member since September 2011
Posts: 428
|
Post by rykk on May 22, 2014 4:02:30 GMT -5
If you can see that the cut is actually curving on the uneven ones, you're probably dished AND feeding too fast. The curve can come from the blade bending/dishing. It could also happen if the rock rides up on the blade, though your vise carriage shouldn't be able to flex enough to let it climb too far up.
Three minutes per inch works out to a whopping 20 inches per hour. That's way, WAY too fast. An 18" saw should be fed something on the order 5-8 inches per hour. I think you need to slow it down, especially on harder stuff like agates. You'll end up going through a lot of blades feeding it so fast.
C-ya,
Rick
|
|
rykk
spending too much on rocks
Member since September 2011
Posts: 428
|
Post by rykk on May 22, 2014 3:52:12 GMT -5
Wow - neat stuff! I like the dense, yellow slices. I was lucky and got a huge slice of the flame agate from Split Point before the prices went insane on Ebay. So, do y'all really have to watch out for the huge tidal bore to get these rocks?
C-ya,
Rick
|
|
rykk
spending too much on rocks
Member since September 2011
Posts: 428
|
Post by rykk on May 22, 2014 3:47:36 GMT -5
Well, now that I looked at his pix, it's *maybe* possible he's using the wrong white balance. Though, I don't think I've ever had such garish results with my camera - maybe a different make/model? I've noticed that seller and cringe every time I see one of his listings. His pix didn't look like that when he started selling and it's only been maybe in the last 1-2 months they got all crazy. There's one other rockseller - not sure if it's kosher to mention their name - whose pix look like that and his only went nutz in the last 5 or so months.
C-ya,
Rick
|
|
rykk
spending too much on rocks
Member since September 2011
Posts: 428
|
Post by rykk on May 22, 2014 3:30:53 GMT -5
Uhm - just a thing - There's no way an ebay seller can retaliate for bad feedback other than blocking the person from bidding on future items that he lists. Ebay sellers are not protected at all from unscrupulous buyers who game the system - especially cases of "buyer's remorse" where a bidder will toss out some big snipe only to find one or more other folks sniped as well and his was the highest. Ok, I won't get into rant mode here - lol.
As far as the pix, I agree the colors are WAY out of whack and saturated. This can be caused by using the wrong white balance setting on their point 'n shoot camera. Or just a bad camera. The blue mentioned (I didn't go look) can be caused by hitting "Auto Color" or "Auto Contrast" in Photoshop. How do I know this? Cause I've tried it and found that those automatic adjustments stink. My most likely guess is it's "Auto Color" or maybe way too much contrast increase in the "Brightness and Contrast" adjustments in Photoshop.
Most point and shoot cameras really suck at reproducing colors properly. Myself, I spend an inordinate amount of time having to tone down the saturation of reds and yellows in my listings' pix. It's just not right to just resize the pic and upload it if the colors are all wrong. I know about the above settings from dorking around to see if they help or hurt the image accuracy. Still, it can be tough to get out all of the effects of crappy/wrong white balance and el cheapo photo detectors. Different white balance settings give different results. My wife has a big honkin' "real" camera - a Nikon D80 or 200? - but, though she'd probably relent and let me use it if I was adamant, she'd be constantly stressed that I'd spray water on it or scratch the lens with my pant leg or shirt sleeve. :-)
Anyhow, all that said (ought to start a thread on camera settings), I'm pretty sure that he's doing "something". Most likely "auto color" or adding a ton of contrast in a graphics editor like Photoshop, Gimp, Paintshop Pro, et-al. I can't really speak to the white balance as I only tried to take pix outside a couple of times and don't really know what the settings do under those conditions. It was just way too hot outside here in FL and the glare was nutz, too.
I think a lot of the sellers try to get good looking pix and use the right lighting just like jewelry stores do but a couple go overboard or "enhance" them and some don't try to (or can't) tone down some of the effects of shining a bright light really close to their slabs. Noreena "Jasper" (Argyllite) is the worst because, when well/brightly lit, the backdrop looks white instead of the actual grey. I remember ragging at a seller when I bought my first slab of it because every pic I ever saw showed the red and yellow against a white background rock color and what I got was grey. It wasn't until I tried taking some pix, myself, that I learned he wasn't enhancing the pix. It still disappoints me that the background rock color isn't white like almost every pic I ever saw on the 'net and I try to buy the lightest grey slabs I can find.
C-ya,
Rick
|
|
rykk
spending too much on rocks
Member since September 2011
Posts: 428
|
Post by rykk on May 20, 2014 19:18:45 GMT -5
Wow - VERY nice wood!
Rick
|
|
rykk
spending too much on rocks
Member since September 2011
Posts: 428
|
Post by rykk on May 12, 2014 20:39:35 GMT -5
I'm just like you. If I beat on it long enough, I can get one straight. The gold Covington blade was super messed up. a couple fair edge dings from rocks jumping the vise - or chunks breaking off, mid cut - twisted, and dished. Here's a link to where I learned the most from: www.carbideprocessors.com/pages/saw-blades/hammering-saw-blades.htmlTook a good bit of pounding to get it decent. Actually, it's better than when it was brand new. Three out of three gold Covington blades I've had were warped/dinged right out of the box brand new. I set it on a 13" round sheet of plywood and pound a block of pressure treated 2x4 with a 4lb hand sledge to get the dings and dishing out. This one was so bad that I had to pound the edge to straighten out discontinuities. The 2x4 prevented any damage to the diamonds. After it was straight, I balanced it in my hand and tossed it up and caught it and held it by the edge and wiggled it. Made a sound/feeling like pushing a dent in and out of a tin can. Found the culprit areas and those I hammered without the wood block and that restored the tension. At least it acts that way now that I'm using the blade. I had tried once before with this blade and got it straight but I reckon not re-tensioned. I actually heard it pop/chime in the saw on about the 3rd slab afterward. Sure enough, the saw marks were back and it had dished again. This time I did the extra, bare hammer pounding until the "tin can" action stopped and it *seems* to be holding up now. C-ya, Rick C-ya, Rick |
|
rykk
spending too much on rocks
Member since September 2011
Posts: 428
|
Post by rykk on May 12, 2014 20:14:56 GMT -5
Hmmm - Hard to tell if the Last Chance Agates you posted are the same as my stuff that I was sure was Carey Plume. Here's a couple of slabs pix - do they look like what you have or saw there? The line of black appears to be hematite or pyrite - shiny. 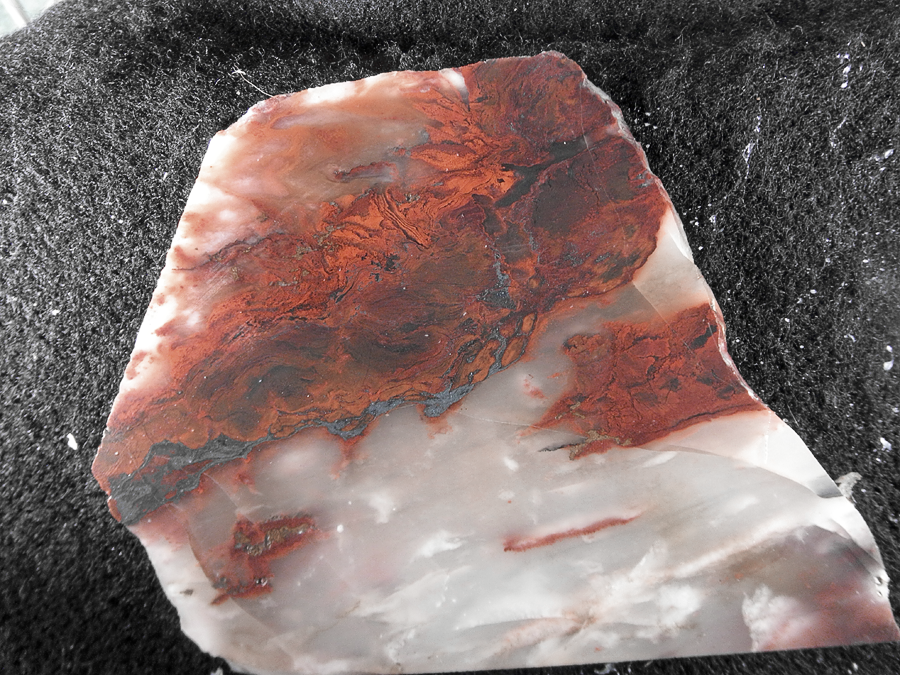 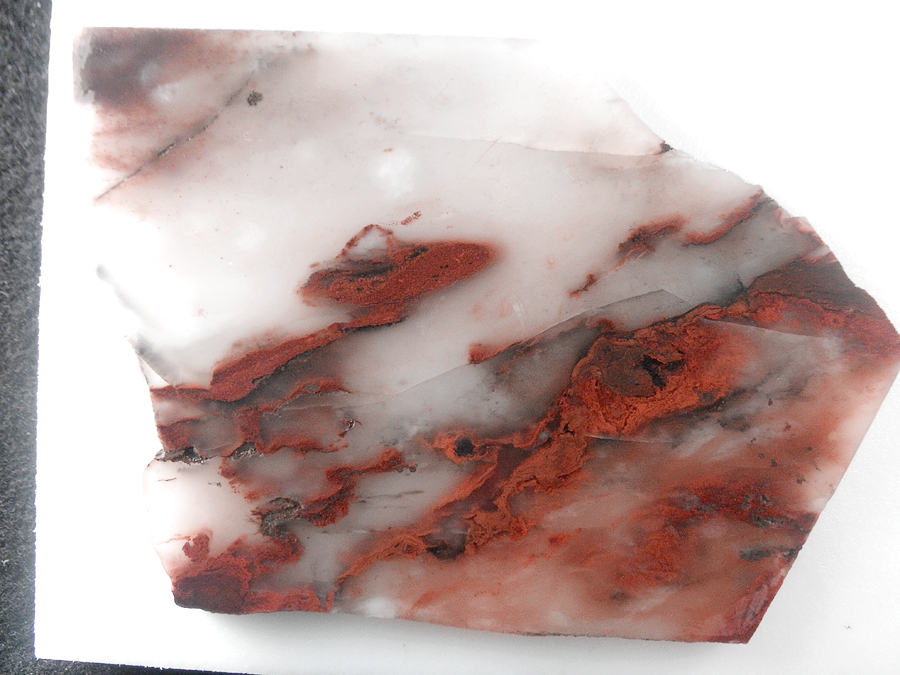 C-ya, Rick |
|
rykk
spending too much on rocks
Member since September 2011
Posts: 428
|
Post by rykk on May 12, 2014 19:34:42 GMT -5
Yep - EXTREMELY hard. And Parral Agate is every bit as hard as PDA. They both shine up like nobody's business - as good as Morrisonite. I was really jazzed about slabbing the Parral because it polishes so well and is so rare. The first two slabs are kinda butchered as far as being flat, though I did do a pretty good job of realigning the chunk with every rotation of it, so not overly bad. I cut 3 more slabs with the gold blade last night with no problems and they turned out pretty good.
I'm running the feed motor at around 3.0 to 3.5 inches per hour. Pretty slow. I could probably bump it up to around 5 but I've reined in my impatience. The present setting is working great, so why fix what ain't broken? Besides, I don't want to get all impetuous and dish the blade I just hammered straight and re-tensioned. I'll wait until I'm cutting something that's not so obstinate. Never did find out if the AlO2 "fixed" the black, sintered blade but I suspect, even if it was improved, that it would still have had trouble with the Parral. It's a good bit thicker than the notched, gold blade.
C-ya,
Rick
|
|
rykk
spending too much on rocks
Member since September 2011
Posts: 428
|
Post by rykk on May 12, 2014 4:32:58 GMT -5
Nice job!
Rick
|
|


 Ribbbbit