rockbrain
Cave Dweller 
Member since January 2022
Posts: 2,513
|
Post by rockbrain on Nov 7, 2023 19:12:29 GMT -5
I recently purchased a cheap knife blank to try my hand at putting a stone handle on it. I have no idea what I'm doing and can't find very much internet info. I would rather just glue them on and not drill them to insert pins. My plan is to use Devcon 2 ton epoxy. There a few holes in the handle area of the blank so the epoxy should get a good grip there. I planned on making sure my scale sections are flat and then gouging up the glue area with a rotary tool to give the glue a better place to grip there. I've done some searching on line and see very few that actually have pins. I know pins will make them stronger but I don't plan on having J. Neilson or David Baker testing my knife! It's a pretty cheap blank anyway. vegasjames I saw your post about doing some knives on the board game thread but didn't want to hijack. (that's a first for me!) I'd certainly appreciate your input along with anyone else who has some experience or slept at a Holiday Inn last night. 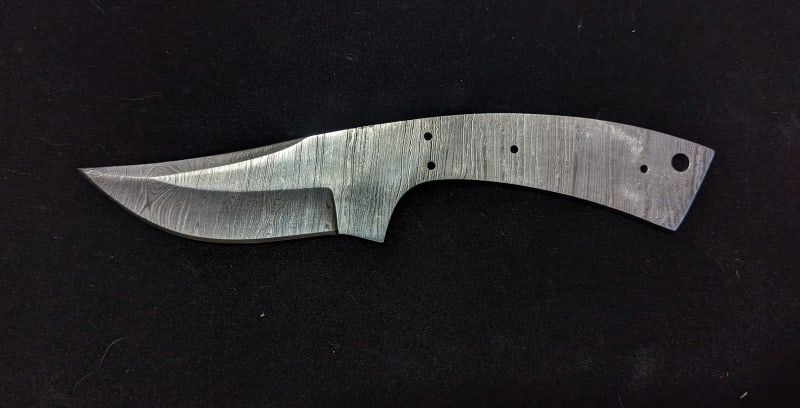 |
|
|
|
Post by parfive on Nov 7, 2023 20:32:46 GMT -5
|
|
|
|
Post by vegasjames on Nov 7, 2023 20:59:38 GMT -5
Lay the knife on a slab you are going to use and trace the pattern of the handle. Mark the slab for left or right so you remember which way it is going to go on, The flip the knife over and repeat the process again marking if that will be the right or left hand side.
If you do decide to put pins in, this is a good time to also mark the slabs with where the pin holes will go. I like using the carbide tipped spade bits for glass and tile to drill my holes in the stone, but masonary bits will also work.
Cut the slabs preferably to the outside of your outline because you can always grind material away, but it is hard to fill gaps in if you over cut.
Once you have your preforms cut, I would use a cabbing machine or other grinder to clean up the preform some grinding it down to the the outline, and grinding the forward edge straight and rounding it over and polishing that end as this will be virtually impossible once glued on.
at this point I would enlarge the pin hole a little in the knife if you decide to use pins. Makes it easier to along the pin through all three holes (knife and two slabs). Of you are going to use pins, place the right side scale on the left side temporarily then use a drill press to drill the hole for the pin using the knife hole as your guide. You will repeat this with the left hand scale on the right side. The reason for placing them on the opposite side for drilling is any blowout will be on the inside of the scale and not the outside when you go to glue them on.
Glue one of the preforms to the knife and insert the pin to make sure it is aligned. The pin should stick out just slightly on each side when done so you can grind it down flush to the stone. Once set up, glue on the second scale.
Once the glue is set up for the second scale, now you can finish the grinding. I use my cabbing machine to round over and grind the stone flush to the knife on the top and end. Have also used an angle grinder with diamond pads and an aluminum backer to grind in the past. The underside of the handle is a bit harder to do. Here is usually use a glass grinder machine which diamond grinders. Or a rotary grinding tool with diamond bits can also be used. Dip the knife handles in water frequently if doing this to keep the diamond bits cool.
If the stone is soft enough, the sanding sponges ou can get at Harbor Freight are also great for contouring and polishing.
That is the basics. Each knife has it own characteristics that need to be dealt with. Such as pocket knives of course have some differences in putting scales on as are the knives that have posts that insert in a handle rather than all metal handles like yours.
|
|
|
|
Post by jasoninsd on Nov 7, 2023 21:51:13 GMT -5
vegasjames - You are awesome!! Thanks for posting all that!  rockbrain rockbrain - I seriously can't wait to see what you do with this. What you come up with through your skills and creative mind never ceases to astound me!
|
|
rockbrain
Cave Dweller
Member since January 2022
Posts: 2,513
|
Post by rockbrain on Nov 7, 2023 21:51:50 GMT -5
Thanks so much guys. Great info.
|
|
rockbrain
Cave Dweller
Member since January 2022
Posts: 2,513
|
Post by rockbrain on Nov 7, 2023 21:55:37 GMT -5
I came across Jay Fisher when looking for info. Check out his Website if you want to see some great work. He makes the knives and then does lapidary handles. The ones I looked at were upward of $3000. |
|
Rockyy
starting to shine!

Member since August 2023
Posts: 47
|
Post by Rockyy on Nov 7, 2023 23:02:37 GMT -5
I too would be interested in seeing what you come up with. Do you have a handle material in mind? If I can expand on what vegasjames said, which was pretty cool by the way and thank you I learned something. I think I would dry fit your handle slabs before applying any sort of epoxy just in case there is any sort of mis-fit |
|
|
|
Post by vegasjames on Nov 8, 2023 2:06:54 GMT -5
I too would be interested in seeing what you come up with. Do you have a handle material in mind? If I can expand on what vegasjames said, which was pretty cool by the way and thank you I learned something. I think I would dry fit your handle slabs before applying any sort of epoxy just in case there is any sort of mis-fit Another good reason also to cut outside the tracing line. This way the preform is slightly larger than the knife for some wiggle room. |
|
rockbrain
Cave Dweller
Member since January 2022
Posts: 2,513
|
Post by rockbrain on Nov 8, 2023 9:53:48 GMT -5
I too would be interested in seeing what you come up with. Do you have a handle material in mind? If I can expand on what vegasjames said, which was pretty cool by the way and thank you I learned something. I think I would dry fit your handle slabs before applying any sort of epoxy just in case there is any sort of mis-fit I'm trying to narrow down handle material now. I've got a lot of large slabs of Chapenite Jasper but I'm all over the place on making a decision. I learned a bunch from what vegasjames posted. Drilling the scales on opposite sides of the knife is brilliant and I'm really glad he included the part about final shaping and polishing on the blade end of the scales. I don't know if I would have realized that would be so hard to do until it was too late! |
|
Rockyy
starting to shine!
Member since August 2023
Posts: 47
|
Post by Rockyy on Nov 8, 2023 13:01:10 GMT -5
Yeah vegasjames laid that out very well. Also, when you are making your scales, if you have not thought of this already, you can slab something up so the two scales are matching and since sometimes I do not splain things very well this is just an example....take a slab 3/4 inch thick or so and slab that in half then take both sides and flip them so your cut is on the outside and.......matching handle scales. |
|
|
|
Post by rmf on Nov 8, 2023 14:21:42 GMT -5
Depending the rock material you are planning to use drilling may be problematic from the directions above. Agates are too hard for carbide and masonary bits. Diamond would be better. They need to be run in oil/water. Also most rocks are heat sensitive (need for water cooling) and most rocks are really bad in tension. Drilling rocks puts them in tension so scales are prone to crack. Jade would be a good rock for scales. Hard yet tough and good in tension compared to agates and jaspers. Agates and jaspers are much prettier and way more pattern variety than jade.
|
|
|
|
Post by vegasjames on Nov 19, 2023 19:13:31 GMT -5
One other tip I forgot to add that I have used. Another advantage to drilling the holes for the pins is that you can use those holes to your advantage when shaping.
I have used the drilled holes to run short bolts through to hold the slabs together when shaping, especially the front edge, which you cannot shape if on the knife if there is a guard on the knife that the stone butts up to. Therefore,by bolting the two pieces together off the knife, you can shape the front edge in both sides evenly before gluing the pieces to the knife.
You can also temporarily bolt the two pieces to the knife itself while doing a lot of the shaping to the knife itself in case the stone breaks, or you mess up so as bad scale can be easily removed and replaced, unlike if glued on first.
|
|
rockbrain
Cave Dweller
Member since January 2022
Posts: 2,513
|
Post by rockbrain on Nov 19, 2023 20:39:52 GMT -5
Great tip! Thanks. I've been starring at that blank today thinking I should get started on it.
|
|
NDK
Cave Dweller
Member since January 2009
Posts: 9,440
|
Post by NDK on Nov 21, 2023 20:28:11 GMT -5
I've done a few knives, James is right on with what I've learned.
Only difference for me is I've never done pins, don't feel it's needed. The epoxy holds very well and like you've said, it's not being tested on forged in fire 🤣
|
|
|
|
Post by vegasjames on Nov 21, 2023 20:49:05 GMT -5
I've done a few knives, James is right on with what I've learned. Only difference for me is I've never done pins, don't feel it's needed. The epoxy holds very well and like you've said, it's not being tested on forged in fire 🤣 I agree the pins are not needed and have done some of the knives without them.
On some of the knifes though they add more character. For example, with a large Bowie knife, I added BBs to the scales for something different and for better grip due to the weight of the knife. They are only copper coated, so when buffing the BBs, the copper comes off leaving a silver BB.
And as pointed out, drilling the holes allows you to bolt the scales together to work them and keep them even, especially for the front edge if there is no guard. And this allows the scales to be temporarily bolted to the knife while shaping in case you mess up or the stone cracks or something and a scale need to be replaced before doing the finally gluing.
Even if you do not wan to insert the pins all the way through, which would require drilling the metal if not already drilled, the drilled holes can be filled with metal rod up to the handle on each side then ground flat giving the illusion of being pinned while filling the drilled holes used to make working the scales easier.
|
|
|
|
Post by MsAli on Nov 21, 2023 21:04:46 GMT -5
My one and only attempt sits on a self in the garage. I still have some shaping and polishing to do.
I also bought a "cheap" scale, but my handles are gorgon rocky mountain butte and I wish now I didn't use that slab for the knife
|
|
|
|
Post by vegasjames on Nov 21, 2023 23:13:02 GMT -5
My one and only attempt sits on a self in the garage. I still have some shaping and polishing to do. I also bought a "cheap" scale, but my handles are gorgon rocky mountain butte and I wish now I didn't use that slab for the knife Best to practice on cheap, readily available material as it is a learning process and so we are bound to make mistakes.
And different knives can present different challenges.
For example, I did a pocket knife that had ornate patterns on it, so I had to shape the scales completely off the knife so I did not damage the ornate patterns.
The Bowie knife was the hardest of all and took me months as the part the scales went over was a just a metal post and the stone I used was extremely had. So, it took me quite a while to create the groove for the post to go in to and the get the handles shaped.
Pocket knives generally require very thin slabs that can be more prone to fracturing. |
|
NDK
Cave Dweller
Member since January 2009
Posts: 9,440
|
Post by NDK on Nov 26, 2023 11:56:47 GMT -5
My one and only attempt sits on a self in the garage. I still have some shaping and polishing to do. I also bought a "cheap" scale, but my handles are gorgon rocky mountain butte and I wish now I didn't use that slab for the knife It may have been a cheap blank but when it's finished it's going to be really nice! |
|


 Al Falfa