panamark
fully equipped rock polisher

Member since September 2012
Posts: 1,343
|
Post by panamark on Jul 28, 2013 22:21:03 GMT -5
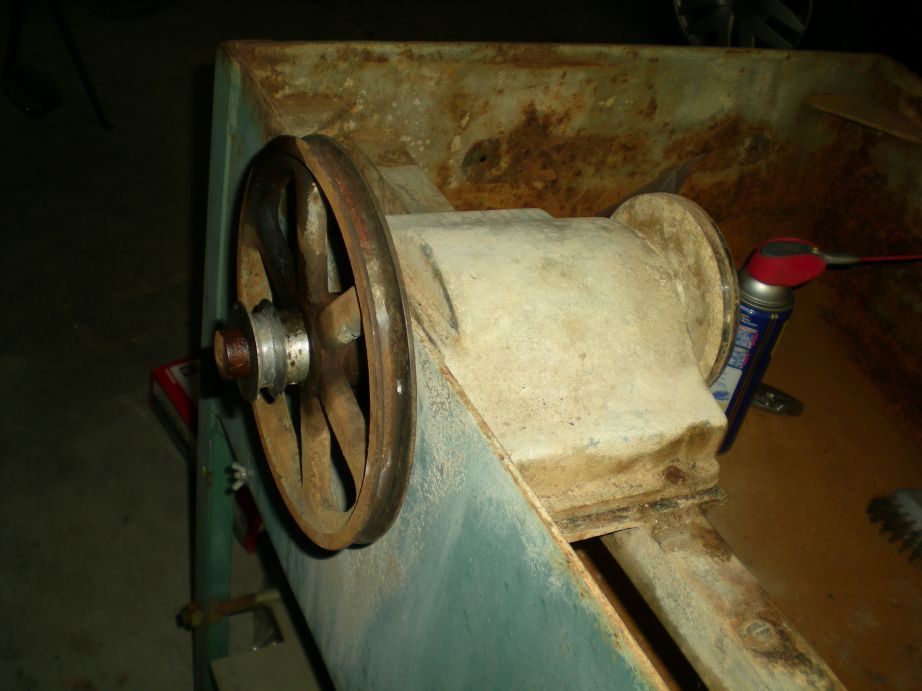
Okay, so I am deep into restoring a HP 20" saw (model 20 SSM), circa  old. I have to replace the main bearings on the saw and it appears I have to pull the pulleys to do this. It doesn't appear that the inner arbor face comes off. Is it press fit while heated and therefore kinda permanent? It looks like the pulleys are held on the shaft with set screws, but before I put the puller to them is there anything else? Any tips appreciated. - Mark |
|
|
|
Post by Rockoonz on Jul 28, 2013 23:18:24 GMT -5
Should come right off with a puller once the set screws are loose. Check the end of arbor shaft to make sure PO didn't use a hammer and mushroom the end. My HP is a real oldie with pillow block arbor bearings on the outside of the saw, so I'm not sure exactly what your arbor looks like, but if there's any way you can change bearings without removing the arbor housing it will save a lot of time re-aligning the arbor to the vice.
Lee
|
|
QuailRiver
fully equipped rock polisher
Member since May 2008
Posts: 1,632
|
Post by QuailRiver on Jul 29, 2013 3:47:31 GMT -5
Remove the set screw/screws and spray wd-40 in the set screw hole/holes. Let it sit a couple of minutes and then try to slide the pulley off of the arbor shaft. The metal that most cast pulleys are made from is kind of soft so don't pry it or use too much force. If the pulley won't come off borrow or buy a three-jaw gear puller similar to this one: www.harborfreight.com/8-three-jaw-gear-puller-69224.htmlThese work great for removing stubborn pulleys. |
|
panamark
fully equipped rock polisher
Member since September 2012
Posts: 1,343
|
Post by panamark on Jul 29, 2013 18:50:06 GMT -5
|
|
riverbendlapidary
fully equipped rock polisher
Member since September 2006
Posts: 1,058
|
Post by riverbendlapidary on Jul 29, 2013 19:36:16 GMT -5
first take off nut and flanges and remove arbor face plate (two screws). The cover has a gasket around the bottom, you will probably have to carefully pry it up or slide a razor underneath. There is also gasket where the cover meets the saw tank, and there should also be two screws on the outside of the saw tank you have to remove as well. the bearing will probably be packed in a thick, heavy grease. have fun and wear gloves!
|
|
panamark
fully equipped rock polisher
Member since September 2012
Posts: 1,343
|
Post by panamark on Jul 29, 2013 22:37:14 GMT -5
first take off nut and flanges and remove arbor face plate (two screws). The cover has a gasket around the bottom, you will probably have to carefully pry it up or slide a razor underneath. There is also gasket where the cover meets the saw tank, and there should also be two screws on the outside of the saw tank you have to remove as well. the bearing will probably be packed in a thick, heavy grease. have fun and wear gloves! Yes, I had found all the screws and bolts and the bearing cover is loose. I can move it about 1/2" up and around and it is totally loose. But there is a thick reinforcing plate bolted on this bearing cover between it and the inner arbor that the shaft goes through. I thought it would be horseshoe shaped so I could just lift the cover off, but it is instead a laying-down "D" shape if you will. The shaft goes through the hole in the D. The D plate is held on by 4 screws, But I can't reach the screws because the arbor is too close. Only about 1/4 inch clearance. Arggghh! Can't even get a picture to show you it is too tight. Therefore, the cover cannot simply come up until I get that reinforcing plate separated from it. So I am thinking maybe the inner arbor is supposed to come off. But I am a bit worried of putting much torque with a puller on that arbor. (It is obviously a press fit as no screws or set screws are evident.) It might be really hard/expensive to get a replacement arbor face, whereas pulleys might not be so hard. So do I approach it by taking off the arbor or do I remove the pulleys and pull the whole shaft? Thanks for any help! It should be a really nice saw ......someday. - Mark |
|
quartz
Cave Dweller  breakin' rocks in the hot sun
Member since February 2010
Posts: 3,341
|
Post by quartz on Jul 29, 2013 22:42:25 GMT -5
If you pull the pulley, make sure the end of the shaft is clean and smooth, a little rust or marking [the shaft looks nasty in the pic.] will cause you fits. Use sandpaper, emery cloth, or Scotchbrite. The smaller pulley looks very worn, and shiny on the bottom of the groove. Once a belt rubs the bottom of the groove it will slip, time to replace the pulley. Don't get this line thru it, not there when I write it.
|
|
panamark
fully equipped rock polisher
Member since September 2012
Posts: 1,343
|
Post by panamark on Jul 29, 2013 23:10:35 GMT -5
Thanks for those tips. I will get the shaft shiny before I pull. And good to know about how to tell pulley wear. It should be real easy to find that one. Thanks again for the help - I am a gunsmith by trade so am used to tiny parts, ha ha.
|
|
Deleted
Deleted Member
Member since January 1970
Posts: 0
|
Post by Deleted on Jul 30, 2013 8:28:23 GMT -5
Not sure if you figured it out yet. But, you need to remove the nut and two blade stiffeners to get to the three screws that hold the plate that the arbor slides through. Once you remove the plate and gasket the cover will pop right off with the arbor bearings still attached.
|
|
panamark
fully equipped rock polisher
Member since September 2012
Posts: 1,343
|
Post by panamark on Jul 30, 2013 14:44:08 GMT -5
Not sure if you figured it out yet. But, you need to remove the nut and two blade stiffeners to get to the three screws that hold the plate that the arbor slides through. Once you remove the plate and gasket the cover will pop right off with the arbor bearings still attached. Thanks, but my problem is how to remove saw collars? (I just found out what they are called) The outer one comes off straight forward, but the inner one is not bolted on(like most saws)but press fit, probably heated first to expand its hole. And I sure don't want to bugger the inside collar. So I will "attack" the pulley side. |
|
Deleted
Deleted Member
Member since January 1970
Posts: 0
|
Post by Deleted on Jul 30, 2013 15:01:33 GMT -5
I guess I am confused on what you are describing, there are no collars on these arbors. If you are talking about the arbor flange, the large washer type things that go between the blades(See link), they are not pressed on. The inner one is probably locked on with rock goop. Clean the arbor shaft really well, spray it with wd-40 and give it a small love tap, should pop it loose. www.hplapidary.com/p/501/highland-park-arbor-flange-for-18-and-20-inch-saws |
|
riverbendlapidary
fully equipped rock polisher
Member since September 2006
Posts: 1,058
|
Post by riverbendlapidary on Jul 30, 2013 16:02:37 GMT -5
Are you sure you need to replace the bearings? Those should be Sealmasters - they last dang near forever.
|
|
panamark
fully equipped rock polisher
Member since September 2012
Posts: 1,343
|
Post by panamark on Jul 30, 2013 17:47:48 GMT -5
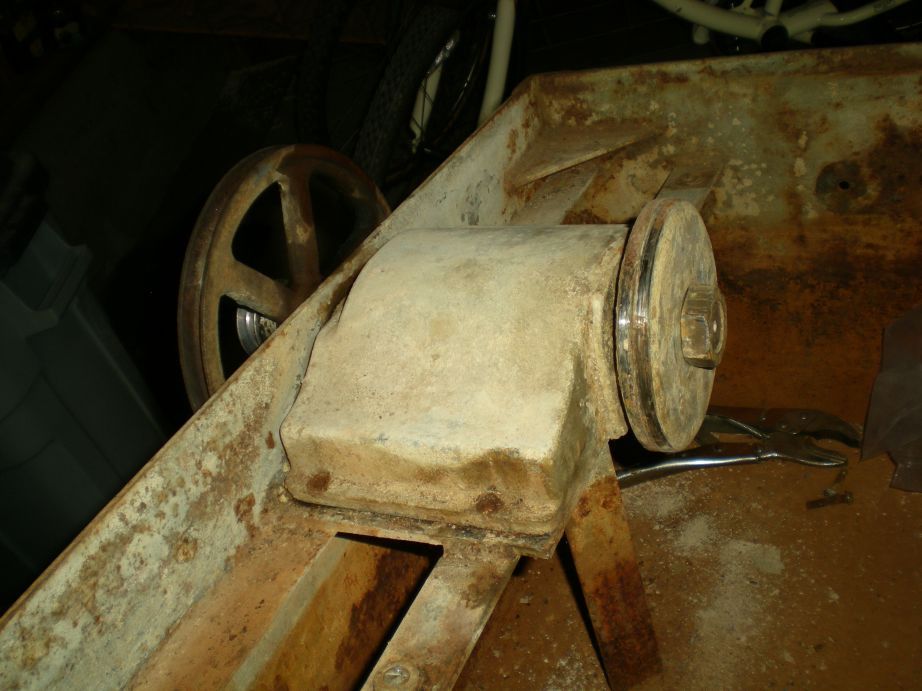
Thanks to all, I have had success ----- then disappointment. Thanks to azrockgeek's tips I went out and worked on the flange again (sorry I didn't know the right name). I gave it a "small love tap" and I saw it barely move. So with some careful work it came free. It was really stuck on with 30 year old dried rock snot! Just so you all can see what I was trying to describe yesterday here is what the bearing cover and reinforcing bracket look like with the saw's inner flange removed. 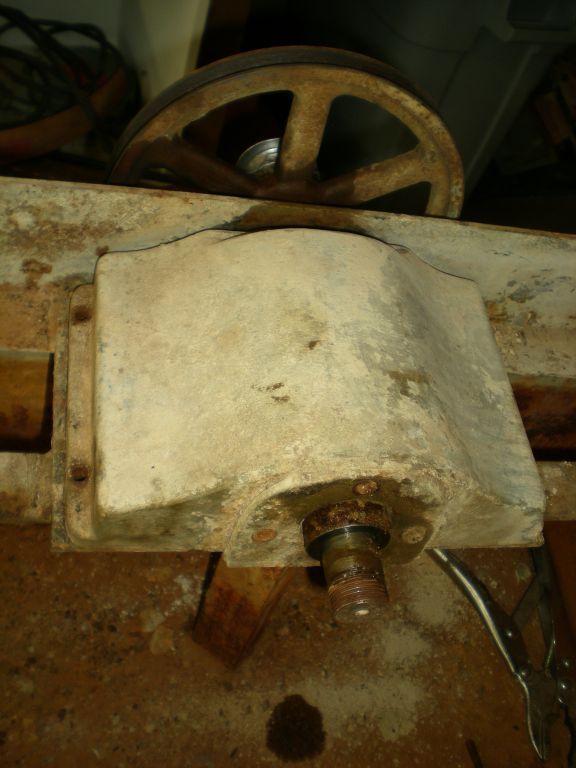 Then I could finally get the bearing cover off. Wow what a mess  . Obviously the gaskets didn't totally work as the white dust is about 1" deep! 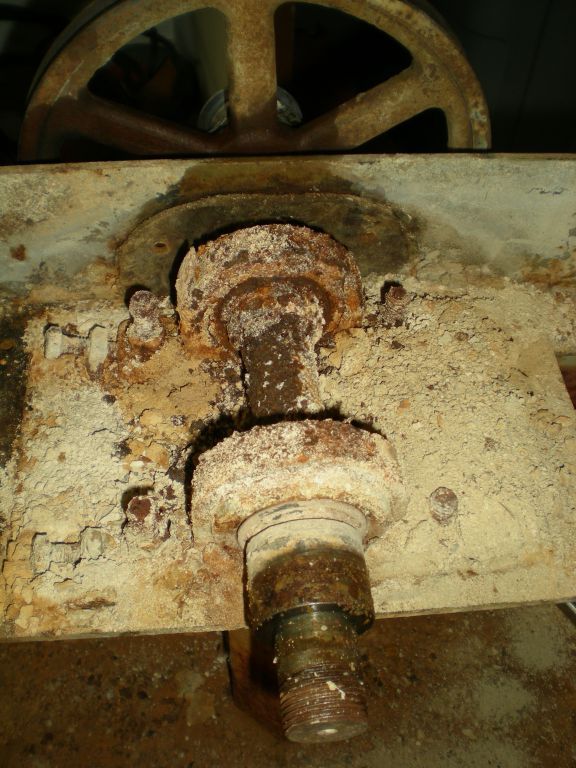 I knew the bearings were bad when I bought the saw but I didn't suspect this bad. Yes Riverbend, the bearings are good, but not this tough, LOL. So now I know all the things (I hope ) that I have to replace and I can start rebuilding  Someday I will turn this beast into a prince  Thank all of you who took the time to help me. I really appreciate it and you will share my success! - Mark |
|
Deleted
Deleted Member
Member since January 1970
Posts: 0
|
Post by Deleted on Jul 30, 2013 19:04:33 GMT -5
Wow, those bearings are in bad shape.  Know the fun starts, get that baby sand blasted and powder coated. Here are a few pic's of a restore I did several years back to motivate you. Good luck with the project. Tim   |
|
|
|
Post by Rockoonz on Jul 30, 2013 22:04:54 GMT -5
So yours has bearings just like mine, but on the inside. Mine on my HP14" are on the outside. 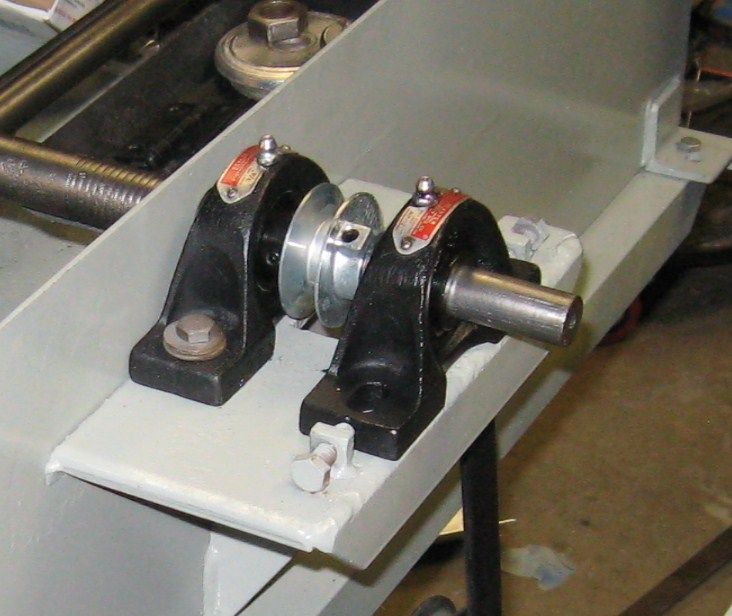 Just get one of them off, scrape it off a little bit, and take it to a bearing house. They can match it by dimensions. Pillow blocks can be inexpensive, replace the whole unit, forget trying to clean it up enough to get the bearing out. Lee |
|
panamark
fully equipped rock polisher
Member since September 2012
Posts: 1,343
|
Post by panamark on Jul 30, 2013 22:32:53 GMT -5
Tim, your restore is inspirational. Great job! How long (in hrs) did it take? And where did you ever find a green belt for your autofeed?  Lee, that is a very nice and CLEAN looking saw. Thanks for the tip on the bearings. They have a great shop for those things in a town nearby. Thanks again everybody. Now the fun does indeed start! - Mark |
|
|
|
Post by catmandewe on Jul 30, 2013 23:20:46 GMT -5
You will do great with this Mark.
Looking forward to seeing the finished saw.
Tony
|
|
jamesp
Cave Dweller
Member since October 2012
Posts: 36,169
|
Post by jamesp on Jul 31, 2013 5:46:45 GMT -5
What a fine restoration Tim. I bought a new Covington 7 years ago and like it. But it is not built like yours and Mark's saw.
Those are well built vintage machines.
I could have saved a couple of 1000's easily and had a 20 or 24. Saws are not common on east side of US.
I work with a lot of rusty iron. I clean the initial scale with a powerful pressure washer.
You will know that saw mechanically after overhaul Mark.
|
|
panamark
fully equipped rock polisher
Member since September 2012
Posts: 1,343
|
Post by panamark on Jul 31, 2013 7:31:47 GMT -5
Thanks for the encouragement Tony and James! At least it is not a muscle car restoration that I will barely use.  And I love your new avatar James. Is that a rachmer or a hamchet? Crazy guys with welders = TROUBLE |
|
Deleted
Deleted Member
Member since January 1970
Posts: 0
|
Post by Deleted on Jul 31, 2013 8:52:31 GMT -5
That particular saw I had a lot of hours into it since I had to fabricate the hood, probably over 40 hrs. Others that I have done, I usually have 10-15 hours. A majority of the time is sanding and painting, that is why I highly getting everything sand blasted. Luckily all the parts are still available.
Have fun with it.
Tim
|
|


 old. I have to replace the main bearings on the saw and it appears I have to pull the pulleys to do this. It doesn't appear that the inner arbor face comes off. Is it press fit while heated and therefore kinda permanent? It looks like the pulleys are held on the shaft with set screws, but before I put the puller to them is there anything else? Any tips appreciated. - Mark


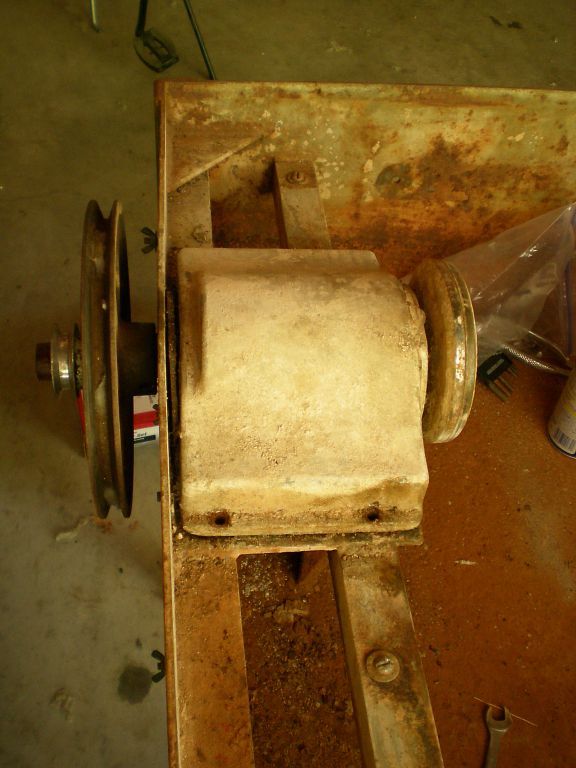


 . Obviously the gaskets didn't totally work as the white dust is about 1" deep!
 Someday I will turn this beast into a prince


