jamesp
Cave Dweller 
Member since October 2012
Posts: 36,155
|
Post by jamesp on Oct 22, 2015 6:27:10 GMT -5
You will throw rocks at the 4 inch barrels, I think the 6 inch ones will be your favorites.
That narrow shaft spacing may be no problem except you get better pinch(traction) if the barrel sits deeper....
PVC slicker than rubber barrels. I run bare shafts so I spread the shafts more so the barrel sits deeper 'in the saddle'.
if the shafts get wet(dew for instance) and you only have the barrel 5/8 full you could get slippage with shafts too close.
Wearing a notch in your barrel. Not worth cooking a barrel.
If you set your shafts to 6.5 inches on 7.3 inch barrels(taking it to extreme) you will have a lot of wedge force. Make it adjustable so you can do 4 or 6 inch spacing.
Glad to see you have posi-traction Ed.
Glad to see you went with longer 4 foot shafts. I wished I had done that. One set is 34 inches and the other 40 inches on my double shaft rig.
The 40 inch set holds 3 barrels, only 2 on the 34 inch. Of course, depends on barrel length.
Three shorter barrels better than one long barrel because of end mixing is better on short barrels.
It is simple build once you got parts in hand. The rest is carpentry and alignment. Plenty of room for end rollers too. Good on you.
You may want to use 2" X 6" under pillar blocks so you have more room to mount end roller(s).(instead of 2" X 4")
With 2" X 6" you can have more holes for 4 inch spacing and 6 inch spacing by sliding the pillar blocks out wider to a separate line of holes.
|
|
Intheswamp
Cave Dweller
Member since September 2015
Posts: 1,910 
|
Post by Intheswamp on Oct 22, 2015 9:45:10 GMT -5
captbob... Well, at least I have most all the parts together. Still gotta figure out nailing/screwing/ducktaping assembly. The slots on the pillow bearings are rather large...I'm thinking some lag bolts for that...or would nuts and bolts be better? Nuts and bolts would require the wood that the bearings sit on to be only one layer thick...if I go with lag bolts I can have another layer of wood beneath for more bite. Like I said earlier, I'm no carpenter so fastening wood together is kinda greek to me. In my beekeeping I've only assembled pre-cut rabbet joints...nails and glue. With the constant vibration and not having the equipment setup to cut rabbet joints I'll be using the good ol' butt joints. I've thought about adding a short piece of 4x4 in each corner for stability...overkill you think? This sucker is probably going to be a bit heavy, anyhow...no need building it heavier than it needs to be...? As for covering the shafts...as of now I'm not planning on covering. I may change later on...might go with individual 2-3 inch long pieces of automotive heater hose (if it fits properly) scattered along the shaft. Nothing concrete on covering, though. I had been wondering about what you referred to as "pinching" and whether it was valid in that it helped traction...thanks for talking about it, that confirms my thoughts. I set the 4" barrel on the rollers with the bearings pushed end-to-end and it set down in the gap nicely...that got me to visualizing that the 6" barrel won't be riding nearly as low in the gap. At the price of fittings...no, I don't want to cook a barrel!!! I'm thinking the tumbler will be in a sheltered area, most likely indoors...but, maybe not. I figure the 4" barrel(s) might be handy for the odd, small-batch coarse tumbles. But, there again, I could use the Model A along with the granddaughters Model T for the small batches (got to remember this is all for the granddaughters...yep, doing all this for them...not me!!!  ). Rather than making it adjustable I think I'll just try to get it working at a single spacing for now...maybe later on work on modifying it for adjustable spacing. Yes, I decided to go with the posi-traction...the cost of another pulley and a belt seemed like a good investment. One thing I've been wondering about is how to adjust the tension on the posi-traction belt. Do you simply size the belt tight as possible and use the slots in the bearings?...seems like those slots wouldn't give enough adjustment...  ? After seeing the 4' shafts in place in the mock-up I'm realizing the tumbler is going to take up some serious real estate...will have to find a corner to stick in it. But, yes, I think that will be all the tumbler I will ever need for coarse tumbling. How much evenly distributed weight do you think those shafts can handle at a 3' span... I'm still tossing around ideas for barrel lengths...naturally I want to get the biggest bang for my bucks in regards to fittings cost, but don't want the barrels too big. Still mulling that over. By "end mixing" I'm taking it that there can be a "stagnant" or "static" area in the ends of the barrels where things are mixed/tumbled as well as they are out in the field of the barrel...and that longer barrels are more prone to this? Btw, I haven't seen my buddy with the city again...I'll have to flag him down soon and see if he's found any cut-off pieces yet. Otherwise, I've got the address of a commercial plumbing outfit up in Montgomery I'll pay a visit to...hopefully they don't take their profit-frustration out on guys building rock tumblers.<grin> I had thought about going with 2x6 under the bearings for the extra acreage to work with. Later on I would have room to drill some holes for a different spacing, no problem. Naturally I went off and left my drill at the house this morning (the ump'teen time I've meant to grab it!  Ah well, maybe saw some wood instead this evening...get the pieces laid out. What do you suggest for fasteners? |
|
|
|
Post by oregon on Oct 22, 2015 17:13:58 GMT -5
So I've been collecting parts for something like Chuck's with two levels below a workspace top. Anyway, I have an 8' length of 3/4 steel in the shed I was planning on using, but today, I remembered salvaging a couple Treadmills this summer for the DC motors (nice adjustable drill press/saw motors) and they both had Rollers for the treadmill on bearings - turns out they're 5/8 rod ~28" with decent bearings on either side. And I already have a collection of pulleys in 5/8. So I think I'll go that route. I have 3 12lb Murray/Thumlers steel barrels with liners, and the fourth has the split liner, same barrel, but a 6lb liner on either end. Idea is to have 2 on top, 2 on bottom.
What I was wondering about was the posi-traction notion? (coupling the front/rear rollers). The treadmill rollers have a ~2" outer metal sleeve with an adapter and bearings, so that could very easily be the rear bar if you just wanted it to freewheel. (just bolt down the bar and let the outer casing turn). The treadmill bars probably won't even need cutting, about the perfect length, but the rubber hose on the old tumbler shaft is pretty quiet, and I imagine gives much better traction. Seems like I've seen comments in both camps about it being necessary or not to drive the rear bar.
$ for 8 pillow blocks adds up as well, thinking about how to reuse normal bearings that are on the rods from the treadmill.
Getting closer. Thanks, Rick
|
|
Intheswamp
Cave Dweller
Member since September 2015
Posts: 1,910
|
Post by Intheswamp on Oct 22, 2015 17:37:23 GMT -5
Rick, it sounds like you've got some good parts to work with...I'd go with them. If the bearings can handle a 200#+/- person walking on them for extended periods of time they oughta be good for what your doing. 5/8" at less than 28" span should be fine, too. I say go for it!!!  Oh, be sure your pulleys fit the shafts before you get too invested in the build. Thanks to quartz who gave me the heads'up on that. Being as the shafts are coming out of a machine I would think they should have good accuracy in size and work fine with the pulleys...but check'em! |
|
jamesp
Cave Dweller
Member since October 2012
Posts: 36,155
|
Post by jamesp on Oct 23, 2015 7:00:07 GMT -5
Get the posi-traction belt last Ed. It can fit loose and still drive the other shaft. it has a lot of wrap and will grab. It is low torque application.
Or use an adjustable V-belt. Or a large stretchable o-ring.
I used 1/4 or 5/16 bolts and large washers for the pillar blocks to wood. You need to use a small washer and a large washer at each wood contact.
And cover the big hole in the pillar blocks. Washers cheap, stack them as necessary. Just figure your needed bolt length with added washers.
Roughly nail the 2 X 10 box together. Square it up and lock it down by nailing the two 2 X 6's on top. Pre-drill the first board if you need to help driving nails.
The single spacing for 6 inch barrels is the way to go at start. For many reasons, mostly barrel traction and posi belt size. Makes all simple.
With those sealed bearings I spray my entire tumbler down with water avoiding the motor. I am on gravel floor so water not an issue.
Looks like you will have about 40 inches of shaft to put barrels on. Lots of barrels, one motor. Sweet
|
|
jamesp
Cave Dweller
Member since October 2012
Posts: 36,155
|
Post by jamesp on Oct 23, 2015 7:16:26 GMT -5
Note on posi-traction-if you have a barrel leak when away a single drive may slip and cook your barrel.
Posi will drive with sugar-Karo syrup-red mud-lime-news paper pulp-diatomacious earth- and many other additives dripped on to the shafts.
It is not worth the risk of having slippage when you can stop it with two $10 dollar pulleys and a $10 belt.
yes tumbler is big, but you have space for end rollers, posi pulleys, end drive, and lots of barrels.
|
|
jamesp
Cave Dweller
Member since October 2012
Posts: 36,155
|
Post by jamesp on Oct 23, 2015 7:21:48 GMT -5
You can look up 'home made tumblers' by doing a google search. Looking at this really long tumbler. The middle bearings may be redundant. For two 3/4" shafts 40 inches long and 6 inch barrels, the 3/4" shafts are not going to sag. I doubt they will sag with 150 pound barrel. if the shafts were 8 feet long then yes, sag may be a problem. He is running (Lortone 12 pounders ?) rubber barrels. Being rubber, doubt that they will slip with a single drive shaft. Nice to have table height. And flat spot in front of barrels to roll them off shafts and do barrel inspection right there.  |
|
Intheswamp
Cave Dweller
Member since September 2015
Posts: 1,910
|
Post by Intheswamp on Oct 23, 2015 13:01:18 GMT -5
Howdy Jim.
Posi-traction belt...will wait till the tumbler is built. Not so critical on type of belt nor tension, that's good.
The slots in the pillow bearings measure right at 7/16" wide...I'll carry one of the bearings with me a see if 3/8" bolts will fit ...3-1/4" bolts should be long enough from what I eyeballed...maybe grab 3-1/2" ones to be sure...and some flat and lock washers.
The bearings...should I turn the set screws to the inside or outside?...the set-screw side protrudes out a bit more than the other side of the bearing. Split collars on the outside of bearings?
The thought about extra area to place barrel sounds good, but seems like it would add more acreage to the footprint. But, ya gotta have somewhere to set the barrels. I've gotta decide whether to build in enough room to set another set of rollers on later...maybe build it with the extra table space figuring if I ever decide to add more rollers I'll just have to give up that space. It's a thought.
Set screws...should I file a flat on the shaft-ends for the set screws to tighten against?
Glad to hear I should have no problem with sag. Is there any reason not to have a solid top? Maybe even build a perimeter around it to catch possible leaks?
|
|
|
|
Post by captbob on Oct 23, 2015 13:39:47 GMT -5
Thinking outside the box interesting idea. who needs them expensive shafts and bearings!  |
|
Intheswamp
Cave Dweller
Member since September 2015
Posts: 1,910
|
Post by Intheswamp on Oct 23, 2015 14:11:52 GMT -5
Dang, I wasted all that money.... |
|
|
|
Post by captbob on Oct 23, 2015 14:37:01 GMT -5
Gotta admit that it looks like it is doable if using PVC barrels.
And, you could build it for less than 50 bucks.
Probably for less than $20 if you had an old motor sitting around and a garage full of odds & ends.
|
|
Intheswamp
Cave Dweller
Member since September 2015
Posts: 1,910
|
Post by Intheswamp on Oct 23, 2015 16:21:32 GMT -5
Well, my pvc guy came through for me a few minutes ago. He had no idea what I was going to do with it and it's amazing at what length pipe he brought me...take a look. A little dirty and scuffed/scratched up, but a little cleaning and sanding and it should be ready for some glue and fittings! I can easily get several barrels out of this. But for now the cost for fittings is going to keep me at two barrels. My goal is to figure barrel size so that when the rocks are ready there will be multiples of four pounds, plus a tad for culling, ready for the Lot-O. I don't want the barrels so big that I don't have enough rocks to fill them but I do want to make use of the fitting$ the best that I can. For now, I'm going to build two barrels. I'm thinking along the lines of a 17# barrel that would be 15-16 inches long and that maybe will yield a bit over 12# of coarse tumbled rock. The other barrel to be a 12# barrel, 11-12 inches long and that will yield around 8# of coarse tumbled rocks. That still leaves me with around another foot of shaft length for another barrel later on...size to be decided on. Anyhow, all I'm lacking are the fittings, which I hope to acquire next week. Now, to get all of this put together! 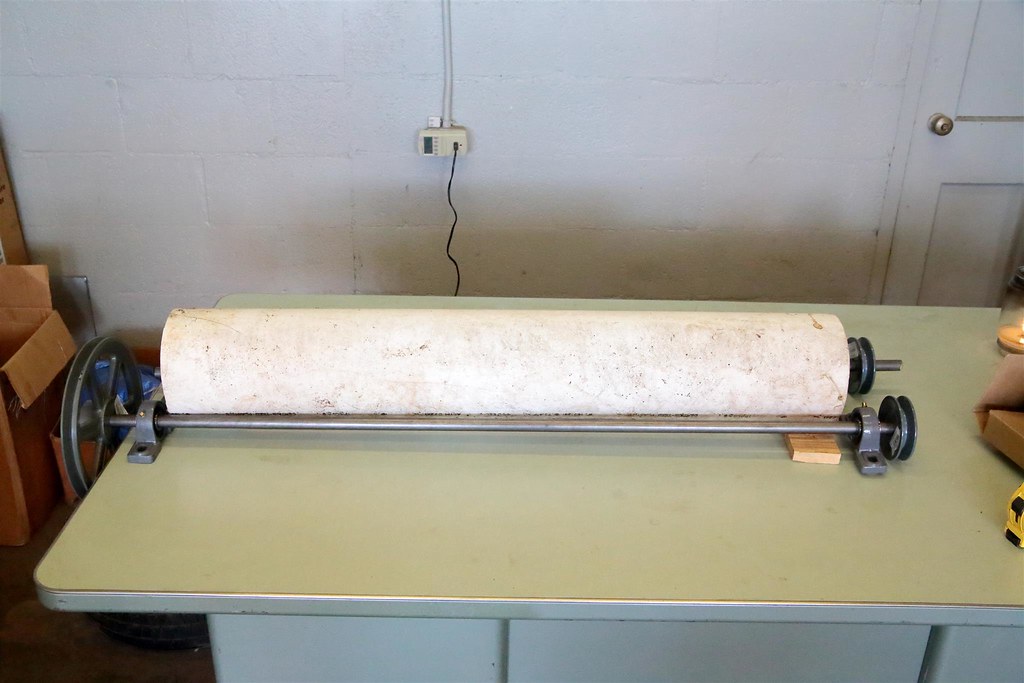 IMG_7333a (Custom) IMG_7333a (Custom) by Intheswamp, on Flickr |
|
Intheswamp
Cave Dweller
Member since September 2015
Posts: 1,910
|
Post by Intheswamp on Oct 23, 2015 21:39:16 GMT -5
Well, I cut up some wood tonight. Like I said, I'm no carpenter. I had one blow-out on an end piece but other than that it's turning out so-so. The treated pine had laid outside for about a year and was hard as a rock!!! I pre-drilled small holes to hammer the galvanized nails in and it was still tough hammering!!! It's a bit warped so I'm going to go back and use some screws on it to try and draw things up tight. I made it wide enough for another pair of rollers to fit...or, I can tack down some plywood and use it for a work surface. I think I'm going to end up with just a grunt under 40 inches of roller space. Did I tell ya that I'm not a carpenter?...I thought so... 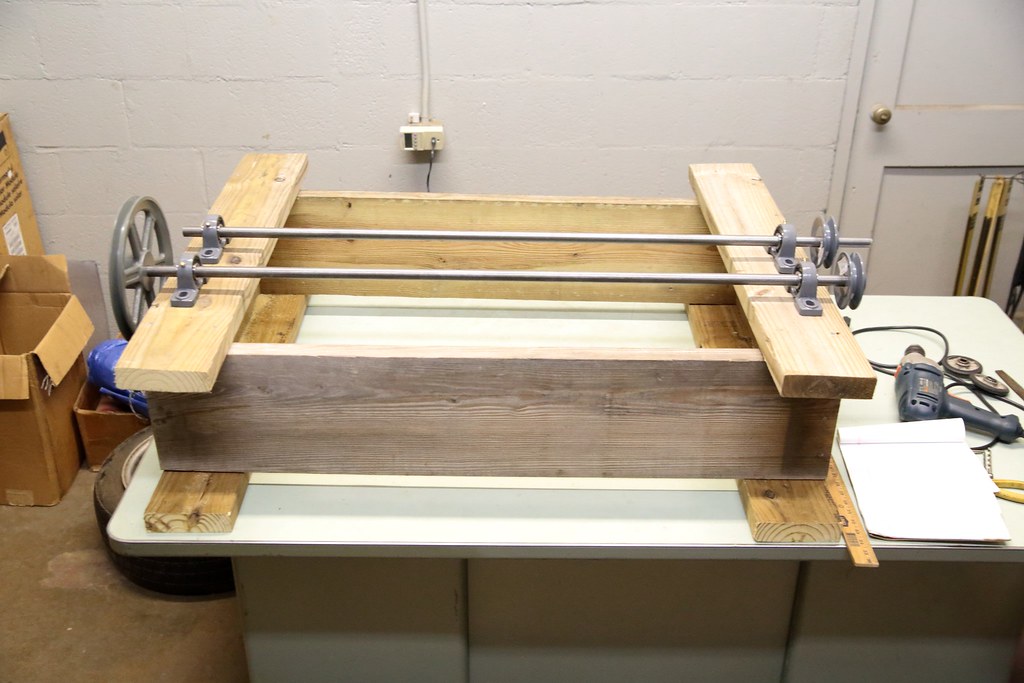 IMG_7343a (Custom) IMG_7343a (Custom) by Intheswamp, on Flickr |
|
Intheswamp
Cave Dweller
Member since September 2015
Posts: 1,910
|
Post by Intheswamp on Oct 23, 2015 21:46:47 GMT -5
I'm seriously thinking about going back and trimming off those overhanging pieces...the box is wide enough that stability isn't an issue. The actual box is 44-1/4" long by 27" wide...2x10 pressure treated pine....2x6 pt pine for the top and bottom pieces. I think it will work out well if I ever want to drive another set of rollers...the extended shaft on the right side will be available for a pulley to power the extra rollers.
|
|
|
|
Post by captbob on Oct 23, 2015 22:23:25 GMT -5
That's a fine platform / box / thingy.
I's even up the shafts and if you ever want to expand with another set of rollers, add the new pulley to the end next to your big drive pulley. Otherwise, you are going to have the pulley driving the new roller set sitting way outside the box instead of close in like your big drive pulley.
Where is the motor to be mounted?
|
|
Intheswamp
Cave Dweller
Member since September 2015
Posts: 1,910
|
Post by Intheswamp on Oct 24, 2015 5:03:03 GMT -5
"...fine platform/box/thingy"....attesting to my fine woodworking skills.<GRIN> I think I'm right on this... There's not enough distance between these rollers for another pulley to sit on the same plane as the jack pulley. The drive shaft has reached it's maximum spread so it has to be arranged more or less as it is...the drive pulley for the secondary rollers would have to be positioned out past the primary jack pulley if it was on that end of the tumbler. If I recall correctly, if you pull the posi-traction shaft out to where it's end is flush with the outside of the jack pulley there is less than an inch of space between the shaft and jack pulley. I'm still thinking about where to mount the motor. It will be on the near facing long board or either the opposite one. Mounting on the near side would would call for a shorter belt and maybe cause the belt to wrap more around the pulleys than I desire. Mounting on this (near) side would also keep the motor and belts away from the extra space on top which I'll probably cover with plywood for a work surface. Oppositely, mounting on the far side would require a longer belt (might be good) but would position the motor next to the work area (if that area is indeed used for a work area). Anyhow, that's my ideas on those ideas...for now. |
|
Intheswamp
Cave Dweller
Member since September 2015
Posts: 1,910
|
Post by Intheswamp on Oct 24, 2015 9:20:47 GMT -5
captbob, here's another shot of the tumbler (you can see the blow-out on the right side of the base  ). The jack pulley is 9.75" O.D. and the smallest motor pulley that I will be using is 3.75 O.D. These two added together is 13.5 inches across, half would be 6.75 inches...the roller spacing is to be 6". I might could nudge the rollers out a bit to give the clearance but it would be tight and the posi-traction pulley may get in the way of the motor belt. But, looking at it in person the posi-traction shaft seems much closer than what the above figures would suggest...maybe my "ciphering" is buggy? 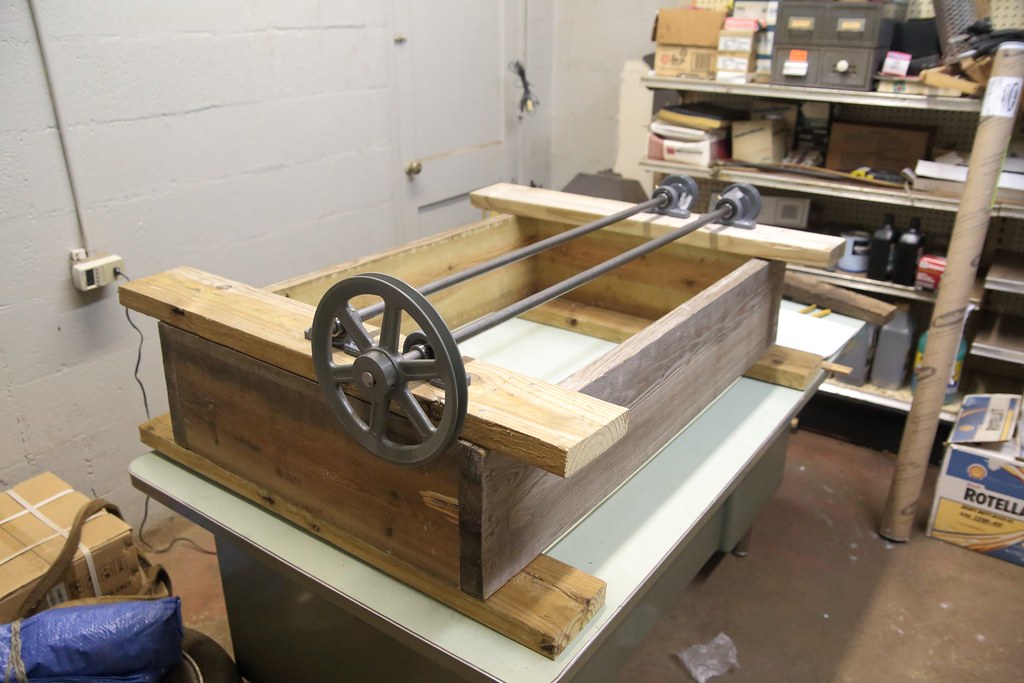 IMG_7337a (Custom) IMG_7337a (Custom) by Intheswamp, on Flickr |
|
|
|
Post by captbob on Oct 24, 2015 10:31:37 GMT -5
Gotcha Ed, that end view better shows that there is no room for the pulley on this end.
You think a second set of shafts may happen in the near future? If not, mount the motor up top - to the rear of the bearings. It would be easy to get to there, not add to the footprint of your build, and be out of the way should any leaks occur.
If the bearings aren't yet mounted, you could rotate your platform/box/thingy so the "blow out" is on the other end and at the back - out of sight, out of mind!
|
|
Intheswamp
Cave Dweller
Member since September 2015
Posts: 1,910
|
Post by Intheswamp on Oct 25, 2015 22:30:04 GMT -5
I like the idea of mounting the motor up top...it will be a while before I add more rollers (if I do add more). My thoughts, though, have been to take a piece of the 2x10 and attach in at the bottom of one side of the box with hinges, mount the motor on it and let the motor's own weight be an automatic belt tensioner. I thinking, though, that the hinged idea might create more noise.
I will move the jack pulley and motor to the other end. The box is probably compromised a bit at that blow-out so I'll add the weight of the pulley and motor to the opposite end. I don't think structurally the blow-out is going to hurt anything, but why not make the switch now while I'm finalizing things, eh? Another good idea!
I picked up some deck screws and will tighten things up a bit. They are supposed to be self-drilling, but as hard as this 2x10 wood is I'm going to pre-drill holes. When I was hammering I'd hit a spot and the hammer would make that "pinnnggggg" sound when it hit the nail...hard wood!!!
|
|
Intheswamp
Cave Dweller
Member since September 2015
Posts: 1,910
|
Post by Intheswamp on Oct 26, 2015 21:35:48 GMT -5
Does it matter if the side of the pulley with the set screw is turned toward the shaft or away from the shaft?
captbob, I'm still toying with placement of the motor. It looks like there actually is enough room with the 2x6 "ears" that protrude from the box that the motor can remain on top even if I add another set of rollers. At the moment, though, I'm seriously doubting that I will add another roller. I've got a good many rocks currently, but to keep two rows of barrels going will be a bit much for me, I'm afraid. I feel like I'll just stay at one pair of rollers.
I tightened things up a tad with the deck screws this evening. Tomorrow I've got to go to the hardware store and size up some bolts for mounting the motor and some for attaching the pillow bearings. Get the motor and shafts installed and I'll be ready to size belts up and to wire the motor. Only thing then I'll lack....is barrels.
|
|


 ).
). ?
? Ah well, maybe saw some wood instead this evening...get the pieces laid out. What do you suggest for fasteners?


 ). The jack pulley is 9.75" O.D. and the smallest motor pulley that I will be using is 3.75 O.D. These two added together is 13.5 inches across, half would be 6.75 inches...the roller spacing is to be 6". I might could nudge the rollers out a bit to give the clearance but it would be tight and the posi-traction pulley may get in the way of the motor belt. But, looking at it in person the posi-traction shaft seems much closer than what the above figures would suggest...maybe my "ciphering" is buggy?


