Intheswamp
Cave Dweller 
Member since September 2015
Posts: 1,910 
|
Post by Intheswamp on Oct 29, 2015 13:21:40 GMT -5
Sorry, still lost here. Maybe you covered this earlier? What does "trap the bearing" mean? What are the split collars for? Hey, I can answer this one!!!  ...I think.  A collar is positioned on either side of the bearing and tightened down on the shaft. With the collars in place the shaft can't move length-wise back and forth which could cause the pulleys to move up against the bearings/wood. Now, having said that... The bearings come with a set screw that can secure the shaft inside the bearing. Apparently the set screws can scar the shaft enough to make pulley and/or bearing removal difficult later on. Plus, you have extra security in the shafts staying where you want them. I guess you could call it a "fail safe" type of setup. |
|
Intheswamp
Cave Dweller
Member since September 2015
Posts: 1,910
|
Post by Intheswamp on Oct 29, 2015 13:31:06 GMT -5
I would put set screws to outside Ed, probably keep them cleaner out there. No need to file flat spot for set screw landing. On the end away from the big pulley trap the bearings. Two to outside, two to inside. that traps the shaft, as does the set screws. I suggested the shaft collar clamps because on occasion pillar blocks have fussy eccentric locks. The table is your preference/space allowance. Adding another set of shafts, hmmm, that depends on how much Ed wants to tumble. If you build it with the box design you can add to it. Not sure about other designs. You have plenty of shaft length, that will help to add an end pulley on the side away from the motor drive. You may have to move the outboard bearings on the original shafts inward to expose more shaft for the take off drive pulley to the new shafts. Thanks for the feedback, Jim! You now I need all the help that I can get!!! Good point on turning the set screws to the outside to help keep them clean. Will not worry about filing flat spots. Thanks for clarifying where to put the collars. But, what about putting them on the outside of each bearing...which would only saving about 3/4" of shaft, but...that's 3/4".  The table idea sounds good. I'm already wondering about keeping enough to tumble *and* the cost of grit so another set of shafts may be far off for now...but, it could be set up for those pesky 4" barrels. |
|
|
|
Post by captbob on Oct 29, 2015 13:32:06 GMT -5
That made sense Ed - thanks!
So the split collars are clamped onto the shaft. Therefore they rotate with the shaft. I assume that they are mounted a bit away from the bearing so that they don't rub against the bearing.
IF the shaft moved laterally in the bearing and the split collar came in contact with the bearing, could they (collar & bearing) damage each other?
Thinking you sure as heck wouldn't want those split collars coming apart while running! Loctite?
|
|
|
|
Post by captbob on Oct 29, 2015 13:35:57 GMT -5
Thanks for clarifying where to put the collars. But, what about putting them on the outside of each bearing...which would only saving about 3/4" of shaft, but...that's 3/4". The picture a couple pages back looks like the barrels will sit lower than the wood the bearings are mounted to - ?? |
|
Intheswamp
Cave Dweller
Member since September 2015
Posts: 1,910
|
Post by Intheswamp on Oct 29, 2015 13:55:31 GMT -5
This arrangement perfect for future shaft addition. Upper right hand corner shaft is longer and hanging out past 2 X 6. Perfect to mount take off drive pulley for another set of shafts. To keep Bob's eyes from glazing over LOL mount the split collars on each side of the two bearings on the right as positioned in photo. Looks like the pillar blocks are going to hit together if you do not offset them for 4 inch barrels. The 4 inch PVC is an issue. But we started this project off with 6 inch barrels... Excellent box. Lookin good Ed. Because the shafts are offset, it pushed the upper right shaft out to the right offering a place to mount the take off pulley for the second set of shafts if wanted. So do not cut off that extra length at upper right corner. As far as pursuing 4 inch barrels confusion and shaft spacing issues will continue I believe. Kind apples and oranges.... Me, I would leave those 2 X 6's sticking out and mount a 'roll off table' area so you can simply roll the barrels off the shaft and onto a landing. Got a 'roll off' table on one set of shafts and not the other. Like the roll off table. Yes, I built it with expansion in mind, but now I'm thinking that this single pair of rollers will handle everything I'll have to throw at it so the extra room will work for a "roll off table"...I ain't getting no younger and these joints ain't getting any stronger! A table seems like a wonderful thing!! Without measuring, I'm guessing that the closest center-to-center spacing I could get without offsetting the bearings is probably 5 inches. Ok, I need to figure something out. I've been doing my shaft spacing calculating using center-to-center distance. For 6" barrels I've been figuring on 6 inches from center-to-center of the rollers. Should I be figuring for center-to-center or actual open gap between the rollers? How far center-to-center do you have your rollers space for your 6" barrels, Jim? Well, between 6" and 5-1/2" there's not a lot of difference...almost as much as the slots in the pillow bearings would allow. I'll design for 6" but maybe later tinker with adjusting things and trying 4" barrels, too. If it works good for both 6" and 4" then good....if it doesn't work good for 6" then I'll spread the rollers back out!  No biggie...the primary goal, though, is for 6". Yeah, I'm in no hurry to trim the ears off. I'm actually thinking of attaching a short piece of 2x6 with a hinge flush to the end away from the motor (hinge toward big pulley) and attach the motor on top of it. Size the belt so the belt holds the motor up in the air at an angle and the weight of the motor could be it's own belt tensioner as it hinges up or down. If I need more tension that the motor weight I could add a turnbuckle or something to tighten it with. |
|
jamesp
Cave Dweller
Member since October 2012
Posts: 36,155
|
Post by jamesp on Oct 29, 2015 22:23:05 GMT -5
That made sense Ed - thanks! So the split collars are clamped onto the shaft. Therefore they rotate with the shaft. I assume that they are mounted a bit away from the bearing so that they don't rub against the bearing. IF the shaft moved laterally in the bearing and the split collar came in contact with the bearing, could they (collar & bearing) damage each other? Thinking you sure as heck wouldn't want those split collars coming apart while running! Loctite? split collars can rest against the bearing since the ID of the bearing sticks out and rotates with the shaft. Trust me, no locktite needed once these suckas are clamped down.   Ed-I guess I am not a fan of small set screws. They can put a divot in the shaft and make the bearings hard to remove. But worse is when they rust and the allen key strips the pesky thing and you can't loosen it. Make life easy with the split collars when aligning the pulleys to the belts by sliding the shafts. less screws to loosen. And shaft collars will not strip because they require big allen keys. |
|
quartz
Cave Dweller
breakin' rocks in the hot sun
Member since February 2010
Posts: 3,341
|
Post by quartz on Oct 29, 2015 23:08:18 GMT -5
One thing you do want to do though, tighten the set screws on the bearings enough to make sure the bearing inner race turns with the shaft, snug is plenty good. If the shaft turns inside the bearing, it will wear a groove the shaft and wear the bearing bore. Anti-sieze on the set screws is a good idea.
|
|
Intheswamp
Cave Dweller
Member since September 2015
Posts: 1,910
|
Post by Intheswamp on Oct 30, 2015 6:21:43 GMT -5
Thanks for clarifying where to put the collars. But, what about putting them on the outside of each bearing...which would only saving about 3/4" of shaft, but...that's 3/4". The picture a couple pages back looks like the barrels will sit lower than the wood the bearings are mounted to - ?? Good eyes. The 4" coupling definitely bottoms out against the wood...already checked that out so I understand that limitation of using the 4" barrels at 5-1/2" roller spacing. I've got a drawing of the 6" barrel and played with spacing the rollers under it...I've drawn a 4" and 5-1/2" spacing but it's all inconclusive so far with a little more measuring and "cipherin'" to do. But, even with the drawing, until I can get some couplings to actually test I'll still be looking through a foggy window regarding the 6" barrels clearing the wood at certain roller spacings. Living in a 2-traffic light town nobody carries 6" pvc. I found a place about 20+ miles away that does handle it, a commercial plumbing supply company...but they shut-down when I do, so getting over to them while they're open has been a problem.  |
|
Intheswamp
Cave Dweller
Member since September 2015
Posts: 1,910
|
Post by Intheswamp on Oct 30, 2015 6:31:39 GMT -5
Ed-I guess I am not a fan of small set screws. They can put a divot in the shaft and make the bearings hard to remove. But worse is when they rust and the allen key strips the pesky thing and you can't loosen it. Make life easy with the split collars when aligning the pulleys to the belts by sliding the shafts. less screws to loosen. And shaft collars will not strip because they require big allen keys. Preventing stripping the small set/allen screws makes sense. Seems the set screws would be problematical in this possibly damp, gritty application. What about positioning a collar on the outside of each bearing? That would still trap the shafts but wouldn't take up any roller space... |
|
Intheswamp
Cave Dweller
Member since September 2015
Posts: 1,910
|
Post by Intheswamp on Oct 30, 2015 6:44:46 GMT -5
One thing you do want to do though, tighten the set screws on the bearings enough to make sure the bearing inner race turns with the shaft, snug is plenty good. If the shaft turns inside the bearing, it will wear a groove the shaft and wear the bearing bore. Anti-sieze on the set screws is a good idea. Thanks quartz! I was figuring on snugging the scews up a bit to hold the shafts in place while I installed the collars and was wondering about loosening the set screws back up. I'll leave them snug. Anti-seize...I'm trying to think what I might have that would work for that that I have already....I'm seeing on the internet Pepto Bismol, Maalox, etc.,... With my wonderful gastro system, I've got something in the cabinet! Ok, just looked...got Pepto Bismol MAX...that oughta do it!!!  |
|
jamesp
Cave Dweller
Member since October 2012
Posts: 36,155
|
Post by jamesp on Oct 30, 2015 7:03:28 GMT -5
quartz makes great point about wearing the shaft. James a slacker about using anti-sieze. I had a leaking barrel made of thin wall PVC. It leaked slightly and I let it run anyway. It caked dried slurry on the pillar blocks on one side you could barely see the bearing LOL. Finally, the outer race was spinning in the cast iron pillar block. The bearings were shot. It took months for the grit to destroy the bearings though. Testimony to how tough those pillar blocks are.
|
|
Intheswamp
Cave Dweller
Member since September 2015
Posts: 1,910
|
Post by Intheswamp on Oct 30, 2015 8:49:22 GMT -5
Yeah, I think these bearings are pretty tough, for sure! But, I like it when I push the big pulley and it sits there and spins smoothly for several seconds from little energy used...I'd like to, if I can, keep it close to that performance. That way the smaller motor that I'm using will be at it's lowest possible load and keep electricity use as low as possible. That's my thinking, anyhoo. Speaking of motor, I took a shot of the idea I spoke of early in regards to using a hinged platform to mount the motor on and let its own weigh be it's belt tensioner. This is just a mock-up... Where the slanted board meets the horizontal board will be a hinge...motor mounted at the upper, far end. This would also keep it high and away from dirt, grit splash if it gets rained on. Speaking of rain...are these types of motor rainproof?...I'm thinking of a small tin roof if I move it outdoors. The hinged motor mount also kind of complicates fabricating a belt/pulley shield..but that is still doable. I could mount it on the outside of the box on the far side but that adds somewhat to the footprint, though it would be between the ears. What do ya'll think?...mount in on the hinged piece or simply mount it on the side...or flat on top without the hinged part?  IMG_7361a (Custom) IMG_7361a (Custom) by Intheswamp, on Flickr |
|
|
|
Post by captbob on Oct 30, 2015 8:53:11 GMT -5
Yeah, I think these bearings are pretty tough, for sure! But, I like it when I push the big pulley and it sits there and spins smoothly for several seconds from little energy used... Do you make motor noises? |
|
Intheswamp
Cave Dweller
Member since September 2015
Posts: 1,910
|
Post by Intheswamp on Oct 30, 2015 9:01:26 GMT -5
Of course, don't you?  |
|
|
|
Post by captbob on Oct 30, 2015 9:07:54 GMT -5
Why not mount the motor right next to the pulley? Shorter belt. I think you are looking at your tumbler backwards. Put the big pulley shaft to the rear, and your "roll off table" to the front. Go stand on the other side of the table for a minute... |
|
Intheswamp
Cave Dweller
Member since September 2015
Posts: 1,910
|
Post by Intheswamp on Oct 30, 2015 9:38:57 GMT -5
Thanks for those comments, Bob. That got me to thinking about things. I'm right-handed and *think* I'd rather have the least cluttered area to my right. Thinking along those lines I may just move the big pulley to the back but still keep the posi-traction shaft between the motor and big pulley. This would put the big pulley and motor on the left-side and the roll-off table to the front. The reason I'm thinking about leaving the pt shaft between the motor and big pulley is that if I ever do decide to add more rollers then the extra length of the pt shaft would be right next to the new rollers to power them. Moving the motor and big pulley closer together would give more belt wrap-around on the pulley and increase it's traction...the way I understand it is that you want your center-to-center distance of motor shaft and pulley shaft to equal or exceed the diameter of the big pulley...so in this case that distance would be 9 inches.
I haven't finalized the setup, yet, still pondering. That comment of yours definitely helped me!!! Thanks!!!
|
|
|
|
Post by captbob on Oct 30, 2015 9:48:01 GMT -5
For your belt guard, I wonder if you could MacGyver something out of an old bicycle fender. Probably find different options at your local junk yard for low or no cost.
Heck, you're in Alabama, what was I thinking...? There are probably 10 to 20 old bikes in your neighbor's front yard! (behind the toilet)
|
|
jamesp
Cave Dweller
Member since October 2012
Posts: 36,155
|
Post by jamesp on Oct 30, 2015 10:24:28 GMT -5
Looks like Bob's suggestion works best. Motor in left front. Keeps belt away from shafts too. Easier for guard... The 2 X 10 is a big face to mount motor, a good thing. And you could still do a swing tensioner on the motor using a hinge or two. 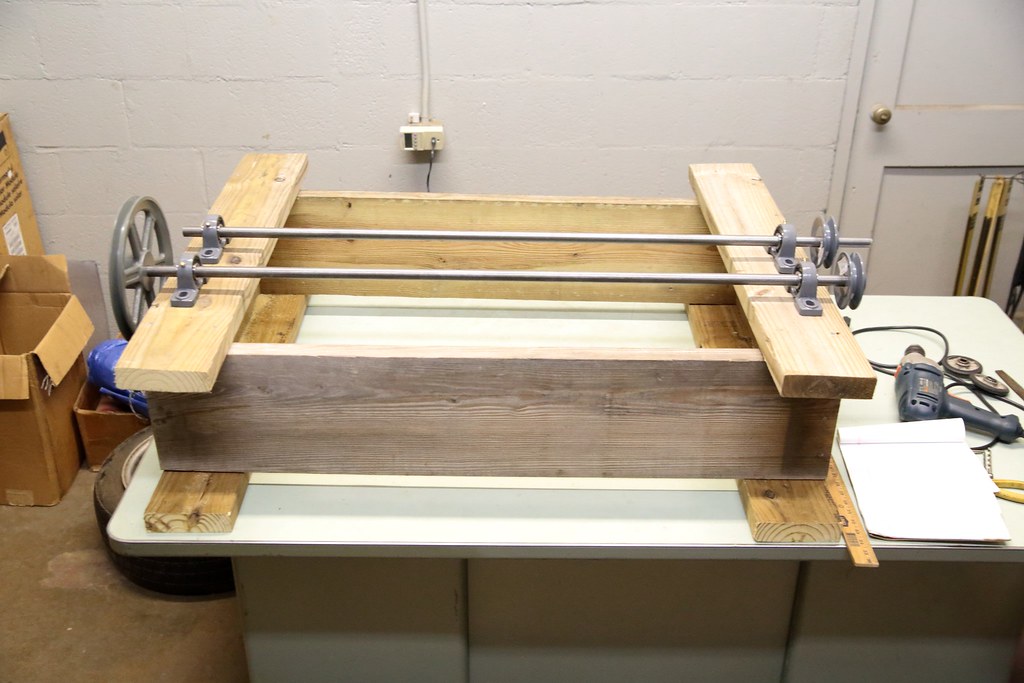 |
|
|
|
Post by rockpickerforever on Oct 30, 2015 10:40:09 GMT -5
I know I've not been around much, but have pulled up a stool and have been keeping an eye on your project, Ed. This may sound like a no-brainer, but check the rotation of your motor before mounting it. (Maybe you already have, and I missed it? If so, disregard this suggestion.) Would hate to see you invest the time and energy to place that motor on a hinge (gravity tensioner, great idea!), only to find it is turning in the opposite direction than what you require.
Okay, my two cents worth... Carry on!! Jean
|
|
|
|
Post by captbob on Oct 30, 2015 11:01:01 GMT -5
Jean, I'm often easily distracted and sometimes unobservant in that I miss something small while looking at the whole. I just now noticed your change to your signature area. I'm so sorry for your loss of your baby girl Lucy. I hope that you and mrrockpickerforever are doing okay. Rest in Peace Sweet Lucy |
|


 ...I think.


 No biggie...the primary goal, though, is for 6".