richardh
spending too much on rocks

Member since June 2016
Posts: 391 
|
Post by richardh on Jun 21, 2016 17:11:16 GMT -5
I’m new to tumbling, got a tumbler for my birthday earlier this year. I have done a few batches and am getting a little discouraged as the results haven’t been quite what I had hoped for. I received a mixed bag of rocks from Madagascar that I tried and it seems like all of the softer rocks were basically destroyed/ruined. I tried separating them by hardness but my skill at doing so appears to need plenty of improvement. I posted some of my results here: s1097.photobucket.com/user/RichardRocks1/library/?view=recent&page=1I wonder if the rocks I am using are simply not suitable for tumbling? None of my rocks have come out of the process looking all that shiny. Even the best ones look a little dull. I tried putting plastic beads in with what I believe are the softer rocks and sent them through the entire process again and still got the same results. I am using a 3lb tumbler and have been working in four stages. #1 ~3lbs of rocks with 3tbsp of 60-90 grit SiC #2 ~2.5lb of rocks (what was left from stage 1) with 3 tbsp of 120-220 grit SiC #3 ~2.5lb of rocks with 3tbsp “prepolish” #4 ~2.5lb of rocks with 3tbsp “polish” The grit was purchased as “set” from amazon.com Each stage was typically run from 5-7days Any suggestions are appreciated. Richard |
|
napoleonrags
Cave Dweller 
Member since October 2015
Posts: 474
|
Post by napoleonrags on Jun 21, 2016 17:46:11 GMT -5
Don't lose courage man. I couldn't view your pix, but I'm sure things are OK. Give me your address, and I'll send you a small box of local pet wood, jaspers, chalcedony, and a baggie full of rough grit. I'll grind the cobbles down so it will only take about 6-9 weeks for the rough grind. These stones won't need plastic pellets.
Others will chime in with solid advice about polishing who have much more experience.
I won't be able to post until Friday of next week because I will be in the great state of Nebraska at a couple of swim meets.
Just keep on rolling.
Colin
|
|
|
|
Post by spiceman on Jun 21, 2016 21:52:54 GMT -5
Clean out the barrel very good, then do it again. If the stage 1 grit gets into stage 2 and so on down the road, that's a problem. Patience is also a key.
|
|
|
|
Post by Toad on Jun 21, 2016 21:55:02 GMT -5
Stage 1 takes longer than 5-7 days. A minimum of weeks, but more often months. After stage 1 is done, the other stages are only a week in the rotary tumbler.
|
|
peachfront
fully equipped rock polisher
 Stones have begun to speak, because an ear is there to hear them.
Member since August 2010
Posts: 1,745
|
Post by peachfront on Jun 23, 2016 12:27:56 GMT -5
Yeah, I have some 3# rotary barrels from Harbor Freight. I usually hit my rocks first on the wheel to grind them and I still like to have 3-4 weeks in the 60/90 stage. For a real newbie I strongly suggest starting with a load of jasper, agate, or quartz. It may seem counter intuitive but I felt like starting with jaspagates was the most rewarding way to start, because they seem to WANT to be polished. For some reason soft stones can be fussy.
|
|
Deleted
Deleted Member
Member since January 1970
Posts: 0
|
Post by Deleted on Jun 23, 2016 13:47:20 GMT -5
Your rocks are fine.
You ain't done yet.
Stage 1 is for shaping. It runs until they are done shaping, and not before.
Then each stage until it's done. I'll let others say how long that typically takes.
But 5-7 days per stage ain't it.
|
|
richardh
spending too much on rocks
Member since June 2016
Posts: 391
|
Post by richardh on Jun 27, 2016 19:32:12 GMT -5
Thanks to everyone who replied. I was on a family vacation and am just now able to read them.
One quick update, I had been working on some of what I believe to be jasper that I found in a river bank and the results seem much more promising. The rocks started out pretty rounded already so that probably helped. I tried tumbling nothing but the jasper and checked them when I got home and they actually look shiny! Not quite as shiny as I hoped but much better than anything I have seen so far.
A couple of additional questions I have are about washing off the excess polish. I believe I am using Aluminum Oxide polish and it looks like everything has a thin film of the polish on it. I tried tumbling for a couple of hours with a tablespoon of borax and that helped but there is still lots of residue in the crevices so I started over again with a tablespoon of borax but I also added a cut up paper towel. I will see how they look in the morning.
I also have a question about the different stages of tumbling. I have watched several youtube videos and advice seems to be all over the place. Someone please correct me but here is what I understand the various stages to be.
Coarse stage: Smoothes out the rough edges and gets the rocks to the proper rounded shape. This stage should be run until all of the major grooves and edges are worn away. At the end of this stage the rocks should have pretty much their final shape. I find that I get best results when I add an additional tablespoon of grit every third day. So far I have been using SiC 46-70 grit and it seems to work fairly well but seems somewhat expensive. I spoke to a geologist and he suggested using aluminum oxide as an alternative but I don’t really know where to buy it.
Fine stage: Cleans up any residual scratches and blemishes left over from the coarse stage. So far I find that my rocks come out very smooth by the end of this stage. There have been a couple of times that I almost wanted to go directly to the polishing stage from here. I have been using SiC 120-220 grit for this stage so far.
Pre-polish Stage: Not really sure what this does. The rocks don’t seem to look much/any different at the end of this stage than they did at the end of the fine grit stage. What I have seen on a few occasions so far is that the rocks have come out rougher after this stage than they were going in. I suspect that the problem might be that I have a mixture of rocks with varying hardness and the harder rocks are damaging the softer ones. I have been trying to match the hardness of my rocks in each batch but this has been quite a challenge so far.
Polish Stage: Gives the shine to the rocks. My biggest challenge here seems to be getting the excess polish off of the rocks.
I have a couple of questions about the “thickness” of my slurry. The various tutorials that I have read and watched all seem to suggest adding three or four tablespoons of grit or polish to the tumbler with 3lbs of rocks resulting in a tumbler that is around 2/3 to 3/4 full. To this water is added until it reaches the level of the top of the rocks after they have been shaken down to their lowest level in the tumbler. The resulting slurry is very thin/watery. From reading some of the posts here it sounds like it is desirable to have a thicker slurry to maximize the contact between the grit and the rocks. If this is true, how does one achieve a thicker slurry? What should the slurry look like going into each stage?
In addition I am very curious to know what the rocks should look like at the end of each stage. How do I know when a stage is completed and the rocks are ready to advance to the next stage?
I have been making an effort to clean out the barrel at the end of each stage before starting the next stage. To do this I have been rinsing the barrel and rocks as best I can and then tumbling them for an hour with water and a tablespoon of borax then rinsing the barrel and rocks again. When I run my fingers over the barrel’s inner surface I can’t feel any grit and visually I can’t seen any grit or discoloration, however, the barrel is black rubber so it would probably be difficult to see contamination anyway. I suspect this might indeed be part of my problem.
From reading the responses I am probably ending the first stage too early. I noticed when I tried to tumble quartz rocks it did take a very long time before I could really see them smooth out. I have also tried some softer rocks and they seem to break down and in some cases totally disintegrate within a week.
With the softer rocks I have tried using plastic beads to keep them from tearing up too bad but I haven’t quite figured out the proper loading for them. The softer rocks seem to never really smooth out. Instead they seem to get pitted as I go and I just wear them down to tiny pebbles without ever getting the smooth surface I am after. Any advice for softer rocks is very much appreciated.
For those tumbling in the rotary tumbler (I also have a Harbor Freight style 3# tumbler) do you add extra grit when doing the first stage for 3+ weeks? When I check the tumbler I see that after a few days the grit that I put in seems to be broken down into much finer particles. With the finer particle size the rate of smoothing seems to slow drastically. Is this normal?
The suggestion about polishing jasper/agate was a very good one. I happened to stumble on that one myself and it definitely gave me my best results to date.
Thanks again for the help, my excitement is once again kindled.
Richard
|
|
Enigman
starting to spend too much on rocks
Member since December 2013
Posts: 163
|
Post by Enigman on Jun 28, 2016 11:26:51 GMT -5
The number 1 requirement is patience. It took me about two years to settle on a process that works every time. A few things: I think you need to add a 500 grit stage after the 120/220. 120/220 is still very coarse and jumping from that to prepolish and polish is too much of a leap. Prepolish is usually only needed for softer rocks like fluorite and anything around Mohs 4. With harder rocks you can go; 60/90, 120/220, 500, and then polish. With softer rocks insert the prepolish stage between the 500 and the final polish. Also you are better off buying individual grits rather than kits. That gives you better control. I too started with a Chicago Electric twin 3 pound machine and now use Lortone machines. The biggest initial mistake I made with grit was using a kit where the grits were only identified by stage names like "course", "medium" and so on. It turned out that the "polish" was actually 1500 grit pre-polish and not the true polish which is around 14,000 grit. I made myself crazy trying to get a shine until I discovered the grit error in the kit. It's also important to separate rock types by hardness. Determining that ahead of time will save you grief. Find a good Mohs hardness scale ( I have one on my site HERE ) and learn about how to identify rock types, then look them up on the scale. That takes time and research. No way around the investment of time. Plastic beads can carry embedded grit from stage to stage. I recommend either ceramic or small prerounded streambed pebbles from a floral or craft shop. I use streambed pebbles for the 60/90 and 120/220 stages and then switch to ceramic for 500 grit and polish stages. On cleanup, never flush slurry into a sink drain or yard drain pipes. It turns to concrete in pipes almost immediately. I use a high pressure hose nozzle and flush the barrels and rocks outdoors into a screen topper on a 5 gallon bucket. The high pressure nozzle will also blast grit out of holes and cracks in the stones. Let the water in the bucket stand until the grit sinks to the bottom, (a couple of days) then siphon off the clear water from the top. Repeat until the bucket is half full of grit mud, then you can cap the bucket and discard it sealed. Alternatively, if you have land you can bury the dense mud from the bucket, or spread it out and let it dry and then discard the dry mud. On slurry thickness, it is a matter of water. Less water means thicker slurry. Too little water makes "fudge" and then nothing happens in the barrel. Generally speaking fill with water until it is below the top layer of rocks and adjust as needed in later runs to achieve the thickness you want. It takes experience. 2.5 pounds of rock in a 3 pound barrel is a bit high. A higher ratio of media will distribute the grit a little better. I usually do the first 60/90 run for 8 to 10 days, (depending on hardness) then check rounding. If it needs more rounding than I clean and reset grit and add more 8 day 60/90 runs as needed. When the stones are rounded the way I want, then I move on to 120/220 and 500 grits. Hang in there. It takes time to get into the rythm. |
|
richardh
spending too much on rocks
Member since June 2016
Posts: 391
|
Post by richardh on Jun 28, 2016 18:15:57 GMT -5
Thanks for all the great information, that is exactly what I was looking for. I did buy a four part grit kit and that is what I have been using. I will try to get some 500 grit and some actual polish and see how things go.
|
|
|
|
Post by Garage Rocker on Jun 28, 2016 19:37:47 GMT -5
Go look at where you got the grit packs and see what it says in the description. For instance, the Rock Shed has a grit combo pack that includes 'prepolish', which is what they are calling Sic 500. Also included is AO polish, which will put a shine on most anything you want to tumble. Those aren't really the problem from what I'm reading. You just haven't put enough time in on the course grind. Those pits and crevices you are trying to rid of polish residue shouldn't be there. Be more selective about which rocks can move on to the next stage and you will see a world of difference. Throw out the instructions that came with the tumbler. Also great advice about sticking to agates and jaspers in the beginning. Knowing what to do is more than half the battle, and it looks like you've learned the first lesson. Just be patient. Ask questions or read old posts. And buy more grit.  |
|
jamesp
Cave Dweller
Member since October 2012
Posts: 36,182
|
Post by jamesp on Jun 29, 2016 4:55:04 GMT -5
Looking at your photo bucket rocks. The red ones are likely jasper and you did well with them. The green and blue rocks are soft and they did not do well. The green is amazonite and I believe the blue is apatite. Both of those common from Madagascar and both are difficult to tumble to a polish. The apatite breaks up. Wasting your time tumbling that one. Makes a mess out of your slurry. Order some jasper and agate. You did great on this jasper. Go back to the Brazos and collect more of this and other agates. Fill barrel up with these babies and go at it again. I'll arm wrestle you for some of this red jasper; you scored on this material. 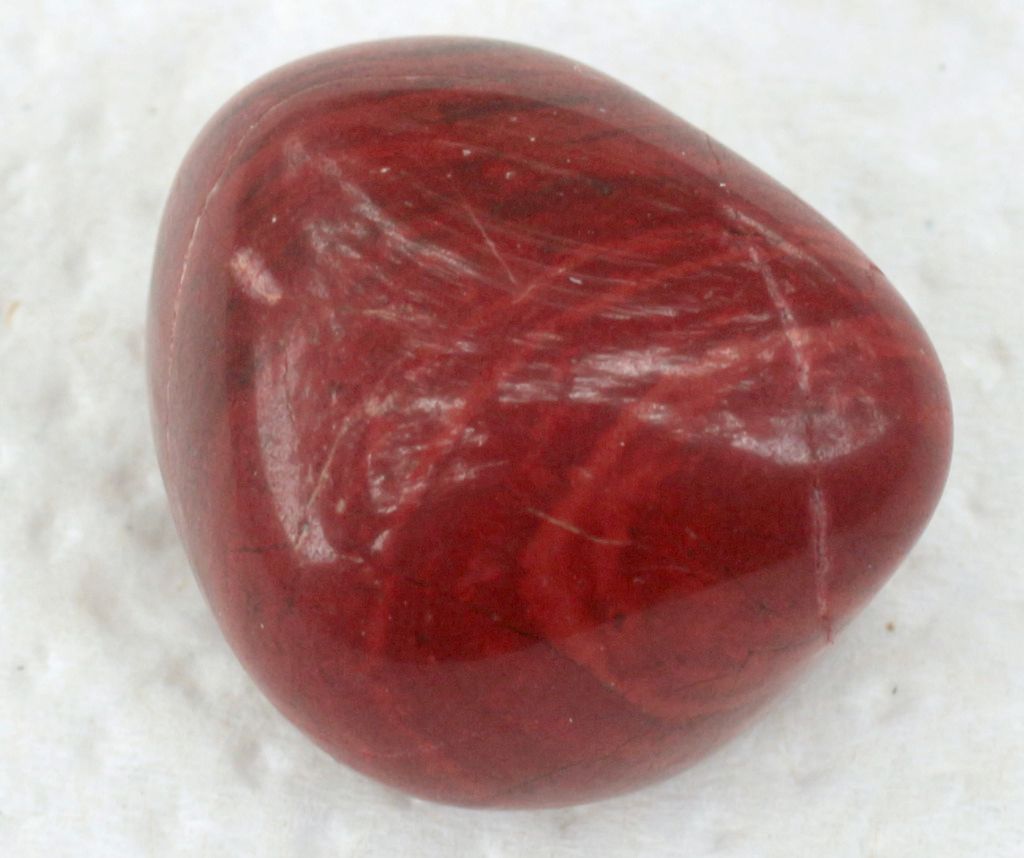 And this is typical for apatite. Not easy to tumble. Probably from out of Madagascar: 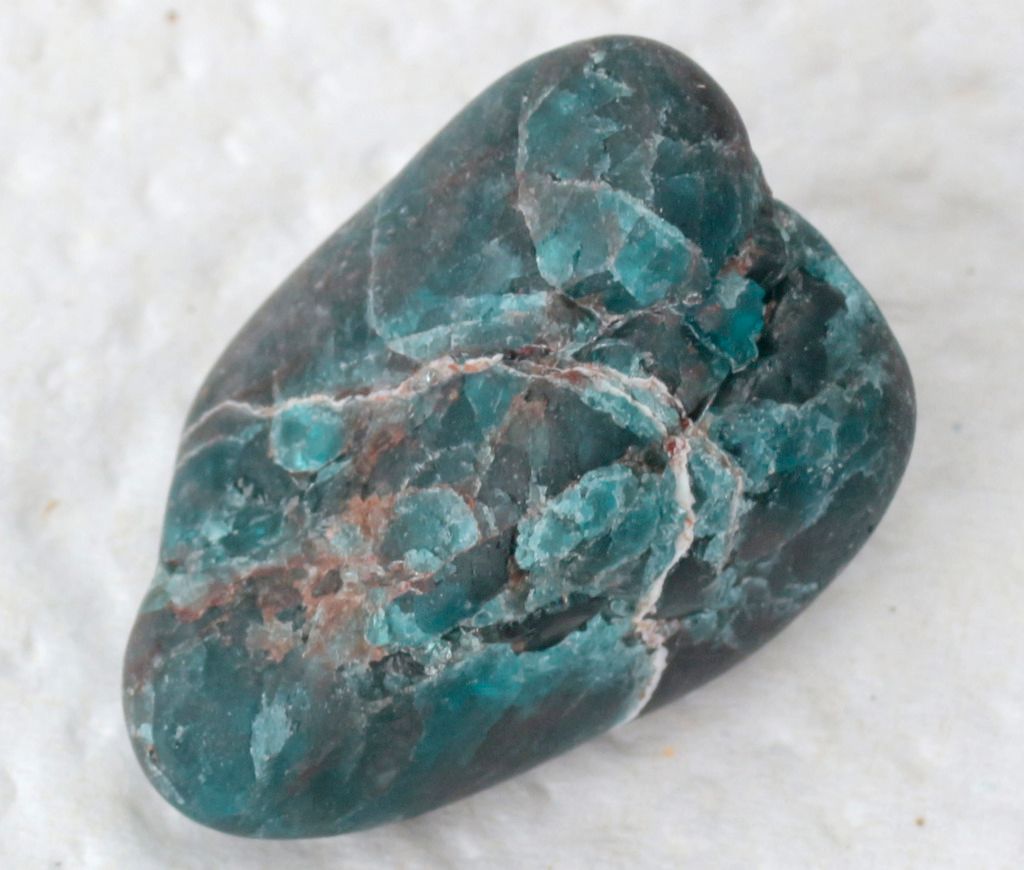 Another success from your Brazos River. If you live in Texas you have a gold mine of cool agates and jaspers. And already rounded by the river. A1 tumbling fodder. Your technique is very close. Fill barrel to 3/4 with Brazos agates and do it again. Hard rocks like these grind much better together. Soft mixed with hard rocks makes for poor tumble. 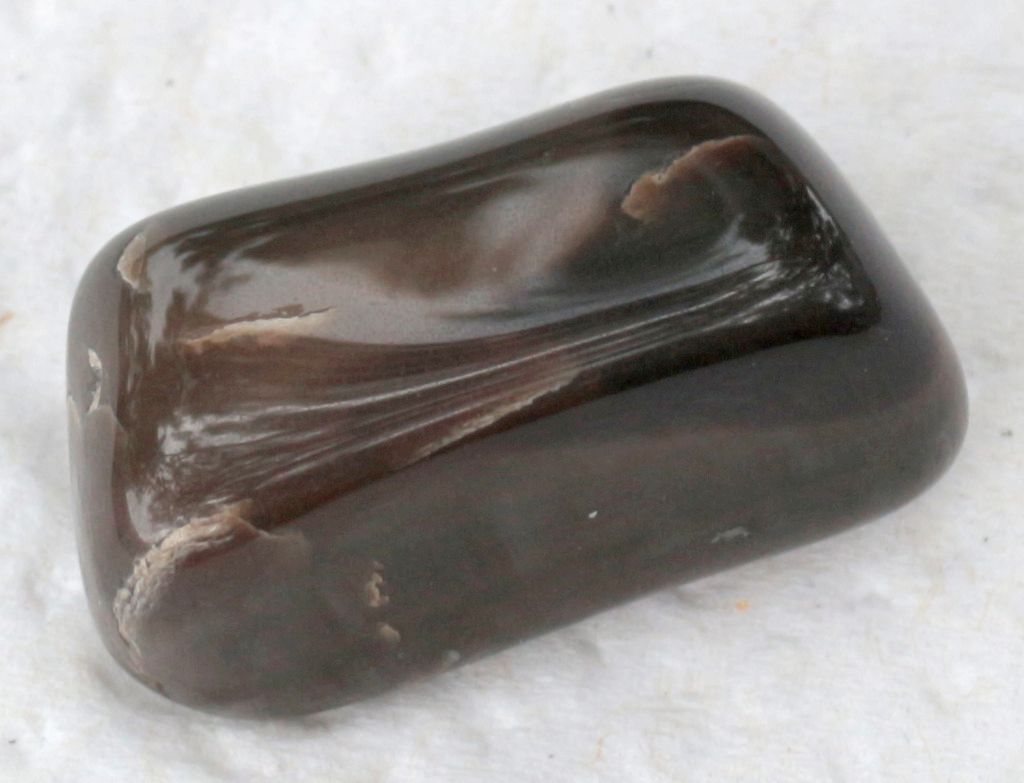 |
|
jamesp
Cave Dweller
Member since October 2012
Posts: 36,182
|
Post by jamesp on Jun 29, 2016 5:20:39 GMT -5
Blood red Brazos. Holy cow. I'll take 100 pounds  Looking at the pits in the glare. Looks like you did not run 120/220 long enough. Or 60/90 long enough. Fill that barrel with Brazos agate pebbles. Do three 60/90 changes and run each for a week. Then run 120/220 for a whole week. Then do pre-polish and polish for a week each So 3 +1 + 1 + 1 = 6 weeks tumbling(for rounded river agates). Barrel 3/4 full, water just below rocks. Re-run those Brazos jaspers/agates with them to get rid of pits.  |
|
richardh
spending too much on rocks
Member since June 2016
Posts: 391
|
Post by richardh on Jun 30, 2016 20:07:06 GMT -5
Garage Rocker,
The grit pack that I purchased was from Tru-square Metal Products. It was from thumlerstumbler.com packs 310 “Coarse Grit” 311 “Fine Grit” 312 “Prepolish” and 313 “Polish” I also got a bag of 320 “Plastic Tumbling Beads”
They don’t give a whole lot of information about it and I just assumed they were appropriate for a high-gloss polish. However, from looking at photos posted in the photos section of this site I haven’t been able to achieve anywhere near the level of shine that others are getting. I have taken some of my better looking rocks and have started them through the process again. As was pointed out previously I don’t think I gave enough time in the first stage and wonder if that might have limited what I could achieve in the following stages.
jamesp
I definitely want to go back down to the river but it looks like it will be a while before I get another chance to. We have had some pretty serious flooding and the river has been extremely high for weeks. I am itching to get back and find some more jasper.
I am sure I rushed the first two stages. It totally makes sense. I think these rocks will look really beautiful with all those crevices and scratches worn away.
Thanks very much for the tumbling recipes, I am giving it a try.
|
|
|
|
Post by Garage Rocker on Jul 2, 2016 10:21:28 GMT -5
Get you some grit and polish from the Rock Shed while you wait for those rocks to run the first stage again. I'm sure you'll be pleased with the difference a bit of patience makes. Post the 'after' pics when you're done.
|
|


 Drifting along with the tumblin' tumbleweeds


