notjustone
spending too much on rocks

Member since January 2017
Posts: 426 
|
Post by notjustone on Mar 4, 2017 7:20:19 GMT -5
I was just curious how many here preform? not just breaking off the weird potusions (trying to eliminate areas that would catch grit) but actually grinding all the hard edges and sharp corners to speed things up. vs how many just throw the rough in the barrel and just let them do their thing?
|
|
|
|
Post by Jugglerguy on Mar 4, 2017 7:29:54 GMT -5
I do not preform. After tumbling for a couple weeks, sometimes I'll grind away a bad hole, or cut the hole off on my saw. Bad fractures get chiseled to make two smaller, fracture free rocks.
|
|
tropidale
starting to shine!

Member since October 2016
Posts: 46 
|
Post by tropidale on Mar 4, 2017 22:31:06 GMT -5
I preform everything, since I mainly do cabbing. My main reason for tumbling is the final polish stage. The rest I do on my flat lap. So it takes me a while to have enough for a full of load.
|
|
|
|
Post by Garage Rocker on Mar 4, 2017 23:12:12 GMT -5
Same as Jugglerguy, no pre-shaping. Just cutting out/through problem areas. |
|
|
|
Post by Drummond Island Rocks on Mar 4, 2017 23:28:23 GMT -5
much like Garage Rocker and Jugglerguy I will do some grinding in stage one on certain rocks. I basically tumble in stage one for as many weeks as necessary but if a nice looking agate looks just about ready except for one or two deep holes or a fracture then I will do a quick fix and put it back in stage one for one more week. I really only do this for rocks worth the time and effort like my lakers or botswanas for instance. On an average weekly 36 pound clean out I will end up grinding on about one pound of the rocks. That means that pound plus others will be ready to be pulled the next week. Chuck |
|
|
|
Post by MrMike on Mar 6, 2017 6:18:18 GMT -5
I was just curious how many here preform? not just breaking off the weird potusions (trying to eliminate areas that would catch grit) but actually grinding all the hard edges and sharp corners to speed things up. vs how many just throw the rough in the barrel and just let them do their thing? Please share some pictures & details on that tumbler & barrel in your profile pic. Looks like you're an accomplished wood worker. |
|
jamesp
Cave Dweller 
Member since October 2012
Posts: 36,155
|
Post by jamesp on Mar 6, 2017 6:39:32 GMT -5
Sometimes I pre-grind heavily. These are totally ground and should take about 2 weeks to coarse grind. 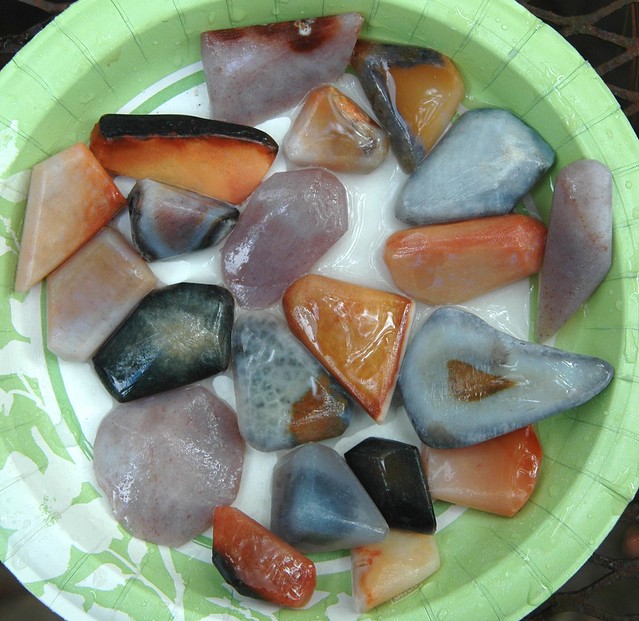 |
|
notjustone
spending too much on rocks
Member since January 2017
Posts: 426
|
Post by notjustone on Mar 6, 2017 10:33:36 GMT -5
its a coarse workhorse tumbler I made for wife. up and running for about a month now. the first hf started about 3 weeks b4 I had this one built. It basically just does coarse with some really aggressive sic I got from work (not sure what grade it comes in 2000lbs bags on pallets no grit designation)I add grit at about day 4 do cleanouts every Saturday and pick out the best rounded ones. from there it goes through all the normal stages in the hf tumblers for 1 week. coarse 60/90, med 150/220, fine 500, since I started the small hf tumbler near end of January the polish barrel is still empty. I figured a separate barrel for each grit was the way to go? 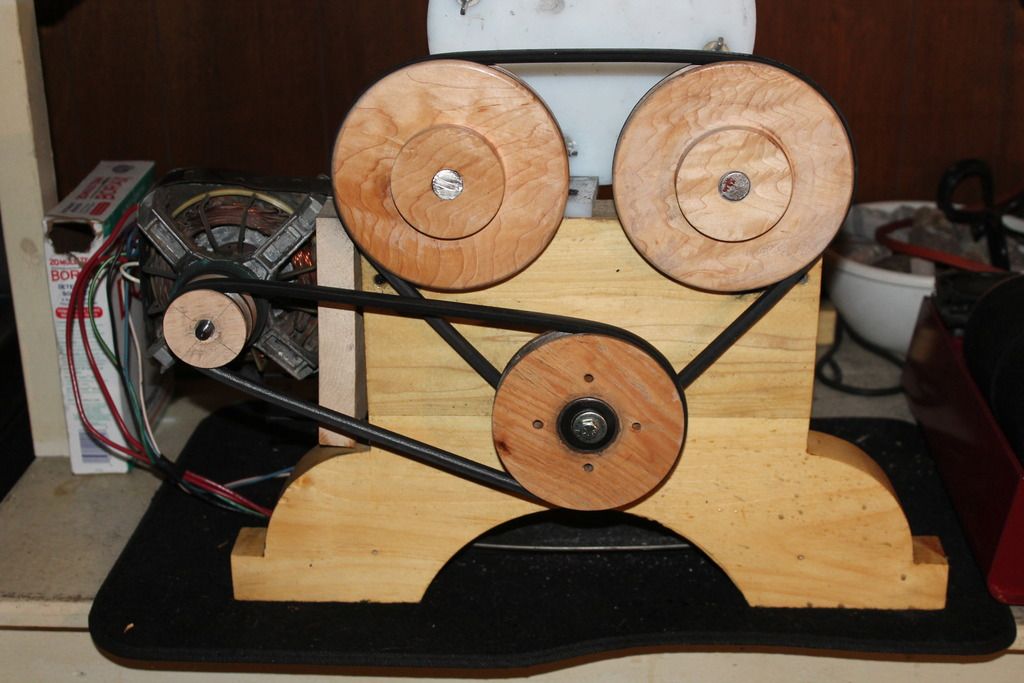 the 6 inch pulleys on the shafts are maple I just turned them out on my wood lathe. idler is oak since I didn't have a chunk of maple thick enough to do a 2 step pulley. with bearings in it. motor is old dryer motor till I find a smaller one way more power than is needed. motor pulley maple. if I ever want to make a speed change I just turn out a new pulley whatever size I want easy peazy. 3/4 inch shafts. the pillow blocks were the only parts I bought everything else was scrounged. 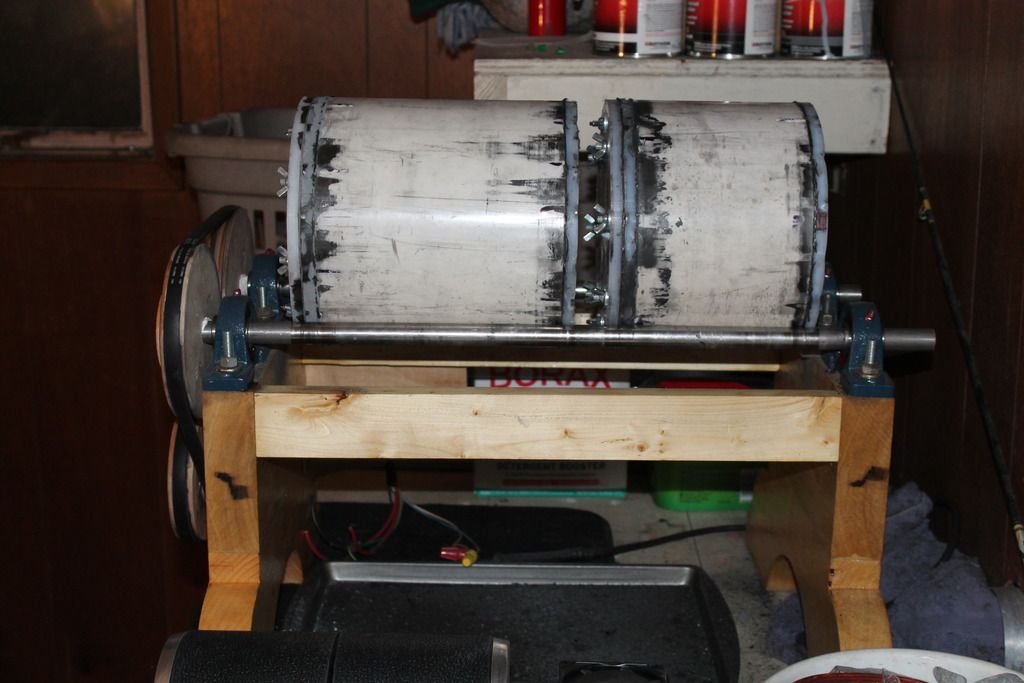 barrels are 8 inch pvc with uhmw screwed on ends. one is 8" long the other 6". I used roofing rubber for gaskets (that's all the nasty black gook on them) I do use a small paddle in them 3/8ths by 1 inch epoxied in hopefully not enough to slam them around but just enough to prevent the slide. 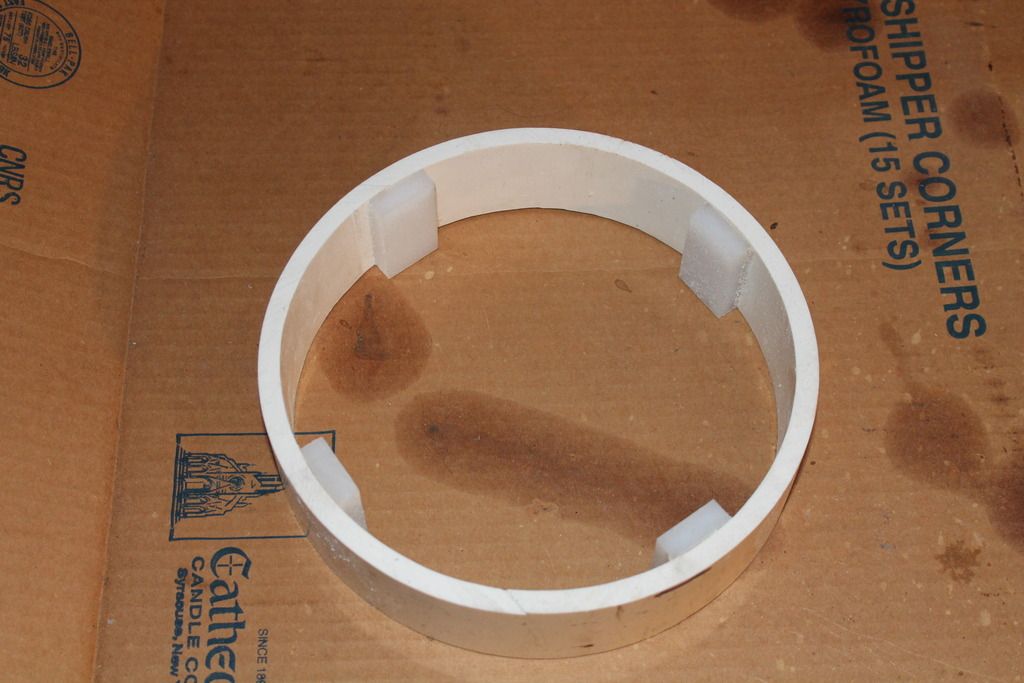 |
|
|
|
Post by captbob on Mar 6, 2017 10:44:35 GMT -5
Extremely cool. What is the barrel made from and how is it put together? Pictures of barrel?
|
|
jamesp
Cave Dweller
Member since October 2012
Posts: 36,155
|
Post by jamesp on Mar 6, 2017 10:54:12 GMT -5
Excellent build. Never thought about direct driving both shafts off of reduction pulley. Post-traction.
Maple pulleys, any size you please. Go thru a lot of trouble getting desired pulley sizes. And belts. You can even trim them to match a given belt length.
V-belts last forever on a tumbler.
Shape edges and trim out and wife may allow it as a piece of furniture.
|
|
notjustone
spending too much on rocks
Member since January 2017
Posts: 426
|
Post by notjustone on Mar 6, 2017 10:54:39 GMT -5
8 inch pvc with uhmw scraps from work screwed onto them with roofing rubber for gaskets. lid has 6 inch opening with carriage bolts and wingnuts. to hold lids on. see above I posted a couple more pics.
|
|
notjustone
spending too much on rocks
Member since January 2017
Posts: 426
|
Post by notjustone on Mar 6, 2017 11:07:35 GMT -5
|
|
|
|
Post by captbob on Mar 6, 2017 11:23:25 GMT -5
Your uhmw ends are screwed directly into the walls of the 8" PVC? Curious how the threaded rods that the wing nuts are on are attached to the barrel.
I've noticed that many home crafted tumblers have some kind of hose on the shafts, figured it gives the barrels better traction. No slippage on your bare shafts? What is the RPM of your barrels?
That really looks to be an ingenious build. Thumbs up!
|
|
notjustone
spending too much on rocks
Member since January 2017
Posts: 426
|
Post by notjustone on Mar 6, 2017 11:37:04 GMT -5
Excellent build. Never thought about direct driving both shafts off of reduction pulley. Post-traction. Maple pulleys, any size you please. Go thru a lot of trouble getting desired pulley sizes. And belts. You can even trim them to match a given belt length. V-belts last forever on a tumbler. Shape edges and trim out and wife may allow it as a piece of furniture. I found with the posi drive I don't even need to sleave the shafts. they just don't slip. that or it could be all that black goo from the roofing rubber gaskets that's kinda why I didn't get the acetone out and clean all the crap off the barrels. |
|
notjustone
spending too much on rocks
Member since January 2017
Posts: 426
|
Post by notjustone on Mar 6, 2017 12:05:26 GMT -5
Your uhmw ends are screwed directly into the walls of the 8" PVC? Curious how the threaded rods that the wing nuts are on are attached to the barrel. I've noticed that many home crafted tumblers have some kind of hose on the shafts, figured it gives the barrels better traction. No slippage on your bare shafts? What is the RPM of your barrels? That really looks to be an ingenious build. Thumbs up! yepper drill out pilot holes in the pvc or the screws will most definetly break the heads off going in. I countersunk the screw holes in the uhmw and used just plain old 1 1/4 sheet rock screws. guess I should have taken some pics of the barrel build. the lid tightening bolts are carriage bolts recessed a little into the umhw. not a lot just enough to put the head flush with the uhmw. been running a month and showing very little signs of wear. when the heads lose their domed shape ill simply change them out. judging by wear in past month I figure they will go easily a year b4 replacement is needed. |
|
jamesp
Cave Dweller
Member since October 2012
Posts: 36,155
|
Post by jamesp on Mar 6, 2017 13:29:48 GMT -5
The center of my PVC ends wear out way faster than any other part. I will be anxious to see how your ends wear.
Is that nylon that you made the ends out of ?
I thought about using polyethylene, aka Walmart butcher block that comes about 3/8" thick.
|
|
notjustone
spending too much on rocks
Member since January 2017
Posts: 426
|
Post by notjustone on Mar 7, 2017 0:00:17 GMT -5
james
its uhmw "ulta high molecular weight" tyvar brand name we use it at work mainly for chutes coming off conveyers thousands of cast iron parts falling on it everday we replace them every few years.
|
|
huskeric
spending too much on rocks
Member since May 2016
Posts: 353
|
Post by huskeric on Mar 17, 2017 14:14:35 GMT -5
Your uhmw ends are screwed directly into the walls of the 8" PVC? Curious how the threaded rods that the wing nuts are on are attached to the barrel. I've noticed that many home crafted tumblers have some kind of hose on the shafts, figured it gives the barrels better traction. No slippage on your bare shafts? What is the RPM of your barrels? That really looks to be an ingenious build. Thumbs up! yepper drill out pilot holes in the pvc or the screws will most definetly break the heads off going in. I countersunk the screw holes in the uhmw and used just plain old 1 1/4 sheet rock screws. guess I should have taken some pics of the barrel build. the lid tightening bolts are carriage bolts recessed a little into the umhw. not a lot just enough to put the head flush with the uhmw. been running a month and showing very little signs of wear. when the heads lose their domed shape ill simply change them out. judging by wear in past month I figure they will go easily a year b4 replacement is needed. First, beautiful tumbler. You're my hero! Next, on the barrels, also, good form! Would you mind, maybe even on another thread in homemade equipment, share some more pics of your barrels? |
|
notjustone
spending too much on rocks
Member since January 2017
Posts: 426
|
Post by notjustone on Mar 17, 2017 22:31:47 GMT -5
yepper drill out pilot holes in the pvc or the screws will most definetly break the heads off going in. I countersunk the screw holes in the uhmw and used just plain old 1 1/4 sheet rock screws. guess I should have taken some pics of the barrel build. the lid tightening bolts are carriage bolts recessed a little into the umhw. not a lot just enough to put the head flush with the uhmw. been running a month and showing very little signs of wear. when the heads lose their domed shape ill simply change them out. judging by wear in past month I figure they will go easily a year b4 replacement is needed. First, beautiful tumbler. You're my hero! Next, on the barrels, also, good form! Would you mind, maybe even on another thread in homemade equipment, share some more pics of your barrels? when I make another barrel ill take pics of some of the steps I took like hot glueing the umhw to the pvc and using a guided router bit to cut them round. they may be smaller 6 or 4 inch as I think I'm gonna make a second set of rollers down below. |
|