jasperfanatic
spending too much on rocks

Member since January 2019
Posts: 456
|
Post by jasperfanatic on Nov 24, 2019 21:02:14 GMT -5
Just finished up my second attempt at silversmithing. There's too much to fix, but I learned a ton and it doesn't look too bad if you're not zoomed in on top of it. Pretty sure I did everything the hard way - like splitting a piece of double half round might have been easier than two separate round wires. The idea seemed simple in my head but getting symmetrical bends with differing styles and bringing the shank in tight...it was way more difficult than I anticipated. Also, that silver sure flashes bright when polished up, was hard to get pics and it wanted to out flash the fire obsidian. Looking for critique, suggestions, corrections, etc. - tear it to pieces, I love to learn! Thanks for looking!  IMG_E2066 IMG_E2066 by Kevin, on Flickr  IMG_E2067 IMG_E2067 by Kevin, on Flickr |
|
|
|
Post by rockjunquie on Nov 24, 2019 21:26:50 GMT -5
I think it's great. I do see a little more solder than usual, but for your second one- I think it's awesome and the design is sweet, too.  |
|
Deleted
Deleted Member
Member since January 1970
Posts: 0
|
Post by Deleted on Nov 24, 2019 21:37:06 GMT -5
Like the design. Should give some protection for that nice piece of Fire obsidian.
|
|
jasperfanatic
spending too much on rocks
Member since January 2019
Posts: 456
|
Post by jasperfanatic on Nov 24, 2019 21:46:22 GMT -5
I think it's great. I do see a little more solder than usual, but for your second one- I think it's awesome and the design is sweet, too. Yeah, for me soldering is the metalsmith challenge equivalent to what flat spots and scratches were when I started cabbing. Practicing beat the flat spots, and will beat the soldering challenge too I think. |
|
quartz
Cave Dweller  breakin' rocks in the hot sun
Member since February 2010
Posts: 3,341
|
Post by quartz on Nov 24, 2019 22:52:26 GMT -5
Practice makes perfect, for a second project I'd say you did quite well. I like the simplicity of the design.
|
|
|
|
Post by fernwood on Nov 25, 2019 3:47:58 GMT -5
Love the design. I think it looks good.
|
|
|
|
Post by RocksInNJ on Nov 25, 2019 4:53:34 GMT -5
Yea really nice design. Looking good.
|
|
|
|
Post by opalpyrexia on Nov 25, 2019 11:34:32 GMT -5
For only a second piece I think that your ring looks great! I think that most people would assume that you've been doing this for a while.
I can offer a suggestion. The first photo looks like the bezel covers a little more of the stone than it should. One way to deal with that is to put the stone in place and use a Sharpie ultra fine point marker angled against the stone to mark a line inside the bezel. Then remove the stone and file the bezel down to the line. Alternatively, you might be able to trim your bezel wire prior to forming and soldering it in place.
|
|
|
|
Post by lpl on Nov 25, 2019 12:48:58 GMT -5
Yes, for a second piece, it's out of the park good. I love the design!
|
|
|
|
Post by miket on Nov 25, 2019 13:04:21 GMT -5
I think they look great, like the others I love the design.
And I don't think I've seen fire obsidian yet, very cool.
|
|
jasperfanatic
spending too much on rocks
Member since January 2019
Posts: 456
|
Post by jasperfanatic on Nov 25, 2019 14:31:57 GMT -5
For only a second piece I think that your ring looks great! I think that most people would assume that you've been doing this for a while. I can offer a suggestion. The first photo looks like the bezel covers a little more of the stone than it should. One way to deal with that is to put the stone in place and use a Sharpie ultra fine point marker angled against the stone to mark a line inside the bezel. Then remove the stone and file the bezel down to the line. Alternatively, you might be able to trim your bezel wire prior to forming and soldering it in place. Thanks, Gary. This is an awesome suggestion - much appreciated. In the course of my self-education on silversmithing I haven't run into anything that suggests how much coverage should/shouldn't be present. There was actually even more but I did file the bezel down, but I was eyeballing to a guess (and burning through floss as I was popping the stone in and out), so this tip is super helpful! You can kind of see it in the photos if you knew where it was, but there was a small buckle that I couldn't completely burnish out and I'm thinking it was because there was an even heavier amount of metal in that particular area, does that seem correct? There were a lot of things I learned not to repeat, and still some I'm not sure how to handle if I keep trying to make jewelry. Bending the two individual wires, making them symmetrical, support the bezel, and come in for the shank was much more difficult than I thought it would be. Consequently, I marred the metal pretty good. Any suggestions on better controlling that? Some the things I learned not to repeat: I set the stone too early because I thought I could clean everything up, but there were some areas that didn't jive with that line of thinking, and the stone took some blows it didn't need to. I also did some things out of order, or didn't "finish" as much as I should before committing to other steps which made some detail cleanup difficult to impossible. Thanks again for the comments and suggestion! I'm looking to learn all I can and really appreciate the help! |
|
jasperfanatic
spending too much on rocks
Member since January 2019
Posts: 456
|
Post by jasperfanatic on Nov 25, 2019 14:37:50 GMT -5
I think they look great, like the others I love the design. And I don't think I've seen fire obsidian yet, very cool. Thanks, Mike! The fire obsidian is amazingly beautiful stuff in the right lighting, but that directional aspect is also it's greatest weakness as a gemstone I think. It's also hard to come by, I'm just fortunate that it comes from my state and I've become friends with the claim owner who's a pretty great guy and he shared a little for me to play with. You can see some of the other pieces of it I've played with here www.instagram.com/kevin.dunigan if you're interested. |
|
|
|
Post by miket on Nov 25, 2019 15:37:59 GMT -5
I think they look great, like the others I love the design. And I don't think I've seen fire obsidian yet, very cool. Thanks, Mike! The fire obsidian is amazingly beautiful stuff in the right lighting, but that directional aspect is also it's greatest weakness as a gemstone I think. It's also hard to come by, I'm just fortunate that it comes from my state and I've become friends with the claim owner who's a pretty great guy and he shared a little for me to play with. You can see some of the other pieces of it I've played with here www.instagram.com/kevin.dunigan if you're interested. Wow. I checked out the rest- amazing stone! The other cabs that you have on there aren't too shabby, either. Thanks for sharing. |
|
|
|
Post by hummingbirdstones on Nov 25, 2019 16:21:49 GMT -5
Great job on your second one. It looks great!
Take Gary's advice and ask questions if you're not sure about something. There's enough silversmiths on here that will be happy to jump in and give you tips.
Regarding where you said the bezel buckled a bit: Are you slowing pushing the bezel in North, South, East and West and then in-between those before you start burnishing? That helps immensely to even the metal out around the stone and to keep the stone centered.
Keep at it. Looking to see more of your fire obsidian jewelry!
|
|
|
|
Post by opalpyrexia on Nov 25, 2019 18:50:17 GMT -5
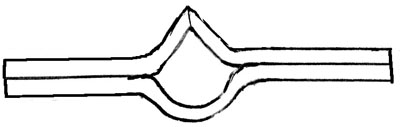
Thanks, Gary. This is an awesome suggestion - much appreciated. In the course of my self-education on silversmithing I haven't run into anything that suggests how much coverage should/shouldn't be present. There was actually even more but I did file the bezel down, but I was eyeballing to a guess (and burning through floss as I was popping the stone in and out), so this tip is super helpful! You can kind of see it in the photos if you knew where it was, but there was a small buckle that I couldn't completely burnish out and I'm thinking it was because there was an even heavier amount of metal in that particular area, does that seem correct? There were a lot of things I learned not to repeat, and still some I'm not sure how to handle if I keep trying to make jewelry. Bending the two individual wires, making them symmetrical, support the bezel, and come in for the shank was much more difficult than I thought it would be. Consequently, I marred the metal pretty good. Any suggestions on better controlling that? Some the things I learned not to repeat: I set the stone too early because I thought I could clean everything up, but there were some areas that didn't jive with that line of thinking, and the stone took some blows it didn't need to. I also did some things out of order, or didn't "finish" as much as I should before committing to other steps which made some detail cleanup difficult to impossible. Thanks again for the comments and suggestion! I'm looking to learn all I can and really appreciate the help! I can't see the buckle. Marks on the metal during forming or handling give me headaches. Did you form the "rounded" and "V" wires and then solder them together prior to bending into a ring? Like in this crummy sketch — My favorite pliers for ring forming and bezel forming is a half-round-and-flat pliers like the first of these two. I can't really justify the parallel version, which is even better. These leave fewer marks:
Yes, leave stone setting as the very last task prior to final cleanup/final polishing.
|
|
jasperfanatic
spending too much on rocks
Member since January 2019
Posts: 456
|
Post by jasperfanatic on Nov 26, 2019 15:38:18 GMT -5
I can't see the buckle. Marks on the metal during forming or handling give me headaches. Did you form the "rounded" and "V" wires and then solder them together prior to bending into a ring? Like in this crummy sketch — My favorite pliers for ring forming and bezel forming is a half-round-and-flat pliers like the first of these two. I can't really justify the parallel version, which is even better. These leave fewer marks:
Yes, leave stone setting as the very last task prior to final cleanup/final polishing.
The wires aren't actually soldered together, just bent tight with a bit of tension, they're only soldered to the bezel. The most difficult part of the whole thing was the bend where it goes out from the bezel and then down and in to form the shank. I think that's probably where things got marred the most, and also where I had the most challenging clean up on the inside areas that were hard to get to after the wires were soldered to the bezel. I think those parallels would have come in handy for some of this. I used a pair of all flat and a pair of all round for this effort, but if I decide to keep trying jewelry I might pick up those tools you mentioned. Thanks again for the insights! Kevin |
|
|
|
Post by opalpyrexia on Nov 26, 2019 15:59:38 GMT -5
... but if I decide to keep trying jewelry I might pick up those tools you mentioned. Thanks again for the insights! Kevin I hope that you do. You did a great job here. |
|
jasperfanatic
spending too much on rocks
Member since January 2019
Posts: 456
|
Post by jasperfanatic on Nov 26, 2019 17:31:04 GMT -5
... but if I decide to keep trying jewelry I might pick up those tools you mentioned. Thanks again for the insights! Kevin I hope that you do. You did a great job here. Thanks, Gary, that's very kind. I definitely dig working with metal and rocks, so I'll find a way to combine them somehow |
|