chrisperez
spending too much on rocks

Member since January 2009
Posts: 457
|
Post by chrisperez on Mar 26, 2011 21:41:03 GMT -5
Krystee, Looks great to me..I like it. I'd say you got the wires to flow pretty well.  Honestly, I like it so much, it looks like something I would do. Er, Something I might do ... Chris |
|
chrisperez
spending too much on rocks
Member since January 2009
Posts: 457
|
Post by chrisperez on Mar 26, 2011 3:29:48 GMT -5
This is one of my cabs from Tonyterner. I drew up a couple of fancy designs for it, but none of them really looked quite right.... So, I made this cab into the first thing I thought of the first time I saw it..... A machete  ... 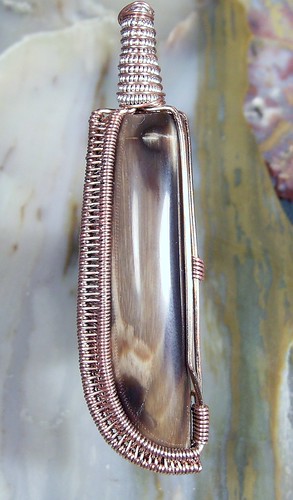 .. I think my weaving is getting pretty good... 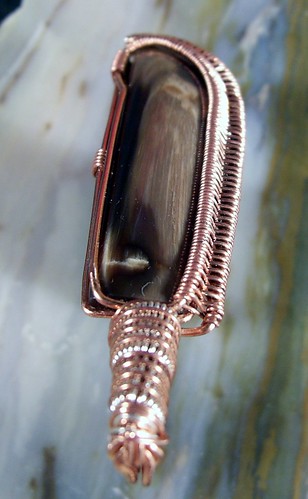 .. here's the back. 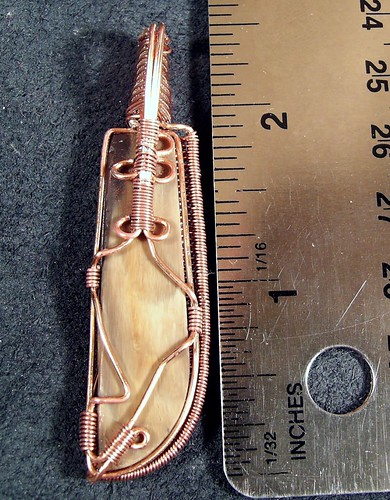 Everybody run!!!! RVD has gone mad!!!! Ahhhhhh, He's got a machete!!!!  Lol, Chris |
|
chrisperez
spending too much on rocks
Member since January 2009
Posts: 457
|
Post by chrisperez on Mar 24, 2011 21:48:56 GMT -5
Ooooh, count me in.... It was fun last time. I will promise to do my best to, how did you put it...try my hardest to make the wraps nice and neat, lol ... Thanks for doing this Krista!!! Chris |
|
chrisperez
spending too much on rocks
Member since January 2009
Posts: 457
|
Post by chrisperez on Mar 22, 2011 22:33:51 GMT -5
Actually, here's some pics of what I took ( Sorry mom, I just couldn't help myself ).... Dendrites and montanas... Each of the dendrites are smaller than a dime...  Boulder Opal... from Pporky... four have already been used . That biger one in the middle is amazing. I need to try puting that one in water to try to catch the fire...  Here a rough and tumbled piece of some sort of petrified wood ( I guess? ). I'm thinking a his and her pendant set for these...  Some really neat citrine pieces...  And some aquamarine...  |
|
chrisperez
spending too much on rocks
Member since January 2009
Posts: 457
|
Post by chrisperez on Mar 22, 2011 20:51:56 GMT -5
Yep, I got the little dendrites and those golden montanas on the right side of the 3rd pic. The dendrites are really small, so I'm gonna group them together kind of the the B.O. pendant, but not . These sure are some pretty stones! Good work mom ! We just need to get that camera working right, I keep forgetting to play around with it. Maybe next time I'm over... Chris |
|
chrisperez
spending too much on rocks
Member since January 2009
Posts: 457
|
Post by chrisperez on Mar 21, 2011 22:03:00 GMT -5
He he he, I thought you guys might like this one .... Someone else told you not long ago it's time to move on to the next level, to use high end stones in your creations. Which, by the way, are already high-end. I seccond that opinion. If you were able to make such a wonderful, symetrical pendant, using those four tumbled stones, you're GOOD! Adrian Chris, I told you I'd be watching! Outstanding piece! Swirle around in the B O's for awhile and then go get you some Coober Pedys and a little vermiel wire and step out a little farther. Good job.........gary Adrian and Gary... Maybe some day. Right now I can't afford my own rent  , let alone some nice stones and wire. Belive me, if it weren't for the kindness of you guys ( everyone here on RTH ) I would not even be doing this stuff at all. I owe you all alot... Thanks so much for everything.  HA.... well, I don't know about that You are just amazing!!! Wow!!!!! how long did that take you to make it? Not really sure... I did it over two days. Just kind of picking it up and putting it down ( I work on my couch in front of the TV and all my wrapping stuff is on my end table, for easy access). I guess about 10 hours from sketch to finished product, now that I think about it. Chris |
|
chrisperez
spending too much on rocks
Member since January 2009
Posts: 457
|
Post by chrisperez on Mar 19, 2011 23:25:42 GMT -5
Well, I pulled it off... I worked 4 little tiny stones into one wrap... My mom tumbled some little boulder opal pieces and they came out so nice I had to do something with them. They are too small to put into a pendant so, I figured group a few together.... well, here's my first multi-stone wrap... 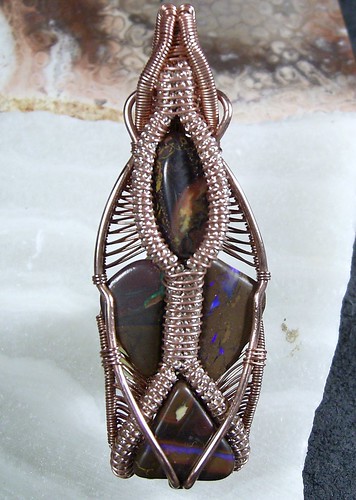 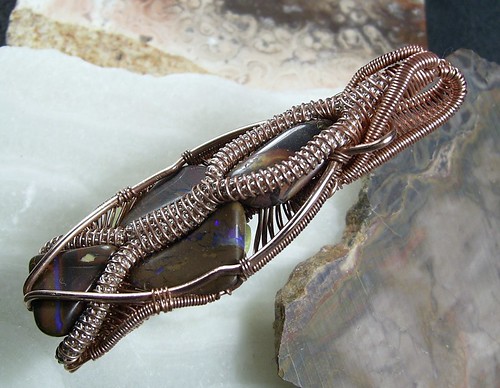 ...here's the back... whew, look at that!!!  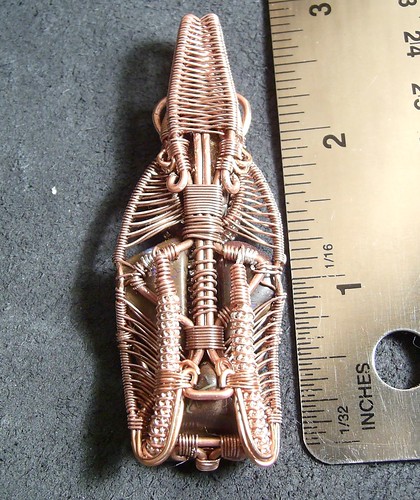 ... and here's a pic of these stone before I put them in the pendant ( in water so the fire shows better, it really does work ) 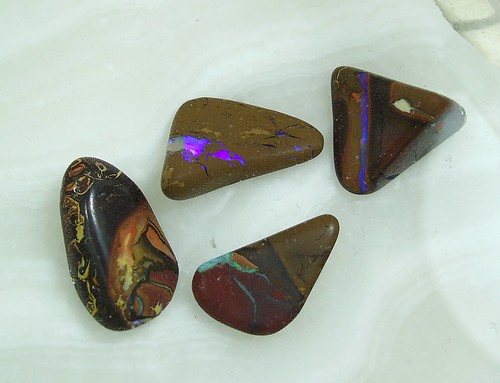 I have quite a few more... I'll definately have to try this again ;D. Oh, and it's wrapped in 16, 20, 24, and 26 gauge copper with 24 and 26 gauge silver plated copper in the coils... All from Hobby Lobby if anyone is wondering. So, is this rediculous, or what?!?!?lol |
|
chrisperez
spending too much on rocks
Member since January 2009
Posts: 457
|
Post by chrisperez on Mar 17, 2011 22:23:26 GMT -5
Heck.. here's my first wrap, from almost 2 years ago..lol.. bad lighting too Attachments:
|
|
chrisperez
spending too much on rocks
Member since January 2009
Posts: 457
|
Post by chrisperez on Mar 17, 2011 22:14:29 GMT -5
Hey Krystee, It dosen't look like you tried... I'd say you succeeded ... That wrap looks great to me. I'm not a fan on using square wire on the bail bind, but that's only because I tried once and the wire kept trying to twist on me, it just wouldn't lay right, so I just gave up and used half round as usual. So as far as the bail goes, I'm impressed. Other than that, your wires are straight, binds are tight and even your little curls on the back are nice and graceful... so, nice work.. Really, my only critique would be a little better lighting you know, so we can see it better Oh, and 5 hours is about right...lol ;D Can't wait to see your next one... Chris |
|
chrisperez
spending too much on rocks
Member since January 2009
Posts: 457
|
Post by chrisperez on Mar 16, 2011 22:02:18 GMT -5
I did a couple more over the last week.... This fist one is an agate wrapped in copper. I'm not to thrilled with this one... My weaving still needs work, as long as I keep going in a straight line it looks good, but as soon as I make it curve it gets all funky.... I'm starting to figure it out though . One thing I do like about this one is how rigid it is... it looks really fragile, but it's not... the end of the weave and the end of the coil are tied back into the frame. 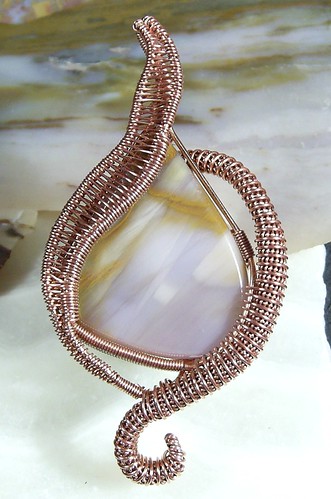 here's a view of the bail... 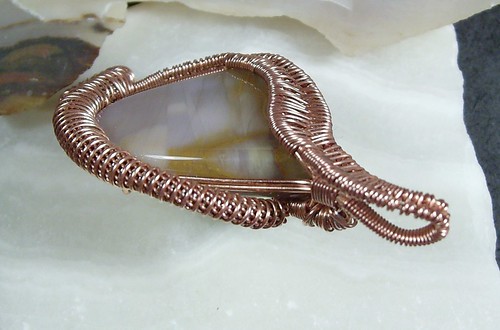 ... and here's the back. If you notice on the bottom, the core wire from the coil and one of the wires supporting the weave are actually bound into the coil and then tied back into the frame... took a little planning but it really locked everything into place. 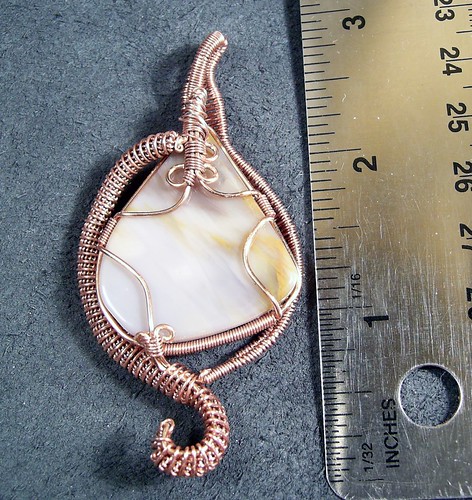 And now something a little different. Toad said someting about no stones at all... well, how about this? 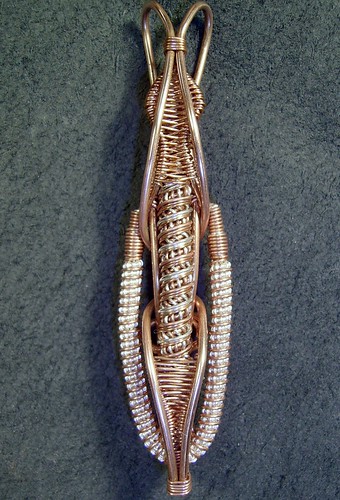 This all started with that big coil in the middle... I was just playing with some scrap pieces of wire, I ended up just coiling a whole bunch together. There is actually 13 wires in that coil in the middle, you can see 12 of them. Then I attached that coil to a frame, did a little weaving, added another coil and ended up with that... thing .  .. here's the back, I like the back of this thing... 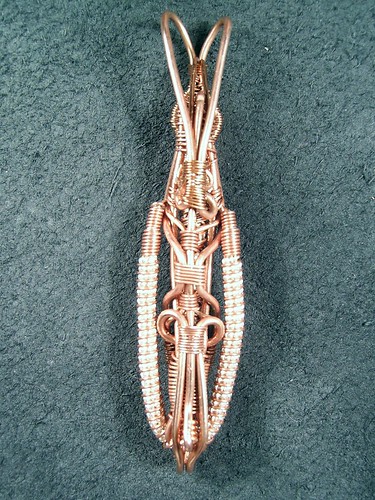 Well, how did I do? Chris p.s. My next new post will be titled " One wrap... fours stones ", if I can pull it off that is We will see.... |
|
chrisperez
spending too much on rocks
Member since January 2009
Posts: 457
|
Post by chrisperez on Mar 15, 2011 20:04:57 GMT -5
Sorry guys, I haven't responded to anyone's posts in a while... I always spend so much time uploading, reading and looking online I never seem to have the time to respond.... Thanky you all, as always... ya'll are the best ;D. Gorgeous! Chris, I think this is my favorite of your wraps! It's unique, and classic at the same time and yes, it really looks like it's floating there! LOVE IT!!! Dee, you know I'm a fan of your's so this really means alot  I plan on doing more like this, kind of ... The stone hanging there, it looks like levitating. Magic! Adrian Well Adrian, I hope I don't spoil any of the magic, but... Here's the back 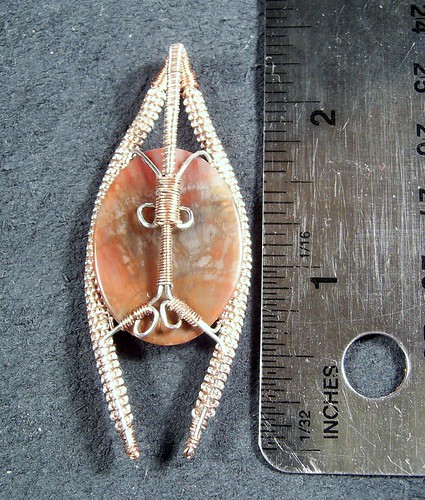 Really like that. Elephant tusks. Ha ha, Toad... Elephant tusks.... is this about right? ;D 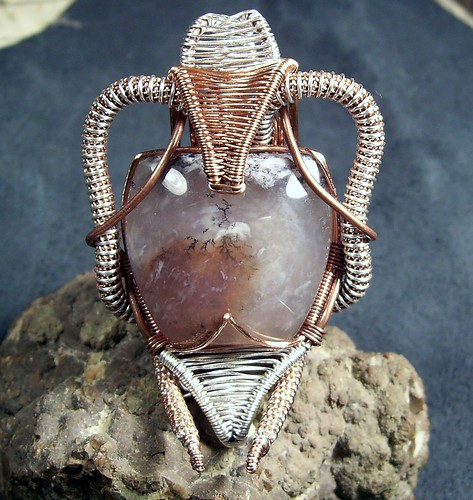  ummm i didnt see anything but the mexcrezylace on the left ... seriously though ... do i need to even say it anymore . superb as usual .. Isn't that little slab sick? One of these days I want to make a cab with that one, It's looks too nice to tumble... Thanks guys, Chris |
|
chrisperez
spending too much on rocks
Member since January 2009
Posts: 457
|
Post by chrisperez on Mar 8, 2011 23:06:09 GMT -5
First off thanks for all the kudos on my last two wraps, I still need to respond to everyone on those..... But for now, I have another one for your viewing pleasure.... This is a piece of Arizona pet wood my mom tumbled. I didn't really know what to do with it, I just knew I wanted to wrap it... so I ended up just throwing alot of copper coils and weaves on it. It's like, wrapped in a copper scarf.... I'm still getting better at weaving .... 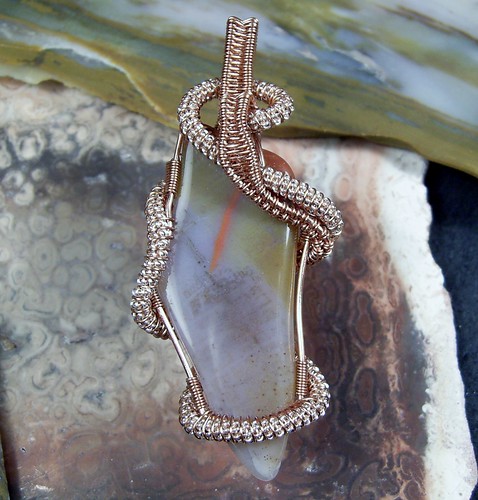 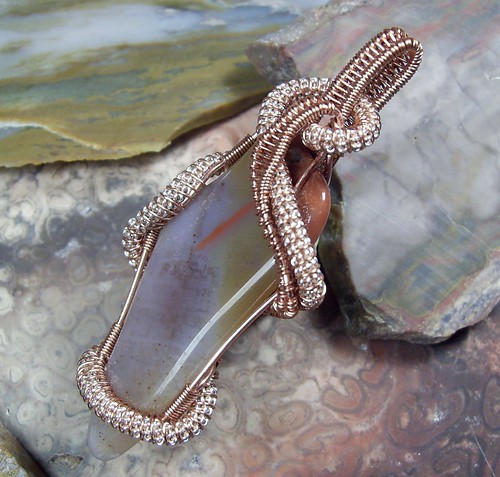 ... and, if you wanted to copy this one ( good luck christopherl1234 ), this pic of the back should completely explain just how I did this wrap ( yeah right, what a mess ).... 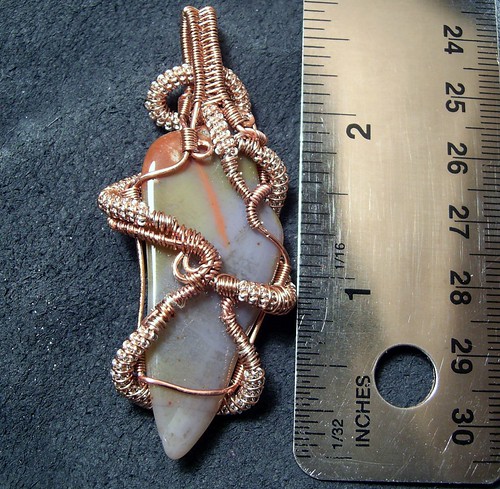 So, what about this one? Chris p.s. It's wrapped in 20, 24, and 26 gauge copper and 26 gauge silver plated copper. |
|
chrisperez
spending too much on rocks
Member since January 2009
Posts: 457
|
Post by chrisperez on Mar 6, 2011 1:36:48 GMT -5
Hey, I have another one... I'm pretty sure this is the simplest looking wrap I've ever done. The cab is some sort of agate ( from a fellow RTH'er, thank you once again ) wrapped in 26 ga copper and 26 ga silver plated copper.. and some of that really stiff wire ( had to be really stiff, or this wouldn't have worked....). It didn't come out exactly how I wanted it to, but it is close enough. I've seen alot of really neat eye shaped wraps recently ( Dee, for example ), that's what inspired this. Like an eye, but not. Mostly, I was trying to make it look like the stone is just floating there.... Did I pull it off? 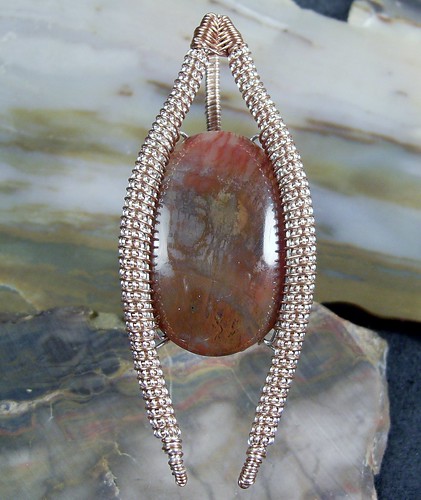 ... the weave at the top was a last minute decision... 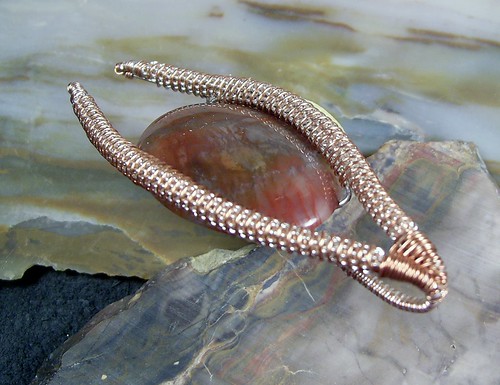 ... thin, thin, thin.... 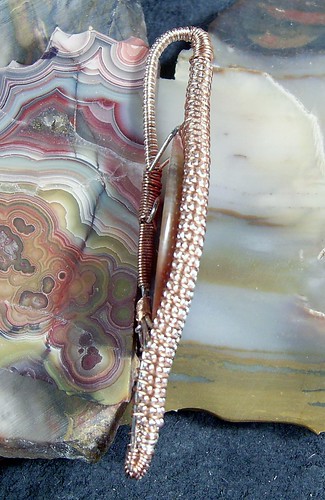 By the way, the stone is quite secure... I mean, you could pop it out if you really wanted to, but it would take a bit of effort. I will post the back later is anyone wants to see.... I just want to keep it mysterious for a day or two.... Chris |
|
chrisperez
spending too much on rocks
Member since January 2009
Posts: 457
|
Post by chrisperez on Mar 3, 2011 20:05:49 GMT -5
What's up RTH, Well, here's the wrap I used that coil on. This is a tumbled piece of bloodstone wrapped in copper and silver plated copper. I'm getting a little better at weaving, but it's just soooo darn tedious  . The weaves do look good, so I guess it's worth it. I was going to do a weave on the bail, but I kind of like it the way it is. 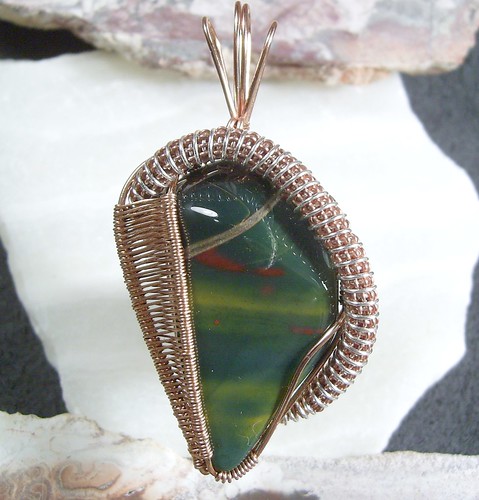 It looks like the weave is covering alot of the stone, but it's not really. You know how I like to change the shape of the stone , I used the weave to make the stone look wider to make sure it hung just how I wanted it to. 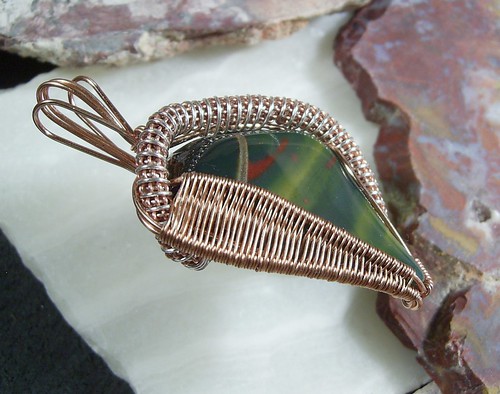 and the back... 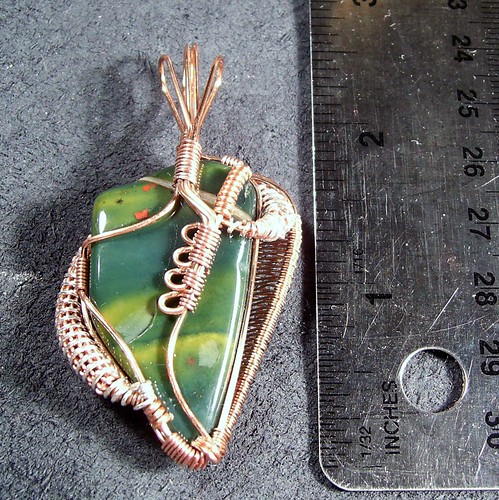 Well, how did I do this time? Chris |
|
chrisperez
spending too much on rocks
Member since January 2009
Posts: 457
|
Post by chrisperez on Mar 2, 2011 23:06:08 GMT -5
Hey guys, Some of you have asked me how I make the " fancy wires " I've been useing in my wraps recently, so I took some pics for you .... I start off coiling one wire around another... I make this coil with a drill. I attach one end of the center wire to a fishing leader ( keeps the line from tangling ), and twist the other end together with the coiling wire. Chuck the twisted end into a drill ( variable speed drill, you don't want to go all that fast ) and attach the fishing leader to a hook or something to anchor it. Then I slowly feed the coiling wire with one hand while pulling the trigger and keeping a little tension on the center wire with the other. The wire breaks on occasion, but the I just re-chuck it back into the drill... Honestly, it's a little tricky. There is probably another ( better ) way, but this is how I do it right now. In this case I used 24 gauge copper, wrapped around 24 gauge silver plated copper about 2 feet long. I started with about 8 feet of copper to make a coil about 9 inches long.  Then unwind about 3/4" of the other end of the coil... Be sure you have a tail on either end of the coild wire about 2" long, this will be used to help secure everything. 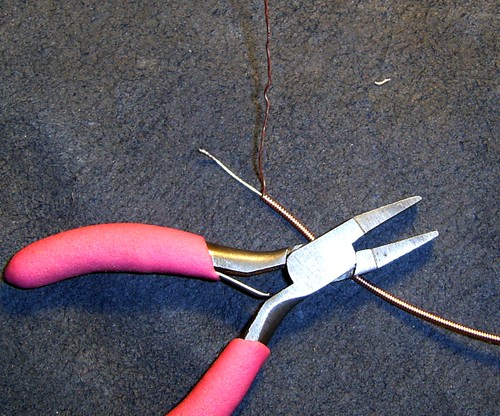 Next, coil that coil around another wire... In this case I used 20 gauge copper. Start with the short end and wrap the center ( silver ) wire around the 20 ga. Then wrap the 24 ga copper around the silver wire. After that just start wrapping the coiled wire around the 20 ga. As you wrap, the coil will actually slide down the silver ( that's why I used 2' even though the coil was only 9" ). If it is really hard to wrap then the coil was too tight. You can just loosen up the coil by untwisting it with your fingers. 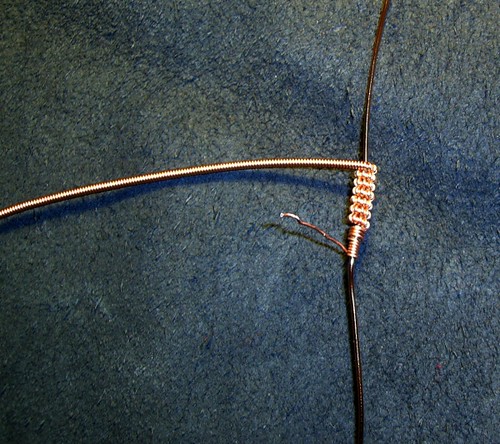 Just keep coiling the coil until you get to the end ( or as long as you want, you can just cut the coil and make a new end ). Finish it off the same way it was started. Wrap the silver wire a couple times, then the copper. At this time, make sure it is really tight. Twist it a few times to tighten it up, you will notice that everything kind of locks into place. Then bend the ends of the 20ga tightly against the coils to keep it from spreading apart. At this point the coil is only about 4" long. 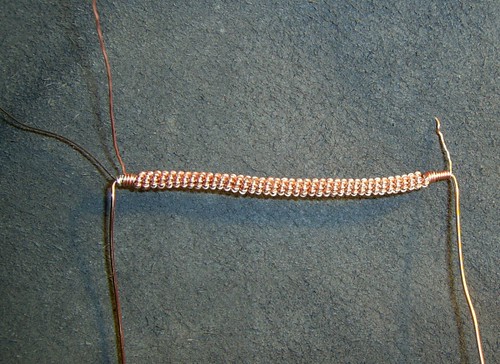 Last step... Now it's time to coil the final wire. Here I used another piece of 24 ga silver plated copper about 2' long ( every time I do this I worry that I cut the wire too short, ). I usually start about 1/2" from one end and wrap it up to the close end. The wire should fall on top of, but not between, the coils of the coiled coil ( did you get that??? ;D ). Then just work up to the other end... 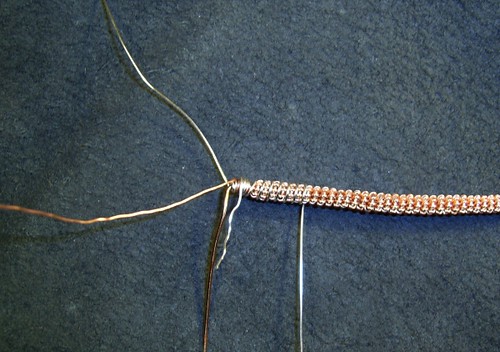 Here's a closer pic.... 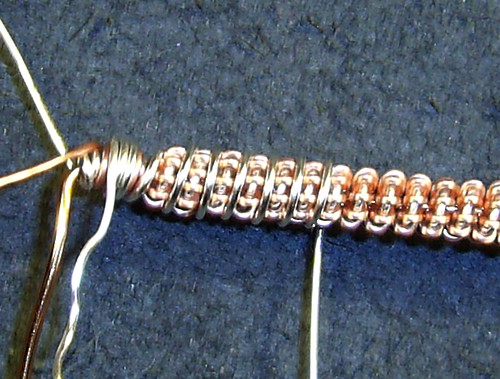 That's as far as I took that final wire at that time. I used it to tie the coil into a wrap.... here's a peek... 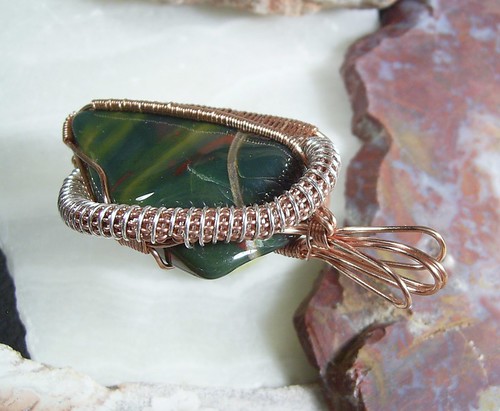 Well, that's it.... Go ahead and ask questions, I'm sure there will be plenty ( as this probably dosen't make any sense ). I'll do my best to answer.... Chris |
|
chrisperez
spending too much on rocks
Member since January 2009
Posts: 457
|
Post by chrisperez on Feb 28, 2011 23:07:30 GMT -5
Thanks guys, I'm glad you like it.... I think you just amaze everyone here with your style Chris. Keep it up the great work. I was trying to do some wrapping last night and I was so frusrtated I was ready to kick the dog (that would never happen)and slap the cat (that could) ~gary Ha ha ha... dang cat!!! ;D Looks like you are going to be a trend setter Chris. Your work is very original and innovative. I can imaging that we will see others attempting your techniques (myself included)! I really look forward to seeing your work. You consistently push the envelope and have a unique style. Lol...Well, I don't know about setting any trends, but you can go ahead and copy them if you like ... Just be sure to post what you make, 'cause I want to see it too. Hmmm, maby I shouldn't post the backs anymore... keep a little mystery to the wraps.... lol... Super cool wrap Chris. I'm wondering if that wire might be stainless steel? Springy and tough to cut tell me it is. Nate Yeah, I was thinking it might be steel.... I was hoping Fran would chime in, I'm pretty sure it came from her. Whatever it is, it worked out perfect for this wrap. I just drew up another wrap that I'll have to use this stuff on. It going to look impossible, and really wild.... Also, I thought you all might like to see what a couple of my sketches look like...( thank you once again, Nancy, for the sketch pad, hours of entertainment )  Thanks y'all, Chris |
|
chrisperez
spending too much on rocks
Member since January 2009
Posts: 457
|
Post by chrisperez on Feb 27, 2011 22:49:11 GMT -5
:blush: Thanks as always guys ;D, I'm glad you all like it ( so far ). I think is is a bit overdone, but I made sure to let the stone dictate the design... so it all worked out pretty well. Chris, never in my wildest thoughts did I ever see that cab in such a beautifully crafted wire setting. To be honest, though the pattern in the cab was interesting, when I made it, I couldn't see it in my minds eye as a finished creation. Seeing this just made my day! You are a truly gifted artist with all of your creations! Thanks Shan for the kudo's. I was hoping you say something like that Lori . I have had the hardest time coming up with designs for cabs with flat sides ( those are tough )... But with all these new ( to me ) tricks I've figured out, I'm finding new ways to make the flat sides work with the design. You sure sent me some callenging cabs to work with ( that's a good thing ), thank you once again Lori. Yep it's an elephant and it's awesome. Needs the trunk to come down longer and curl to the front. Lori's cab rocks too. Maybe next time Jo, maybe next time...lol I can see you making fabulous pieces without stones at all... I have some ideas .... By the way. So, which way looks better left or right? I think the left looks more strong and bold like an elephant, and the right looks more dainty and delicate like a princess... It's kind of suprising how just flipping the pendant makes such a difference. 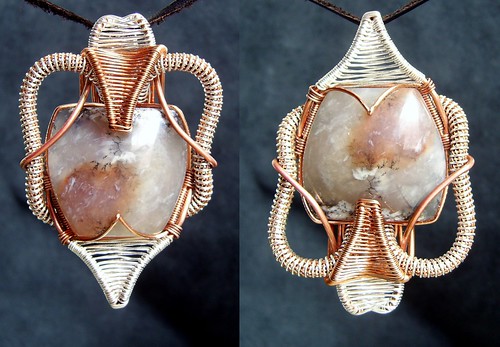 |
|
chrisperez
spending too much on rocks
Member since January 2009
Posts: 457
|
Post by chrisperez on Feb 27, 2011 0:28:04 GMT -5
Well, I have yet another new wrap. This wrap is one I sketched up a while ago, I just never could figure out how to make the sketch work.... until now... The cab is one I recieved from Tonyterner a while ago ( thanks again Tony, great stuff ), I'm pretty sure it's mahogany obsidian. It is wrapped in 21 gauge argentum silver ( I think? My mom recieved it in a gift box... half hard, really hard stuff!!! ) and 24 gauge half round sterling in the coil; also 24 gauge copper and 26 ga copper for the weaves. The 21 ga actually ruined my cutters, I ended up using my dykes from work, and even those have little nicks in them now ... hard stuff, and springy too... This wrap is actually as simple as it looks, but it was pretty tricky to pull off. The coil holds the stone in and the 21ga silver holds the coil. It was really hard to keep everything together unitl I got to the two binds right at the top of the stone. I'm not sure it even would have worked if I had used softer wire. Anyways, as always, let me know what you think.... Front view....  ... better view of how it's held together....  ... and the side, this thing is extremely thin....  ... and the back, that's all there is to it....  I think I'm going to be wearing this one for a while ;D.... It's not often that I make something I would wear myself... Thanks guys, Chris |
|
chrisperez
spending too much on rocks
Member since January 2009
Posts: 457
|
Post by chrisperez on Feb 24, 2011 21:29:17 GMT -5
Alright, now this time I think I have gone too far.... First off, Thanks as always for the kind comments on my citrine and pet wood wraps. You all got me started wrapping ( thanks Randy ) and honestly, you all keep me wrapping .... Anyways... This one got a little rediculous.... The cab is some sort of agate ( I think? ) which I recieved from Lori ( sitnwrap ) in one of her gift boxes ( thank you Lori, I'll bet you never thought it would look like this ). It is wrapped in 16, 20, 24, and 26 gauge copper also 24 and 26 gauge silver plated copper ( don't even ask how much, lol). It started out as a neat sketch, but turned into.... uh... an elephant. I'm not quite sure how that happened, but it did .... It looks like something straight out of India.... What do you think? 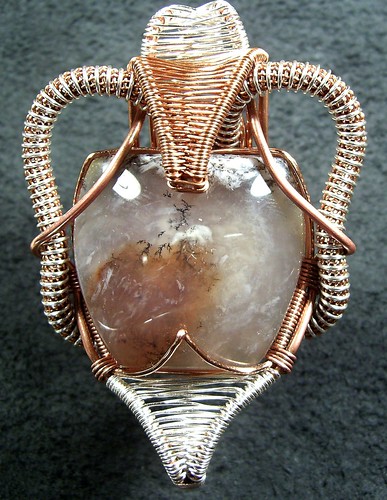 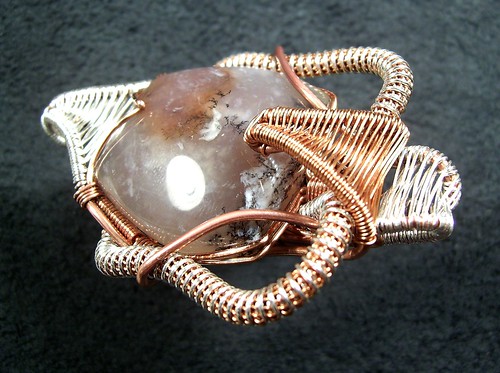 It's not as bulky as it looks, less than 1/2 inch thick... and you can also hang it upside down, it has a loop on both ends. Heck, I think it looks better that way, I'll get a pic of it hanging both ways for ya'll. 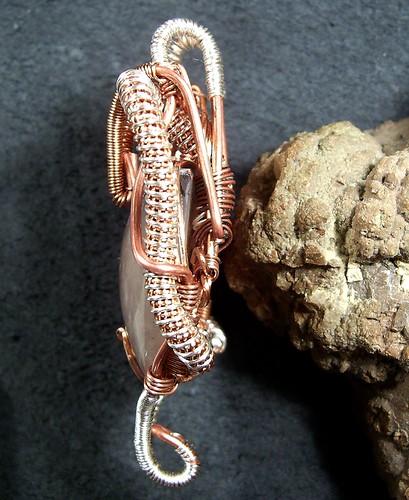 and the back... what a mess, lol...  So, what's the verdict? Is it a little too much? lol Chris |
|
chrisperez
spending too much on rocks
Member since January 2009
Posts: 457
|
Post by chrisperez on Feb 21, 2011 19:01:03 GMT -5
Hello RTH, O.K. I have another wrap to show... I'm still experimenting with coils. I had this cool piece of Arizona rainbow wood my mom tumbled that I just couldn't figure out what to do with, the shape wasn't that flattering. I wanted to come up with a way to " frame " the tree. I used the coil and thicker wires to cover parts of the stone and kind of change it's shape. Tumbled arizona pet wood, wrapped in... 16, 20, and 24 ga copper and 24ga silver plated copper ( Hobby Lobby in town just started carrying this stuff. Looks nice, and the price is right. I did manage to scratch some of the silver off, so I don't think I should polish it much ).  In this pic you can see where some of the stone is hidden behind the coil, and where I attached the 3 16ga wires to the frame on the far side.  This angle shows where I tied the coil into the frame to hold everything together tightly.  Doh, I forgot to get a pic of the back.... if anyone wants to see that, just let me know .... Thanks as always, Chris |
|


 ...
...
 , let alone some nice stones and wire. Belive me, if it weren't for the kindness of you guys ( everyone here on RTH ) I would not even be doing this stuff at all. I owe you all alot... Thanks so much for everything.


 . The weaves do look good, so I guess it's worth it. I was going to do a weave on the bail, but I kind of like it the way it is.