rykk
spending too much on rocks

Member since September 2011
Posts: 428 
|
Post by rykk on Apr 28, 2014 20:32:20 GMT -5
My grit sequence is 60/90 - 220 - 600 - Tin Oxide polish. I add an optional 1000 or 1500 grit phase after the 600, sometimes. Usually for Montana Agates and Obsidian. I think just doing 2 consecutive 600 grinds works as well. I just did that last week and hard to polish rocks like amethyst slabs turned out awesome. Make sure you have a separate pan with a felt pad to do your polishing and store it wet in a sealed garbage bag after you're done. Tin Oxide and Cerium Oxide hardly wear down at all, so saving the polish in the pan saves a good chunk of change. You do have to add a tablespoon here and there as some polish slurry gets lost on the rocks and some collects and hardens on the lip of the pan.
Whenever you start a new batch/grind, make sure to stay and watch the movement in the pan for 5-10 minutes before you go off to make cabs or whatever. Sometimes there will be a rock or two that doesn't play well with others and you can end up with gridlock in the pan. Other than the first little while on the coarser grits where the rocks/slabs will jitter around chaotically, once the grit wears some, the rocks should rotate together around the pan slowly - or sometimes faster than slow. It's usually long, rectangular slabs that cause the most problems because they are always trying to spin on a long axis and can end up wedging rocks on the other side of the pan firmly against the side and stop the rotation. That's why you want to keep an eye on them for a while and play "traffic cop" if any combo of positions of the rocks stops the rotation. Sometimes you just have to move a rock or two to a different spot in the pan. I try to keep round/squarish ones in the center and have the long ones at the edge, travelling around the pan parallel to the edge of the pan. Moving length-wise, in other words. It's pretty easy to move rocks around as you watch and set them so that the long, narrow ones always stay pinned at the edge. Fill the pan completely and then remove one or two rocks. You have to have enough rocks in the pan to make sure they all stay rotating and in their place where you want them. Too much empty space and they just loiter in the same spot or the long ones spin and get sideways an create a logjam.
Sometimes, since the slabs all have heavy weights on them, a lighter rock might even get shoved over the top of the traffic jam and start whacking against the top of some other slab at over 1000 times per second and make some pretty deep dings that require you to take that one all the way back for multiple grinds at 60/90 to re-flatten the slab. That sux! Doesn't happen very ofter and, if it does, it's usually in the polish phase where the rocks/slabs have some drag from the felt pad rather than skate over the top of grit bits. If the rocks stay in one place for too long, you end up with a grid of circles in the finish. Remember, Tin Oxide is very hard stuff. I was going to add a picture of my prize, 8" slab of Rolling/Waving Hills Dolomite to show the effects of gridlock in the polish phase, but I didn't get a pic that showed it well. Now, dolomite is kinda soft - polishes well, but it *is* soft. On one side of the slab, the rocks got stuck sometime overnight. It resulted in one side of the slab having a thousand round dings and a texture like a waffle. It was shiny, but sitting in the same place so long made the polish dig little round dents all over the slab. They are fairly deep, too - like a millimeter or more. I'll have to totally redo that side. The harder rocks didn't get dented, per se, but you can definitely see a grid of little circles in the polished faces if you look.
I find that 95% of all gridlocks happen in the polish phase. Usually caused by a "slow" rock that doesn't have it's edges all beveled at 45-ish degrees or, occasionally, a rock whose tape is too low on the edge and drags against the pad. You want to make sure to bevel all edges of every rock/slab a fair bit at the very start of the grinds. This helps the grit get under the rock. Not beveling causes the center of the rock to not get ground/polished. Also, sharp edged rocks drastically decrease the life of your polishing pad. The sharp edges - with a couple pounds of lead weight behind them - will mow the fibers off the pad like a lawnmower cutting grass. Most times, a worn pad means half a pound or more of lost polish. I've started trying to save the polish slurry and let it settle out in a jug to see if I can't save $$ by adding it to the pan with a new pad. I'll find out in a few days if it works to do that.
Use "outdoor" graded duct tape during the polish phase. You don't want the tape to come off the slab and the weight to fall off the slab and go merrily around the pan polishing itself. Tape coming loose is rarely a problem in the grind phases. But it's a real pita when polishing. That's because
1)the polish is so much finer than any of the grits and can get under the tape somewhat but mostly because...
2)The the felt pad offers way more drag/resistance than grit does. This means the weights will wiggle more on the tops of the slabs and eventually work the tape loose, aided by the water/polish slurry. The outdoor tape sticks a ton better than the regular or "advanced" duct tape.
Anyhow - this is freaken long...
C-ya,
Rick
|
|
rykk
spending too much on rocks
Member since September 2011
Posts: 428
|
Post by rykk on Apr 28, 2014 3:06:10 GMT -5
Always glad to help. Jiggle pans are a great way to work up lots of slabs at one time while doing other things. I know the tape bit seems sort of tedious but, like anything else, you get really fast at it with repetition. I can dress up 20 slabs in 10 minutes.
C-ya,
Rick
|
|
rykk
spending too much on rocks
Member since September 2011
Posts: 428
|
Post by rykk on Apr 24, 2014 21:50:11 GMT -5
I've been using an old 20" Lortone for almost 3 years now. I've found that it produces a great polish and perfectly flat slabs/nodules. I, recently, modified it to have a circular/reciprocal action using an offset shaft and 2" shock mounts to reduce/eliminate the up/down hopping that the old "steel flag on a shaft" design had that caused orange peel texture on some rock species. I get a lot less problems with rocks banging into each other and chipping with this setup as it's not as chaotic. It does seem to take longer than the old design but that may be because I'm only jiggling at 1075rpm instead of 1550rpm. Gonna try a different pulley combo for that. There are ways to eliminate the problems of splashing and drying up. You can make a simple drip system and suspend it over the pan. As far as splashing, if it is splashing out, you have too much water in the pan. Sometimes it's unavoidable without a drip system. What I've done is I got a 14 or 16 inch bike inner tube and sliced it open, length-wise. I then stretched the inner tube around the pan so that it overhangs the lip by 1/2" to 1". This channels the great majority of the slurry back into the pan. I, usually, don't need it here in Florida since it's almost always so dang humid, but it works great in Winter. Get some 1-3lb lead ingots off of Ebay to weight the slabs down. Be sure to cusion the bottoms of any weights you use so that they don't dent the rock - takes a lot of grinding to get those dings out as even lead will ding a rock if it rattles against it 1000 time per minute all night and is heavy. Wrap the edges of your slabs with duct tape to cushion any collisions. On the bigger slabs, make little "fences" around the edges to keep a lot of your grit from being deposited on top of the slabs. You can end up with half your grit out of the pan bottom and not working for you if you don't. Wrap thunder eggs completely with duct tape because their rinds are always so crumbly and you don't want pieces getting into the bottom of the pan and making deep squiggly scratches on the rocks' surfaces. Run your grinds longer than the book says, especially the 60/90 and 600. You want the 60/90 grit to have time to break down to as near the 220 as possible. On the 600, the longer you grind, the smoother the slab gets. You want it to break down to at least 2400. Consider adding a 4th step using 1000-1500grit silicon carbide if you don't want to run the 600 so long. Anyhow, I'm thinking of doing a sticky on "jiggle pans" if I figure it out and/or they let me. Here's some pix of some rocks in my pan: 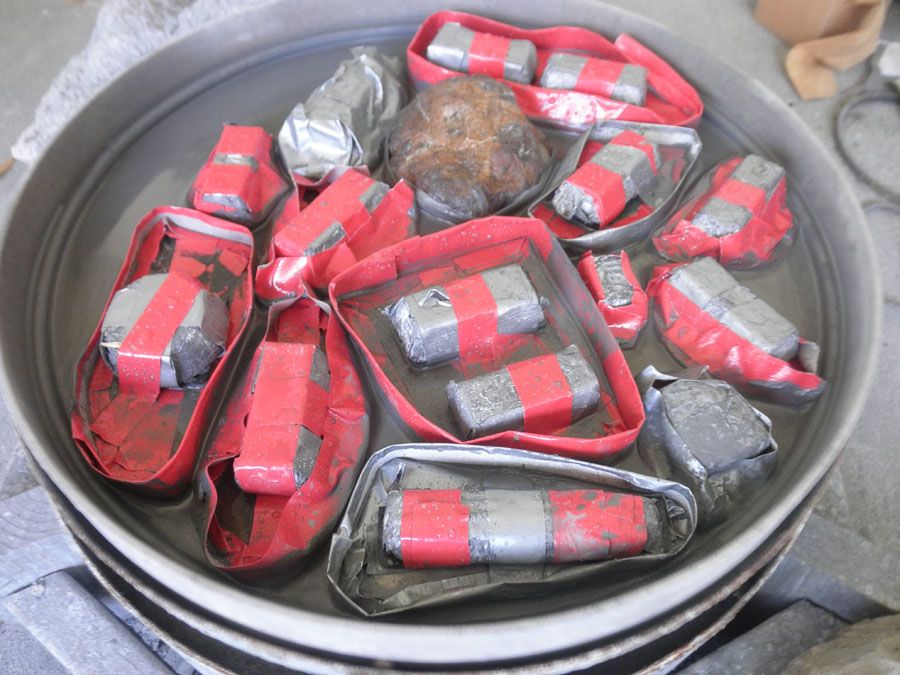 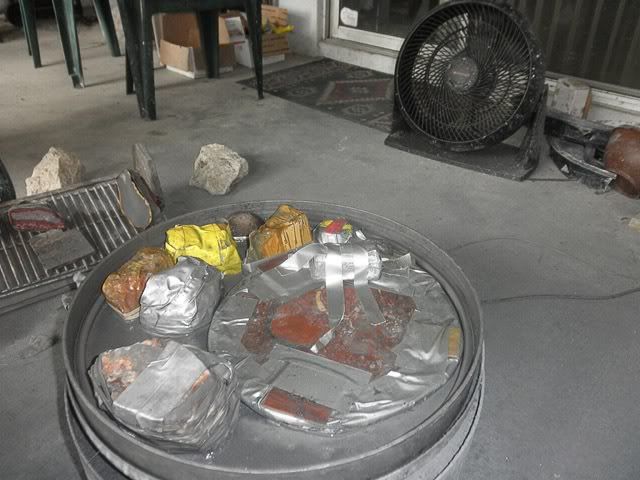 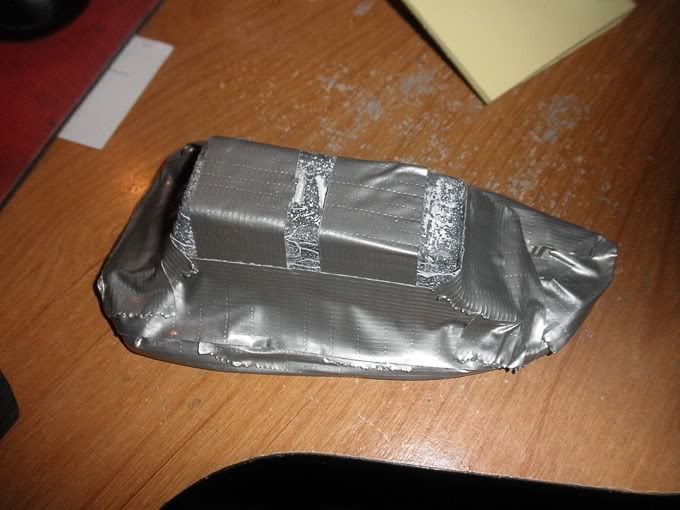  The giant slab only has one lead weight on it in the one pic because it had a big nub/high spot that needed to be evened out before I could proceed in getting the slice flat. It, also, has some plastic tubing taped to wooden slats taped to the top of the slab because it had a sharp edge and was super heavy with 4 weights atop it and would have made a mess of broken pieces in the pan if allowed to crunch up to the other ones. Also, note the 1/8" sheet rubber taped to the bottoms of all of the weights. C-ya, Rick |
|
rykk
spending too much on rocks
Member since September 2011
Posts: 428
|
Post by rykk on Apr 21, 2014 3:59:28 GMT -5
Looks like a Montana Agate, to me...
Rick
|
|
rykk
spending too much on rocks
Member since September 2011
Posts: 428
|
Post by rykk on Apr 18, 2014 17:54:59 GMT -5
PM Sent
Rick
|
|
rykk
spending too much on rocks
Member since September 2011
Posts: 428
|
Post by rykk on Apr 11, 2014 3:46:11 GMT -5
The scratches are probably leftovers from the coarser grits. They can be very hard to spot until the finer grits make them obvious. I've had this happen a lot with my vibrating lap where scratches become obvious only after the 600 grit grind or, most often, during the polish phase. I've learned to clean the slabs really well and inspect them under a good, bright light after the 220 grit phase.
I had the same problem as you're having when I was using my 8" Inland flat lap and was pretty frustrated. I didn't know what I know now, back then. I quit using it when I got the "jiggle pan". Does just a good a job, maybe better anyhow. No danger of heat caused crazing and faded colors. Takes longer, but you can do 15-30 at a time and have you hands free for cabbing, slabbing, or... honey do's. :-)
C-ya,
Rick
C-ya,
Rick
|
|
rykk
spending too much on rocks
Member since September 2011
Posts: 428
|
Post by rykk on Apr 8, 2014 20:21:27 GMT -5
#1 - ya got me...
#2 - Large pattern Crazy Lace Agate.
#3 - Rooster Tail Jaggate ("Jasper-Agate") :-)
#4 - Laguna Crazy Lace Agate.
#5 - Maybe Bloody Basin Agate.
#6 - Not sure - the back side looks like Lysite Agate, but the front side with the black would be a habit I haven't seen, before.
#7 - Dunno, maybe a moss agate from Utah or something like Eagle Rock moss?
#8 - Definitely Lysite Agate, from Wyoming - just got finished slabbing a chunk.
#9 - Definitely Bloodstone.
#10 - One of those funky jades from Washington, maybe California, most likely Washington.
C-ya,
Rick
|
|
rykk
spending too much on rocks
Member since September 2011
Posts: 428
|
Post by rykk on Apr 7, 2014 17:38:51 GMT -5
Phil - I'll take your advice on the hot water/Dawn. I don't have a paint mixer but will try to stir it up as much as I can with a stick. I've, so far, only gotten 5 of the 10 gallons back and the remnant is pretty darn thick. I'm using a sheet to filter. It does an *ok* job but some of the finer dust still gets through and the oil has a red orange hue from the super fine dust - dang Lavic, Noreena, and Polychrome! I'm thinking I'll filter the filtered oil a second time with paper once I get as much as I can with the sheet. Florida has, just in the last few days, started to become the absolute hell on earth 10 months of the year that the tourism TV ads and Disney don't want you to know about and I reckon the oil will filter a lot quicker now. Getting close to 100F in the garage already at 11AM and rising. Makes it hard to do any cabbing, to say the least!
C-ya,
Ric
|
|
rykk
spending too much on rocks
Member since September 2011
Posts: 428
|
Post by rykk on Apr 6, 2014 3:01:50 GMT -5
Looks like a Buchannon Ranch thunder egg - and a heckuva nice one, at that.
Rick
|
|
rykk
spending too much on rocks
Member since September 2011
Posts: 428
|
Post by rykk on Mar 30, 2014 18:06:32 GMT -5
Wow! I mean WOW!! Those are fantastic. One of my very favorite jaspers to collect.
C-ya,
Rick
|
|
rykk
spending too much on rocks
Member since September 2011
Posts: 428
|
Post by rykk on Mar 27, 2014 22:18:59 GMT -5
It improved, but the blade, itself, has some definite twists and soft spots I need to hammer out. I know perfection is pretty much an unrealistic expectation - except maybe for NASA spacecraft - but, just how much wiggling around is normal for a "good" blade? I'm shooting for just barely perceptible, but am I, maybe, being too picky?
Rick
|
|
rykk
spending too much on rocks
Member since September 2011
Posts: 428
|
Post by rykk on Mar 27, 2014 3:17:52 GMT -5
Nice stuff! And it takes a glass shine, too. BTW - I'm just guessing, but I think the reason they called it, "Turretella" is because those types of shells are, typically, called "turret shells" by folks who are into seashells. That was my previous obsession before my rockhounding phase and I was always hoping to find a few whenever I went shell hunting here in Florida. Personally, though they are bulbous like some turret shells, they're not a squat shape and their length makes me think of them as auger shells. Who know, maybe the modern turrets and augers evolved from these?
C-ya,
Rick
|
|
rykk
spending too much on rocks
Member since September 2011
Posts: 428
|
Post by rykk on Mar 27, 2014 3:08:56 GMT -5
Well, I tried finger tight with some grunting but the blade slipped, so I used a wrench and just turned it maybe a quarter turn more just 'til the blade stayed in place.
Thanks,
Rick
|
|
rykk
spending too much on rocks
Member since September 2011
Posts: 428
|
Post by rykk on Mar 25, 2014 23:55:02 GMT -5
Ah, so I HAVE been over-tightening! It just didn't seem like finger - with grunting - tight would be enough to stop the blade from slipping. So now I know. Thanks a TON, y'all!
Yes, I'm pretty sure I have the right flange. The description of the arbor said it was for a 14" Lortone saw.
C-ya,
Rick
|
|
rykk
spending too much on rocks
Member since September 2011
Posts: 428
|
Post by rykk on Mar 25, 2014 19:49:39 GMT -5
Hi, all - I've read here a number of times, now, that a person having problems with saw blade wobble has over-tightened the nut holding the blade onto the arbor. Every blade I've bought (4) has wobbled when I first installed it to the saw. My last one, I straightened out (or maybe just didn't over tighten when I reinstalled it?) after reading an article about blade re-tensioning/straightening in a woodwork forum. I, later, ruined that blade by using the wrong dressing stick to "sharpen it".
Anyhow, so I got a new blade - 14" Covington "Black" - and it wobbles and leaves saw marks just like all the other blades I've tried. Bearings are almost new - I built the saw 1 year ago and probably average maybe 3 slabs per day because some days I can't make up my mind what to cut next. Now, I've heard noise about Covington blades and how the MK303 ones are vastly superior and all that, but I can't believe that I'd go oh-for-four as far as getting a straight blade. So, either I'm super unlucky or there's something else going on, ya reckon?
The arbor I used in building my saw is a brand new Lortone saw arbor and flange. I use a 10" crescent wrench to tighten the nut while holding onto the drive pulley. I don't push exceptionally hard and really can't because I am, basically, pushing against my own left hand on the pulley. And so, my question is, How tight do you tighten the nut? Is a tight "finger tight" enough to keep the blade from slipping?
Thanks,
Rick
|
|
rykk
spending too much on rocks
Member since September 2011
Posts: 428
|
Post by rykk on Mar 22, 2014 0:37:32 GMT -5
For slabs, it's best to wrap the edges with a couple go-rounds of folded duct tape. I only use rubber bands for nodules that don't have a sharp slope. The bands won't stay on slabs very well unless the slab is really thick. What happens with the rubber bands a lot is that the band will come off the edge and go under the slab which causes an uneven grind or polish.
I use 1lb lead ingot weights on medium sized slabs and 2-3lbs on larger or very saw marked/scored slabs. Or I will arrange multiple 1lb ingots on a large slab. I'm doing a 9 1/2-10" by 4 1/2" Death Valley/Wingate Pass slab that has two one pounders in line. And also a Deschutes slab about 8in square-ish that has two ingots on it that are a tad heavier than 1lb. The rocks have to be tight to the grit. The old Lortone laps are notorious for hopping the rocks up/down and weight helps with those.
Another good thing to do is to cover the whole slab/ingot with duct tape slanted down to the edge of the slab. Or, if the slab isn't long and narrow or is too big, fold over some duct tape, leaving maybe 1/4" of stickum and make a sort of wall around the whole deal. It's inevitable that your water will be deep enough to splash onto the tops of flat slabs. When it does, it deposits grit there. Over the lenght of the grind, you can end up with fully a third or more of your grit riding atop the slabs rather than being in the pan working for a living like you paid for it too. Keeping the grit from getting stuck on the slabs saves a lot of grit/polish/$$. It's a little tedious at first but, after a while, you get really fast at "dressing" your rocks for their dance in the ol' jiggle pan. Make sure to strip off all of the tape, clean the rocks well, and apply new wraps before you proceed to the polish phase. It just takes a little grit wedged under a fold of tape to contaminate your polish. I don't usually redo the tape between grit phases. Overkill, imo. I usually do 60/90 - 220 - 600 grit grinds and occasionally 1000 or 1500 grit for obsidian and Montana Agate, followed by polishing with tin oxide. I run 60/90 for 14-20 hours. The longer you "pay your dues" at the coarser grits, the better you polish will be. I run 220 for the same time because the jump to 600 grit is bigger, though I've thought of doing a short-ish 400 grit grind in between. More time, more $$ and I really have no complaints doing it like I have for 3-4 years, now. The longer you run each phase, the better shine you'll get because the grit breaks down over time. A good 600 grit grind can end up with the grit being finer than 2400 in 14-20 hours.
You can get a perfectly flat surface and a glass shine on most harder rocks like Morissonite, Bruneau, Imperial jaspers and agates and thunder eggs. It does tend to make softer areas undercut but maybe no more than any other method. The matrix on Deming Agates is just awful for undercutting. It *is* somewhat slow but, with my 20" pan, I can do anywhere from 17 to over 30 slabs/nodules all at once, so it evens out that way as compared to using wheels, etc. And the colors pop brighter than using the heat-based methods, plus no micro-fine scratches. I've noticed that damp polishing generates a good bit of heat and sorta fogs the colors on rocks. I've had to take ones done that way and run them in my polish pan for maybe 6 hours to get the colors popping again.
Well, this was long, eh? I had a tips thread back before they changed the software with a lot of info on using a jiggle pan (vibrating lap) but it's gone, now, I guess. I might start another one as I've learned a lot in the 4 years I've been using this tool.
C-ya,
Rick
|
|
rykk
spending too much on rocks
Member since September 2011
Posts: 428
|
Post by rykk on Mar 19, 2014 2:05:50 GMT -5
Beautimous! It looks maybe like African Queen Jasper.
|
|
rykk
spending too much on rocks
Member since September 2011
Posts: 428
|
Post by rykk on Mar 16, 2014 3:02:52 GMT -5
Woof! What a daytime nightmare! However, the night time dream slab looks suh-weeeeet! I thought I was bad because every time I do any yard work I end up bleeding - usually from saw palmetto branches or being stabbed by 3in long spikes that stick out of robellini palm branches. Your story makes my little wounds sound trivial! Heal up quick so's you can start hounding whenever the snow melts up there.
C-ya,
Rick
|
|
rykk
spending too much on rocks
Member since September 2011
Posts: 428
|
Post by rykk on Mar 14, 2014 1:42:08 GMT -5
Nice batch!
|
|
rykk
spending too much on rocks
Member since September 2011
Posts: 428
|
Post by rykk on Mar 7, 2014 3:22:22 GMT -5
Hi, social - The name is Rivera. It's named after the Rivera brothers who mine it, down in Mexico.
Rick
|
|


 Ribbbbit