jm
having dreams about rocks

Member since October 2015
Posts: 56 
|
Post by jm on Dec 15, 2017 15:39:47 GMT -5
|
|
jm
having dreams about rocks
Member since October 2015
Posts: 56
|
Post by jm on Dec 1, 2017 15:28:19 GMT -5
VEry. very nice. Love your daughters find. It turns out that I'm really bad a predicting what other people will like:) I would have guessed that the more colorful ones would be the crowd favorites, but most people that I've shown them to liked the same one you do. |
|
jm
having dreams about rocks
Member since October 2015
Posts: 56
|
Post by jm on Dec 1, 2017 15:22:41 GMT -5
Wow those are great! Very smooth uniform curves, and you don't seem to be thrown off by different hardenesses of areas of the material. The one your daughter found is my favorite! Thanks, but I wouldn't go so far as to say I wasn't thrown by the different hardnesses. The top left and bottom right ovals in the first picture both have flat spots in the profile. I just positioned them so it wasn't very apparent in the picture:) Those two were some of the first ones I did, so I knew what to pay attention to after that. |
|
jm
having dreams about rocks
Member since October 2015
Posts: 56
|
Post by jm on Nov 30, 2017 3:11:15 GMT -5
Now that the weather has turned cold and rainy I'm back working on rocks in the garage again. I just finished my first ever batch of cabs and thought I'd post pictures of them. These are the ones that turned out mostly well, there were 4 or 5 others that broke during the process. I've learned that I need to pay a lot more attention to fractures in the rock and either work around them or glue them up first  Anyway, I don't think I did to bad for my first effort. I've still got a lot to learn, though. In the top picture, the round cab with the white stripe down the middle is from a chunk of agate my daughter found in the stream when we were fishing up on Mt St Helens. The three mossy looking ones right below it are cut from the center of a Richardsons Ranch thunderegg. All the rest of them came from slabs I picked up at garage/estate sales, so I couldn't say what they are (other than the very bottom right one that appears to be polka dot agate). 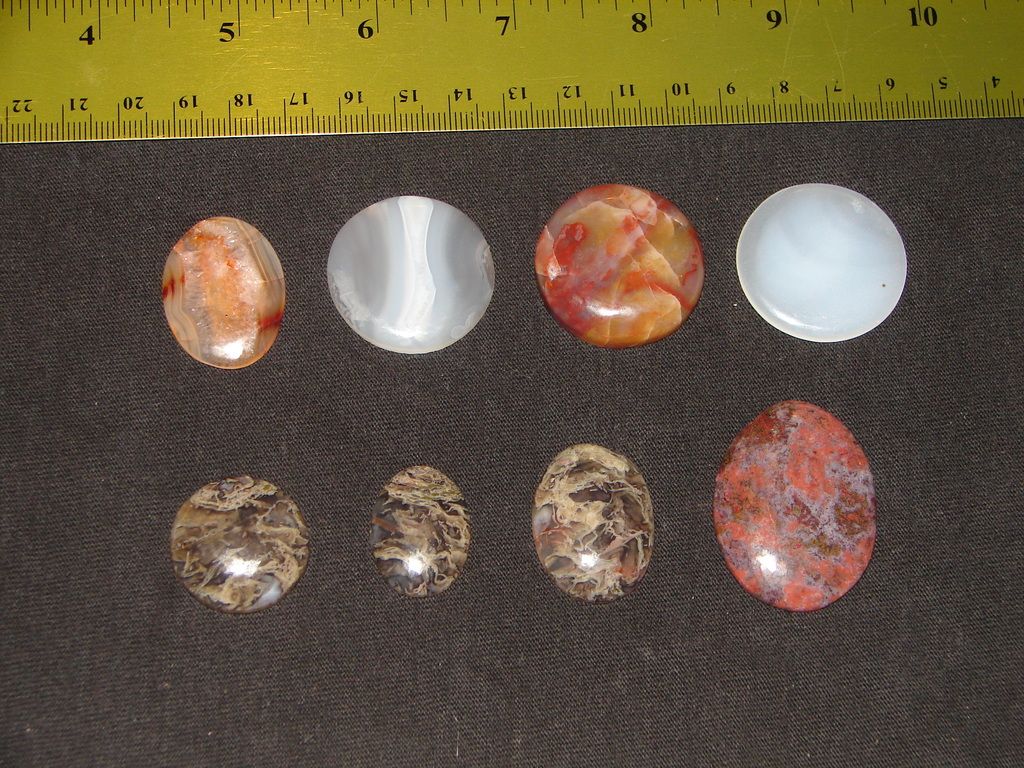 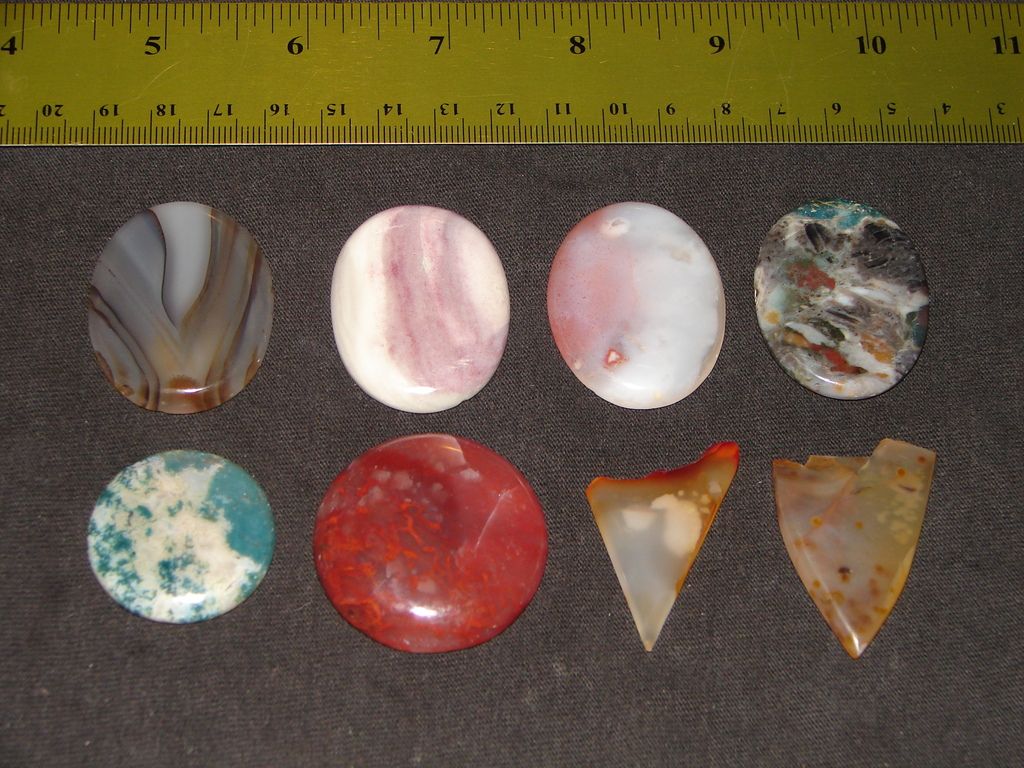 |
|
jm
having dreams about rocks
Member since October 2015
Posts: 56
|
Post by jm on Mar 11, 2017 12:31:45 GMT -5
Really nice build and spiffier than mine which I drive with a drill press. I ended up using a much larger flat bowl and put an inside flange around the top of it to keep the overspray from rising out after hitting the side of the bowl. The shaft I used is a deep grinder base bolted to the drill press table turned vertical. Not sure what size shaft you are using but if you want to have it not sticking up through the flat laps you can purchase or have your machine shop friend make a threaded backer plate that screws down onto the shaft with a jam nut below it. I use a velcro backer made for the impregnated plastic counter top polisher but in your case you could use a magnetic backer. I do have a magnetic backer setup for flat lap discs but I think I have only used it once because I prefer the velcro pads. Your price tag beats mine by a long shot too. The old drill press I had coughed it up so I just went and bought a new one for a hundred and thirty bucks and the velcro backer is fairly expensive too when you figure out that you should have started with a five inch instead of a four inch which didn't take long to figure out. I now have a 3/4 horse treadmill motor running my 12" slab saw so I am also a firm believer in tread mill parts. I gave the frame and rollers to a friend because he makes his own tumblers. A++ build. Gotta love the home made. I have a factory 6" wheel machine that never gets used except for the trim saw on it. Jim I like the idea of the threaded backer plate. I hadn't thought of that approach, I'll have to try it one of these days. I have a set of the 4" diamond polishing pads along with the backer plate. I've used them in a drill to polish a few thundereggs, but it was a pretty slow process so I decided to build this new flat lap. |
|
jm
having dreams about rocks
Member since October 2015
Posts: 56
|
Post by jm on Mar 11, 2017 12:15:37 GMT -5
Thanks for all the comments everyone. what size wheels you using? I'm using 8" wheels on it at the moment. I might get some bigger ones at some point, but the 8" seemed like a good starting point. I love it! Builds like this always intrigue me. Nice craftsmanship and MacGyverin' there. Wondering if some kinda rubber cap (something) would be beneficial to put over the threads & nut exposed in the bowl just to keep it clean? So far keeping the threads/nut clean hasn't been a problem. All the water and debris get flung outward by the rotation of the disc. If it becomes a problem after more use, I'll use your idea. And when not being used for lapidary work, it can be cranked up to high speed to make a dandy salad spinner!  Ha! I like it. Nice build. I bought an old, used flat lap that didn't come with a water supply. Instead of wrapping wire around a plastic hose, I used flexible copper tubing used for refrigerator ice makers. I considered several different methods for making the drip tube, including copper tubing, but the deciding factor was that I already had rubber tubing and copper wire laying around in my garage.  |
|
jm
having dreams about rocks
Member since October 2015
Posts: 56
|
Post by jm on Mar 10, 2017 1:34:35 GMT -5
Sticking with my theme of not buying anything that I can build myself, I recently put together a flat lap for polishing up some thundereggs and making cabs. First, I found a free treadmill on Craigslist. It was an older one with a rotary dial for the speed controller, which works great for something like this. I've probably mentioned this in my other posts, but I love old treadmills for building equipment. They have fairly powerful DC motors and have a speed controller that is already matched up to the motor. The older ones tend to have a separate rotary dial for controlling the speed that can be easily detached from all the other electronics in the dashboard. I built a plywood box and mounted the motor and speed controller inside. The motor uses the original pulley to drive a separate shaft that goes up through the top of the box. I picked up a digital tachometer off ebay for about $10 and found an old DC power supply in my garage and wired it in to supply 12VDC to the tachometer. The tachometer reads a magnet on the drive pulley so it shows the actual rpm of the lap disc. Here's the view from the bottom of the box. 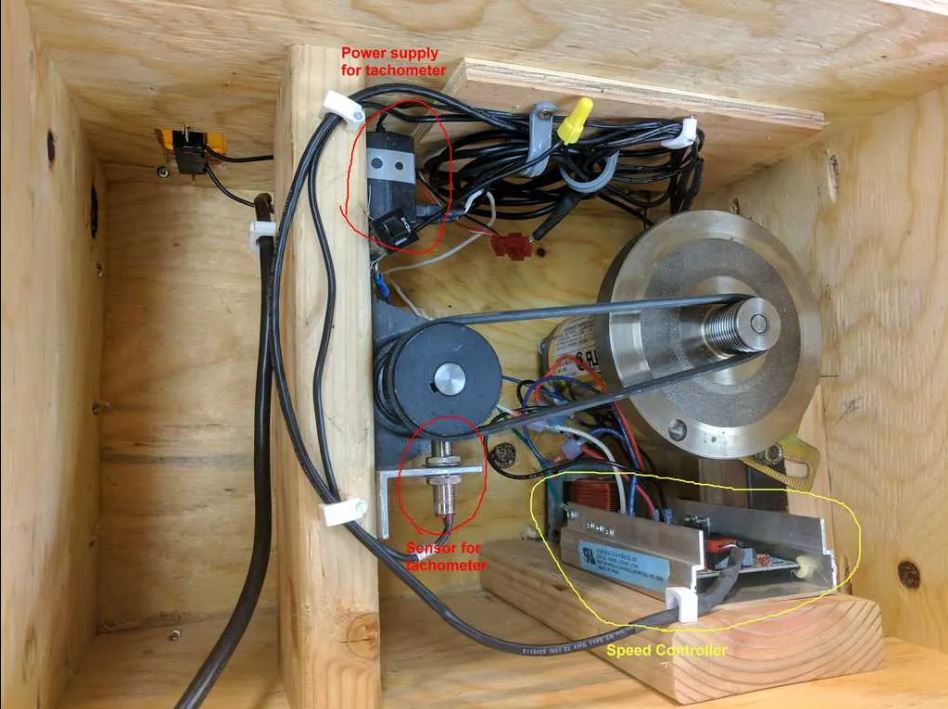  And a view from the top. The switch turns power on/off to the whole system, the rotary dial controls the rpm, which is displayed on the tachometer. The speed controller will spin the shaft anywhere from about 5 - 2700 rpm. 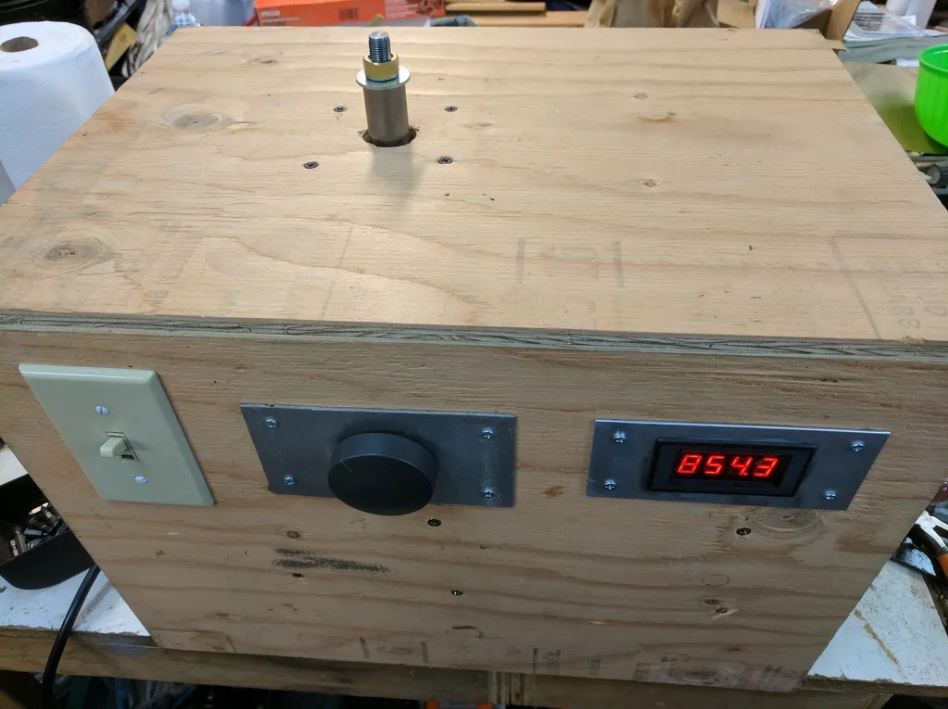 I used some drywall screws to attach a bowl to the top of the box, and used some silicon to attach a piece of 2" pvc pipe in the middle to keep water away from the shaft and bearings. There's some silicon on the drywall screws too, to keep it from leaking around them. 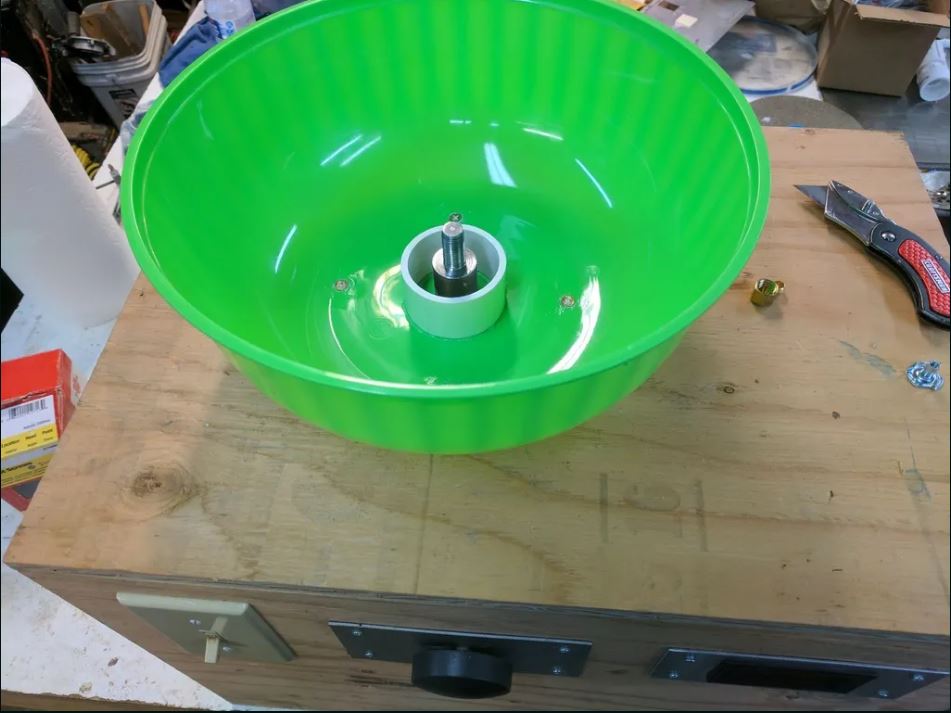 The water supply is just a water pitcher with a valve bolted into the bottom of it. It's held up by a piece of angle iron with a notch cut out of it for the handle of the pitcher to fit into. Zip ties hold the pitcher in place. It's set up so I can just slide the pitcher straight up to remove it. The water line is just a piece of rubber tube with about 4 ft of copper wire wrapped around it. 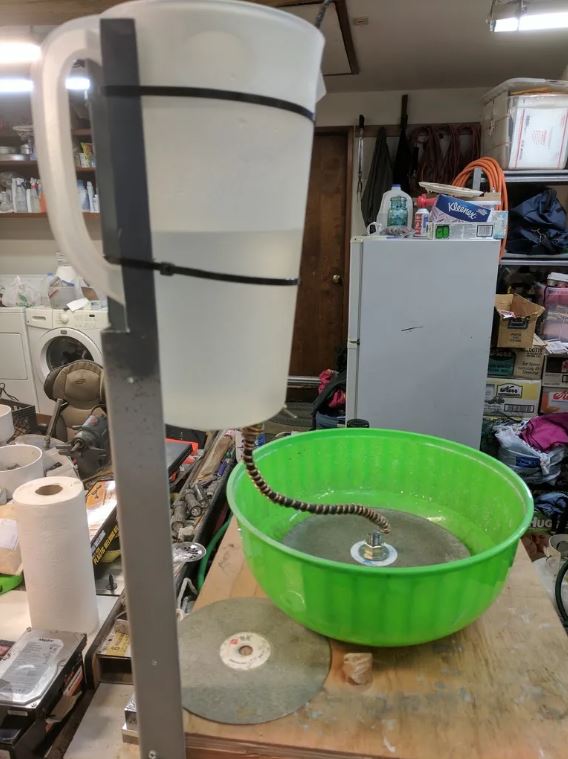 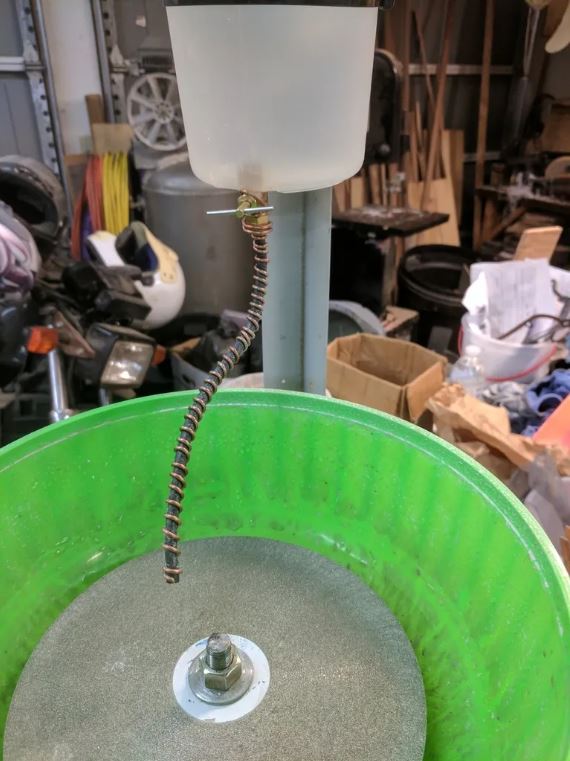 It took me a little while to come up with a good way to attach a drain to the bottom of the bowl, but finally came up with this. A piece of rubber tubing stuck onto a flanged T nut. I drilled a hole in the bottom of the bowl, through the plywood, and threaded the hose down through and pounded the nut into place. Some silicon keeps it from leaking. 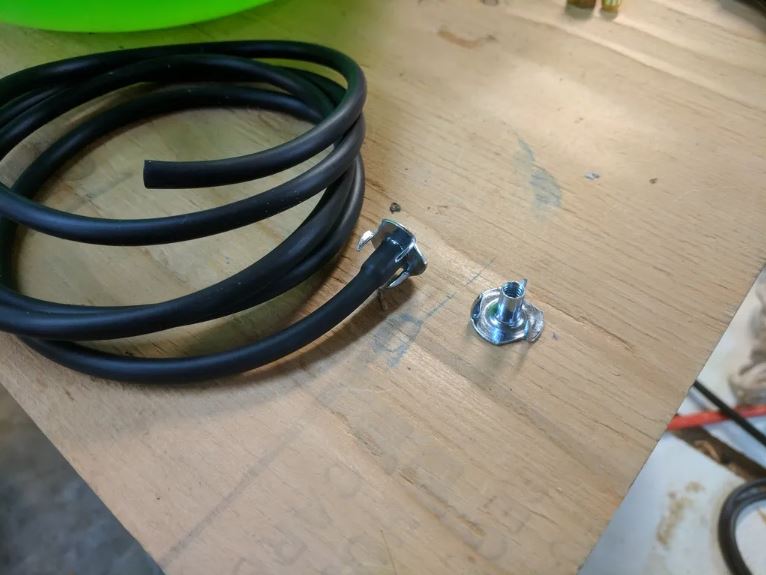 The drain tube is only about 3/16" ID, so if it gets clogged up easily I'll replace it with a bigger tube. 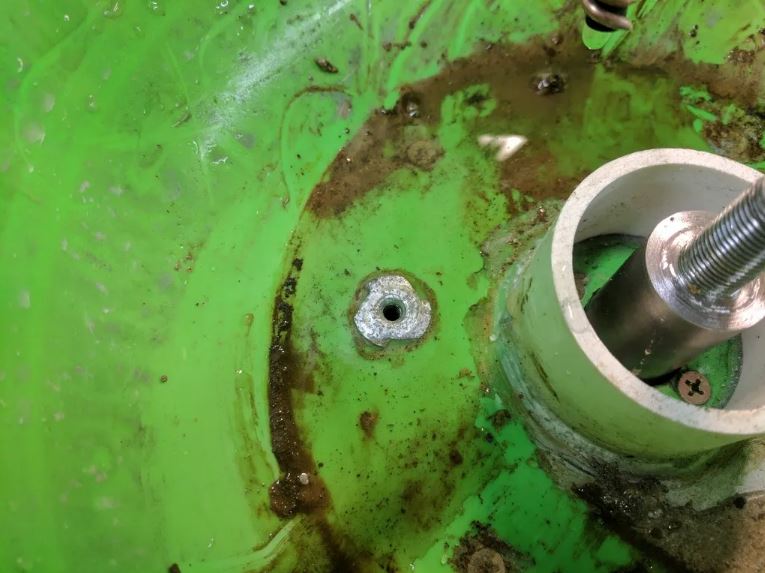 I've already preformed a few cabs with it and it seems to work fine. Now I'm waiting on some finer grit lap discs to finish them up. Total cost, not including the stuff I found laying around in the garage. A friend of mine who runs a machine shop provided the main shaft in exchange for a plate of home baked treats for the guys in the shop. Gotta love that kind of price. tachometer - $10 bowl - $1 pitcher - $1 valve - $3 poly-v pulley - $8 2 pillow block bearings - $18 What do you think? Questions and/or comments welcome. |
|
jm
having dreams about rocks
Member since October 2015
Posts: 56
|
Post by jm on Nov 3, 2016 15:06:37 GMT -5
Wonder if there is something that you could coat the bottom wood piece with in which you could sprinkle grit which would make the wood last longer and also become a grinding surface. Some kind of resin or the like? That's a good idea. Epoxy might work too. I also considered getting a can of the liquid truck bedliner and lining the grooves with it. Although I'm not sure how well any of those would work in an environment where the wood gets saturated with water and it's getting hit with repeated rapid impacts from the top side (I'm thinking of when the rocks still have some corners on them). Maybe there's some marine grade stuff that would stay bonded to the wood under those conditions. UHMW or HDPE would be another option. They'd both probably have considerably more wear resistance than wood. I don't have any of that laying around, but I just saw on Amazon that a 1x12x12 piece of HDPE is only about $20, so that might be worth a shot. |
|
jm
having dreams about rocks
Member since October 2015
Posts: 56
|
Post by jm on Nov 3, 2016 9:40:52 GMT -5
What if you replaced the bottom wood piece with a grinding disk that was about 1/2 used up so it had good grooves in it? That way you had a grinding surface top and bottom? That same thought had occurred to me also. I'll give it a try on one of the future batches and post the results. |
|
jm
having dreams about rocks
Member since October 2015
Posts: 56
|
Post by jm on Nov 3, 2016 9:38:29 GMT -5
I need to make something like that... is the bottom just metal? No, I used a piece of wood for the bottom. It wears out quickly, but it's easy to replace. |
|
jm
having dreams about rocks
Member since October 2015
Posts: 56
|
Post by jm on Nov 1, 2016 15:10:28 GMT -5
I forgot to mention this before, but with 3/4" marbles the current setup can fit 50+ in one batch. I started this batch with a few less than that, probably around 45, since they take up more room when they're rough. Once they got rounded off some I put another 5 - 10 rough ones in. The additional rough ones got rounded off very quickly, since they were the only ones contacting the grinding wheel.
|
|
jm
having dreams about rocks
Member since October 2015
Posts: 56
|
Post by jm on Nov 1, 2016 14:49:40 GMT -5
Peruano - The grit is embedded in the grinding wheel. I didn't add any extra, although now that I think about it, it might speed up the process to add some loose grit as well. I'll have to try that in the future.
When I start the process I just add some clean water to it, usually just enough to cover the grinding wheel. My thinking is that since the grit is embedded in the grinding wheel, there's no need for a thick slurry to help pick up the grit particles. I might be off base with that, but that's what I've been doing so far. In any case, once I turn the machine on the water starts getting cloudy in a matter of seconds. Usually after an hour or so it's the consistency of chocolate milk. After a couple hours it's even thicker, so even starting with clean water it doesn't take long to build up a thick slurry.
colliel82 - I didn't record any times, so I'm going off estimates here. I'm thinking that a batch of granite marbles takes 12-20 hours from start to finish, depending on how full the machine is. That doesn't count the time spent sawing the cubes, it's just the amount of time they spent in the marble mill. It's not real fast, but I can turn it on in the evening when I get home from work and turn it off when I go to bed, without much tending in between. I don't like to leave it running when I'm not around, though, just in case something goes wrong.
panamark - I haven't tried any harder materials yet, but I've been considering doing a batch of agate marbles. If I get to that point, I'll be sure to post the results. Just based on my experience sawing granite vs agate, though, I'd guess that the time in the marble mill would probably double for agate.
jakesrocks - Nice. Machines like that were the inspiration for mine.
Jugglerguy - This seems to work fine for different size beads/marbles. I made a batch of obsidian marbles that were probably about 3/8" across. They're in the tumbler right now getting polished up. I don't see any problems with going even smaller. The only catch is that it would take different setups to do different sizes. The piece of wood in the bottom of the bucket would need smaller grooves in for smaller marbles and I think I would use separate grinding wheels for different sizes. They get grooves worn into them that match the size of the marbles.
|
|
jm
having dreams about rocks
Member since October 2015
Posts: 56
|
Post by jm on Nov 1, 2016 1:10:51 GMT -5
A while ago I ran across a website that showed one way that stone spheres were made back in the days before electricity. www.sheldonbrown.com/rinard/ball.htmSince I don't have access to any running streams on my property, I started wondering if it was possible to do the same thing on a smaller scale. After I dug around online a bit I discovered the existence of marble mills that work on the same same principle. They have a rotating disc and a stationary disc and the rocks roll around in grooves cut in the discs. I looked at those and thought 'I bet I could make something like that'. So, following my usual routine of A.) Trying to build something just for the fun of building, and B.) not spending any more money than necessary, I looked around through my garage to see what I could find. Here's what I came up. The main ingredients are: - a drill press
- a 7" masonry grinding wheel
- an ice cream bucket
- some boards and plywood
- a piece of 5/8" steel rod
First, I cut a disc out of a 1x8 that just fit into the bottom of the ice cream bucket. I chucked it up on the lathe and cut three grooves in it, about 3/8" deep. Then I put it in the ice cream bucket (with a little bit of caulking under it) and used a couple screws through the center of the disc to fasten it to a piece of plywood. The one in this picture has already been used, so the grooves are worn deeper than when it was new.

Then I cut some threads on the end of the 5/8 shaft so I could thread the masonry grinding wheel on it. The grinding wheel came from Home Depot. I made sure to get the one that was made with silicon carbide, not the aluminum oxide type.  For the stones, I cut some cubes of granite on a little tile saw I have. I used a jig to cut all the corners off. It's somewhat time consuming, since each cube requires 20 cuts to knock all the edges and corners off. After I figured out a system, though, would only take me a minute or two to round off each one.  Once I had the stones somewhat rounded, I put them in the bucket. For reference, the stones are a little under 3/4" across.  Then I clamped the plywood the the drill press table, aligned everything, and turned it on. I had the speed set as low as it would go, about 200 rpm. This picture shows one of the partially used grinding discs.  To keep a constant pressure between the grinding wheel and the rocks I hung some old scuba diving weights off the handle of the drill press. It's pretty low tech, but it lets me easily adjust how much pressure the grinding wheel is putting on the rocks. When first starting out I use less weight, since all the rough edges tend to bounce the grinding wheel up and down somewhat. Once the corners get worn off and it's running smoother, I put some more weight on to try to help it cut a little faster.  I found out the hard way that when the stones still have rough corners on them, the grinding wheel vibrates enough to splash some of the slurry out of the bucket. I solved that by putting a lid on the bucket. It doesn't show in the picture, but I cut a slit in the lid from the edge to the center so I could get it on and off without having to unchuck the grinding wheel. The electrical tape around the bottom of the bucket is just in case the wheel gets misaligned and chews through the side of the bucket. There will an extra layer there to keep the slurry from immediately pouring out. I know it wouldn't hold up very long, but I did have once instance where that happened and the tape saved me from having to clean up a big mess. I'm more careful about alignment now, but I still put the tape on just for the extra insurance.  When the grinding wheels do finally wear out, so far they've all separated right where the metal hub attaches. The hub will continue to spin, but it's fairly easy to tell when this happens because the sound changes drastically.  Here's what the rocks look like throughout the process.  The process isn't fast, but I like the fact that once I get the stones roughed out I can put them in the mill and I only have to check them once in a while. The board in the bottom of the bucket does wear out after a batch or two, but I've got lots of lumber laying around so it's easy to replace. The pine boards wore pretty quickly, so I'm trying some harder types of wood to see if that makes a difference. So far I've done two batches of granite marbles and one of obsidian. In that time I wore out one grinding wheel ($5.50 at Home Depot) and partially wore out two others. The rest of the stuff came from my garage, so costwise I think I'm doing pretty good. On the current batch I mostly filled it up, so there's not much free space between the rocks. I was curious to see what kind of difference that would make from the last batch, where I kept it about 3/4 full. So far the full batch seems to be grinding down a fair amount slower than the 3/4 full batch. Now I know. Once I have the next batch done I should have enough for a tumbler load. I'm anxious to see what they look like when they're all polished up. I know this setup is ugly and probably inefficient, but I've had fun making and using it and to me that's what it's all about. Anyway, that's what's been keeping me busy in the evenings for the last little while. Questions/comments? |
|
jm
having dreams about rocks
Member since October 2015
Posts: 56
|
Post by jm on Oct 13, 2015 23:44:45 GMT -5
Just out of curiosity, I got out my Kill A Watt meter the other day to see how much electricity my new rock saw is using.
When it's cutting, it draws about 200 watts (give or take). Cutting a slab off a 3.5" thunderegg took about .05 KWH, or about .04 cents worth of electricity. I don't think that's going to break the bank anytime soon.
|
|
jm
having dreams about rocks
Member since October 2015
Posts: 56
|
Post by jm on Oct 10, 2015 10:48:46 GMT -5
Thanks for the welcome, guys.
Shotgunner - thanks for the tip about the No Smoke. I added some and it cut down the oil mist significantly.
|
|
jm
having dreams about rocks
Member since October 2015
Posts: 56
|
Post by jm on Oct 7, 2015 23:28:12 GMT -5
Last year I happend across a documentary about rockhounding in Oregon and in that episode they were visiting Richardsons Rock Ranch to dig thundereggs. It looked interesting, so a few weeks later I loaded up the kids in the car and we made a trip out there to see what we could find. There were 4 normal people in the car on the way out there, but on the way home there was a 5 gallon bucket of thundereggs and 4 new rockhounds! Since then we've been collecting rocks wherever we go (the beach, the mountains, garage sales, etc.) Of course, a bucket of thundereggs isn't a whole lot of fun to look at, so I tried cutting a few open on the little tile saw I have. I quickly found out that a 6" tile saw just doesn't cut it (pun intended). Being the cheapskate that I am, I didn't want to spend much money on a real rock saw, so I set out to build my own based on a few different ideas I saw online and whatever I could find in my garage. Here's what I came up with... 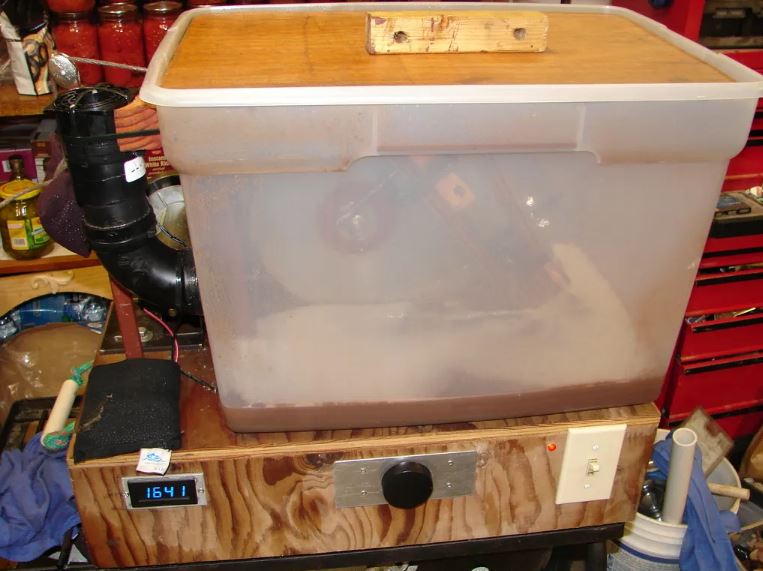 The basin is a plastic tub I got at GoodWill, the motor is from an old treadmill I got off Craigslist, and the tachometer I ordered off ebay. The cover is a piece of scrap 1/8" plywood I found in my garage. I have a friend who has a machine shop, so I had him make the arbor for me (I traded him a pile of cookies to share with the guys in his shop, so everyone was happy). The arbor is a 1" shaft cut down to 5/8" on both ends. It has a keyway on one end for the pulley, and I used a die to cut threads on the other end for the blade. A couple of pillow block bearings from ebay are used to hold the shaft.  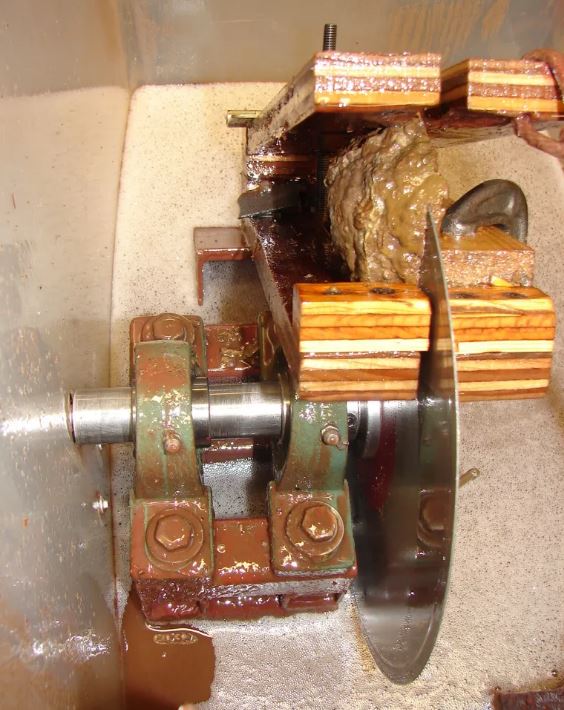 To hold the rocks I made a 2 jaw, pivoting clamp assembly with a long bolt to clamp the jaws together. In this picture I have a little C clamp in place to fasten a block onto the main clamp in order to cut slabs. 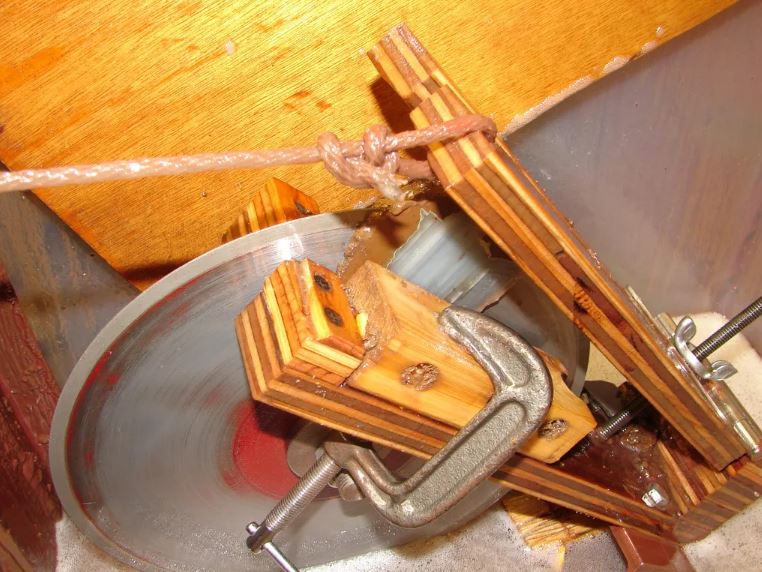  I ran a cord from the top of the clamp out through the side of the tub, where I tie a bag of lead shot to it. I use either a 3 or 5 lb weight, depending on what I'm cutting. I also cut a hole in the side of the tub, used some silicon to fasten some black pvc pipe to it, and hooked an old CPU cooling fan from a computer on top of it to draw air out of the tub. The pipe has several layers of the foam used in small engine air cleaners in it. This cut down on the amount of oil mist getting out into my garage. 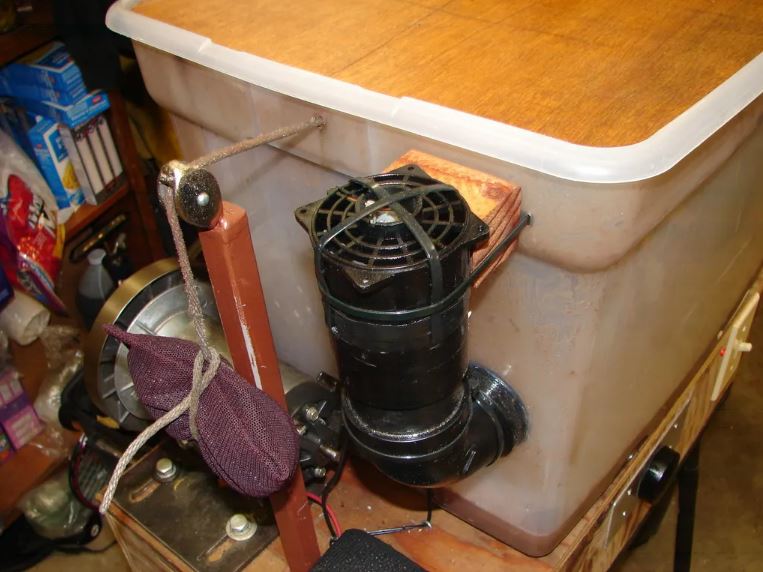 All the electronics (speed controller, power supplies) are fastened inside the plywood box, where hopefully they won't get to much oil on them. Here's the basic list of what it cost me to put this together, minus the blade. Plastic tub $3 old treadmill $10 tachometer $18 pillow block bearings 2@$9 The rest of it was stuff I had laying around in my garage. Grand total $49 It has a 10" blade in it right now, but I made it big enough to put in a 12" blade. It's not much to look at, but it does the job. I like the fact that I can vary the speed with the rotary dial on the front and have the tachometer show me exactly how fast it's turning. There's still a few small improvements I'm going to make to it, like a cover over the bearings, and rebuilding the clamp to get a little more travel out of it. Next up: Building a flat lap for polishing up all the T-eggs and slabs I've been cutting. |
|