|
|
Post by opalpyrexia on May 14, 2021 10:19:42 GMT -5
... Personally I have no interest in bumble bee, even to the point of tossing some in the garbage when it was discovered in a lot from an estate I purchased.
I received some Bumble Bee in a slab lot purchase and I also decided to toss it. It's not worth the health risk IMO.
|
|
|
|
Post by opalpyrexia on May 13, 2021 15:16:48 GMT -5
Welcome from Washington.
|
|
|
|
Post by opalpyrexia on May 13, 2021 13:01:04 GMT -5
dfly.com/I use that cad program to dray all my patterns
Thanks. I'll check it out.
|
|
|
|
Post by opalpyrexia on May 13, 2021 10:08:41 GMT -5
That’s a cool trick! My dad was an architect and always had fun drafting tools lying around to play with and one of my favorite classes ever was a technical drawing course. I was taught to use a French curve for those shapes but your method gives better symmetry.
My dad was a mechanical engineer and we had a couple of his French curves at home. We used to mess with them on occasion, but never comfortable with them. I could never seem to find a good section of curve on them for what I wanted. I recall a couple of times when he'd step in and without hesitation grab the French curve, place it right down on the paper, and draw the perfect curve that I wanted. My immediate response always was, "What part of which curve did you use?" He seemed to know every curve on them.
|
|
|
|
Post by opalpyrexia on May 12, 2021 13:09:36 GMT -5
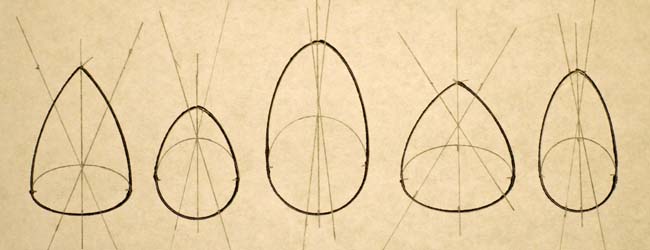
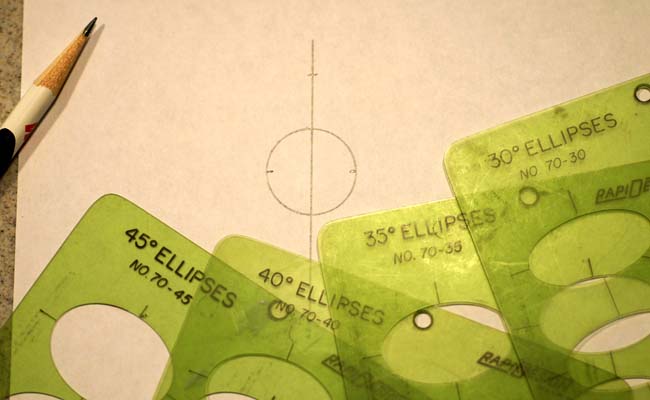
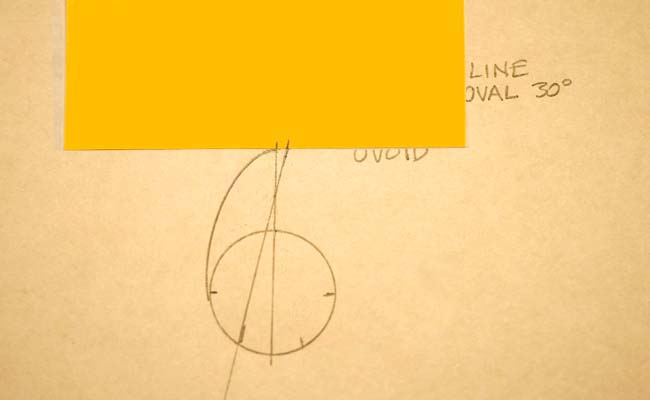
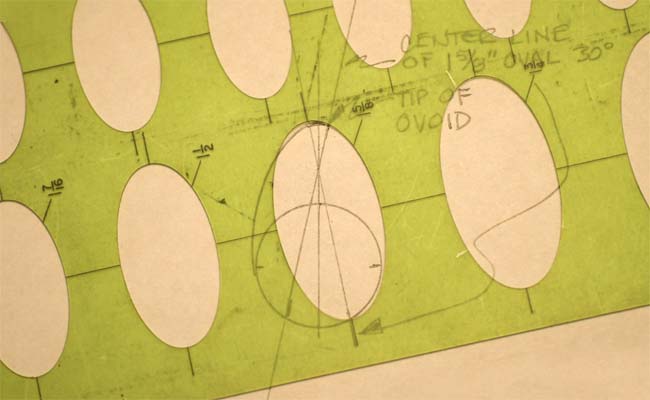
Or perhaps more accurately: “Trace Custom Ovoid or Pear Shapes Directly on Your Slab”. An Ovoid shape is also called an “Egg shape”, and a Pear shape is also called a “Teardrop”. This was born of frustration by lacking the right template! So very frequently I find a pattern on a cab that calls out for a tapered shape. I have various templates but I have no good ovoid templates. I have a few that I’ve traced and cut out of plastic sheet with an X-acto blade, but they all have little symmetry issues. I also have a few pear templates, but they don’t ever seem to be the right size for the slab pattern that I’m interested in. This procedure requires a circle template and an oval (ellipse) template. You can find used templates on eBay for reasonable prices. Any ellipse template will work for some shapes, but I find that templates in the range of 25° to 45° work best for most shapes.
You’ll also need to imagine that my paper in the photos is actually my slab. Because it creates unique shapes you can pretty much include exactly what you want in the cab and avoid much of what you don't want.
All these steps might seem complex, but once you’ve done it, it's really easy and fast.
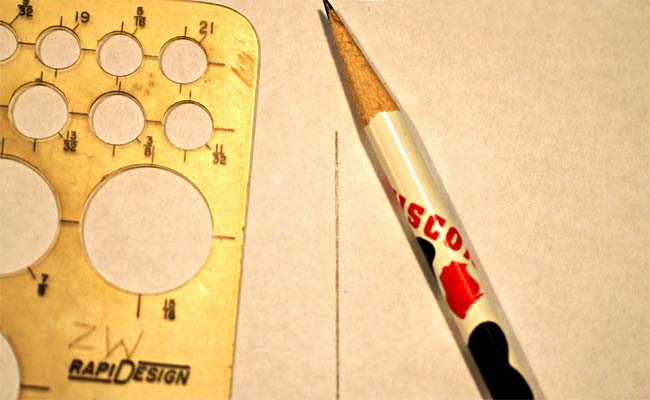
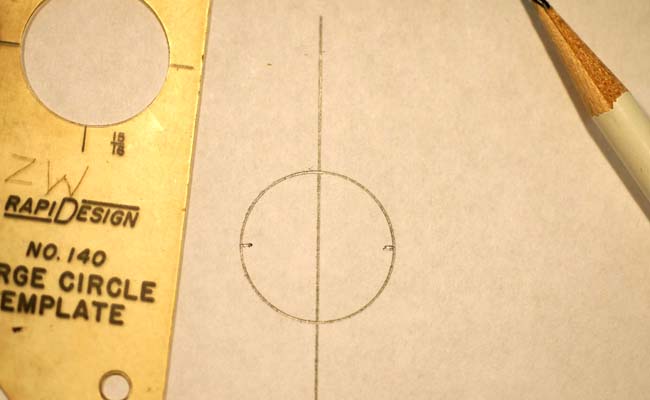
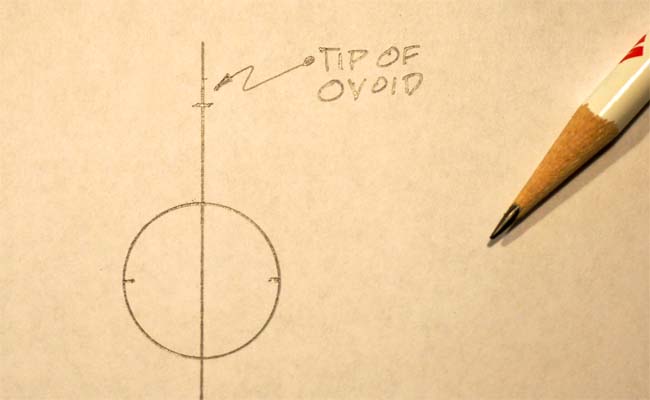
Step 1: Using a straightedge mark the central axis of your cab-to-be. Step 2: Using a circle template mark the wide end of the cab. Circle templates usually have tick-marks or tiny holes to help in locating the center. Align one set with the cab’s axis and then mark the two perpendicular side locations. Step 3: Mark the narrow end or tip location of your cab on its axis. Step 4: Choose an appropriate size oval template for the shape of your cab-to-be. You’ll need to make smooth arcs from the sides of your circle to the tip of the cab.
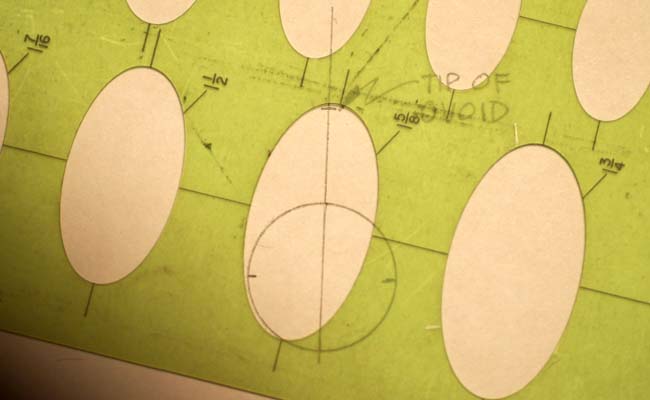
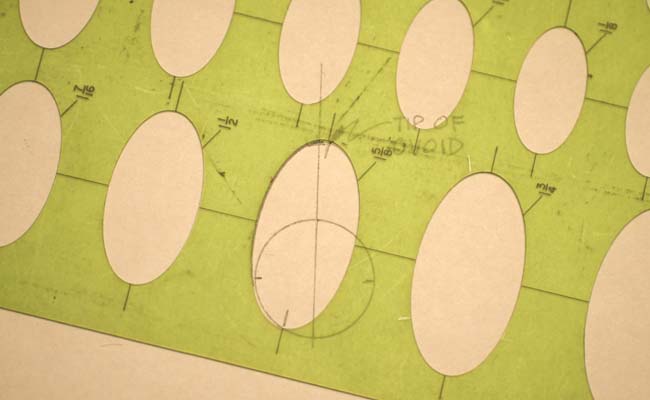
Step 5: Align your chosen oval with the side of the circle and the tip of your cab. Trace the side of the cab AND the top and bottom tick-marks of the oval.
Step 6: Draw a line through the oval’s center using the top and bottom tick-marks.
Step 7: Using the edge of a piece of paper held perpendicular to the cab’s axis, mark the distance from the oval’s center line (where it crosses the circle) to the cab’s center line. Transfer that distance to the other side of the cab’s circle and make a tick mark.
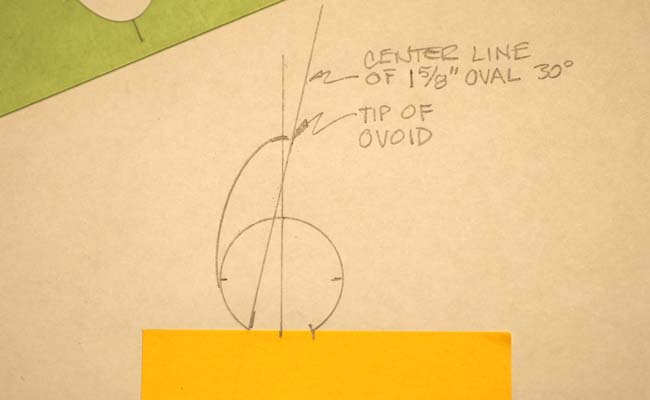
Now do the same at the top of the cab, but measure the distance to the right. Transfer that distance to the left of the cab's center line and make a tick mark. (NOTE: If the cab's center line extends beyond the tip, for greater accuracy measure and transfer a distance from a point higher up.)
Step 8: Mark a new straight line from the first (lower) transferred tick mark through the intersection of the oval’s original center line and the axis of the cab and through the second transferred tick mark at (or above) the tip of the ovoid. This new line is now the center line for the other (right) side of the oval template.
Step 9: Position your oval template on the new center line and mark the other side of the cab. Step 10: Finished. Here I’ve used the templates to mark the new ovoid with a thin Sharpie to make trim sawing easier.
Don’t want an ovoid because you prefer a pear/teardrop with a pointed tip? Follow the same process but choose an oval that, when tilted to mark the sides, will yield a point rather than a rounded tip. Choice of ovals will also determine if the cab is long and thin or short and blunt. This process is fast once you're familiar with it and you can draw any size or shape that you want.
|
|
|
|
Post by opalpyrexia on May 11, 2021 18:07:09 GMT -5
Welcome from Washington.
|
|
|
|
Post by opalpyrexia on May 10, 2021 18:32:25 GMT -5
I see a face in your turquoise. He looks very pleased with his pretty home.
|
|
|
|
Post by opalpyrexia on May 10, 2021 18:23:14 GMT -5
Welcome from Washington.
|
|
|
|
Hello!
May 10, 2021 18:22:24 GMT -5
Post by opalpyrexia on May 10, 2021 18:22:24 GMT -5
Welcome from Washington.
|
|
|
|
Post by opalpyrexia on May 9, 2021 22:52:56 GMT -5
I managed to find my tiger, farmermac . It doesn't look like much because I stopped working on it after I had done roughing out with rasps. Our instructor would move on to power tools and burs at this point. He had a window with a fan to force out all the dust, but I don't have one and the weather was wet and cold so I just put it away.
In your video it looked like you were using woodcarving tools. If I'm going to finish this cat some day I'll have to buy a cheap set.
|
|
|
|
Post by opalpyrexia on May 9, 2021 22:39:03 GMT -5
Nicely done! If you hadn't said that it was your first attempt I would not have believed it. I think that the way that you handled the bezel issue at the cab's point looks pretty good.
Handling bezels the way I do might not work for you, but I'll pass it on anyway. Before I set a cab, but while the cab is sitting in the setting, I take a fine point Sharpie and scribe a line inside the bezel. I do this while holding the Sharpie tangent to the cab's slope close to or a little above the bezel. Then I file or bur away the bezel almost to the elimination of the line. This creates a bezel height that varies with the geometry of the cab, maximizing its surface area and eliminating excess metal that might cause setting problems.
I should add that I usually set opals and my cutting follows the fire, so often they are freeforms or, if they have a symmetric shape, the dome and girdle slope and/or height may still vary.
|
|
|
|
Post by opalpyrexia on May 9, 2021 22:11:25 GMT -5
Welcome from Washington.
|
|
|
|
Post by opalpyrexia on May 9, 2021 22:10:51 GMT -5
Welcome from Washington.
|
|
|
|
Post by opalpyrexia on May 9, 2021 10:43:28 GMT -5
Congrats, Gary.
Who needs opals when you have rocks like that, right?
Maybe you'll have to change your name to algaepyrexia if you keep posting those. It is stunning.
Thanks for my first morning laugh, Vince!
|
|
|
|
Post by opalpyrexia on May 8, 2021 23:43:46 GMT -5
Very nice design, Bill! I see whitewater rapids crashing over your Indonesian river bottom! Good one, I like that! Hope you don't mind but I am going to use that interpretation 🙂 Thank you. I hope that it helps to close the sale! |
|
|
|
Post by opalpyrexia on May 8, 2021 19:39:04 GMT -5
Very nice design, Bill! I see whitewater rapids crashing over your Indonesian river bottom!
|
|
|
|
Post by opalpyrexia on May 8, 2021 19:32:24 GMT -5
Very cool looking owl and other creations. I'm impressed with what you can do with only hand tools.
My daughter and I took a soapstone workshop maybe 15+ years ago or so. I chose to carve a seal because of its simplicity. Following the workshop I started carving a tiger at home, but work and life took me away from it. It's at a very crude roughed-out stage. I'll post a photo tomorrow.
|
|
|
|
Post by opalpyrexia on May 8, 2021 18:58:15 GMT -5
Welcome from Washington.
|
|
|
|
Post by opalpyrexia on May 8, 2021 8:45:29 GMT -5
That is really impressive!
Like some have said, I have a couple of small pieces of fairly decent fire agate rough that are always waiting for me to do something with them. Gotta find the time (my excuse) and the courage.
|
|
|
|
Post by opalpyrexia on May 8, 2021 8:38:46 GMT -5
Congratulations Gary opalpyrexia on a very deserving landslide victory in the Fossils challenge! It really is a beautiful and vibrant piece and you should be proud of it! Thank you everyone who participated in the the contest and who voted! It was a crowded field of really beautiful pieces 
Thank you, Tommy, and thank you to everyone who voted for my cab, and to all those who entered.
|
|


 Ribbbbit