|
|
Post by chris1956 on Jan 27, 2023 21:08:38 GMT -5
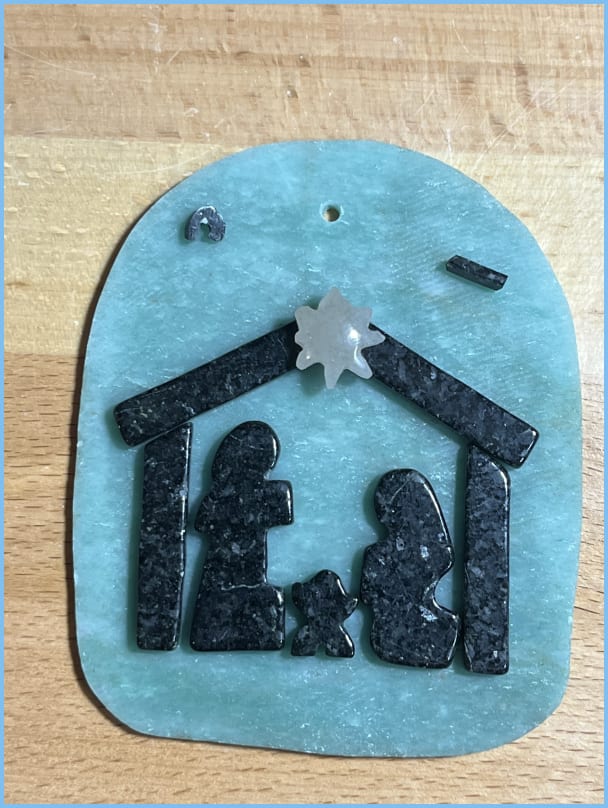
 Last year I made sets of Rob’s (Michigan Rocks) Christmas ornaments for several family and friends. Everyone loved them. My sister-in-law loved them so much she requested additional ones for this year including a nativity scene. My first reaction was “How in the world am I going to do that?” I didn’t think I had the skill or tools to cut the scene out of one slab. After some time, I got the idea to do the scene in pieces and then epoxy them to a background slab as seen in the photo (not epoxied yet). I cut everything but the two pieces of the staff and star on a trim saw and then ran them through the Lot-O tumbler. The two staff pieces were ground on a caber and a Dremel drill press with diamond drill bits. The star was cut on a trim saw and then ground and polished on a caber. I have done another set of the staff pieces since the ones you see didn’t turn out well and one cracked. I may also try a second star as I think I can do better on that. They are very tiny pieces as the adventurine background is about 4 inches tall. Anyway, all went well until I tried to do a mock assembly of all the pieces on the background. That is when I realized how difficult it is to line everything up correctly. I managed to do it for the mockup, but I ended up sliding pieces back and forth to get it lined up. I am concerned that when I put epoxy on the pieces, and try to get them aligned, I will get epoxy all over the place. My fingers are too big. So my question is how to proceed from this point. I was thinking of making an outline of the building with tape and placing that on the background slab. Then I could align the building, get it epoxied, and then do the figures and manger inside which should be easier to epoxy once the building is fixed. I think once you have everything epoxied, you could peel off the tape without too much trouble. Another idea is to draw the outline of the building and figures in pencil on the background and then epoxy. But I am concerned that the pencil lines will show up or they will be too close to the figures to remove. I read that acetone would dissolve epoxy. If it works on the 330 epoxy, maybe cleanup wouldn’t be a problem? Does anyone have experience with using acetone like this? I wanted to leave the adventurine background unpolished so I don’t want to do any grinding or polishing for epoxy cleanup. I am a little concerned about the weight with the background slab (I made it as thin as I thought it could be) but if it is too heavy for a tree, I am sure my sister-in-law will find somewhere to hang it. Is there a better way to do this? Or should I go back to the idea of making it all out of one slab (I think I might be able to use my drill press to start holes and then use the side of the drill bits like a router.). However, I like the look of the tumbled pieces. Or should I give up and do something simple? Any suggestions would be appreciated. Thanks, Chris |
|
|
|
Post by hummingbirdstones on Jan 27, 2023 21:25:05 GMT -5
I like it how it is. I think it looks great!
I would outline with pencil. Denatured alcohol and a Q-tip will get off the pencil marks without dissolving the epoxy. For your applique pieces, once they're applied I think you would be able to clean up any epoxy with the same technique using acetone. I would probably do it after the piece has set up for an hour or so, but while the epoxy is not fully set yet. An Exact-O knife would probably also work to carefully scrape the epoxy up off the stone. Use acetone and a paper towel to clean the blade right away.
Maybe other people who've done something similar will have better ideas for you.
|
|
|
|
Post by opalpyrexia on Jan 27, 2023 21:55:39 GMT -5
Here's one thing that you can try, Chris. If you're using 330 epoxy, you can heat it to partially cure it to the point that it's still fluid but it will not run. You can do this with an incandescent bulb, similar to what I described in this recent thread: It might take some trial and error, but I would expect that 5 minutes of heating would sufficiently thicken it to avoid running. You might also consider applying it with a very small brush (or two or three or ...). Regarding the removal of epoxy, according to Loctite acetone is effective only for porous materials that have been joined:
So control in applying epoxy is probably the better way to go. I hope that this might be of some help.
|
|
khara
fully equipped rock polisher
  
Member since September 2022
Posts: 1,979
|
Post by khara on Jan 27, 2023 23:10:42 GMT -5
Fun project! You could also use large tweezers for placing the pieces more carefully. I’m thinking the large tweezers like are used for soldering/metalsmithing.
|
|
|
|
Post by opalpyrexia on Jan 27, 2023 23:32:36 GMT -5
I forgot to mention that your execution of the nativity scene is so well done! You sister-in-law is going to love it.
|
|
|
|
Post by jasoninsd on Jan 27, 2023 23:42:21 GMT -5
First...genius idea for the ornament! That's awesome!! If it were me...I'd tape popsicle sticks along the bottom of the scene to line up the bottom, and small pieces of popsicle sticks along the edge and roof of the manger. This would allow everything to stay lined up. I don't think you need to coat the ENTIRE back of the small pieces with epoxy. I would think applying a couple small dots on the backs of the pieces, which won't "ooze" out when pressed into place, would hold the pieces very well. A small dot of E6000 works for holding a glue on bail for cabs... Just food for thought.  |
|
rockbrain
Cave Dweller 
Member since January 2022
Posts: 3,167
|
Post by rockbrain on Jan 28, 2023 10:03:51 GMT -5
You could put a piece of wide tape across the pieces like they are now. Lift the tape off with the pieces attached. All the pieces should be properly aligned with each other and be treated as one piece so now you can glue but only have to align the background and the one piece. If the tape (or contact paper or paper with glue) gets in the way of your view for aligning it to the background you can trim it off around the edges.
|
|
|
|
Post by chris1956 on Jan 28, 2023 16:32:15 GMT -5
Thanks for the suggestions. I may try a few experiments with these and see what works.
Chris
|
|
|
|
Post by chris1956 on Jun 15, 2023 19:53:46 GMT -5
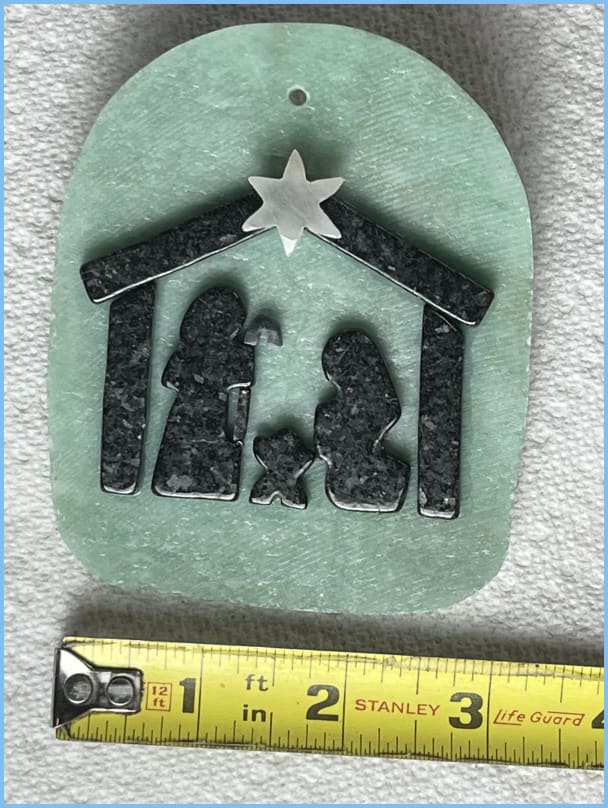
Well after 5 months of thinking about it, I finally got up the nerve to epoxy everything in place. If it wasn't for the suggestions everyone gave, I might have never gotten around to doing it. I think I used a suggestion from everybody that offered help as described below. These were really fantastic suggestions! It just goes to show you how much knowledge is in this forum. I think it turned out ok. I really like the way the green aventurine background turned out. Really glad I didn't try to polish it. One of the walls isn't quite vertical but it was tough to get it to fit together after running the parts through the Lot-O. If I do again, I would make the wall and one roof section as a single piece. That would make it a lot easier putting together. The star was a bugger. I tried five different times and finally settled on this one. From Robin hummingbirdstones, I used a pencil line to set the bottom of the walls and figures. I also made a small pencil dot at the top to center the top of the roof. From opalpyrexia, I let the epoxy thicken before I put parts on the aventurine background. From khara, I used large tweezers to put the small parts (staff) on the background. From Jason @jasonid, I used small dots of epoxy which did indeed keep the epoxy from getting all over and allowed a small amount of movement without making a mess. By the way, I will have photos of some of your Prairie Agates (partially polished) shortly. Boy, you weren't kidding when you said they are hard. From rockbrain, I used clear plastic wrapping tape to attach to the structure and figures after arranging them the way I wanted on the table. Then flipped it over and applied the epoxy to the structure and figures and then flipped it over again to attach to the aventurine. Once the epoxy was cured, the tape came off and everything was left on the background. Thanks again for all the great help. I am sure my sister-in-law will like it.   |
|
|
|
Post by chris1956 on Jun 15, 2023 19:55:48 GMT -5
|
|
|
|
Post by hummingbirdstones on Jun 15, 2023 20:05:02 GMT -5
You think it turned out ok?  ? It turned out GREAT! It's beautiful and I know your SIL will LOVE it!  |
|
|
|
Post by jasoninsd on Jun 15, 2023 20:18:07 GMT -5
You think it turned out ok?  ? It turned out GREAT! It's beautiful and I know your SIL will LOVE it!  I'll second what Robin said here!! Chris, I think that really looks AWESOME!!  **No...I wasn't kidding about the PA's being hard! LOL - I don't think I've worked anything that's harder than those SD Prairie Agates! |
|
|
|
Post by rockjunquie on Jun 15, 2023 21:37:06 GMT -5
Patience paid off. It's beautiful.  |
|
khara
fully equipped rock polisher
  
Member since September 2022
Posts: 1,979
|
Post by khara on Jun 16, 2023 3:27:24 GMT -5
It’s really cute! I almost hate to use the word cute because I can tell how much time went into it and I know it wasn’t a small effort even though it’s a small piece. I like the colors too, they are nice and calm, which is fitting for the scene.
Are you actually going to wait another 6 months before giving it as a gift?!
|
|
|
|
Post by chris1956 on Jun 16, 2023 8:07:03 GMT -5
It’s really cute! I almost hate to use the word cute because I can tell how much time went into it and I know it wasn’t a small effort even though it’s a small piece. I like the colors too, they are nice and calm, which is fitting for the scene. Are you actually going to wait another 6 months before giving it as a gift?! I probably will see her in July or August and will give it to her then.  |
|


 ? It turned out GREAT! It's beautiful and I know your SIL will LOVE it!


