RockyBeach
spending too much on rocks
 
Member since July 2023
Posts: 342
|
Post by RockyBeach on Dec 2, 2023 0:33:33 GMT -5
Have seen in passing comments about "oiling" finished tumbled rocks.
I have some that simply do not polish, it being part of the nature of the beast, BUT they do look nicer when in water ...still not "shiny" but the colors are more intense.
These are beach and stream and landscaping rocks, nothing "fancy" .
A soak in a mineral oil bath in a crock pot set to low has been suggested (somewhere or other ... perhaps a video from an unknown and perhaps un-reliable source ?) but no time frame was given .
Any experience with "oiling" ?
Results good or bad ?
Recipes ?
Type of rocks it will / might work on (or not).
|
|
RockyBeach
spending too much on rocks
 
Member since July 2023
Posts: 342
|
Post by RockyBeach on Dec 2, 2023 4:56:51 GMT -5
@hefty
That sure sounds complicated made more difficult by my not having a vacuum chamber! Your moonstones sure did come out looking nice !
My rocks are of varieties that simply do not take a polish but are smooth and look nice when wet. I rubbed a little oil on them and then buffed until the surface oil seemed gone but the better look has faded in the few weeks since I tried doing it that way.
Thus the question about a more efficient and more lasting method .
|
|
|
|
Post by vegasjames on Dec 2, 2023 10:01:54 GMT -5
Oil will bring out colors more on rocks, but it does not give them a polished look. And oil can attract dirt, so not a good solution. If cabbed, then buffing with a little Zam works great. If tumbled then a plastic coating such as acrylic spray can work.
|
|
|
|
Post by chris1956 on Dec 2, 2023 10:04:17 GMT -5
Here is the method I use. I found it on a website dealing with Petoskey stones but no longer have that site. I have used it mostly for Petoskey stones but may also work on other softer/fractured stones. It works really well on the fractures in Petoskey stones. You should always test it on some smaller material first to see if you like the look. For instance, some material with mica like aventurine, I think looks better without oil. I haven't tried the oil method on aventurine but the look after sawing in oil, to me is not as good as without. I have Petoskey stones that have had this treatment for over two years and still seem as good as when I first treated them. All my stones I give to friends and family. If you are selling material, you should notify people that they have been treated.
I use a small sauce pan, place the stones in the pan and cover them with mineral oil. I use mineral oil I get at the grocery store or hardware store. Bake in the oven at 200 degrees F for 2 hours (I usually let mine go a little longer to account for warmup of the oil and rocks). Let cool and remove. I usually let mine set in the oven overnight to cool. After I get as much oil off as I can by dripping, I usually set the stones on some paper towels for a day or two. Then start rubbing the stones with towels to get most of the oil off. This may take a few days to get the excess oil off. For Petoskey stones, after I have done the paper towels, I will buff them either with a wheel or by hand with canvas or denim to get the final bit of oil off. People use kitty litter to remove oil from cut slabs but I have always been worried that the kitty litter will stick in the small pockets in most Petoskey stones.
One word of warning, you can get some smells off of the rocks in the oven (especially if you have organic material on them). I bought a small oven to use for this and other uses.
Hope this helps,
Chris
|
|
RockyBeach
spending too much on rocks
 
Member since July 2023
Posts: 342
|
Post by RockyBeach on Dec 2, 2023 11:17:18 GMT -5
vegasjames chris1956@hefty Thanks for the info. I have been concerned about the oil and the dust from the dirt road here. These are stones that I know are not ever going to be shiny but they just look so much better when wet. It's more an enhanced color I am after. The $$$ for a vacuum chamber is not in the budget for these ordinary everyday stones. I may try a few in the oven. I have some mineral oil.
|
|
stefan
Cave Dweller 
Member since January 2005
Posts: 14,113
|
Post by stefan on Dec 9, 2023 12:00:03 GMT -5
I saw a video about oiling rocks to get them to shine. It was one of those cheap tumbler infomercials and they basically said that you can't get the rocks to shine naturally unless you oil them. (or- you know follow the correct procedures, use the correct rocks, and a real polish). I'm not opposed to oiled rocks, but it isn't the path I choose.
|
|
|
|
Post by chris1956 on Dec 10, 2023 13:38:15 GMT -5
I had a Petoskey stone that my brother gave me and figured it would be a good stone to show what the oil treatment (2hrs at 200 F in mineral oil) can do, or can't do. The first two pics are the rough stone front and back. I don't know how big it was to start but it ended up being about 2.5 inches each way. 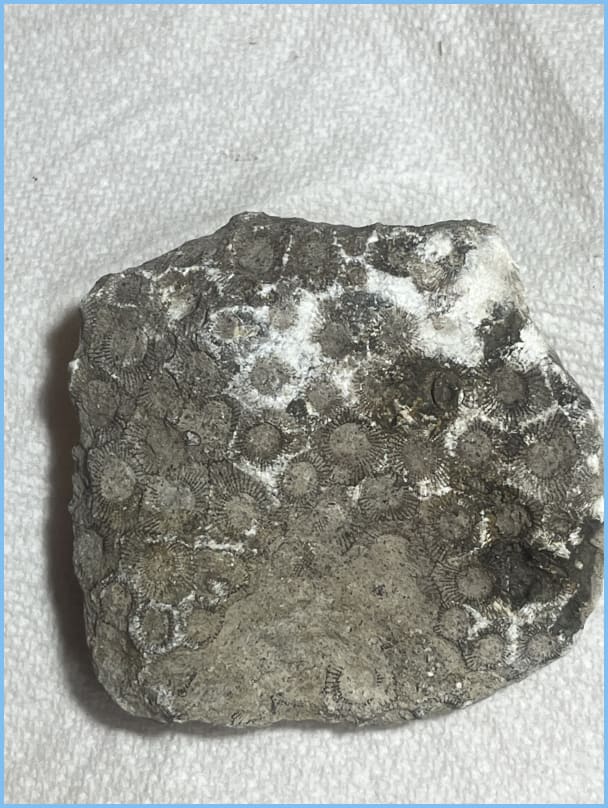  The next pics (front and back) are after polishing (30 grit through 14K and 50K wheels). The 30 grit was used to remove as much of the bad areas as I could. Note the "spots" in some of the eyes at the bottom of the stone (front side). My guess is that these spots are limestone (which won't polish). People that collect Petoskey stones often refer to this as "mud" (ie. I chased the mud all the way through the stone trying to get rid of it). Also, note the clarity around the light reflections for later comparison. Note also the large patch of limestone on the botton left of the back side.  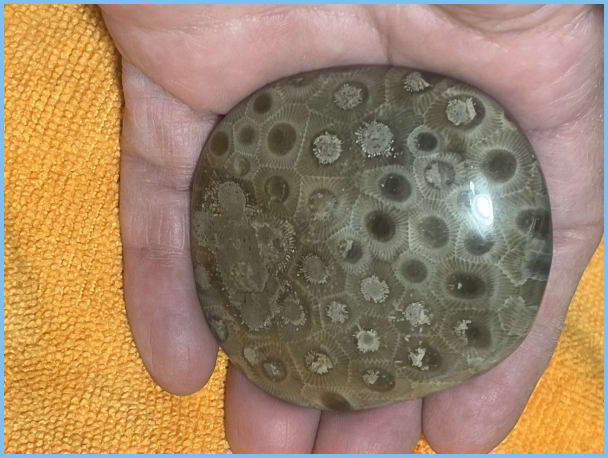 The next two pics are after the oil treatment and after hand buffing with a canvas cloth and buffing with a small Dremel pad. Note the haze around the light reflection. This is one thing that happens when you use the oil treatment which is one reason I typically don't do this on better stones. I think the oily residue must deter from the "flatness" of the polished surface but not sure. The oil soaks into the limestone patches and tends to make them darker and much less visible than they were before oil on the front side. However, on the back side, you will notice that the large patch and some of the smaller patches are still visible. This sometimes happens. Most of the time, the stones will look like the front side. My best guess is that those patches on the back have a lot of small fractures or voids near the surface and the oil evaporates from these quickly. 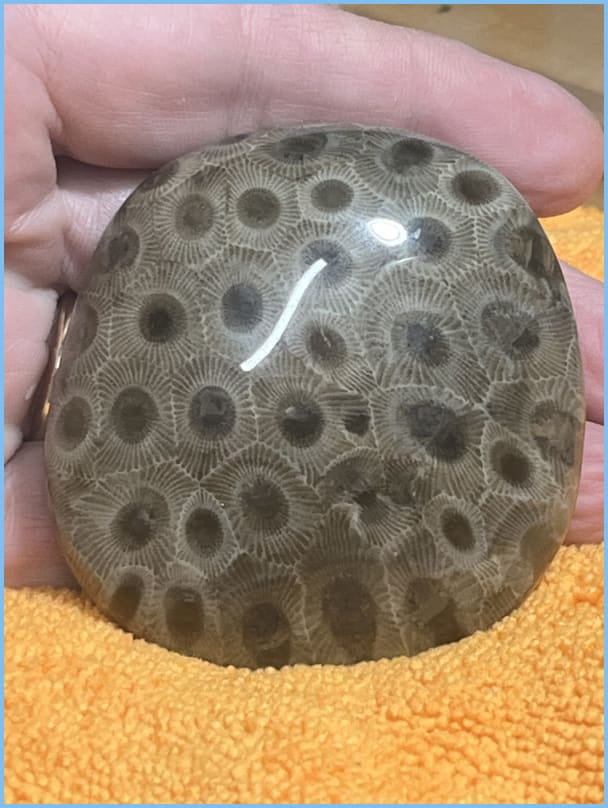  If you look at the stone at the right angle, you will still see the limestone patches (since they arn't polished). Next pic is a close up with one of those patches in the middle of the light reflection. 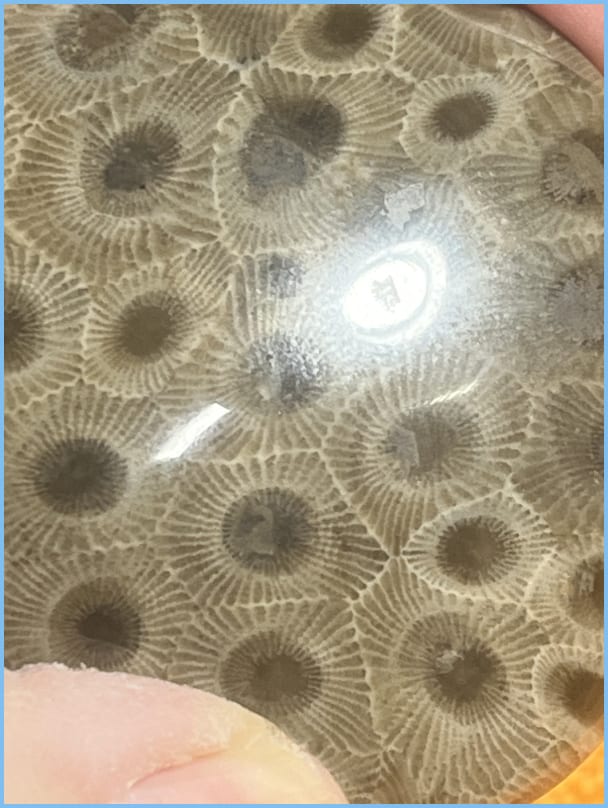 After the oil treatment I thought I would try to repolish the good part of the front side using the 14K and 50K wheels to see if it would remove the haze that I saw around the lights in the earlier oiled pics and it looks like it accomplished that. The following pics are after the repolishing. 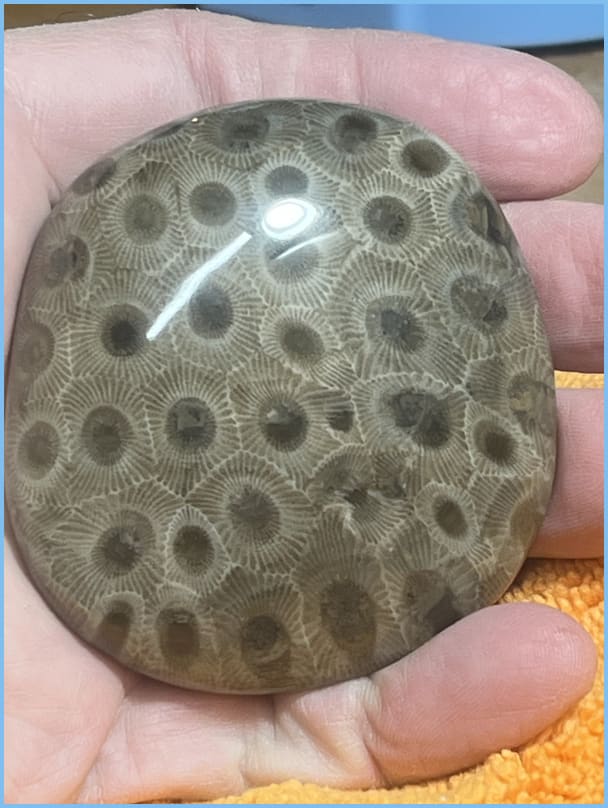  After I was done with all this, I was thinking that it might have been better to grind off the bad parts at the bottom of the stone and just live with a more perfect, but smaller stone. But that would have been a lot of grinding, even with the 30 grit wheel. |
|
rockbrain
Cave Dweller 
Member since January 2022
Posts: 3,172
|
Post by rockbrain on Dec 10, 2023 14:36:52 GMT -5
vegasjames chris1956 @hefty Thanks for the info. I have been concerned about the oil and the dust from the dirt road here. These are stones that I know are not ever going to be shiny but they just look so much better when wet. It's more an enhanced color I am after. The $$$ for a vacuum chamber is not in the budget for these ordinary everyday stones. I may try a few in the oven. I have some mineral oil. Do you have a significant other that needs a vacuum food sealer for Christmas!  |
|
RockyBeach
spending too much on rocks
 
Member since July 2023
Posts: 342
|
Post by RockyBeach on Dec 10, 2023 17:12:49 GMT -5
vegasjames chris1956 @hefty Thanks for the info. I have been concerned about the oil and the dust from the dirt road here. These are stones that I know are not ever going to be shiny but they just look so much better when wet. It's more an enhanced color I am after. The $$$ for a vacuum chamber is not in the budget for these ordinary everyday stones. I may try a few in the oven. I have some mineral oil. Do you have a significant other that needs a vacuum food sealer for Christmas!  I already have one ... complete with the attachment for vacuuming jars.... might give it a try one of these days. |
|