proflev
off to a rocking start

Member since May 2024
Posts: 8
|
Post by proflev on Jun 15, 2024 12:21:06 GMT -5
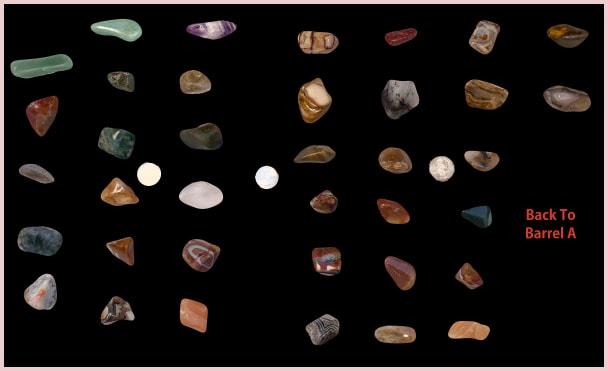
Greetings, I'm a newbie and I've been focused on getting rocks flawless in Stage 1 (a la MichiganRocks) before planning to move them to Stage 2. (About 10 look like they just need one more week). I'm not clear, however, how much material will continue to be removed in a Stage 2 with 220 SC in a rotary tumbler. What size flaw, if any, will come out during that Stage 2 - a small crease, a small hole, a little rough spot? This is what rocks look like that I'm returning to Stage 1 for another week.  This is what rocks look like that I'm ready to move on to Stage 2.  Also, I'm shooting for having a 3lb barrel about half full of rocks so that, when I add ceramic media, the barrel will be 2/3 to 3/4 full. Does that sound right? Thanks for thoughtful coaching. |
|
|
|
Post by chris1956 on Jun 15, 2024 15:55:33 GMT -5
Your rocks you are sending to Stage 2 look pretty good. Some material will be removed in Stage 2 but I would guess most people try to get them as good as they can in Stage 1. There are some rocks with holes and cracks that will never get removed in Stage 1. Have to decide if you want to move them along, cut or crack to remove bad spots, or discard. I usually fill my 3 pound barrle to 2/3 full.
Chris
|
|
|
|
Post by pebblesky on Jun 15, 2024 16:24:20 GMT -5
My only experiences with stage 2 are in a vibe tumbler with 120/220 sc. You can expect the really shallow scratches to be removed, but do not expect anything deeper than 1/2 millimeter to be completely removed, from my very rough estimate. Your miles might vary depending on the sizes and the types of rock and the grit and tumbler you use. why not give it a try and record your findings. If some dent isn't gone after stage 2 you could always save them for another stage 2 run.
For fillers I don't normally use that much ceramic media. A 3lb barrel is already pretty small and I would like to make more use of it than tumbling medias. Maybe try smaller rocks as fillers and cushions and at least these will produce nice small tumbles.
|
|
Warzy Raptor
starting to shine!
 microcrystalline silicates my beloved <3
Member since April 2024
Posts: 37
|
Post by Warzy Raptor on Jun 17, 2024 12:24:50 GMT -5
So Stage 2 is best described as “garbage in, garbage out” (UNLESS you’re working with soft stones like Fluorite where you tend to skip stage 1 and do most of the grinding in Stage 2, but that’s another story.) If you’ve got really minor rough spots that are just surface imperfections they’ll likely smooth out, but deeper rough spots, pitting, or fracture lines is a crapshoot; you’re really better off getting rid of those in Stage 1 than gambling on Stage 2. As far as the amount of material lost, it’s fairly minimal compared to Stage 1!
Newbie tip for the impatient: If you’ve got a rotary tool at home, pick yourself up a set of diamond tipped bits - when I have rocks with stubborn pitting or other imperfections that aren’t coming out in Stage 1 as fast as I’d like, I take them outside and grind those spots out with my rotary tool and diamond bits (dip the rock in water every minute or two while working on it to keep it cool and keep the dust down), smooth the tooled spots out a bit, and then toss them back into Stage 1 for another week. (MAKE SURE YOU WEAR AN N95 RESPIRATOR OR MASK AND SAFETY GLASSES WHEN DOING ANY MANUAL GRINDING OR POLISHING ON ROCKS, you do -NOT- want to inhale rock dust, it can lead to a nasty disease called Silicosis.)
|
|