

Post by jrtrio on May 27, 2006 13:00:19 GMT -5
-------------Joe's Tutorial for Sieg's Workforce Fence Jig----------------
Now, the first thing you want to do is dress properly so as to protect your eyes and your clothing. I wear glasses so I have to cover them with Safety glasses so I'm able to use the bifocal portion when using the saw.
So, I use disposable coveralls, And a pair of large protective glasses so I can still wear my glasses and not chew off any fingers I might need for counting later on.
I also think you should wear ear plugs, or like me, I wear either ear phones for the I-pod listening to music, or headphones that let me listen to the TV! It's amazing how much noise is generated when cutting stone.
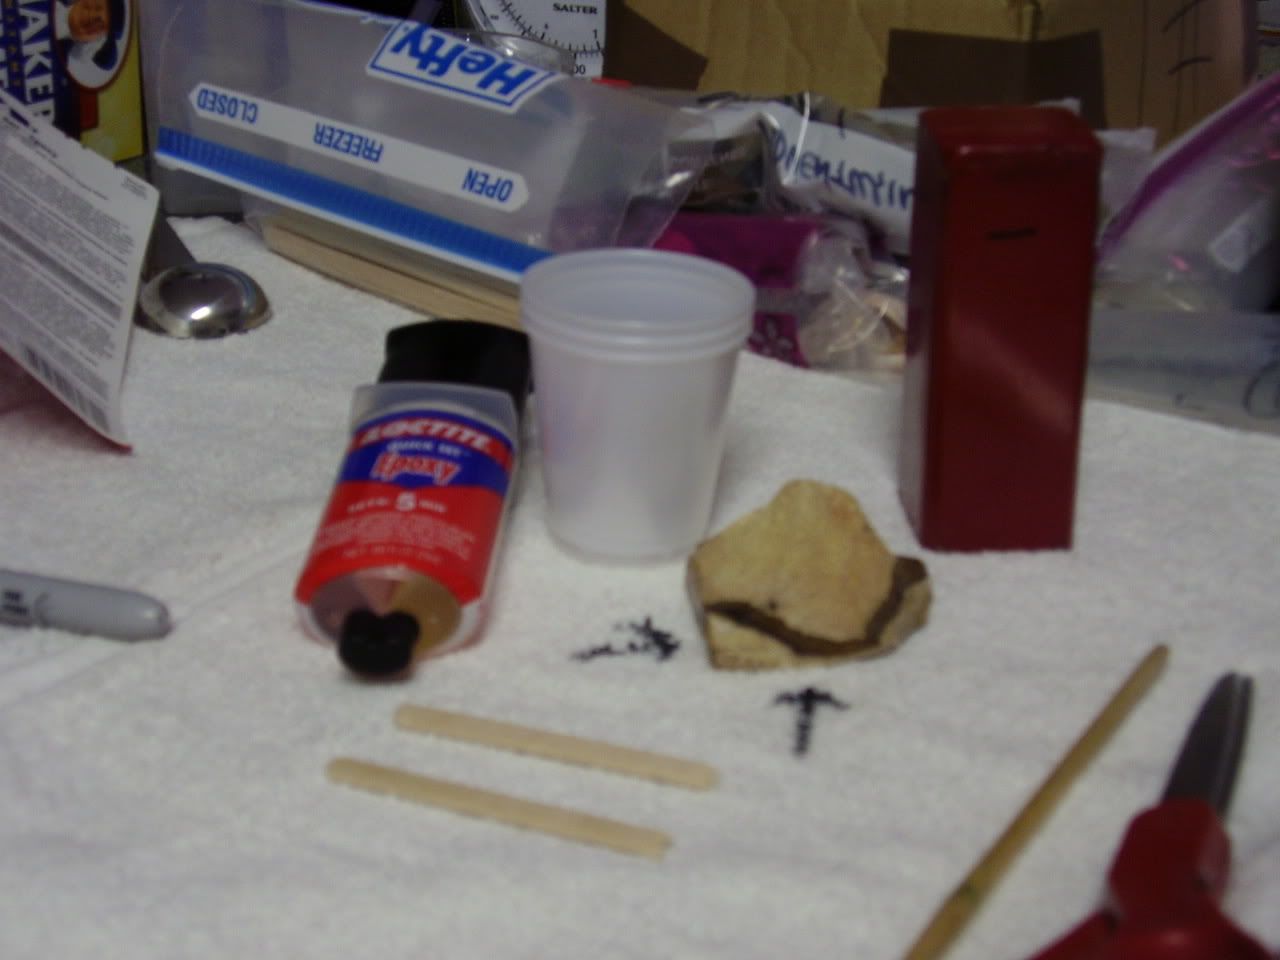
Now, to begin you must glue the rock to the sleeve. I use the Loctite products. They have several varieties of epoxies to suit your needs and your preferences.
You also need a small disposable cup to mix the epoxy. Some people will just mix it on a flat surface but I find it much easier and safer to use the little cup and the small wooden "coffee" stirers. Make sure your rock is clean and has at least one flat side. I'm using a different rock to show you this step so we won't have to wait the 24 hours I like to wait for the epoxy to be truly set. Plus the directions tell you to wait 24hrs before using machines or sanding.
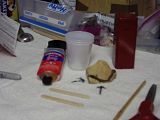
Mix up the epoxy, then apply a good quantity to both the rock and the sleeve.
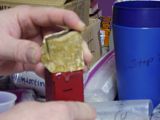
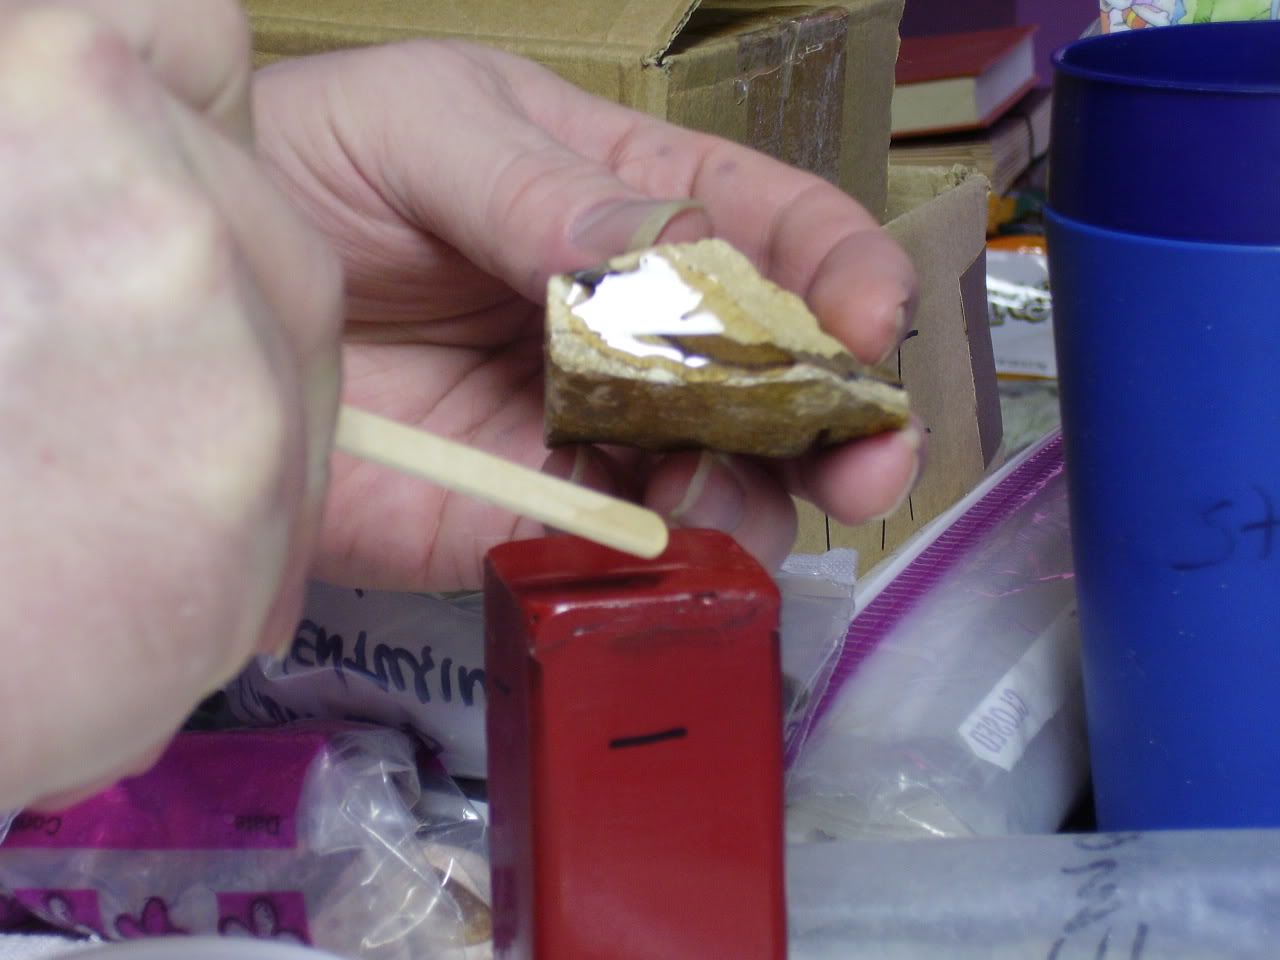
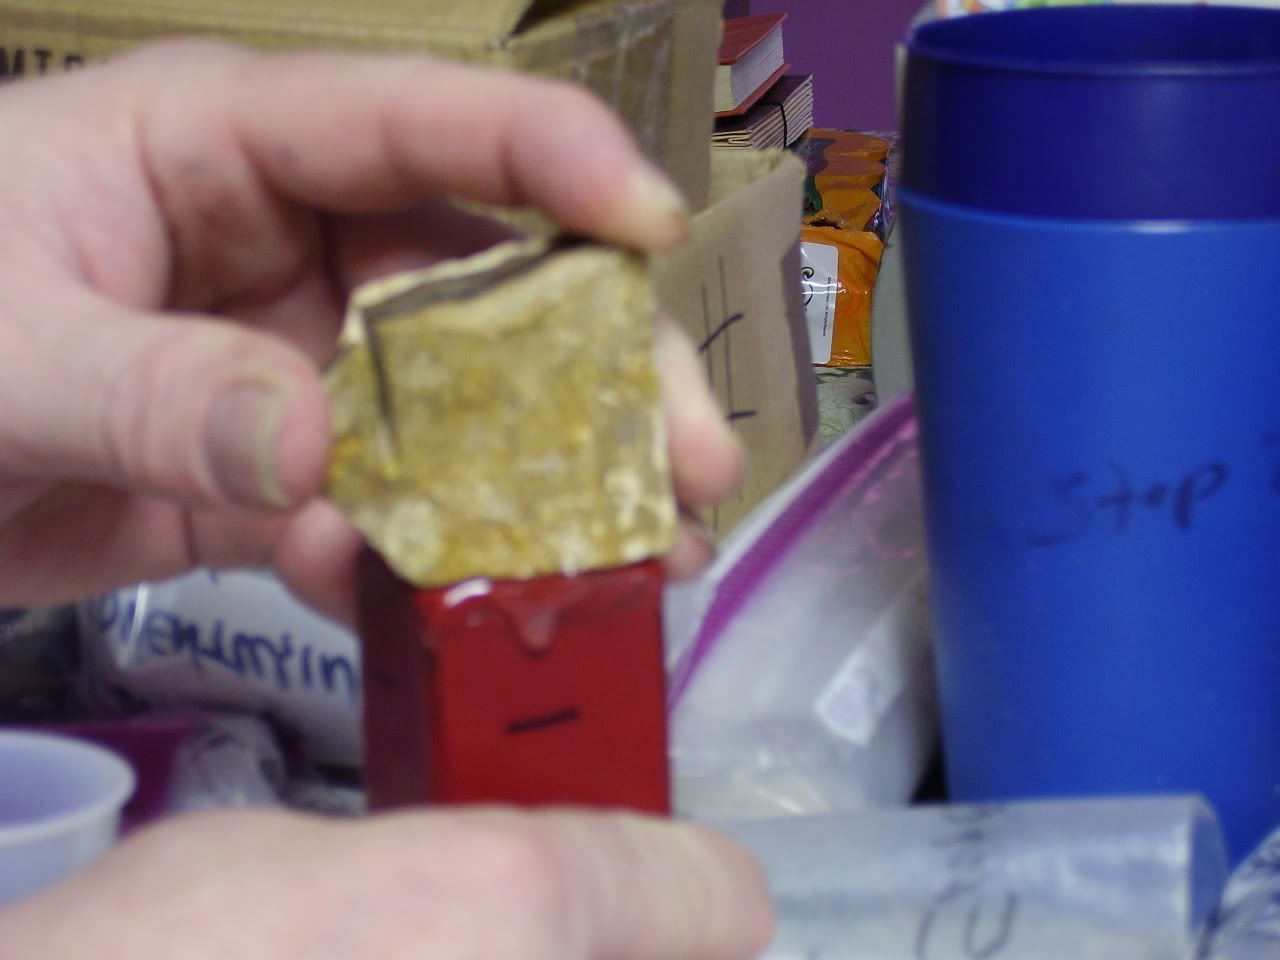
Press the stone firmly onto the sleeve making sure that it is exactly where you want it to be.
Then wipe off the excess epoxy.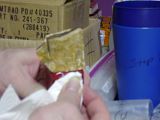
Now go out and play! Do the things that someone like me, a person out on 100% disablity for the rest of their lives would go out and do!!
Now we'll pretend that 24 hours are past. Most people wouldn't wait that long to start cutting. But, the way I feel about it is: if I'm going to be depending on a glue I'm going to give it the best chance at working I can. And the directions advise no sanding or machine work for 24 hours and I'm going to follow the directions! At least when I can find the directions! Plus I've tried sawing early and it's amazing how far a rock can fly when it really wants to! But, it really must want to.
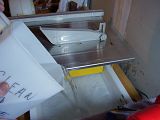
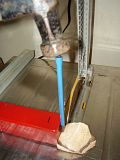
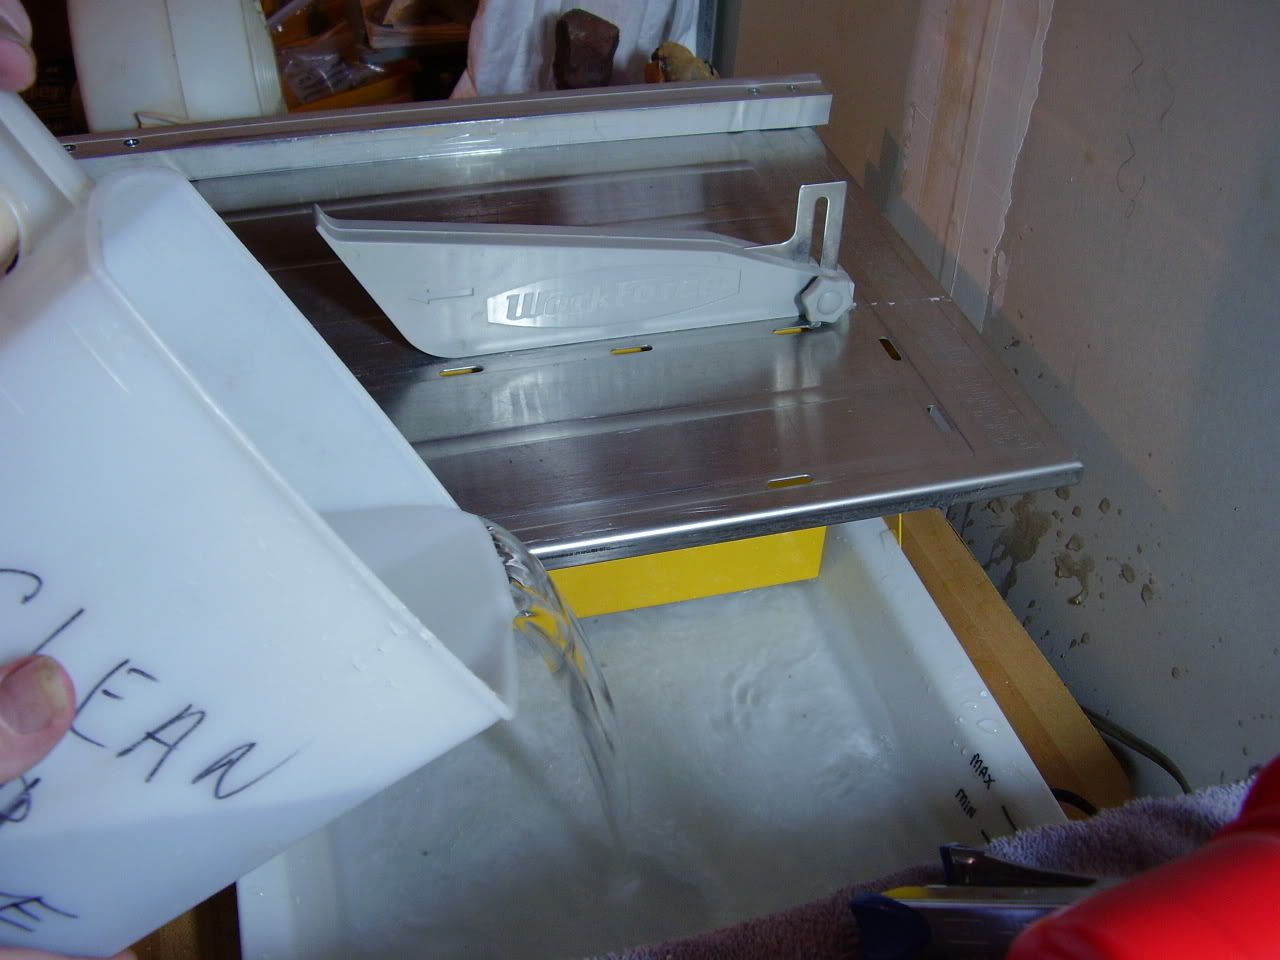
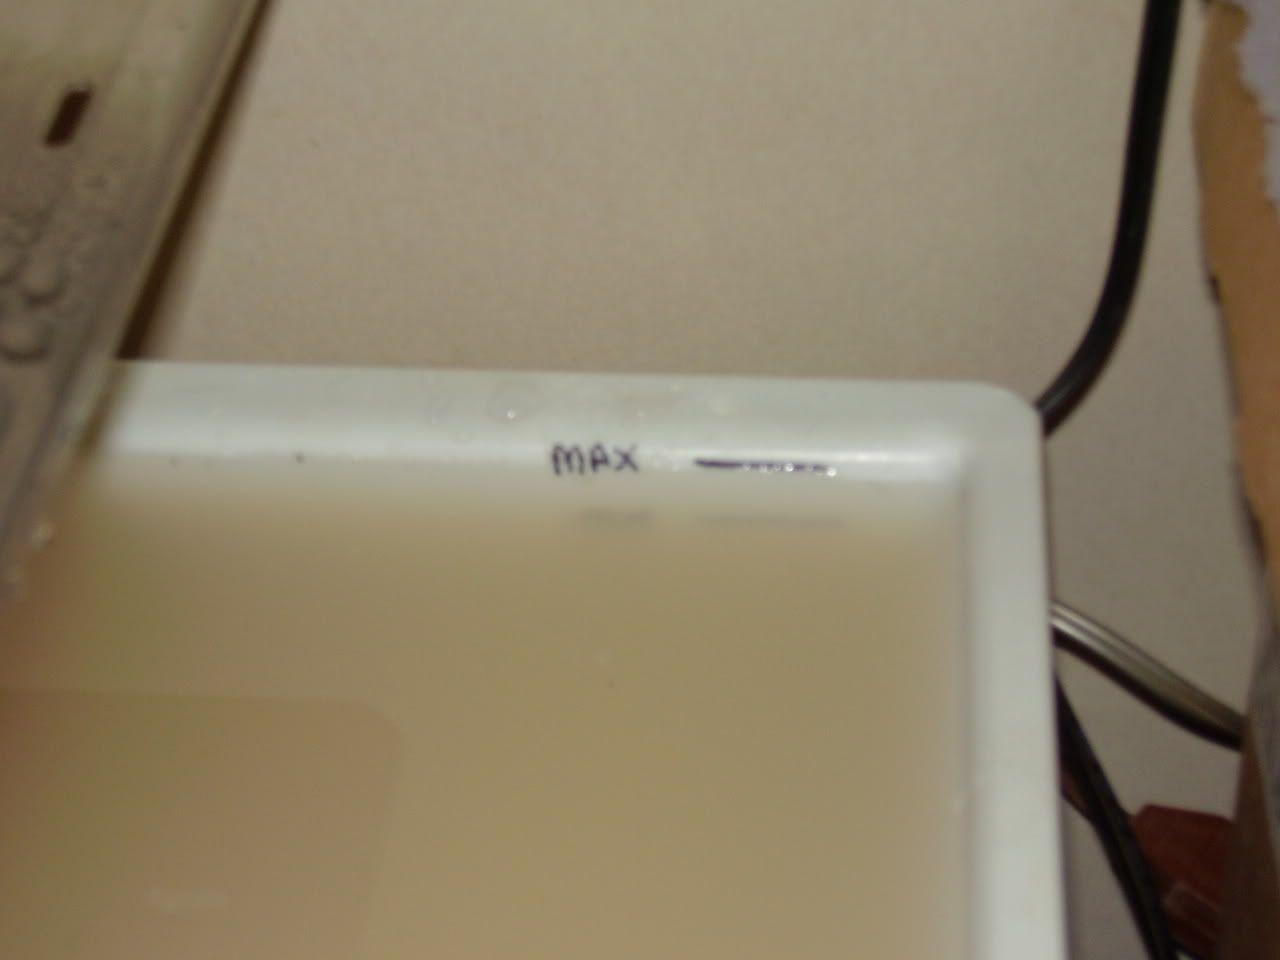
Now you need to set up your Workforce saw. Fill up the reservoir to the max! This type of saw will work best with a full reservoir.

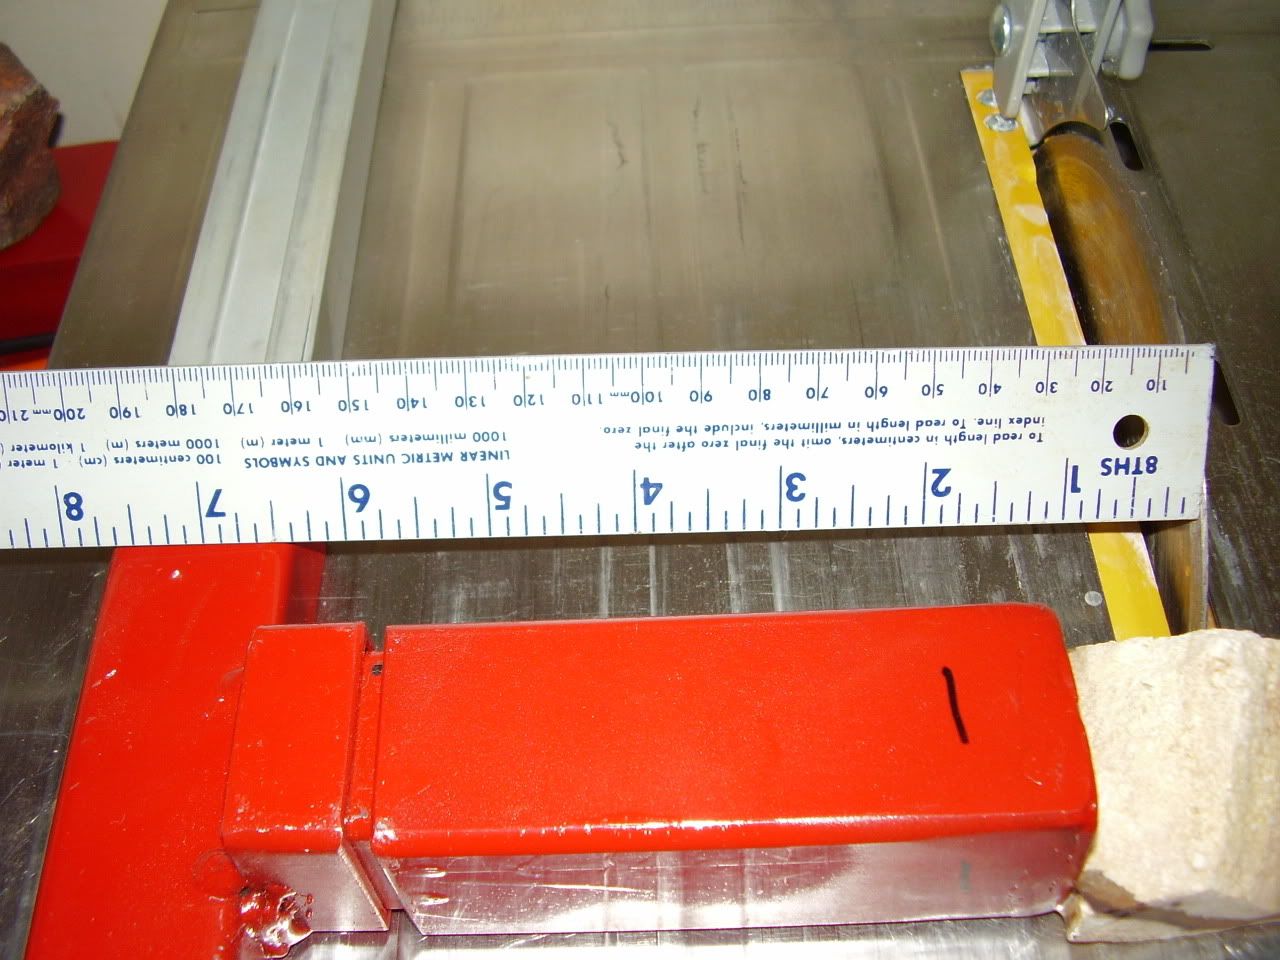
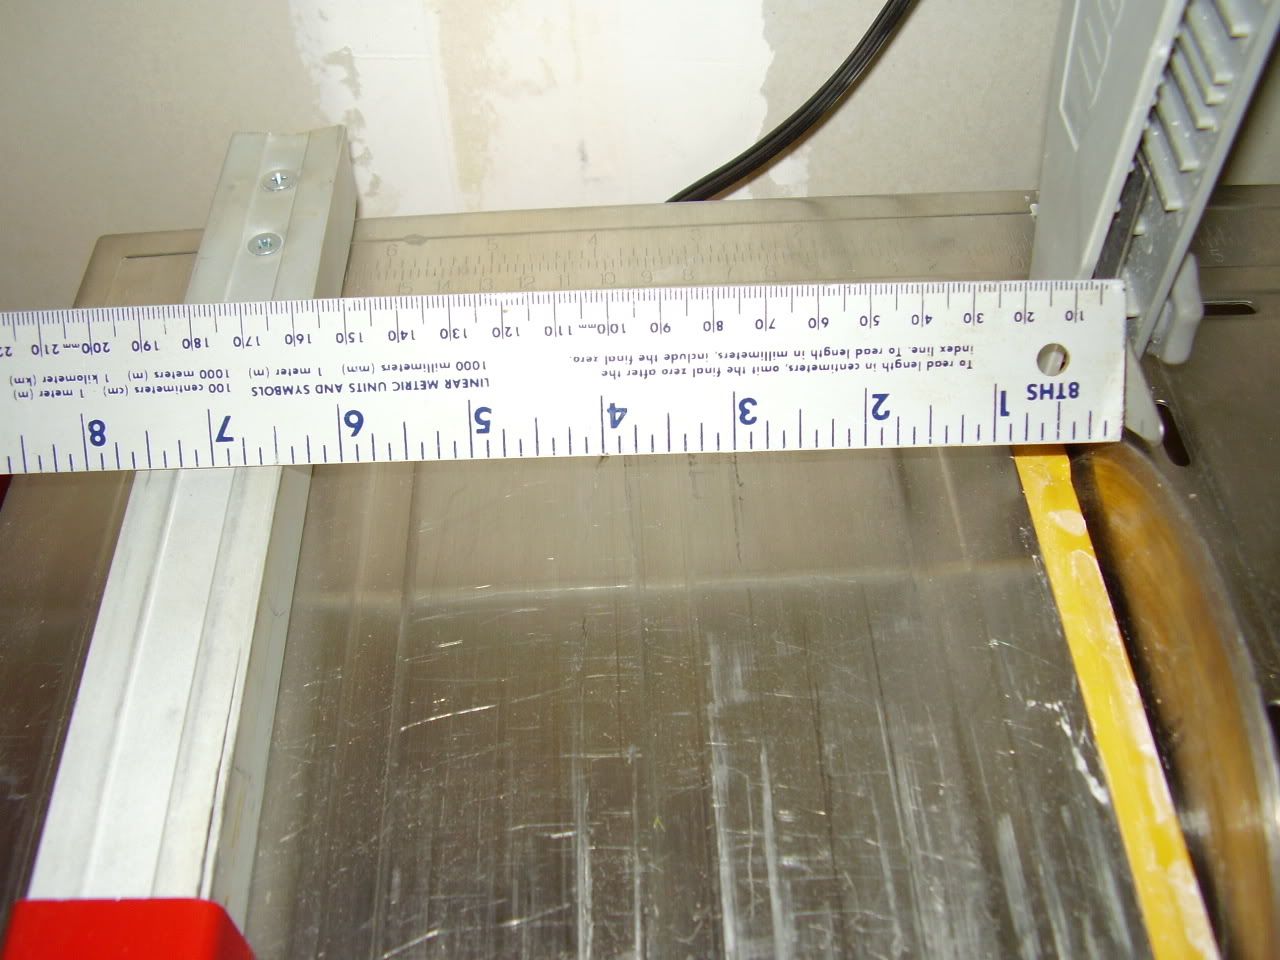
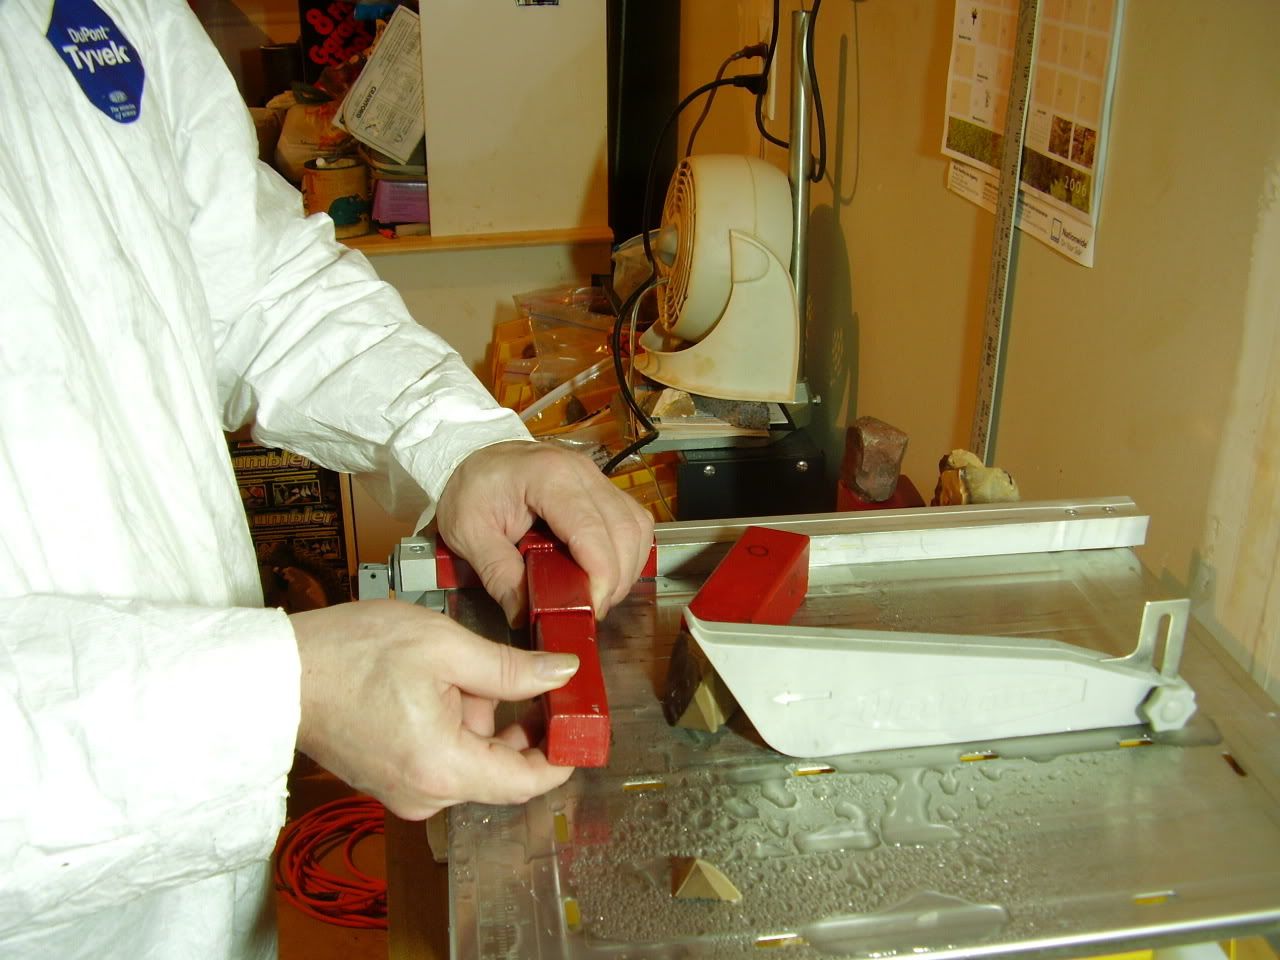
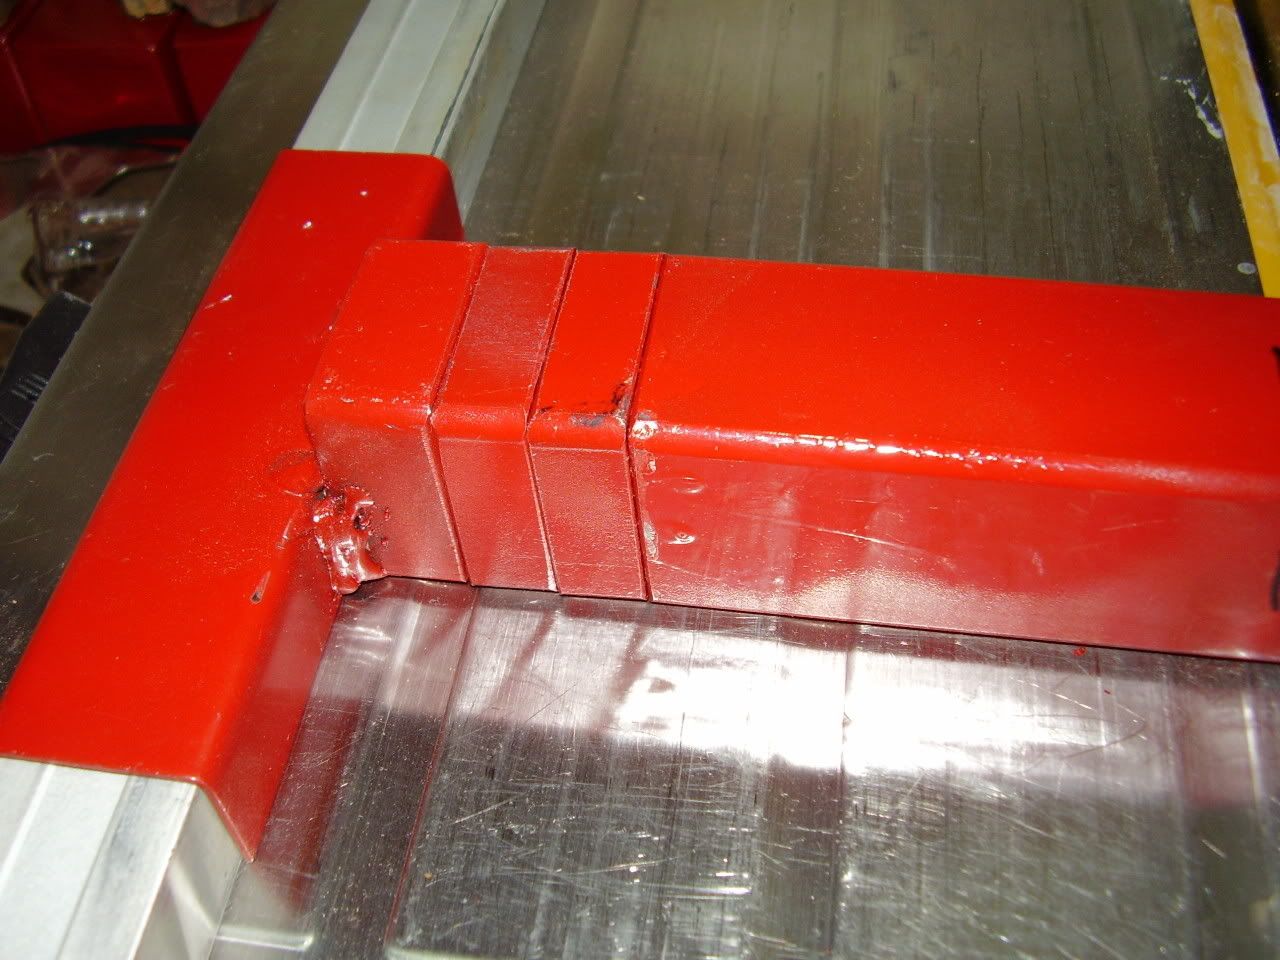
Set up the fence with your jig on the fence with the sleeve and stone on the jig. Line up the stone to the blade for your first cut. Measure the distance between the fence and the front edge of the blade and between the fence and the rear edge of the blade. They both MUST be the same! Or you won't get a paralell cut and could possibly jam the stone between the blade and the jig.


Remove the sleeve off of the jig and insert the weight which will help you hold the stone down onto the table of the saw.

Turn on the saw and make that first cut.

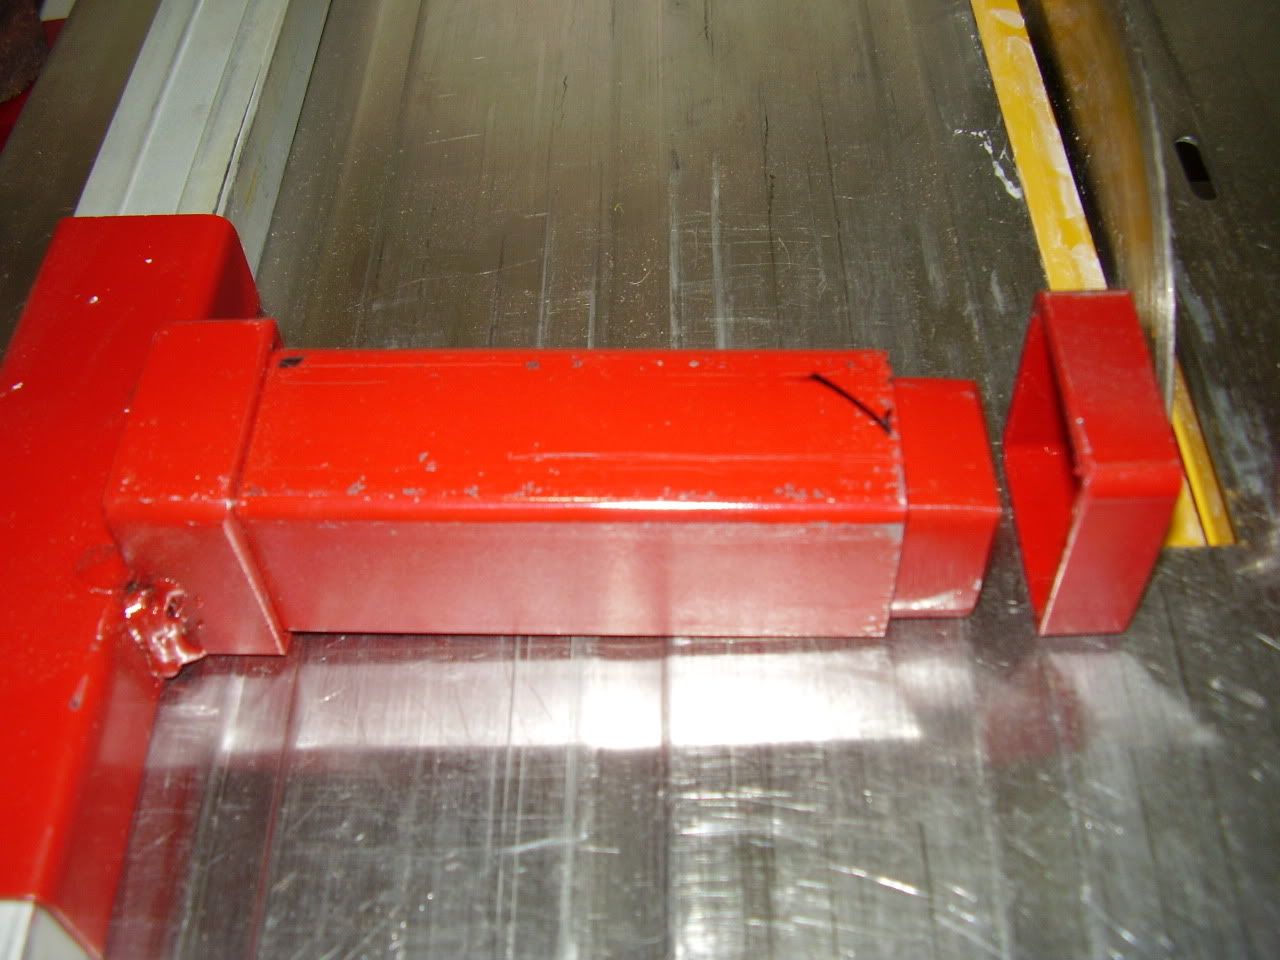
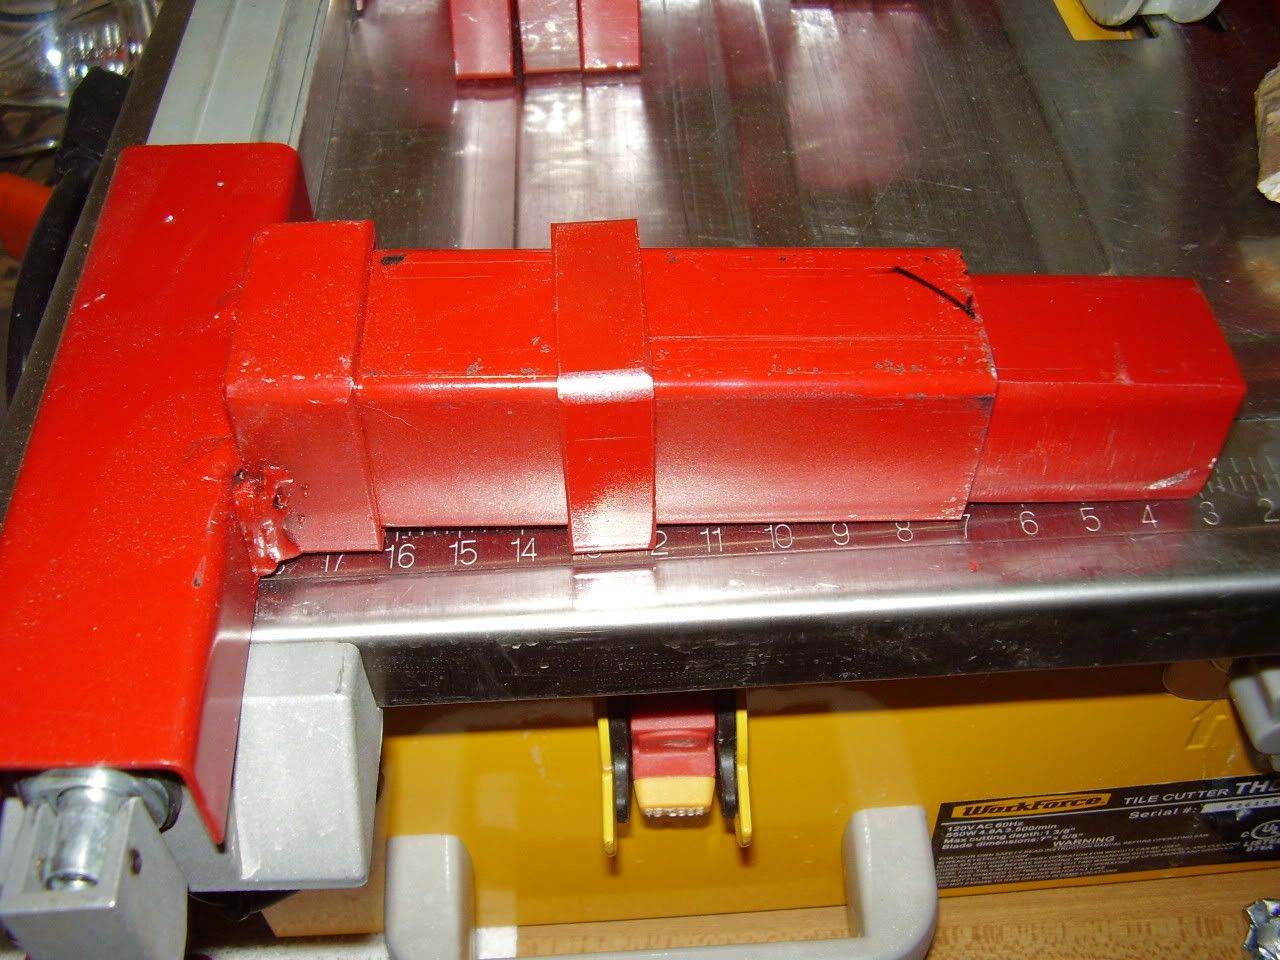
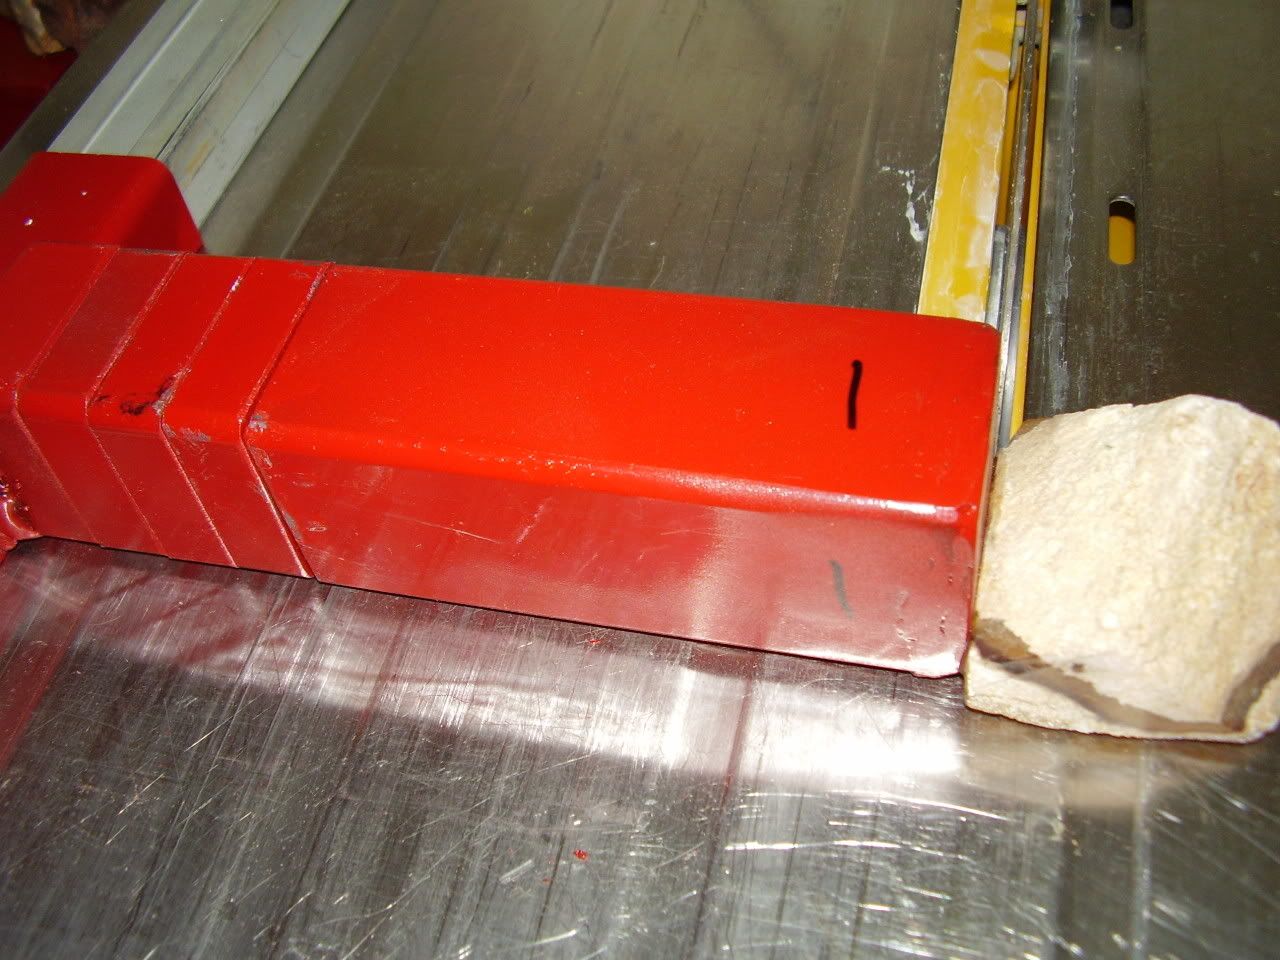
Pull the jig back and turn off the saw and remove the sleeve. Place the 1/2" spacer on the jig. (I'm using the 1/2" spacer because I'm going to be using this for tumbling rough. If I were going to want to create a slabette for polishing I would use the smaller 1/4" spacer or maybe even the smaller 1/8" spacer.) Replace the sleeve and turn the saw back on and make the second cut.


And so far we've made 2 cuts and have 2 pieces of stone.
Continue by placing a second spacer on the jig, make the cut, turn off the saw, remove the sleeve and place on the third and final 1/2" spacer. If you only have 2 - 1/2" spacers then place two 1/4" spacers to compensate. Make the final cut.

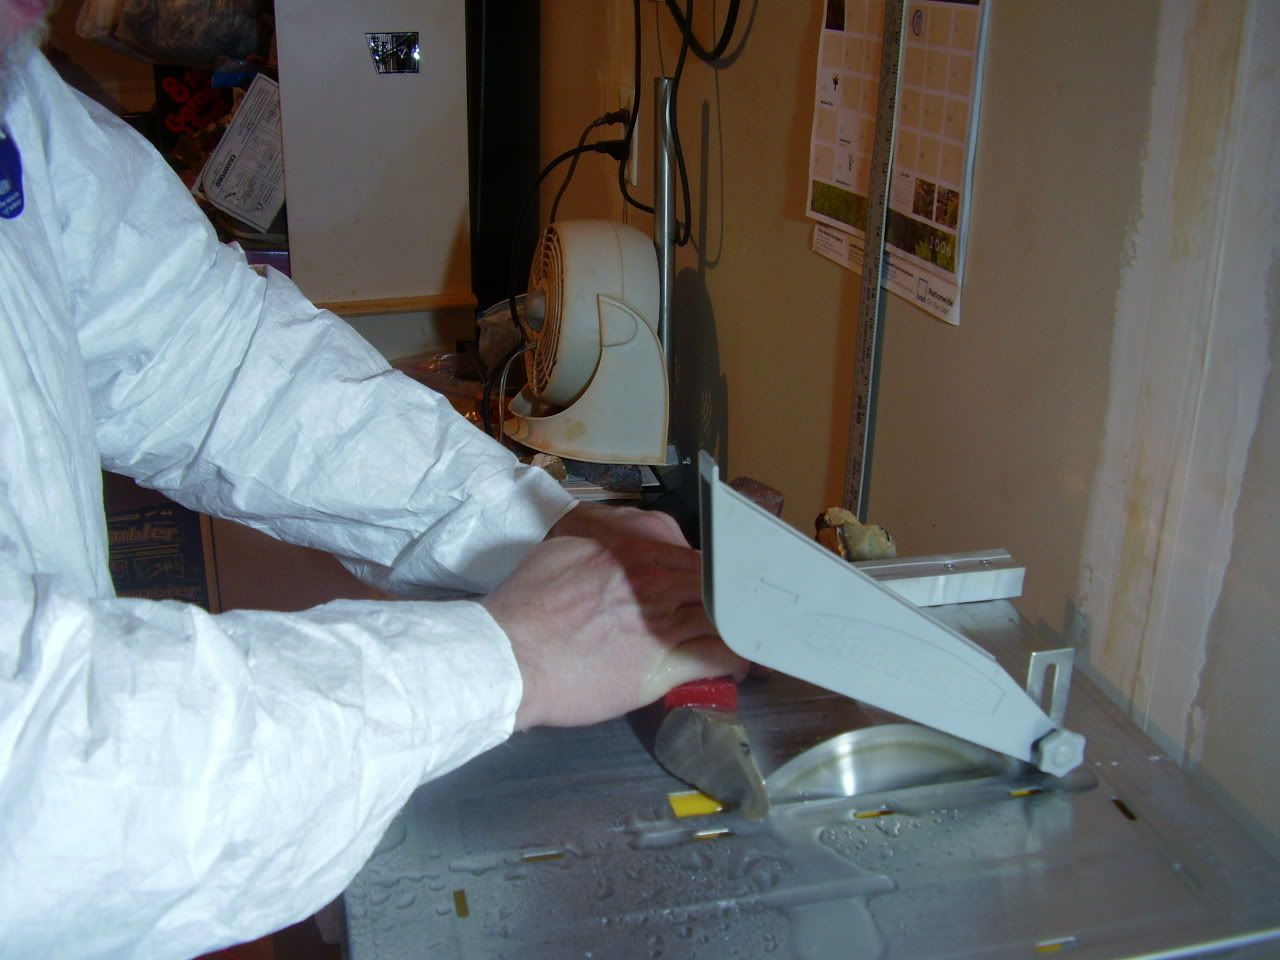
Pull the jig back, turn off the saw.
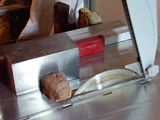
The final piece of stone is still glued onto the sleeve. Take your 1/4" cold chisel and place it between the stone and the end of the sleeve and tap lightly
and the stone will go flying off the end of the sleeve, bounce off the table of the saw and fly across your shop till it comes to rest under the heaviest piece of machinary you own! And with all that dirt and all those dust bunnies under there there is no way you'll be able to get that thing out of there without having a ton of crap stuck to it! But, that's the great thing about rocks...THEY CAN GET DIRTY! THEY COME FROM THE GROUND IN THE FIRST PLACE!
Actually it will probably fly off the saw hit you in your tummy and land at your feet chipping off a small piece from the end.
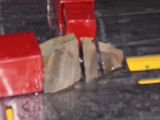
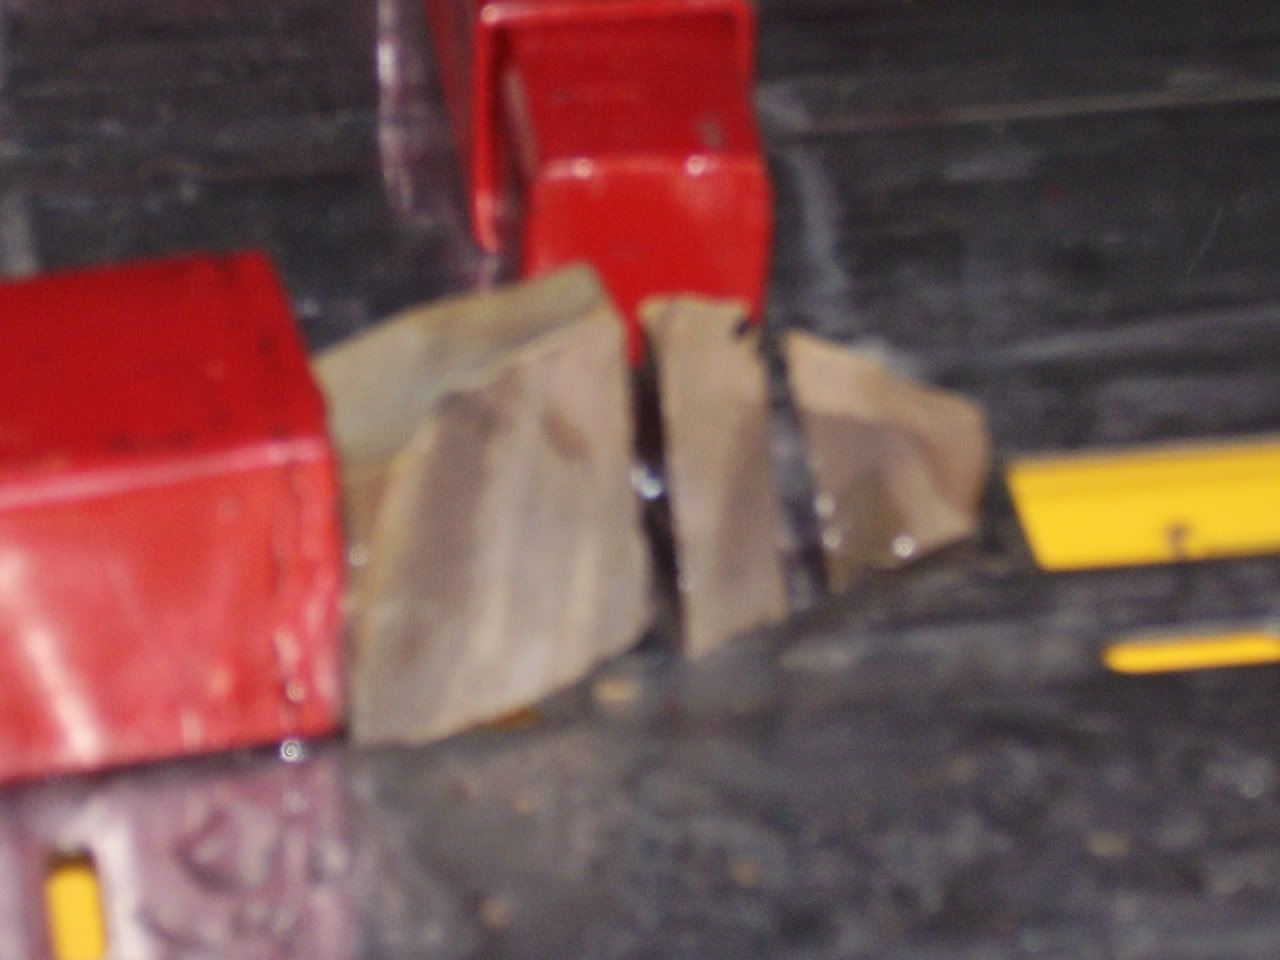
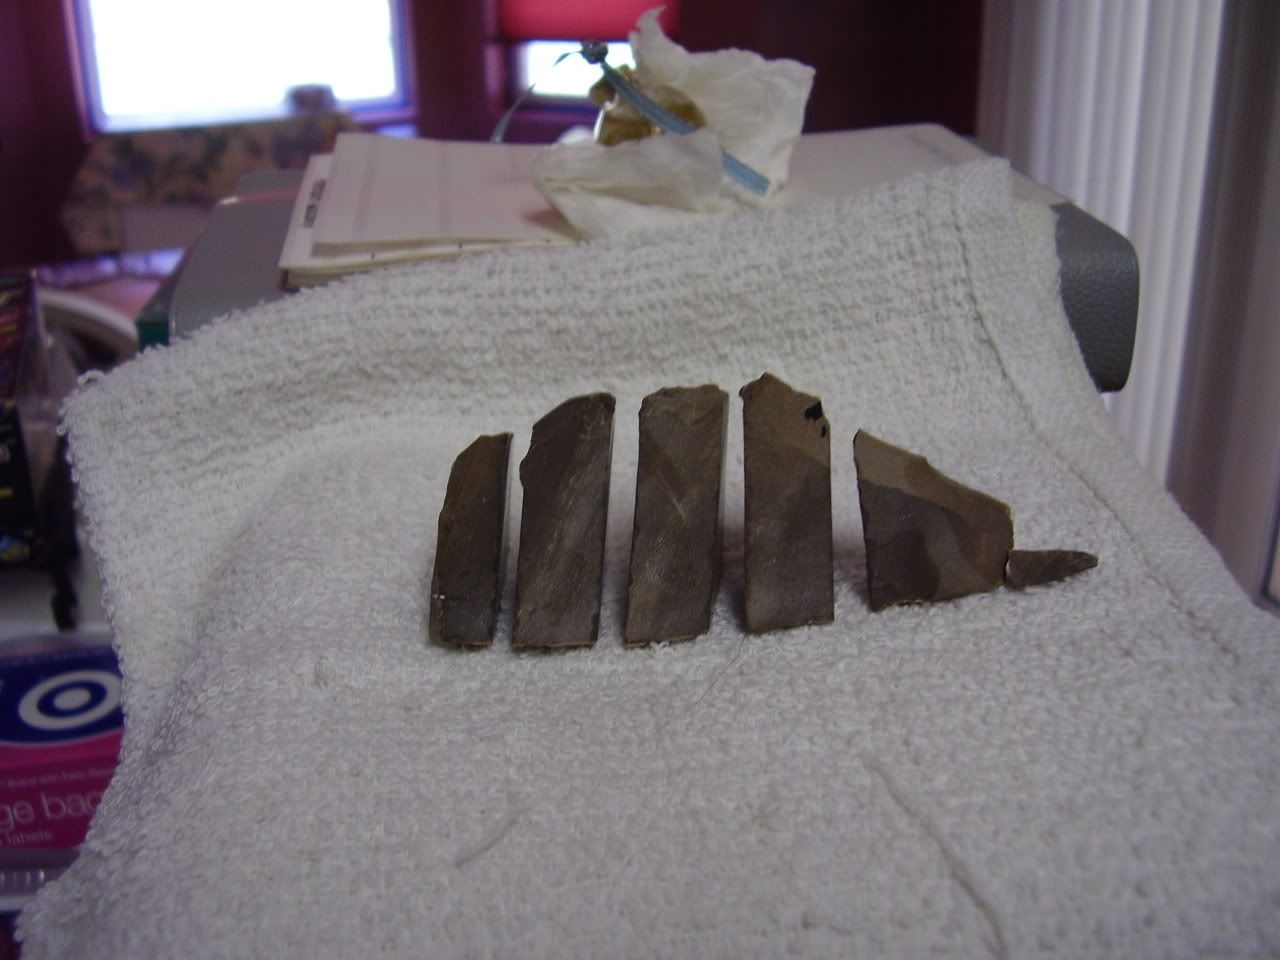
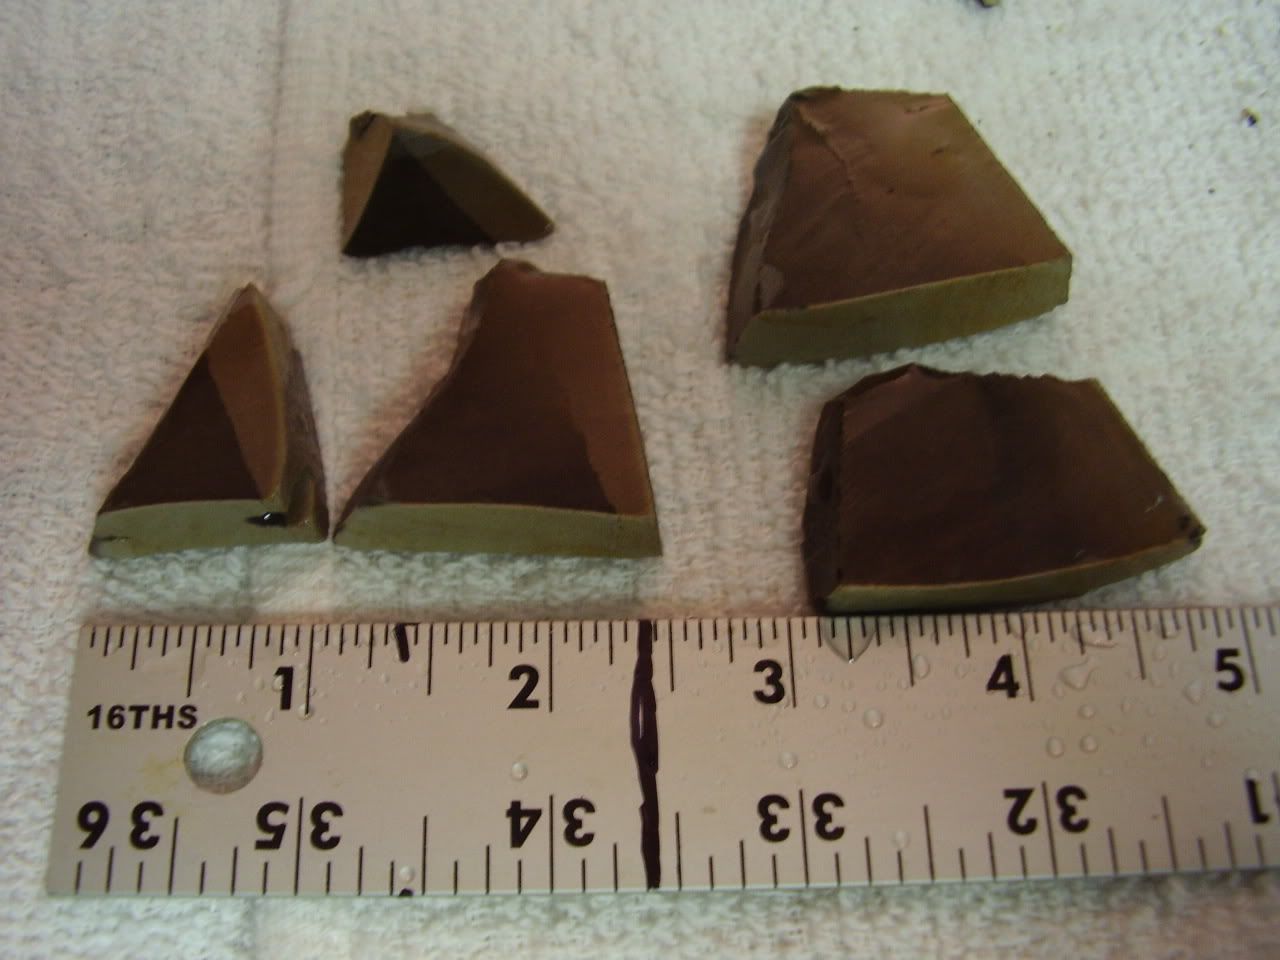
Here's a picture of the actual stone I cut using Rockkittens' (Sieg's) Workforce Fence Jig: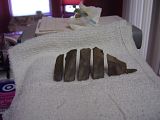
And another picture
showing that because two, (the ones to the far right), of the pieces are wider than an inch and a half, then I'll probably break those with a cold chisel to get them down to tumbling rough size.
That's all for the Tutorial for the Workforce Fence Jig. You may now rewind the film for others to view.
-----------------Stainless Steel Brick Tutorial-----------------------------
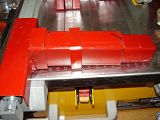
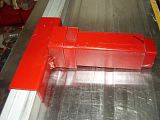
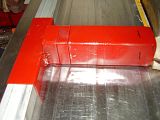
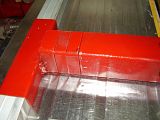
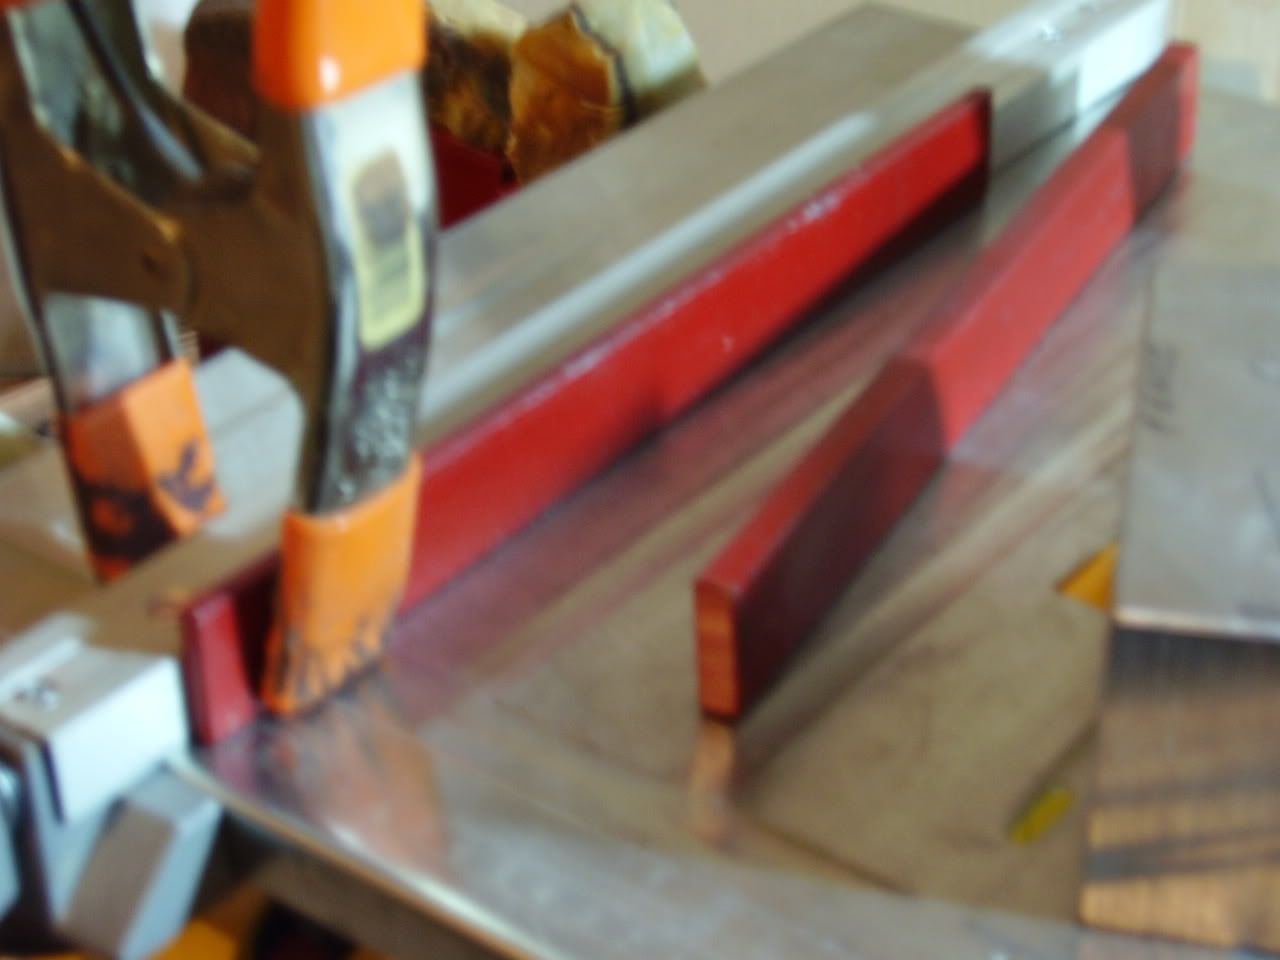
Rockkitten has also developed a unique way to use the stainless steel brick to cut larger rocks without having to move the fence for every cut too!
Check it out!
After you make the first cut with the steel block, and have made the second by flipping it over 180º to get the first slice of stone
, then add a long spacer bar to the fence!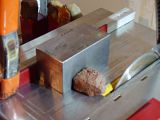
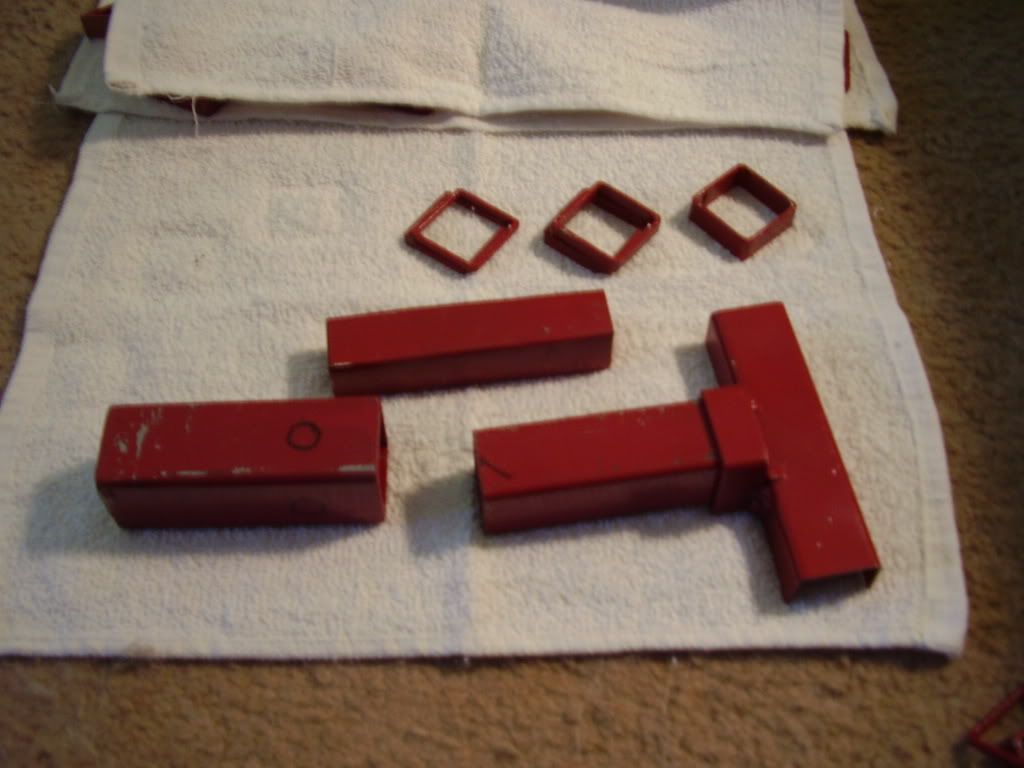
and make your next two cuts to get the second slice of stone.
Then add a second spacer bar,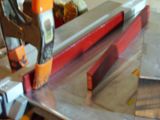
a thicker one if you want, so as to make a larger slice to break up to use for tumbling rough!
I hope that these tutorials have been as helpful as they are meant to be.
I really want to thank Rockkitten from the bottom of my Keds for letting me use the jigs and then publish these tutorials on how to USE her jigs. Now, maybe, when she's done rebuilding her entire home from scratch, starting with those homemade shelves, she'll be able to come to this page and read along while she learns how to use her own creations since it will be years between the time she created them and then used them!
(Just a little kidding there Sieg... but then again Oliver can back me up now, can't he?)
Ta-da! Now folks, I hope that this tutorial has been informative and at least a little(?) entertaining by yours truly? Anyway, I enjoyed working with this new jig from Rockkitten and setting the "workings" of it in this tutorial for all of you.
--------------------------------------
Now folks, what I need from you at this time is to hear if there is any interest in these jigs. Are they something that you would be interested in having as an addition to your Workforce? Is there interest for a jig like these for other saws that work with a fence?
I know that advanced users can cut stone freehand on the Workforce, and do a fantastic job. But, for beginners like me and Novices using these jigs really make cutting slabs, strips and shapes that much easier and safer for us.
-----------------------------------------------
Remember this:
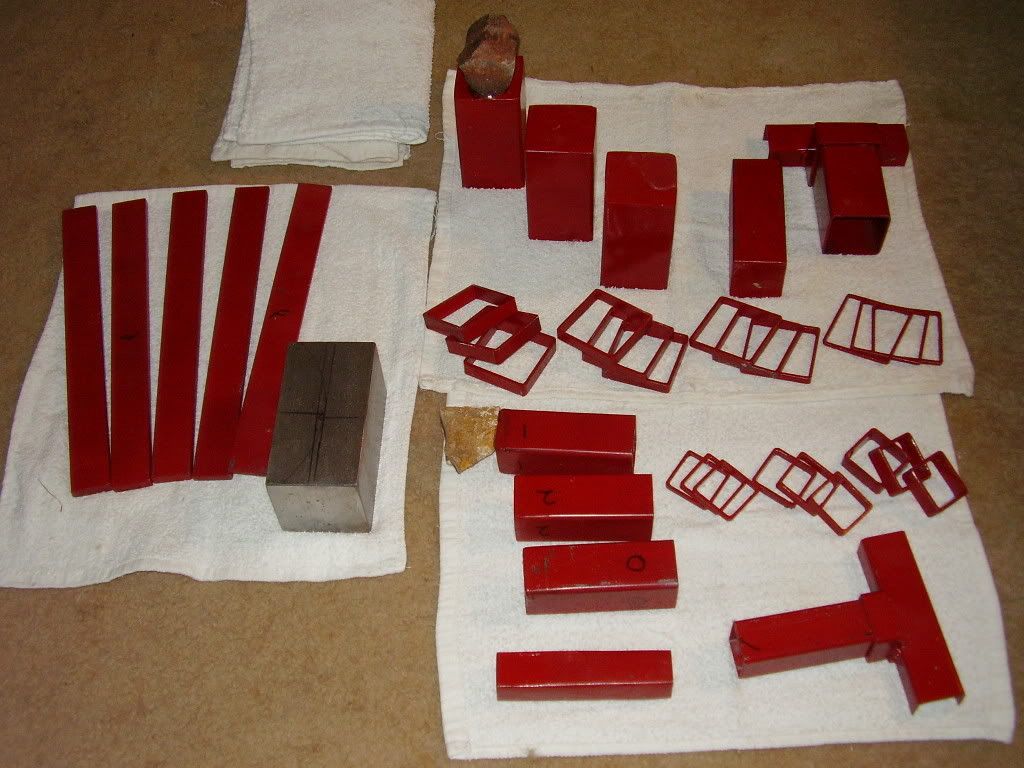
There would be several different versions of the jigs.
Ranging from the Basic model which just has the jig, one sleeve, one set of spacers (1 half inch spacer, 2 quarter inch spacers, 2 eighth inch spacers), (add the 3/8" spacer with the Basic version of the larger jig), one sleeve weight;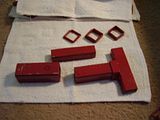
all the way up to the Deluxe model which would include the small jig, the large jig, 3 sleeves for each jig, sleeve weights for each, full set of spacers for each jig which includes 3 spacers of each size (large jig has 4 different spacers 1/2, 3/8, 1/4, 1/8, the steel brick jig along with the different sizes of the fence spacers.
All this and every combination in between.
This is what we need to know. Is there an interest in the jig and the different sets? For now we just need to know is there a great enough interest to persue the jigs, make improvements where needed etc. Please post your answers here, also any concerns you might have etc.
And yes, they would be available in different colors including your favorite College team colors.
So, let's hear from the RTH family! The more input the better the results.
------------------------------------------------
I hope that you can see the many different things that can be accomplished using these 3 jigs (the brick I believe was Stoners invention. Rockkitten just came up with the spacing bars that you clamp onto the fence to make it easier to cut more slices without moving the fence so often), and that you will help by adding your comments, suggestions, questions etc.
But, if you would rather not post your comments or questions on the board you can PM me and I will get back to you as soon as I can. --Joe
---------------------------------------------------------------
One last thing.....................
I have to put my two cents in here. Several people of the RTH family have really helped me. At first all I had to tumble was some rock friends of my brother in law sent me. And they sent rock that was more suited for collecting than for polishing. So, I had to buy from places online or the "refill kits" for the 8oz machines. And most of you know that's a crap shoot. So, some really wonderful and generous people in the RTH family sent me several boxes which helped me become a little more "rock rich" than I was before. A lot of you out there have experienced this wonderful feeling of "Christmas" out of season! But, because of my disability I'm not able to get out to hike and hunt the North Carolina mountains like I would love to do. When my wife and I do go out and rock hunt it usually costs me three of four days of bed rest. That's a pain I can live without! So, these wonderful people that have sent me tumbling rough, stones to cut, and some to collect have been a real boon to me. And by sending me those rocks they've made a friend for life in me.
But, before- the small rough to tumble was all that I could use. But, some rocks they sent I could either break up with my cold chisels or my larger maul. But using the maul I lose a lot of rock. But, the chisels are a little better since I don't lose too much material that way. But, with Rockkittens jigs I can now cut up the larger stones using my Workforce saw. And I'm now able to cut smaller rocks, an ounce or two into slabettes then into strips and shapes. And I can cut these same shapes out of rocks that can weigh up to a half pound using the small jig! And with the larger jig I should be able to slice up a rock that weighs up to a pound or more! But, I haven't cut any rock yet using the larger jig, but I do have a stone glued and ready to go. It's about a pound of rock but I want to put on a new Husky blade before I go cutting it. I'll come back here and post the results of how easy or NOT easy it was to cut the larger, heavier stone using the large jig. It's to be used more or less like the steel brick making the first cut, flipping the sleeve and then making the second cut. And those of you who like using the steel brick to cut your rock, having those spacing bars to clamp onto the fence really helps cutting more than one slice of rock at a time.
So, thanks to people like Cher, Inflight22, Condor, Conrock, Gemmaster, Stoner, and Saber52 (who answers my rock questions), Karen and others that I may have forgotten please forgive me, they have really made my new life of rock, minerals, and Gems a much nicer place to live. And now Rockkitten has made it even easier to take advantage of the gifts I've received and the rocks I have purchased "at rock bottom prices" from RTH members. So, I want to thank you one and all..from the bottom of my heart.
Joe
Now, the first thing you want to do is dress properly so as to protect your eyes and your clothing. I wear glasses so I have to cover them with Safety glasses so I'm able to use the bifocal portion when using the saw.
So, I use disposable coveralls,
 And a pair of large protective glasses so I can still wear my glasses and not chew off any fingers I might need for counting later on.
I also think you should wear ear plugs, or like me, I wear either ear phones for the I-pod listening to music, or headphones that let me listen to the TV! It's amazing how much noise is generated when cutting stone.
Now, to begin you must glue the rock to the sleeve. I use the Loctite products. They have several varieties of epoxies to suit your needs and your preferences.
You also need a small disposable cup to mix the epoxy. Some people will just mix it on a flat surface but I find it much easier and safer to use the little cup and the small wooden "coffee" stirers. Make sure your rock is clean and has at least one flat side. I'm using a different rock to show you this step so we won't have to wait the 24 hours I like to wait for the epoxy to be truly set. Plus the directions tell you to wait 24hrs before using machines or sanding.
Mix up the epoxy, then apply a good quantity to both the rock and the sleeve.
Press the stone firmly onto the sleeve making sure that it is exactly where you want it to be.
Then wipe off the excess epoxy.

Now go out and play! Do the things that someone like me, a person out on 100% disablity for the rest of their lives would go out and do!!

Now we'll pretend that 24 hours are past. Most people wouldn't wait that long to start cutting. But, the way I feel about it is: if I'm going to be depending on a glue I'm going to give it the best chance at working I can. And the directions advise no sanding or machine work for 24 hours and I'm going to follow the directions! At least when I can find the directions! Plus I've tried sawing early and it's amazing how far a rock can fly when it really wants to! But, it really must want to.
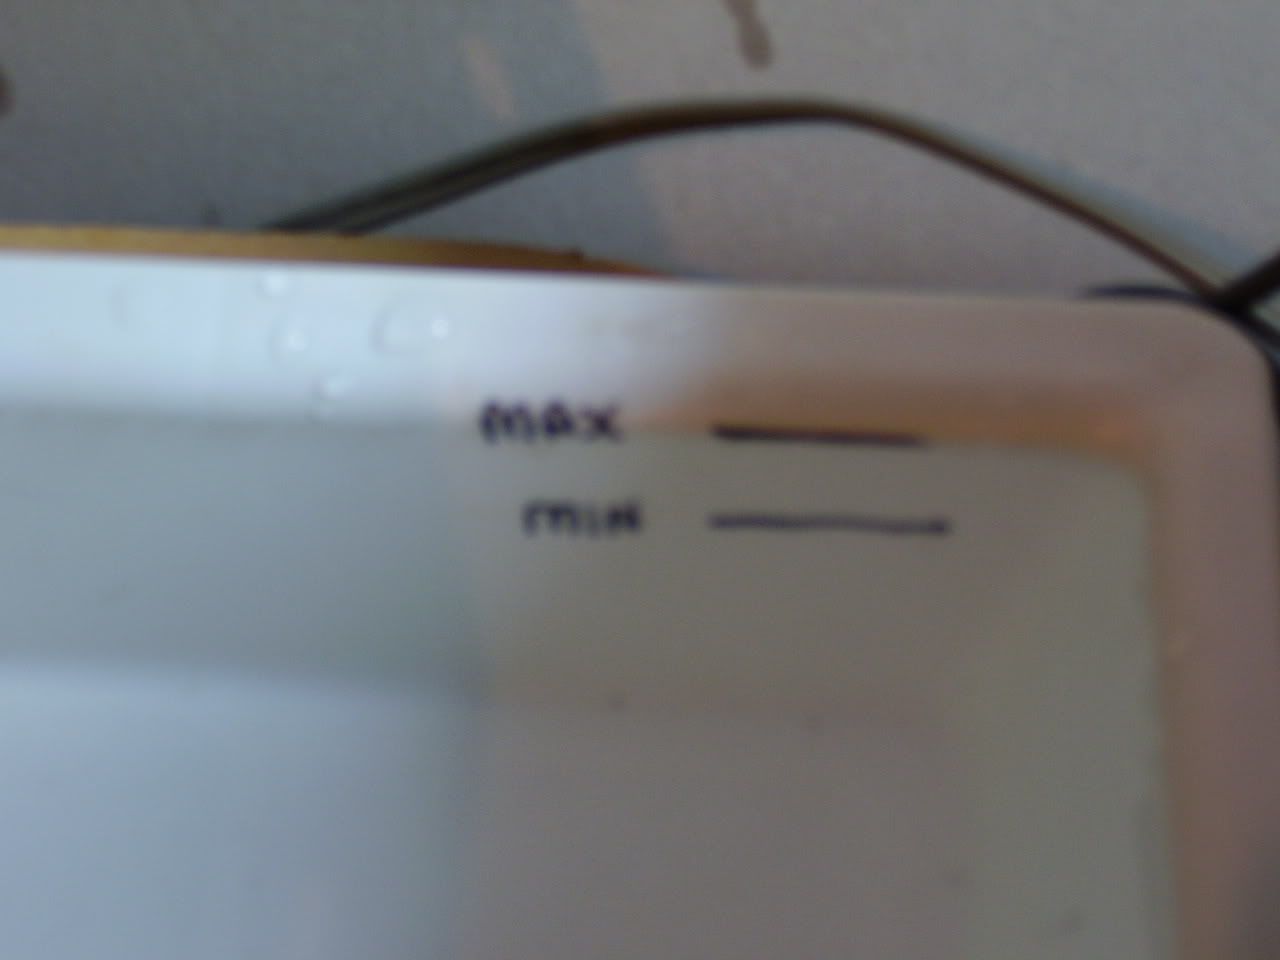
Now you need to set up your Workforce saw. Fill up the reservoir to the max! This type of saw will work best with a full reservoir.
Set up the fence with your jig on the fence with the sleeve and stone on the jig. Line up the stone to the blade for your first cut. Measure the distance between the fence and the front edge of the blade and between the fence and the rear edge of the blade. They both MUST be the same! Or you won't get a paralell cut and could possibly jam the stone between the blade and the jig.
Remove the sleeve off of the jig and insert the weight which will help you hold the stone down onto the table of the saw.
Turn on the saw and make that first cut.
Pull the jig back and turn off the saw and remove the sleeve. Place the 1/2" spacer on the jig. (I'm using the 1/2" spacer because I'm going to be using this for tumbling rough. If I were going to want to create a slabette for polishing I would use the smaller 1/4" spacer or maybe even the smaller 1/8" spacer.) Replace the sleeve and turn the saw back on and make the second cut.


And so far we've made 2 cuts and have 2 pieces of stone.
Continue by placing a second spacer on the jig, make the cut, turn off the saw, remove the sleeve and place on the third and final 1/2" spacer. If you only have 2 - 1/2" spacers then place two 1/4" spacers to compensate. Make the final cut.
Pull the jig back, turn off the saw.
The final piece of stone is still glued onto the sleeve. Take your 1/4" cold chisel and place it between the stone and the end of the sleeve and tap lightly
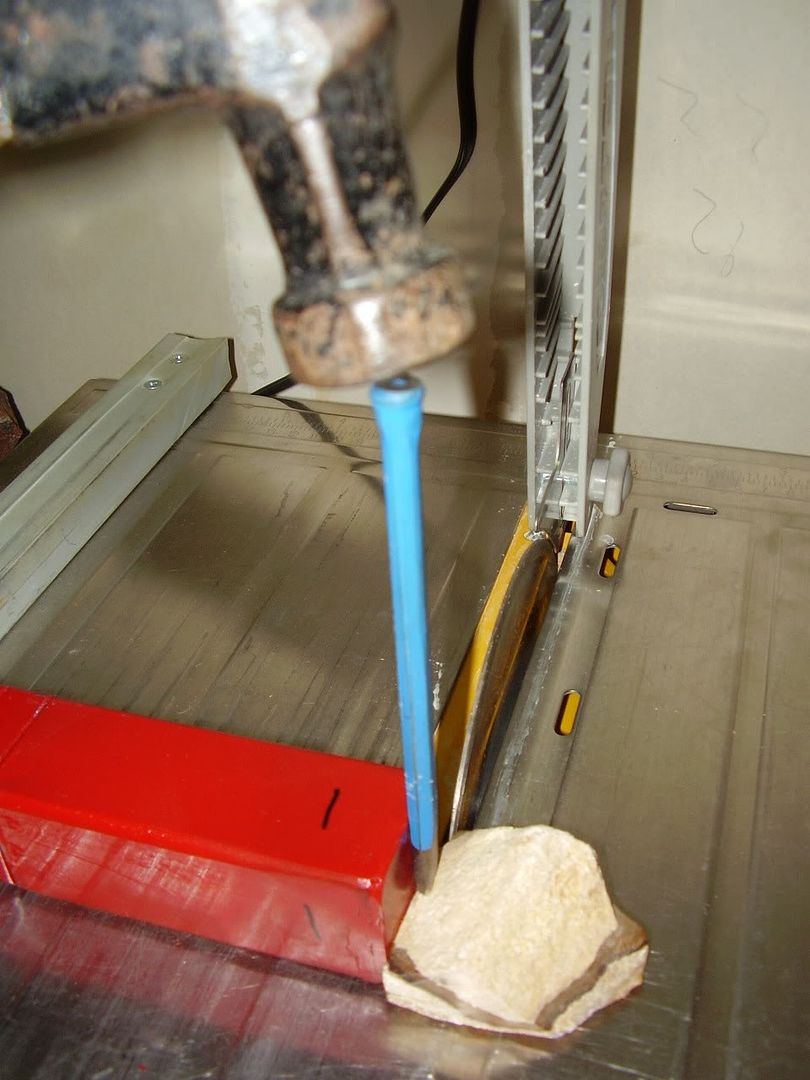
and the stone will go flying off the end of the sleeve, bounce off the table of the saw and fly across your shop till it comes to rest under the heaviest piece of machinary you own! And with all that dirt and all those dust bunnies under there there is no way you'll be able to get that thing out of there without having a ton of crap stuck to it! But, that's the great thing about rocks...THEY CAN GET DIRTY! THEY COME FROM THE GROUND IN THE FIRST PLACE!
Actually it will probably fly off the saw hit you in your tummy and land at your feet chipping off a small piece from the end.
Here's a picture of the actual stone I cut using Rockkittens' (Sieg's) Workforce Fence Jig:
And another picture
showing that because two, (the ones to the far right), of the pieces are wider than an inch and a half, then I'll probably break those with a cold chisel to get them down to tumbling rough size.
That's all for the Tutorial for the Workforce Fence Jig. You may now rewind the film for others to view.
-----------------Stainless Steel Brick Tutorial-----------------------------
Rockkitten has also developed a unique way to use the stainless steel brick to cut larger rocks without having to move the fence for every cut too!
Check it out!
After you make the first cut with the steel block, and have made the second by flipping it over 180º to get the first slice of stone
, then add a long spacer bar to the fence!

and make your next two cuts to get the second slice of stone.
Then add a second spacer bar,
a thicker one if you want, so as to make a larger slice to break up to use for tumbling rough!

I hope that these tutorials have been as helpful as they are meant to be.
I really want to thank Rockkitten from the bottom of my Keds for letting me use the jigs and then publish these tutorials on how to USE her jigs. Now, maybe, when she's done rebuilding her entire home from scratch, starting with those homemade shelves, she'll be able to come to this page and read along while she learns how to use her own creations since it will be years between the time she created them and then used them!
(Just a little kidding there Sieg... but then again Oliver can back me up now, can't he?)
Ta-da! Now folks, I hope that this tutorial has been informative and at least a little(?) entertaining by yours truly? Anyway, I enjoyed working with this new jig from Rockkitten and setting the "workings" of it in this tutorial for all of you.
--------------------------------------
Now folks, what I need from you at this time is to hear if there is any interest in these jigs. Are they something that you would be interested in having as an addition to your Workforce? Is there interest for a jig like these for other saws that work with a fence?
I know that advanced users can cut stone freehand on the Workforce, and do a fantastic job. But, for beginners like me and Novices using these jigs really make cutting slabs, strips and shapes that much easier and safer for us.
-----------------------------------------------
Remember this:
There would be several different versions of the jigs.
Ranging from the Basic model which just has the jig, one sleeve, one set of spacers (1 half inch spacer, 2 quarter inch spacers, 2 eighth inch spacers), (add the 3/8" spacer with the Basic version of the larger jig), one sleeve weight;
all the way up to the Deluxe model which would include the small jig, the large jig, 3 sleeves for each jig, sleeve weights for each, full set of spacers for each jig which includes 3 spacers of each size (large jig has 4 different spacers 1/2, 3/8, 1/4, 1/8, the steel brick jig along with the different sizes of the fence spacers.
All this and every combination in between.
This is what we need to know. Is there an interest in the jig and the different sets? For now we just need to know is there a great enough interest to persue the jigs, make improvements where needed etc. Please post your answers here, also any concerns you might have etc.
And yes, they would be available in different colors including your favorite College team colors.
So, let's hear from the RTH family! The more input the better the results.
------------------------------------------------
I hope that you can see the many different things that can be accomplished using these 3 jigs (the brick I believe was Stoners invention. Rockkitten just came up with the spacing bars that you clamp onto the fence to make it easier to cut more slices without moving the fence so often), and that you will help by adding your comments, suggestions, questions etc.
But, if you would rather not post your comments or questions on the board you can PM me and I will get back to you as soon as I can. --Joe
---------------------------------------------------------------
One last thing.....................
I have to put my two cents in here. Several people of the RTH family have really helped me. At first all I had to tumble was some rock friends of my brother in law sent me. And they sent rock that was more suited for collecting than for polishing. So, I had to buy from places online or the "refill kits" for the 8oz machines. And most of you know that's a crap shoot. So, some really wonderful and generous people in the RTH family sent me several boxes which helped me become a little more "rock rich" than I was before. A lot of you out there have experienced this wonderful feeling of "Christmas" out of season! But, because of my disability I'm not able to get out to hike and hunt the North Carolina mountains like I would love to do. When my wife and I do go out and rock hunt it usually costs me three of four days of bed rest. That's a pain I can live without! So, these wonderful people that have sent me tumbling rough, stones to cut, and some to collect have been a real boon to me. And by sending me those rocks they've made a friend for life in me.
But, before- the small rough to tumble was all that I could use. But, some rocks they sent I could either break up with my cold chisels or my larger maul. But using the maul I lose a lot of rock. But, the chisels are a little better since I don't lose too much material that way. But, with Rockkittens jigs I can now cut up the larger stones using my Workforce saw. And I'm now able to cut smaller rocks, an ounce or two into slabettes then into strips and shapes. And I can cut these same shapes out of rocks that can weigh up to a half pound using the small jig! And with the larger jig I should be able to slice up a rock that weighs up to a pound or more! But, I haven't cut any rock yet using the larger jig, but I do have a stone glued and ready to go. It's about a pound of rock but I want to put on a new Husky blade before I go cutting it. I'll come back here and post the results of how easy or NOT easy it was to cut the larger, heavier stone using the large jig. It's to be used more or less like the steel brick making the first cut, flipping the sleeve and then making the second cut. And those of you who like using the steel brick to cut your rock, having those spacing bars to clamp onto the fence really helps cutting more than one slice of rock at a time.
So, thanks to people like Cher, Inflight22, Condor, Conrock, Gemmaster, Stoner, and Saber52 (who answers my rock questions), Karen and others that I may have forgotten please forgive me, they have really made my new life of rock, minerals, and Gems a much nicer place to live. And now Rockkitten has made it even easier to take advantage of the gifts I've received and the rocks I have purchased "at rock bottom prices"
 from RTH members. So, I want to thank you one and all..from the bottom of my heart.
Joe


 Al Falfa


