maryann
starting to spend too much on rocks

Member since February 2007
Posts: 145
|
Post by maryann on Mar 3, 2007 19:21:24 GMT -5
Ok, that was just great. Maybe I should know, but what kind of grinder is that - a bench grinder? And as for holding the stone, a friend recommended using a vise grip or something like it. Haven't tried it yet though.
|
|
maryann
starting to spend too much on rocks
Member since February 2007
Posts: 145
|
Post by maryann on Mar 3, 2007 19:23:18 GMT -5
Wait - I just saw the pic of the Lortone grinder!! Ya hoo! Bet that's a couple of pennies! Very cool - may have to get one...
|
|
wwwriondocom
starting to shine!

Member since February 2007
Posts: 45
|
Post by wwwriondocom on Mar 9, 2007 21:33:35 GMT -5
Thanks for the pictures. It helps me see how the cabs are made. You guys have a great skill.
|
|
free4rms
freely admits to licking rocks
 My little pet walrus
Member since January 2007
Posts: 839
|
Post by free4rms on Mar 10, 2007 0:20:44 GMT -5
Hey John....great tutorial! Do you mind if I throw in a tip that might help some newbies? I often bevel my pendants like you did in your tutorial, and when I first made some beveled pendants, the upper edge of the bevel (where it met the flat face of the pendant) would sometimes become slightly rounded. And I think the sharper edge on the upper bevel makes a pendant look nicer. So I discovered that by polishing the entire face of the pendant first, and then making the beveled edges last, the upper beveled edge stayed sharper. Of course, an alternative would be to do the face of the pendant on a flat diamond lap after the beveling was done, but that just entails having more equipment on hand.
Another tip that saves some time is to use the very outer edge of the hard diamond wheel to create the bevel on a pendant. If you hold the preform at an angle against the edge of the wheel and use a light pressure as you move the stone along the edge, you can "shave" a beveled edge around the entire outer edge of the stone. The shaved edge will not be totally precise, but it will remove enough material that the time it will take to finish fine tuning the beveled edge will be greatly reduced.
If you want some photos of how to shave the edge of the preform on the edge of the wheel, let me know and I will post some.
As a side note to offbeat bill: Those money-counting finger tips you were talking about? If the ones that were too small made your finger tips go to sleep, that may not be such a bad thing. At least you won't feel the intense pain if the diamond wheels go through the protectors and eat into your finger tips!
Vance
|
|
stefan
Cave Dweller 
Member since January 2005
Posts: 14,095
|
Post by stefan on Mar 12, 2007 10:59:38 GMT -5
Vance- I love your idea on the bevels- If you get a chance could you post some pictures- I think I understand how to do it- but a picture or 2 would be great!
|
|
|
|
Post by sandsman1 on Mar 12, 2007 11:30:26 GMT -5
i just noticed this came back up i thought this post was gone forever --- vance yes if you have a tip or an easyer way to do any part of this yes please post it with pics if pos. i can always use new pointers/tips and if anyone reads this post any more for pointers it will be here also ---the way i see it is my way is just my way haha the way i fig. it out dont mean its the right way or the easest haha --- go for it man id like to see your way
|
|
free4rms
freely admits to licking rocks
My little pet walrus
Member since January 2007
Posts: 839
|
Post by free4rms on Mar 12, 2007 16:18:44 GMT -5
As requested, I have posted a few photos here to illustrate how to grind a beveled edge on a freeform stone, using the edge of a hard diamond wheel. I am using a piece of Bruneau jasper to show what it looks like, since the color of the jasper shows up the beveled edge the best. I am doing this on a 40 grit Turbine wheel made by Crystalite. It is an expensive wheel, but it is the best investment I ever made. It eats the hardest agate faster than you would believe and the wheel lasts forever. I have not used this technique on any other hard wheel, but I think it will work on any hard wheel, but only as fast as the coarseness of the grit will allow. One reason I think it works so well is that the diamonds on the very outer edge of the wheel are never used unless you try something like this. And the angular edge of the wheel plus the diamonds on the edge makes for an aggressive grinding surface. First of all, make sure you have a lot of water lubrication on the wheel, and keep a firm grip on the piece of agate you are using. Hold the agate at the angle shown in the picture and lightly scrape or "shave" the piece of agate towards the wheel, away from your fingers. You will feel the edge of the wheel bite into the agate and as you slide it along the edge of the wheel, you can actually feel it shaving away the agate. Move it along the edge at a fairly slow rate, watching carefully to see how much of an angle you are shaving. Move the agate as straight as you can to avoid a wavely beveled edge. This first photo shows the angle you want to hold the stone against the wheel: 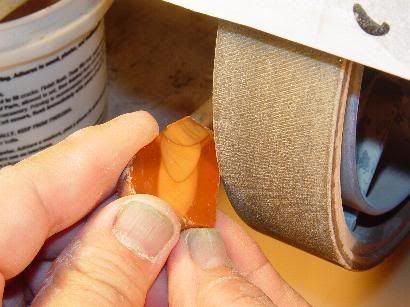 This second photo shows what the beveled edge looks like when you are holding it at the correct angle and moving forward slowly in a straight line: 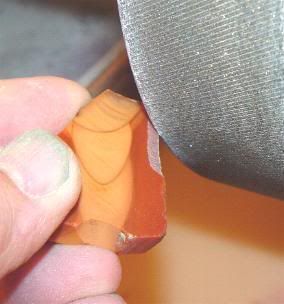 This shows what the beveled edge looks like as it is partly finished. Look at how nice and straight the bevel can be: 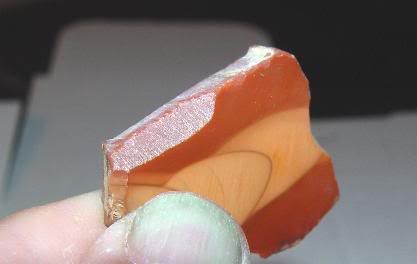 And finally, here is what the piece of jasper looks like beveled on two sides of the face of the freeform: 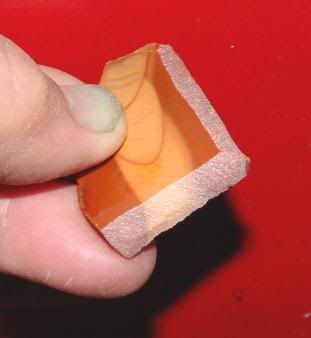 This piece of Bruneau took probably two minutes maximum to make the bevel you see. Can you imagine how long it would take to grind that much off, and to grind it that straight? Needless to say, this can be a great time saver. It can be done on oval cab shapes, too. Again, the speed of the "shaving" will depend on how coarse the wheel is, and it may vary according to the brand of wheel you are using. I just haven't tried it on any other type of wheel, so you will have to experiment for yourself. I hope this has been useful to everyone. |
|
stefan
Cave Dweller
Member since January 2005
Posts: 14,095
|
Post by stefan on Mar 12, 2007 17:48:47 GMT -5
Exactly what I pictured!!! thanks!
|
|
blarneystone
spending too much on rocks
Rocks in my head
Member since March 2010
Posts: 307
|
Post by blarneystone on Jun 6, 2007 20:53:05 GMT -5
Bump for Rocky
|
|
RockyBlue
fully equipped rock polisher
 Go U.K.
Member since June 2006
Posts: 1,719
|
Post by RockyBlue on Jun 7, 2007 1:37:32 GMT -5
Thanks John for the tutorial,now i know what to expect when i start making a cab.........Rocky
|
|
|
|
Post by rocklicker on Jun 7, 2007 2:28:23 GMT -5
I remember this tutorial. It's one of the ones that helped me get into cabbing!
free4rms, do you think that making the bevel that way grinds down the edge of the wheel too fast? I've accidently done that a few tomes but stick to just grinding a bevel with the flat part of the wheel because I thought it would hurt the wheel. I use a different type of wheel, one without knotches. That does seem to be the most aggressive part of the wheel for sure.
Steve
|
|
|
|
Post by stoner on Jun 7, 2007 18:40:12 GMT -5
It won't hurt the wheel Steve. That's how I grind my fish shapes, using the edge of the wheel.
|
|
Deleted
Deleted Member
Member since January 1970
Posts: 0
|
Post by Deleted on Jun 8, 2007 1:30:14 GMT -5
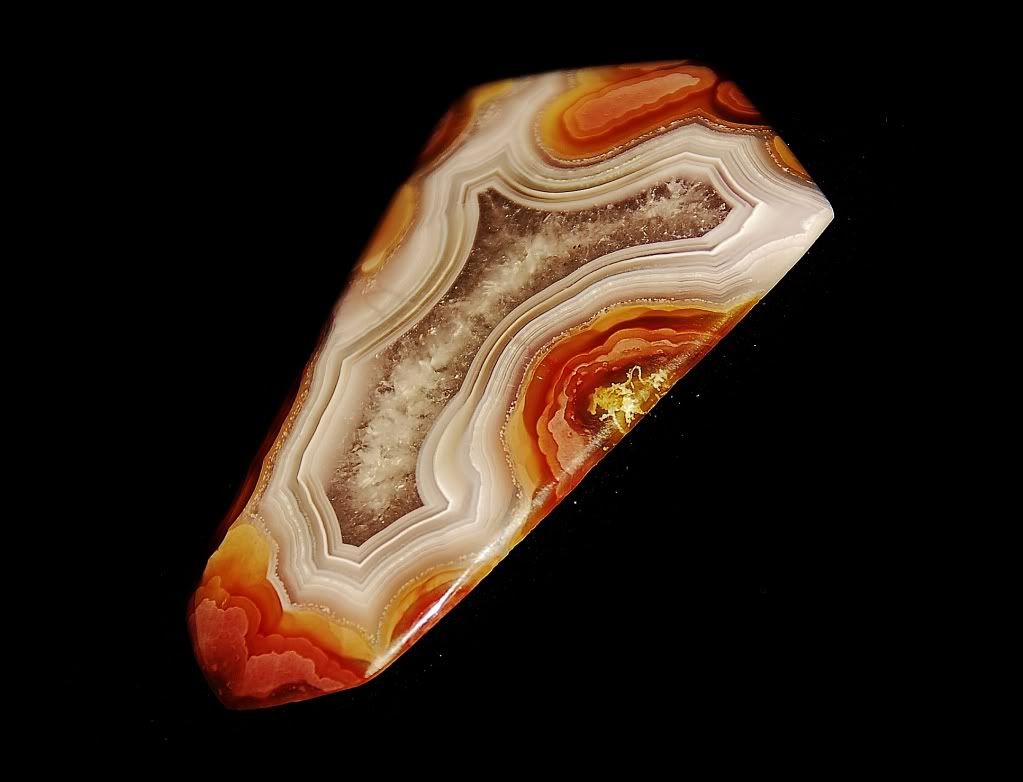
it is such a nice looking rock.
Nathaniel
|
|
|
|
Post by Tonyterner on Jun 14, 2007 14:43:28 GMT -5
Thanks for the exellent tutorial. Now all I have to do is figure out how to do this without a cabbing machine. Sometimes being a cheap Pennsylvania Dutchman is really annoying.  |
|
TByrd
fully equipped rock polisher
Have you performed your random act of kindness?
Member since December 2010
Posts: 1,350
|
Post by TByrd on Jan 1, 2011 22:50:03 GMT -5
Thank you so much for this post, I really worked on a cab today but, I need to purchase a 1200 grit belt. I am very excited.
Tammy
|
|
|
|
Post by Bikerrandy on Jan 1, 2011 23:02:24 GMT -5
Wow, this post is a blast from the past, back when we were "all" learning!! Still great info  |
|
|
|
Post by sandsman1 on Jan 3, 2011 4:55:41 GMT -5
dam i was still livin in philly when i did this has to be close to 5 years old haha -- i just threw my genie hoods and trays in the dish washer they look pretty good again if anybody has some stained up trays give it a try
|
|
|
|
Post by NatureNut on Jan 3, 2011 7:32:53 GMT -5
This thread is a classic! It should be stickied.
|
|
unclestu
Cave Dweller
WINNER OF THE FIRST RTH KILLER CAB CONTEST UNCLESTU'S AGUA NUEVA AGATE
Member since April 2011
Posts: 2,298
|
Post by unclestu on May 20, 2011 14:49:32 GMT -5
SEEK AND YE SHALL FIND......
It took me a while of going through a lot of posts to find this thread. It didn't come up in the search for some reason. It was well worth the effort in searching for it. Thanks for making it and tthanks to all of you who added to it.
You should really make this a STICKY
Stu
|
|
|
|
Post by sandsman1 on May 21, 2011 11:16:39 GMT -5
ok i feel wierd stickin my own post --- ill see how it feels then decide haha
|
|


 You're down here in the bilges with the wharf rats. You will get more mileage above on the upper decks.