10thumbs
spending too much on rocks
 I want to be reincarnated as a dog.
Member since March 2009
Posts: 480
|
Post by 10thumbs on Apr 8, 2009 19:08:10 GMT -5
The three valves on my recently acquired used GP6 seem to do almost nothing. They are very stiff too. Do I need to change out the water tubes or valves?
|
|
rallyrocks
fully equipped rock polisher

Member since November 2005
Posts: 1,507
|
Post by rallyrocks on Apr 8, 2009 20:51:25 GMT -5
They are just little needle valves, if you back one all the way out you can see how they just screw in and kind of wedge off the water flow.
Let me run downstairs and take some pictures, hopefully your rig will look a lot like mine....
|
|
rallyrocks
fully equipped rock polisher
Member since November 2005
Posts: 1,507
|
Post by rallyrocks on Apr 8, 2009 21:12:35 GMT -5
So from the outside; here is what one of the valves backed all the way out should look like; 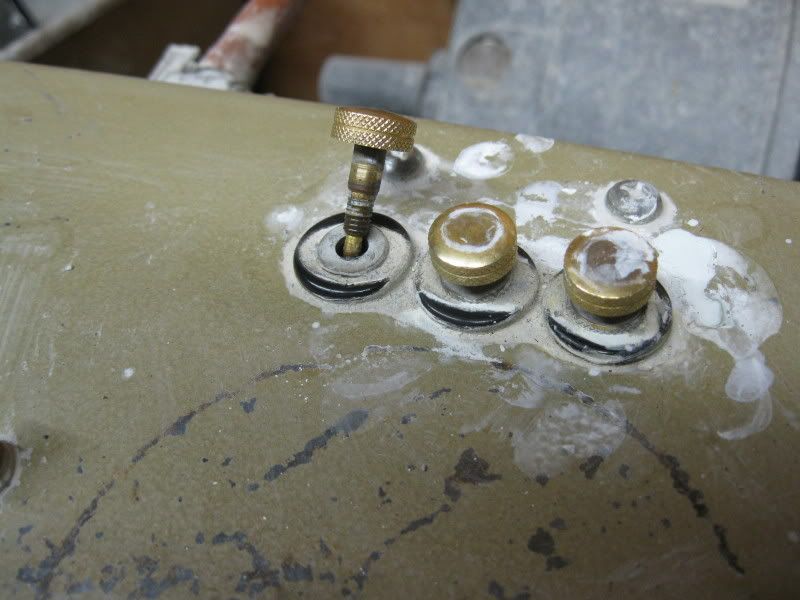 (and yeah they can be pretty stiff especially after sitting a while, you might need to open them with pliers a time or two, maybe apply a little lubricant, but being brass they should last a long time without needing to be replaced) but you were asking about the tubing- here is a quick view under the hood; 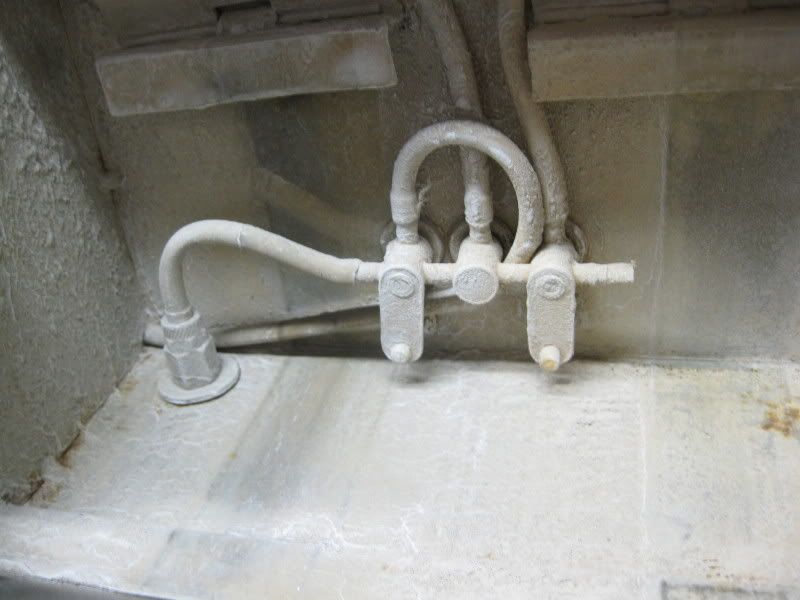 You can see the hose from the outside comes on on the left there and feeds the valve line from which a tube runs out to each of the splash shields (or whatever they are) 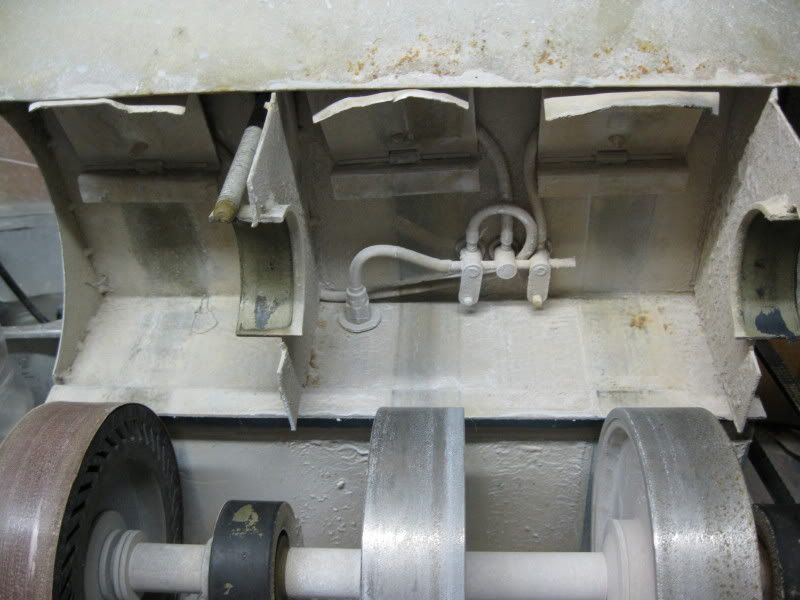 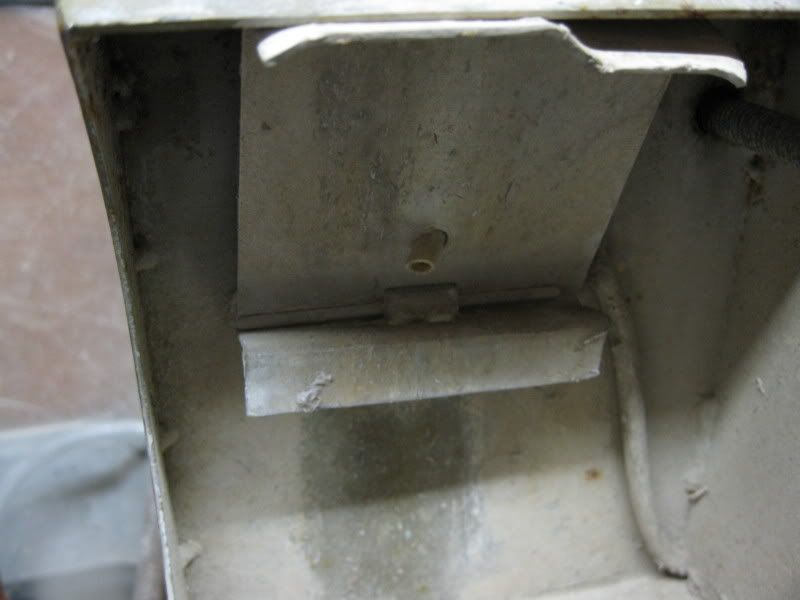 And here is how mine gets its water, a small submersible fountain pump sitting in an old food service stainless pan; 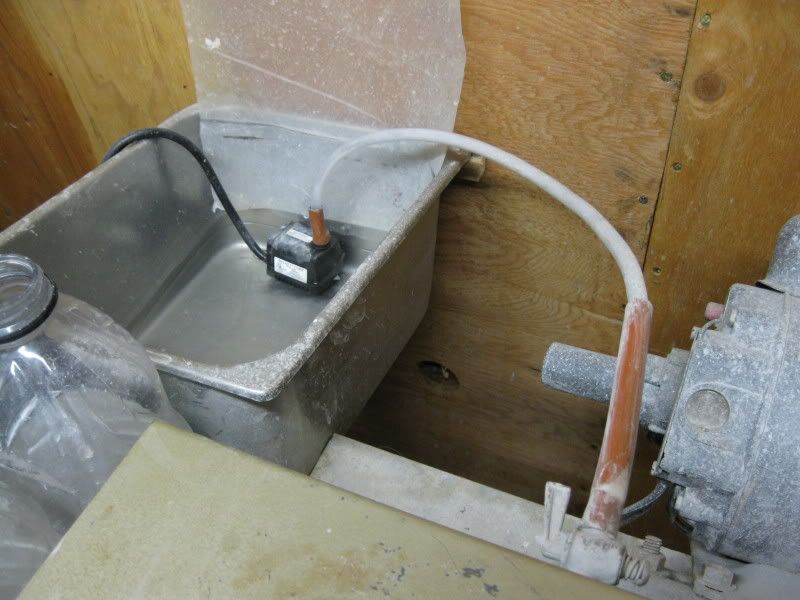 |
|
10thumbs
spending too much on rocks
I want to be reincarnated as a dog.
Member since March 2009
Posts: 480
|
Post by 10thumbs on Apr 9, 2009 11:12:09 GMT -5
Wow, I can't believe you took the time to pull apart your GP6, take those pictures and post them. Thank you so much.
The core issue is no matter how much I loosen or tighten the needle valves it seems to have little or no impact on the water flow. I'd really like to only have water dripping on the wheel that I'm working on and right now I can't do that.
On a side note, I need to rewire my motor as the wheels are spinning the wrong way and shooting water and stone chips at my face constantly. I'll switch the poles on the motor tonight and remedy that.
|
|
10thumbs
spending too much on rocks
I want to be reincarnated as a dog.
Member since March 2009
Posts: 480
|
Post by 10thumbs on Apr 12, 2009 23:05:42 GMT -5
I removed the needle valves and cleaned them up with my Dremel using one of the wire brush bits. I also plugged the plastic tubing than added white vinegar in the needle valve openings. I let that sit in the there for a while than I screwed the needle valves back in and flushed out the vinegar. Adjusting the needle valves still does next to nothing. Has anybody had any problems like this? It is a real pain when by the time I have a decent drip going on the extendo I'm getting splashed by the water gushing out on the grinding wheels.
Also, I don't know precisely how the little plastic flaps above the wheels are supposed to work. I think they're supposed to sag in such a way that the water drips on the wheels. They're not doing crap either. The water drips either onto the adjustable arms or straight into the pan. The wheels still get splashed with water, but so do I.
|
|
10thumbs
spending too much on rocks
I want to be reincarnated as a dog.
Member since March 2009
Posts: 480
|
Post by 10thumbs on Apr 28, 2009 20:46:32 GMT -5
Okay, this has become deeply frustrating. The needle valves provide totally different amounts of flow such that I have to adjust the main valve on the back of the unit as I switch from station to station. If I have the right drip on one station then another station is bone dry and the third is spraying water and soaking me. I don't have any degree of consistency. Those flaps that direct the drops suck too. Do I replace the drip system parts? Do I invest in some other drip method? I've seen the little "squirters" that spritz the wheel that you're working on. It wouldn't be a perfect solution for the GP6 because the extendo and the grinding wheels are separated by a partition.
Any suggestions would be greatly appreciated.
|
|
|
|
Post by johnjsgems on Apr 28, 2009 21:02:06 GMT -5
The reason for three valvesis to have only the wheel you are working on wet. The other two should be off. You need just enough water to avoid grinding dry (you'll see a dry white residue on the wheel if too dry. Overhead water systems tend to be messy since any excess gets thrown toward the operator. A vinyl apron is a good investment. If the little flaps over the wheels are not helping you might need to replace with something a little longer. I've seen inner tubes, canvas, green scrubbies, just about anything. I had clear walk-in cooler curtain strip pieces on my last overhead system but they were only clear until I used them.
|
|
10thumbs
spending too much on rocks
I want to be reincarnated as a dog.
Member since March 2009
Posts: 480
|
Post by 10thumbs on Apr 28, 2009 23:05:24 GMT -5
The reason for three valves is to have only the wheel you are working on wet. The other two should be off. I wish mine worked that way however I can have water flowing from one valve, then completely unscrew another one of the other valves, lay it aside, and water doesn't flow through the valve. It won't even come out the top where I removed the valve until I increase the water pressure. The needle valves at best only serve to very slightly adjust the flow. |
|
|
|
Post by mohs on Apr 28, 2009 23:16:26 GMT -5
You need just enough water to avoid grinding dry (you'll see a dry white residue on the wheel if too dry. wow John !!! you just solved a major befuddlement for me! I couldn't figure out what that white streak was on my silicon carbides wheels were. Doesn't dress away either, because the water flow isn't even. I thought the wheel was loaded up in that area. I get it now! Right on! or rock on Ed |
|
|
|
Post by johnjsgems on Apr 29, 2009 8:31:40 GMT -5
If you have no water coming out you have a plugged line or other restriction. You probably should remove the hoses and see if water goes through them. The stock tubing is pretty small diameter so could be plugged up.
|
|
10thumbs
spending too much on rocks
I want to be reincarnated as a dog.
Member since March 2009
Posts: 480
|
Post by 10thumbs on May 4, 2009 8:46:38 GMT -5
I took the water flow system apart this weekend. I gave the valve system an overnight soak in white vinegar and oxalic acid. I cleaned out all the tubing with pipe cleaners. I can get the valves to seat tightly now however I now think the core issue is the rubber gaskets. They probably need replacing. They're old and a little warped and interfere with getting a tight seal on the needle valves.
|
|
|
|
Post by johnjsgems on May 4, 2009 10:18:13 GMT -5
A lot of my friends are old and a little warped also but that's another issue. I don't know if the seals are available separately. The stainless steel valves in use now are pretty pricey but available. You could also replace with brass needle valves from any hardware store.
|
|
Wolfden
fully equipped rock polisher
Member since November 2007
Posts: 1,368
|
Post by Wolfden on May 5, 2009 10:45:24 GMT -5
can you replace the O-rings ? any hardware store should carry them , just bring in the old ones too match up with .. and tubing which can be found in any fish dept or pet store isnt too pricey new valves could be had there as well ... the plastic ones would even work and are cheap
Wolf
|
|
10thumbs
spending too much on rocks
I want to be reincarnated as a dog.
Member since March 2009
Posts: 480
|
Post by 10thumbs on May 5, 2009 16:34:34 GMT -5
It's not a regular o-ring or flat washer. It is thicker and flanges out on top and below so you can seat the valve system. It seems like it would be a special order but as John stated the new GP6 uses stainless steel valves and no gasket is visible. I don't know if its something they'd make anymore. What I have works but due to the gimpy gasket I have to manipulate the valves with a pliers.
|
|