|
|
Post by akansan on Oct 13, 2009 9:24:30 GMT -5
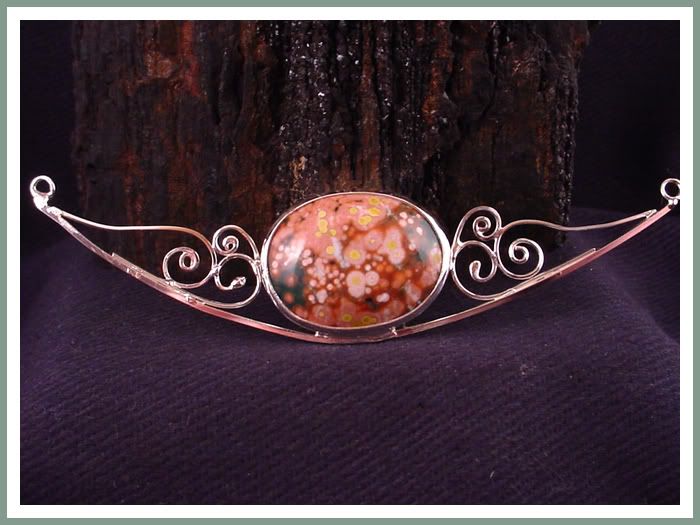
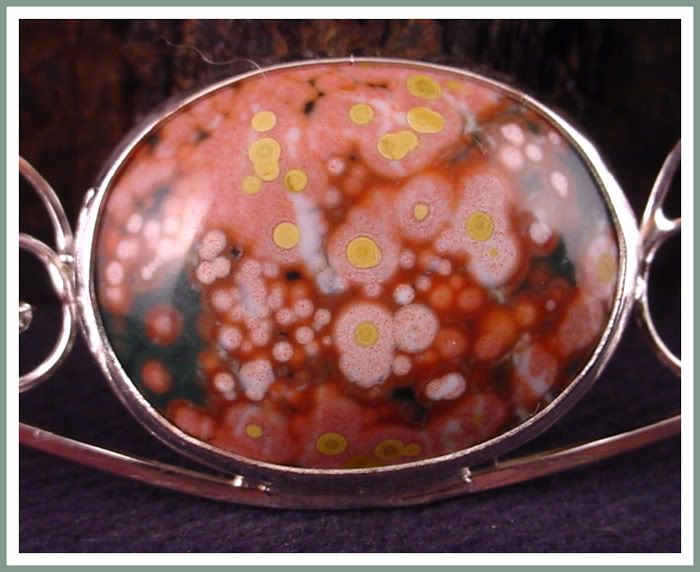
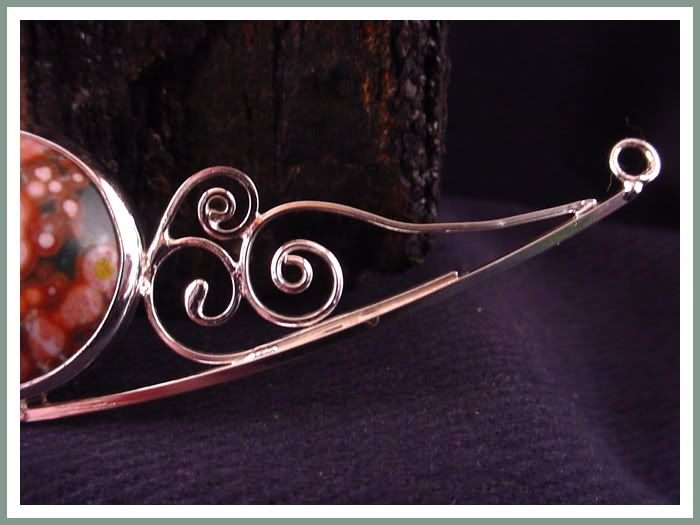
Somehow, for a very practical girl, I make very frilly pieces of jewelry. I'm trying to figure that part out. I still have to cleanup some excess solder on this guy, but I needed to tumble harden it in order to do so. The wires just kept bending otherwise! The right side went together much more smoothly than the left, and the leftover solder speaks for itself! Thought I'd post now, though, while it was all nice and shiny from tumble hardening. This one's been in my design book for awhile, but I didn't feel confidant enough to pull it off yet. Probably should have waited a bit longer! The piece:  The stone:  The "good" side:  Not sure yet what I'll do for a chain - considering chainmaille, black satin cord, silver chain, or stone beads of some kind. Will be playing with that part next! |
|
|
|
Post by Toad on Oct 13, 2009 9:34:42 GMT -5
The piece looks great. Not overly frilly at all. The stone still draws the eye - your metal work accentuates without distracting. Well done.
|
|
drjo
fully equipped rock polisher
   Honduran Opal & DIY Nut
Member since May 2008
Posts: 1,581
|
Post by drjo on Oct 13, 2009 10:22:09 GMT -5
It's your feminine side showing thru  I would have said you just needed a muse, but you didn't say how old the 'girl' was. Very nice work, perhaps you should pull more from your book. Dr Joe . |
|
|
|
Post by rockmanken on Oct 13, 2009 10:40:45 GMT -5
Looks great to me. Love the OJ. Maybe you can bend the curl up on the left side and it won't be as noticable. You do super work.
Ken
|
|
|
|
Post by tkrueger3 on Oct 13, 2009 11:29:01 GMT -5
I think that is outstanding. It's gorgeous with being ostentatious. That's a beautiful cab, and your silver work is darn good.
OK, now I'm curious - you tumbled after doing the scrolls, or before? And what gets "hardened" - the stone, or the silver? That part totally escapes out of my small sphere of understanding. Do you use the same kind of wire we use to "wrap" the stones, but then solder instead of wrapping? Do you use the same type of iron as we use for stained glass work?
Oh, and could we see the "back" side? I'd love to see how it's done.
It makes a beautiful piece, for sure.
Tom
|
|
|
|
Post by Bejewelme on Oct 13, 2009 11:44:30 GMT -5
Ronda:
Dang that is beautiful!!!! If you feel it is foo-foo you can send it to me, LOL!!! What a beautiful piece, you are doing great silver work!!!!!!!!!!!!!!!!!! I Think it would look nice on black satin cord, or velvet! It looks rich!!!!!
Amber
|
|
|
|
Post by Tonyterner on Oct 13, 2009 12:51:40 GMT -5
What a wonderful design. The only way we ever get better is to push ourselves. You are certainly doing that and your skills are growing. Nice work.
|
|
|
|
Post by akansan on Oct 13, 2009 17:10:23 GMT -5
Thank you guys! You're really too kind, and there are plenty of obvious problems with it. I'm learning, though!
Tom - the wire I used here is actually scraps from different wraps I had completed or rejected. The bottom frame is 18g square (from a bracelet attempt), and the scrolly bits are my standard 22g square from my wraps. These are soldered together using a torch and silver solder, rather than the iron used in stain glass.
As for tumble hardening - it's the wire that gets hardened. When you order wire for wrapping, you have a hardness that you order - generally dead soft unless you have fingers of steel. As you bend and shape the wire, it work hardens until is harder than the original dead soft. In the end, you have something between dead soft and hard, depending on how much bending and twisting and straightening you do with it. (There's actually a molecular change happening, but I'm a little fuzzy on those details.) In this case, any hardening that might have happened to the wire was heated out of it (the molecular structure changed when it went under the torch), so this whole piece was dead soft.
In cases like this, you have two options - hit it repeatedly with a rawhide mallet or tumble it with stainless steel shot until it hardens again. (Technically, there's a third choice involving a kiln, but I've never done that.) Tumbling was the easiest answer for me!
|
|
|
|
Post by Bikerrandy on Oct 13, 2009 19:02:37 GMT -5
Thanks to this, I now have something else to learn. lol ... Awesome!  |
|
|
|
Post by Tweetiepy on Oct 13, 2009 21:21:58 GMT -5
That is beautiful - great job on both the stone & the metalwork
|
|
Saskrock
fully equipped rock polisher
  
Member since October 2007
Posts: 1,852
|
Post by Saskrock on Oct 13, 2009 23:50:43 GMT -5
Very cool piece. Nice work
|
|
|
|
Post by connrock on Oct 14, 2009 4:51:12 GMT -5
Well it fer sure ain't no knife!!
One thing it is though,,,,Beautiful!!!
For what it's worth I have never made ANYTHING that I thought couldn't have been done better.
The good side of this is that I always strive to get better.
The down side is that I get sooooooooooooo picky I sometimes work myself into a tizzy!
In learning (which I still am and ALWAYS will be) I have melted as much or more silver then I have soldered successfully striving for that perfect joint.
Something that may help you is to take your scrap wire and keep soldering it together.
Just lay one piece next to another as if it were the real thing and go at it.
This helps you to learn how get the joints perfectly joined with no light showing through them,how to hold the pieces for soldering,how much solder it takes for any given joint,how much heat is needed for any temp solder,how much flux is needed,how far a tiny piece of solder will flow and much more.
Then do the same thing but this time bend the pieces and "mate" them.Try to make one circle of wire sit perfectly inside another and solder it all the way around so it looks like it one piece of silver.
Purposely leave a small "glob" of solder on a joint and try different methods of making it disappear without harming the "finished" product.
Experiment with different buffing compounds such as Zam,Tripoli,etc.Use these on a big buffer and also on a rotary tool with the small buffing pads.
Practice annealing small wire so it will bend easier,clean it, solder it and then harden it.
Try "butt" fusing two pieces of wire together as in a soldered jump ring without the solder!!!
You can do all of this with scrap and if you're anything like me you have PLENTY of it.
PLEASE,PLEASE,PLEASE DO NOT think I am a know-it-all or even come close to being a jeweler because I AM NOT either of them.
I'm just a ham-n-egger who's trying to help you through all of the mistakes I make.
LOL,,,,and they talk about patience in tumbling!!!!!
Good luck!!
connrock
|
|
|
|
Post by Toad on Oct 14, 2009 7:27:26 GMT -5
How do you know when the metal is no longer dead soft?
|
|
|
|
Post by sitnwrap on Oct 14, 2009 8:00:08 GMT -5
That design is stunningly beautifully elegant. The scrolls on either side are a perfect match for that gorgeous stone. WTG with taking a design that you have been wanting to create and bringing it to reality. That had to make you smile.  |
|
|
|
Post by akansan on Oct 14, 2009 8:53:09 GMT -5
Connrock - thanks! Those steps make absolutely, positively, perfectly sensible sense! So far all the experimenting I've done has been with pieces. I've not even thought to experiment with my scrap first and try different joins! (Yeah, roll your eyes at me now...) What killed me about this was the right side just went together lickity-split. The left side (the second side I did) just DIDN'T want to go together. Everything was done exactly the same...except the results (which means SOMETHING wasn't exactly the same...). Toad - the only way I know how to tell the metal is no longer dead soft is it doesn't bend as easily. In this case, I tested the small top wires to see if they still bent as I was removing one of the pesky solder blobs that Tom saw. (  ). Dead soft can be easily bent with your fingers. Half-hard would take a lot more strength with your fingers, but is easily bent with pliers. Hard requires strength and pliers. |
|
|
|
Post by Toad on Oct 14, 2009 9:06:28 GMT -5
So trial and error, eh? Thanks. Don't know if I'll ever get around to cabbing, but would really like to try metal at some point.
|
|
|
|
Post by connrock on Oct 15, 2009 7:15:17 GMT -5
I would say that the joints you don't like happened because you didn't heat them enough and let the solder flow. I don't know what temp solder (s) you're using but on a piece like this one I would say you could use either all high or medium solder. If I may,,,,,,, I think the piece would look much better if the mating pieces were soldered entirely instead of only being soldered in a few places.You can practice making the solder flow where you want it to go with you scrap.  I forgot to add that knowing how much solder to use also enters into the equation.Too much and you have a lot of cleaning to do.Too little and you joints will look "starved" and be weak. And you thought you were making all that scrap fer nothin!! lol Good Luck...OOPS,,,,I have a "hand out" that a silversmith(Mr.Will Smith) uses for his classes.If you would like a copy of it you can email me as it's in pdf form.PLEASE make the subject of your email rock,jewelery, er sutthin like that. tom_kuzia@sbcglobal.net connrock |
|
|
|
Post by connrock on Oct 15, 2009 7:17:31 GMT -5
Toad,
Don't wait to get into metal work,,,do it NOW!!
I waited to "create" in metal until I retired 2 years ago and wish I could have retired at age 16 so I could have enjoyed it sooooooooooo VERY much all my life.
connrock
|
|
|
|
Post by Toad on Oct 15, 2009 8:04:07 GMT -5
Will as soon as I can, Tom. Want to get the tumblers rolling again first - metal will be next.
|
|
|
|
Post by frane on Oct 18, 2009 8:46:01 GMT -5
Oh, that is very pretty! I will look forward to seeing what kind of chain, strap, you use to complete the necklace. Right now I am just in awe of your smith work and that beautiful cab!
Fran
|
|