sticksinstones
starting to spend too much on rocks

Member since February 2012
Posts: 117
|
Post by sticksinstones on Feb 24, 2012 21:02:57 GMT -5
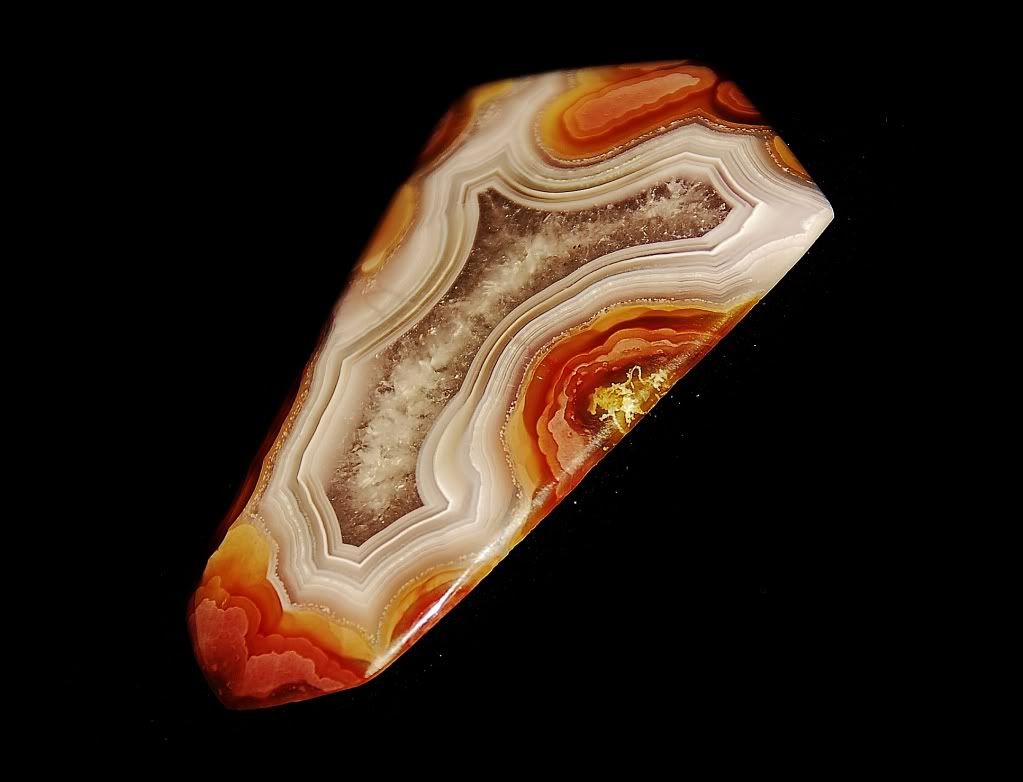
A couple of years ago a miner was bringing in a new stash of Mexican lace agate. It was the first time I'd seen the red shades appear in any newly mined rough and I was excited to buy some. After purchasing about a barrel full I spotted one very large boulder sitting over by the vendor's booth (this was Tucson). I asked him about it and he said he'd sell it, but not cheap. I had to think about it for a day but eventually went back and bought it. It was almost a year before I cut it, and the slabs were pretty impressive. Here's a roughly 12" tall slab I recently finished and gave to a friend:  I have the rest of that boulder on the kitchen counter right now having just glued it to a piece of cardboard to turn around and finish cutting. Looking forward to getting it back into the saw and see what else it has waiting for me! |
|
rockingthenorth
fully equipped rock polisher

Member since January 2012
Posts: 1,637
|
Post by rockingthenorth on Feb 24, 2012 21:07:34 GMT -5
now that is a pretty slab.
|
|
|
|
Post by helens on Feb 24, 2012 21:11:37 GMT -5
Whoa... where are you finding these incredible stones? How big is that btw:)?
|
|
sticksinstones
starting to spend too much on rocks
Member since February 2012
Posts: 117
|
Post by sticksinstones on Feb 24, 2012 21:42:08 GMT -5
Whoa... where are you finding these incredible stones? How big is that btw:)? I purchased the rough directly from the guy who did the digging (I believe that was the story at least). I don't remember his last name, but his first name is Tom and he's a dealer out of Washington state. He has a booth at Electric Park in Tucson. He's the same guy who brought in a lot of new Agua Nueva agates a couple of years ago as well. Those turned out to be mostly duds in my experience, but the lace was good. That particular piece is around 12" tall. I've still got more slabs of it to polish and will be gluing the rest of the boulder into the saw later this weekend so there should be a fair number of slabs out of it yet. |
|
shermlock
has rocks in the head

Member since August 2011
Posts: 612
|
Post by shermlock on Feb 24, 2012 21:53:18 GMT -5
Beautiful!
Scott
|
|
unclestu
Cave Dweller  WINNER OF THE FIRST RTH KILLER CAB CONTEST UNCLESTU'S AGUA NUEVA AGATE
Member since April 2011
Posts: 2,298
|
Post by unclestu on Feb 24, 2012 21:54:56 GMT -5
Wow Steve that has got to be the nicest Crazy Lace slab I have seen it is by far the biggest. Quantity and quality a rare find indeed.
Stu
|
|
geostew
starting to shine!

Member since September 2011
Posts: 42
|
Post by geostew on Feb 24, 2012 22:29:27 GMT -5
Very nice banding and dogtooth patterns! what a beauty!
|
|
NDK
Cave Dweller
Member since January 2009
Posts: 9,440
|
Post by NDK on Feb 24, 2012 22:38:56 GMT -5
Bobby1 would cab that sucka!
Nate
|
|
|
|
Post by roy on Feb 25, 2012 1:28:41 GMT -5
nice slab ! do you need anymore friends lol!!
|
|
|
|
Post by Donnie's Rocky Treasures on Feb 25, 2012 8:43:57 GMT -5
Beautiful, awesome & very impressive!
|
|
|
|
Post by Hard Rock Cafe on Feb 25, 2012 9:16:12 GMT -5
I love crazy lace and that is a fantastic slab. I'm curious, though: why do you glue it to cardboard?
Chuck
|
|
Fossilman
Cave Dweller
Member since January 2009
Posts: 20,687 
|
Post by Fossilman on Feb 25, 2012 11:00:47 GMT -5
Crazyyyyyyyyyyyyyyyyyy!
|
|
sticksinstones
starting to spend too much on rocks
Member since February 2012
Posts: 117
|
Post by sticksinstones on Feb 25, 2012 11:58:03 GMT -5
I love crazy lace and that is a fantastic slab. I'm curious, though: why do you glue it to cardboard? Chuck It's a yield trick. Would probably be just as relevant to anyone else who cuts with oil regardless of saw size. If you have a rock you want to slab, you clamp it and starting cutting all those gorgeous slabs, but when you finally cut the last one you still have a big chunk of rock in the vise. It might be small or large, depends on how you had to grab hold of it. Set it aside and start slabbing your next rock. Once you have cut enough slabs off your latest project to have sufficient cross travel to accommodate the left over heel, get a rag with a little degreaser (I keep some in a spray bottle) and wipe the face of the cut stone still in the clamp clean with it. Do the same for the face of the left over heel. Now wipe a paper towel saturated with acetone across both faces (you might not need both methods of cleaning but I keep a gallon of acetone sitting around for this trick). Now take a clean, rigid piece of cardboard (that hasn't been exposed to moisture and doesn't have a bunch of sticky labels on it or anything) and cut it to be roughly the size of the two stone faces (the heel can be a smaller face than the clamped rock but be cautious going the other way around and gluing a bigger face to a smaller one in the clamp). I will take the heel and lay it on the cardboard and trace the shape with a pencil, then I use medium thickness CA (cyanoacrylate) and drizzle some around on that traced out pattern. Then I hit the rock face with accelerator and quickly slap it down flat on the cardboard (hence the kitchen counter). It's firm in a few seconds, and then I take it out to the rock saw and drizzle glue on the other side of the cardboard and hit the rock in the saw with the accelerator and slap it on and hold it a few seconds until it sets. Be careful not to let the added rock sit too low relative to the face of the one you're gluing it to or you could run into trouble clearing your saw blade arbor. If the bottom of each stone is at about the same height you're just about right. Now I back off my cross feed X number of turns for each slab I want until the blade is pointing at the last interesting cut from the heel and I start slabbing all over again. You can use a regular carpenters hand saw to cut down through the cardboard to separate the two pieces (I don't run my rock saw blade through there or I'd just mar one of my slab faces). I usually leave the two slabs glued together with the cardboard between them and count on their soak time in the degreaser and their trip through the oven to be de-oiled to weaken the cardboard enough to pull them apart. The first time I saw this I thought it was nuts - but cutting oil doesn't weaken the cardboard and it's shear strength is incredible. I've hung 150 lb. petrified wood log heel off the end of another cut stone with this trick no problem. The Crazy lace heel I've just glued on probably weighs 40 lbs. still. The only times I've ever had it fail were when I used cardboard I'd kept out in the shop or cut up a really poor quality bent up box or something. Use good clean new cardboard and it works very reliably. You can always test the bond by grabbing the now suspended heel and trying to wiggle it. If there's any flex with the rock in the vise at all then think about re-doing it all. The advantage of the technique is that it's fast and cheap and it works a lot better than a saw vise "slab grabber" type set up because the last slab you cut (the one glued to the cardboard) will be PERFECTLY flat and mated to the existing stone in the vise giving you no slabs with any taper whatsoever from the stone. It also imparts a great deal of flexibility in how you cut a rock. Not sure if you want to cut it in half or do slabs? Now you can start with a cut through the center instead of the end and decide if you're wasting time or not. If it looks good, glue the big chunk you cut off to a piece of cardboard, re-assemble your rock and start slabbing! Don't try it with water based lubricants as the cardboard will degrade before the first cut is finished, but with oil you can take days to finish the cutting with no issues. In face I sometimes have a large pile of these heels and I end up gluing to slabs that are themselves glued to other rocks. My record was five pieces of cardboard sandwiched between successive slabs before I finally cut the whole thing off and put it in the degreaser. There can be a tiny bit of play in the cardboard so I don't recommend going that far unless you're using something like the thinner cardboard in the postal service flat rate boxes. Maybe I'll take a picture of this and put it in the tips section if this isn't something anyone here has covered before. |
|
elementary
fully equipped rock polisher
Member since February 2006
Posts: 1,077
|
Post by elementary on Feb 25, 2012 12:23:07 GMT -5
That is incredible! I love that design!
I would like to ask permission to copy the write up of your technique and publish it in our club's newsletter. I think others would be interested in knowing this trick.
Thanks for sharing,
Lowell
|
|
|
|
Post by mrswtownsend on Feb 25, 2012 13:06:57 GMT -5
I like crazy lace quite a bit, this is gorgeous!
|
|
sticksinstones
starting to spend too much on rocks
Member since February 2012
Posts: 117
|
Post by sticksinstones on Feb 25, 2012 13:24:33 GMT -5
That is incredible! I love that design! I would like to ask permission to copy the write up of your technique and publish it in our club's newsletter. I think others would be interested in knowing this trick. Thanks for sharing, Lowell Of course. Have at it. |
|
sticksinstones
starting to spend too much on rocks
Member since February 2012
Posts: 117
|
Post by sticksinstones on Mar 2, 2012 12:34:53 GMT -5
Here are some pics to help illustrate the technique. Note that the stone is about a 30 lb. chunk of Crazy Lace agate and that is a 36" blade. I've done this with pieces well over 100 lbs. on my bigger saw. The exact mating of faces in terms of size or shape isn't critical, just so long as there is pretty good surface area overlap. I've probably overdone the glue here, but I really liked this rock and wanted to make sure it held on what is a fairly crumbly piece of junk in the clamp that I'm gluing too. The rock face of the piece in the clamp has just been cleaned with degreaser and wiped over with a paper towel and acetone. Once the acetone evaporates, I hit it with a few spritzes of CA accelerator then slap the cardboard face to it in a hurry and hold it there maybe 30 seconds until it sets good, making sure the bottom edge doesn't go any lower than the clamp.     Now just crank your vise back over and start taking slabs off the far end. Last slab will be perfectly flat and uniform, no tapered slabs anywhere out of the rock and maximum yield. Enjoy! |
|
unclestu
Cave Dweller
WINNER OF THE FIRST RTH KILLER CAB CONTEST UNCLESTU'S AGUA NUEVA AGATE
Member since April 2011
Posts: 2,298
|
Post by unclestu on Mar 2, 2012 16:15:09 GMT -5
Does this guy know how to cut or what. Wow what a great technique
Stu
|
|
Don
Cave Dweller
He wants you too, Malachi.
Member since December 2009
Posts: 2,616
|
Post by Don on Mar 2, 2012 16:44:12 GMT -5
Very nice technique, thanks for sharing it!
|
|
rocpup
spending too much on rocks
Pink Limb Iris
Member since March 2011
Posts: 465
|
Post by rocpup on Mar 4, 2012 8:51:50 GMT -5
They say you are never to old to learn.
What a great idea to be put in the Short Cut Handbook. You say the cardboard will last a long time in oil. My question is would it last for more than one gluing to the clamped rock that still has the last slab hanging on it? I have many faced rock that would cut more nice slabs. When I have used accelerator on super glue the reaction has happen real fast. I was wondering what type or brand you are using?
BTW great crazy lace. Tom always has nice nice rock.
Don
|
|


 Drifting along with the tumblin' tumbleweeds
