|
|
Post by apesandmonkeys on Jul 26, 2013 11:50:24 GMT -5
Hello Rockstars! I just finished up my batch of Labradorites and clearly, I did something wrong. They do not look polished and in fact look rather dull and since this was my first batch of Labs, I'm well aware that it's my fault and I did something wrong. My recipe was the following: **3 weeks of 60/90 grit, changing once a week ** 8 days of 120/220 **500 Pre-polish 8 days ** 2 days of 1000 grit AE (recommended on the Rockshed, but no specific measurement amount given, so I added 4 TBS, which was equivalent to the Pre-Polish recipe ** 11 days of AO Polish **12 hours of Burnishing They appear dull and while I grasp that they have lots of fractures that Labs so often do, is there a way to salvage their shine? Should I repeat the polishing steps? Any help/advice would be appreciated, as I love Labs and want to keep tumbling them; I just want to know what I did wrong and learn from it  Also, I'm unable to add my pics on this thread, not sure what to do :/ s220.photobucket.com/user/apesandmonkeys/media/photo-117.jpg.htmli220.photobucket.com/albums/dd108/apesandmonkeys/photo-119.jpg.htmli220.photobucket.com/albums/dd108/apesandmonkeys/photo-118.html I'm not a computer guru, but if you copy/paste these links above, they'll go to the pics |
|
Steve
has rocks in the head

Member since June 2005
Posts: 506
|
Post by Steve on Jul 26, 2013 12:26:10 GMT -5
My quick guess is that you did not use enough cushioning, such as plastic pellets. Your labradorite looks pretty beat up.
Your only hope is to start over from the beginning, the very beginning, a very good place to start.
|
|
|
|
Post by deb193redux on Jul 27, 2013 1:06:23 GMT -5
yes, ceramic or plastic pellets.
not sure some of those should have left course. deep creases. but, they needed to be in medium longer too.
|
|
|
|
Post by apesandmonkeys on Jul 27, 2013 2:57:15 GMT -5
I actually DID use pellets, sorry, I didn't mention that! Plastic PVC pellets, for each process, too...And I was actually worried that I might have OVER-filled the barrel with pellets... Should I use ceramic pellets next time? Any advice is appreciated |
|
|
|
Post by Toad on Jul 27, 2013 4:18:17 GMT -5
As Daniel said, they don't look like they were roughed out well. And as Steve said - back to the beginning.
Was this done completely in a rotary tumbler. Did you change pellets between stages? Plastic pellets can hold onto grit and so you can be contaminating later stages with previous grits.
Also, if you're new at tumbling, set the lab aside and try something easier first - like agate or jasper.
|
|
|
|
Post by rockpickerforever on Jul 27, 2013 9:33:44 GMT -5
Hello, apesandmonkeys, welcome. I'll leave the tumbling specifics to the experts, but I can help you with getting your photos to post. When you get the links on photobucket, use the "Direct" one. They should look like this: i220.photobucket.com/albums/dd108/apesandmonkeys/photo-117.jpgi220.photobucket.com/albums/dd108/apesandmonkeys/photo-118.jpgi220.photobucket.com/albums/dd108/apesandmonkeys/photo-119.jpgClick on insert image in the icons to the upper right (I can see you already figured out how to link a URL), and paste the info in. There is already an "http://" in the box, make sure there's only one in there when you are through. Your photos will show as you create the post. If they don't you did something wrong. Good job of resizing the photos. Here they are: 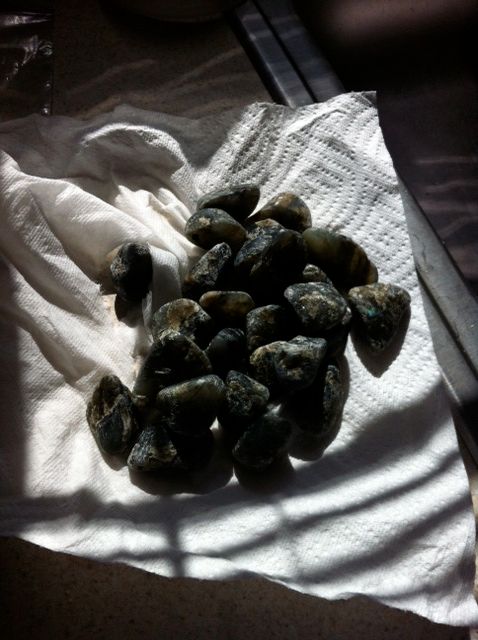 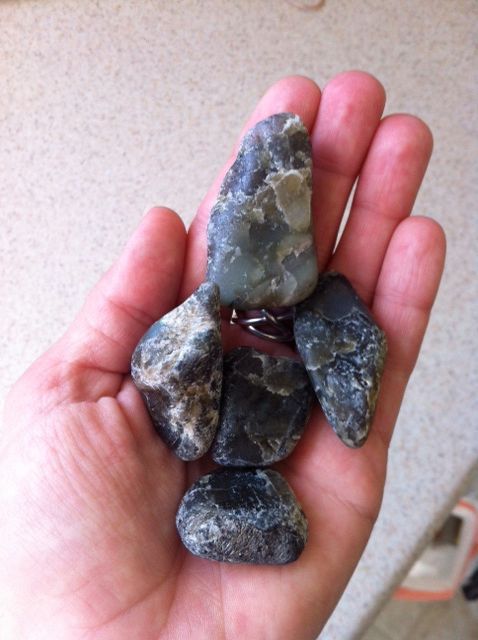 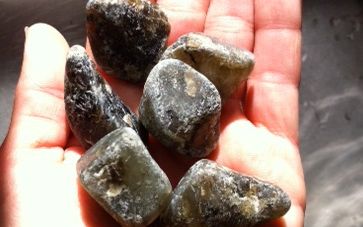 Personally, I'd try something much easier than labradorite for my first tumble, too. With practice, you'll get this in no time. There are a lot of people on here that can help you along the way. Jean |
|
The Dad_Ohs
fully equipped rock polisher
 Take me to your Labradorite!!
Member since September 2012
Posts: 1,860
|
Post by The Dad_Ohs on Jul 27, 2013 10:30:29 GMT -5
I remember when I did my first batch of Lab.... it was also my LAST TOO!!!!
Lab is at best difficult to do if you are not an accomplished tumbler... in fact even then it can be "rough"
My batch came out just like yours did and went back to course for a long time!
My suggestion, due to the very nature of Labradorite, is to go back to the 2nd stage (120/220) and let them go for awhile.
(min 2 wks with recharges every couple (2-3) days and a grit change at the end of each week.)
if you have access to a grinder I would lightly remove the cracked parts if you want b4 tumbling or leave them and they should go away after awhile, some will stay depending on depth of the crack, and make sure you add more pellets, plastic or ceramic, each time you open the container to check on it to allow for loss from tumbling action.. this is the part that gets most people, they forget to allow for the rocks getting smaller as they tumble and don't add more pellets.
1 more thing... do not, under any circumstance, expect perfect stones with tons of shine and color...... it just doesn't happen!!
What you see in the pictures, as much as we would all love to have the perfect stone that shines at all times and all angles, if photography in action.. we always strive to show the best part of the stone or the nest stones from each batch, and the truth is that not every stone is that good.
The quicker you come to grips with that the easier/better your tumbling will be.
I don't want to seem a buzz kill, but tumbling is a learning process... one that you never stop being a student of.... I learned a lot from the great people here and one thing I definitely learned... I have a lot to learn!!!!
Don 't get discouraged by a set back.. I some good looking stones there and it is just question of time and you will be turning out beautiful pieces to rival the people here!!!
Keep the faith ...... ROCK ON !!!!
|
|
|
|
Post by apesandmonkeys on Jul 27, 2013 11:28:24 GMT -5
Thank you so much for everyone's input and assistance with the photos, too  I did switch pellets with each tumble and I go so far as to categorize pellets for EACH stage of the tumble, not just grit/polish... Before the Labs, I had a beautiful lot of Amethyst that came out shined and polished wonderfully, so I know that was done right! These Labs won't discourage me, in fact it just inspires me, more to master them. I wish that I had access to a grinder, but I don't; it does appear, however, that the Labs should go back to the 120/220 tumbling stage for awhile. **When you say "recharges every 2-3 days", what does that mean, specifically? I love Labradorite and appreciate its variety..I certainly am aware they all don't have "flash" but I can see underneath the dullness of this batch that many of these stones have some great color and are trying desperately to display it =D And like I said, I LOVE tumbling and there isn't any silly Lab or other stone that will discourage me I cannot emphasize enough how much I appreciate everyone's feedback, thank you SO much!!!! Rock on! |
|
The Dad_Ohs
fully equipped rock polisher
Take me to your Labradorite!!
Member since September 2012
Posts: 1,860
|
Post by The Dad_Ohs on Jul 27, 2013 15:29:07 GMT -5
A recharge is when you just add more grit to the tumbler without cleaning it out.
what this does is creates a slurry of ground down grit and rock then helps slow the movement of the rocks and the grit by thickening the "water" that is in there to begin with.
After i tumble rocks through the 1st 2 stages I save the slurry and put it in a plastic tub and set it out to dry/evaporate. When that is done I collect the resulting powder and keep it in a jar that I then use whenever I start a new batch. I use about 1-2 large spoons of the slurry powder instead of grit in the tumbler, add my grit, water, and away it goes. the slurry powder has grit and small/tiny pieces of rock in it. My tumbles are much better this way.
good luck and us know how you make out!!
|
|
rollingstone
starting to spend too much on rocks

Member since July 2009
Posts: 236
|
Post by rollingstone on Jul 27, 2013 16:49:17 GMT -5
Oh dear. Now that I see the photos, I think the problem with your labradorite is that the rough is no good. Tumbling will work wonders on good quality stones, but it can't do much for bad rough. I had posted for you earlier some select finished lab. pieces I did years ago... I never kept pics of the rough, but below is a photo of the entire batch rather than just a few select close-ups. You don't see a flash on most of these stones because that only happens when they are orientated in the right direction, but you also don't see all the cracks and pits that you see in your stones. Tumbling can't remove a crack, and if it pit runs deep or is connected to other pits throughout the stone, tumbling can't help there either. IMHO that rough will never work out for you, and your best option would be to move onto something different. If you really want to run lab., find a source of quality material. (I could try to find where I got mine from, but it was 6 or 7 years ago so they may not carry rough from the same source anymore, if the rock shop is even still open). Sorry. -Don 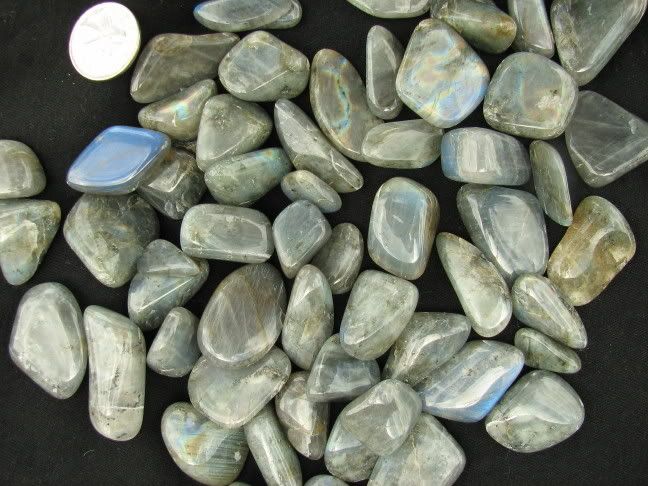 |
|


 I did switch pellets with each tumble and I go so far as to categorize pellets for EACH stage of the tumble, not just grit/polish... Before the Labs, I had a beautiful lot of Amethyst that came out shined and polished wonderfully, so I know that was done right! These Labs won't discourage me, in fact it just inspires me, more to master them. I wish that I had access to a grinder, but I don't; it does appear, however, that the Labs should go back to the 120/220 tumbling stage for awhile.