|
|
Post by snowmom on Jul 13, 2014 7:18:29 GMT -5
Ok, I tried to do a search but doesn't work, evidently it reads lot-o as "lots of" and I couldn't find my tree for the forest... I remember reading in an earlier thread that Lot-O required the bottom of the bowl to be filled with epoxy or something... I understand about making the base secure and how much noise it is going to make... Wanted to take care of the bowl thing before I try to use it... also, an explanation why this is a good idea (I suspect I know the answer ). Super excited to use the knowledge you all have been spoon feeding me here. I am so glad this board is here, I know it will save me hours of frustration. Thanks in advance, I know you all will have answers to my questions! |
|
Deleted
Deleted Member
Member since January 1970
Posts: 0
|
Post by Deleted on Jul 13, 2014 7:26:59 GMT -5
I believe people fill the dimple in the bottom of the bowl so they can use 60/90 grit.ive had my dual lotto for going on three years,never filled the dimples and it has polished many,many, many a load perfectly
Dave
|
|
|
|
Post by Jugglerguy on Jul 13, 2014 7:34:54 GMT -5
Hey, you got a tumbler! Did you get a rotary too?
I'm pretty sure 60/90 grit is a bad idea in the Lot-O whether the hole is filled or not. I filled the hole with epoxy because I kept getting pieces of ceramic jammed in it heart at I had to dig out. I put the epoxy on a stick by swirling it around and then let it fall off the stick at the bottom of the bowl. It worked perfectly and hasn't come out.
|
|
|
|
Post by snowmom on Jul 13, 2014 9:31:45 GMT -5
I have ordered a Lot-O, it is on its way. super excited! I will hold off on rotary tumbling for the moment since so much of what I find is already smoothed by the lake. I don't mind texture, but want to make sure the stuff is shiny so I can see beyond the beating the rocks have taken by the glaciers and the lake. There is no doubt a rotary too, in my future... but not at present (I know that is backwards from what has been recommended by most on the board). thanks for the input, what sort of epoxy did you use, the 2 part liquid type?
|
|
|
|
Post by Jugglerguy on Jul 13, 2014 11:19:29 GMT -5
Yes, as far as I know all epoxy is in two parts.
|
|
junglejim
spending too much on rocks

Member since January 2014
Posts: 344 
|
Post by junglejim on Jul 13, 2014 12:48:02 GMT -5
This is the first I heard about filling the dimple on the loto. I didn't fill mine and the first two batches look fine. I'm leaving mine alone. I think the Envirotex Lite resin that I use in my resin molds would work in the Loto if you decide to fill in the bottom. It's a two part epoxy. Full cure in three days depending on temperature, less in warmer weather.
|
|
|
|
Post by snowmom on Jul 13, 2014 14:26:29 GMT -5
Rob, I have used clay like epoxy extensively for sculpting, it dries a little more waxy and not as glass like as
the liquid types. You must have used that stuff that comes in the tubes or a hypodermic type of container rather than the stuff in rolls or bars that you mix in your hands... right? did you just fill the dimple to the top or just below the edge of the cup bottom? Or did you slightly overfill?
|
|
|
|
|
|
Post by Jugglerguy on Jul 13, 2014 19:11:12 GMT -5
I used the liquid kind that comes in two bottles: resin and hardener. I filled it almost all the way up, but there's still a slight depression. Come take a look at mine if you want to. Have you primed and painted your concrete block and filled the holes yet? If you need paint or primer, I have lots of half pails from old projects. Have you considered doing a tower of blocks? A lot of people do that to avoid bending down to check it. The bending never bothers me though.
|
|
|
|
Post by snowmom on Jul 13, 2014 19:34:09 GMT -5
nope, don't even have the blocks yet, but we'll get 'em soon! thanks!
|
|
swiper
having dreams about rocks

Member since June 2014
Posts: 64
|
Post by swiper on Jul 22, 2014 20:28:35 GMT -5
Working on this also. Filled the dimples in the lotto today and filled holes in a concrete block. Now to let that dry so I can paint the block. How are you doing with yours snowmom?
|
|
|
|
Post by snowmom on Jul 23, 2014 5:03:42 GMT -5
ready to mount the vibe on the block this afternoon. won't be long now til I can start my first batch. I just have to decide what to start with.
|
|
swiper
having dreams about rocks
Member since June 2014
Posts: 64
|
Post by swiper on Jul 24, 2014 21:10:41 GMT -5
Cool!! Keep us posted on how it goes for you. It will probably be 2 weeks before I can paint my block and mount the vibe but I'll post pics when done.
|
|
|
|
Post by snowmom on Jul 25, 2014 4:38:21 GMT -5
first batch in and running, did a 12 hour check a few minutes ago and it was pretty dry. It seemed quite wet when I checked just before bedtime at about the 3 hour mark. rinsed and added more grit and its running again. I was able to do a bit of culling and replaced the rocks I removed with filler to keep levels up and onward from here. It is working faster than I thought it would. Interesting!
|
|
|
|
Post by snowmom on Jul 27, 2014 6:12:29 GMT -5
out of coarse and on to medium. the rocks are not rounded and smoothed but the rough surfaces are all gone so I can see what they look like beneath the wear and tear the lake and glaciers imposed on them. learning a lot, some of the stuff that looked so interesting was only on the outside. culled a lot. having fun. there have been lots of good questions on the board recently which have been perfect timing for this. Love that we all have so much information only a few keystrokes away.
|
|
|
|
Post by connrock on Jul 27, 2014 6:56:03 GMT -5
I've done some loads of petrified wood completely in the Lot-O that I didn't want to be perfectly smooth.I wanted them to still look somewhat like they were in nature yet have some glossy areas on the outer surfaces. One such load was Arizona Petrified Wood.This material is beautiful in nature but difficult to tumble because it's naturally full of cracks and fractures.If you break it up you don't have much left to tumble! I broke some up to use a filler and put 1 piece in that just about fit into the hole in the barrel. I ran a 220,400,1000,Tripoli and polish stage and it came out pretty good,,,,,,  Your beach rocks are much more rounded and smoother so you should get good results as long as they are all the same hardness and you wash the good between grit changes. As you're finding out,the Lot-O is very aggressive and needs a bit of tending but it does a great job! connrock |
|
|
|
Post by snowmom on Jul 27, 2014 7:40:06 GMT -5
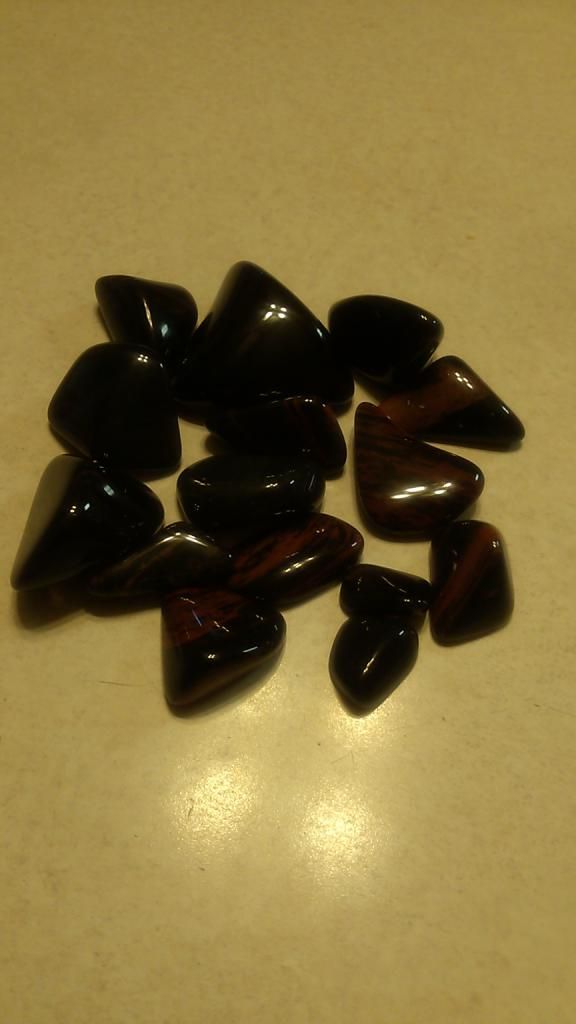
heh, I am really enjoying the tending. I have been surprised by how much media (pea gravel pebbles) it eats, and so quickly. Very pretty piece above, loads of color but it is easy to see what it is(was?) that is the sort of thing I am after, I don't care about undercuts, nicks and dings but want to see what the rocks I pick up
"really look like". I do have some stuff back on the shelves which I will want rounded and smooth and mirror like, but figured this would be a good place to gain some experience and to satiate my curiosity about some of
the beach rocks which have been sitting on the shelf for months now. I learned a lot about what NOT to pick up
any more! having fun. thanks for the post.
|
|
|
|
Post by snowmom on Jul 27, 2014 14:42:05 GMT -5
found this out of the medium grit I'm running now... pretty much a surprise. It was grey with a little bit of red when it went in. No idea what it is though. 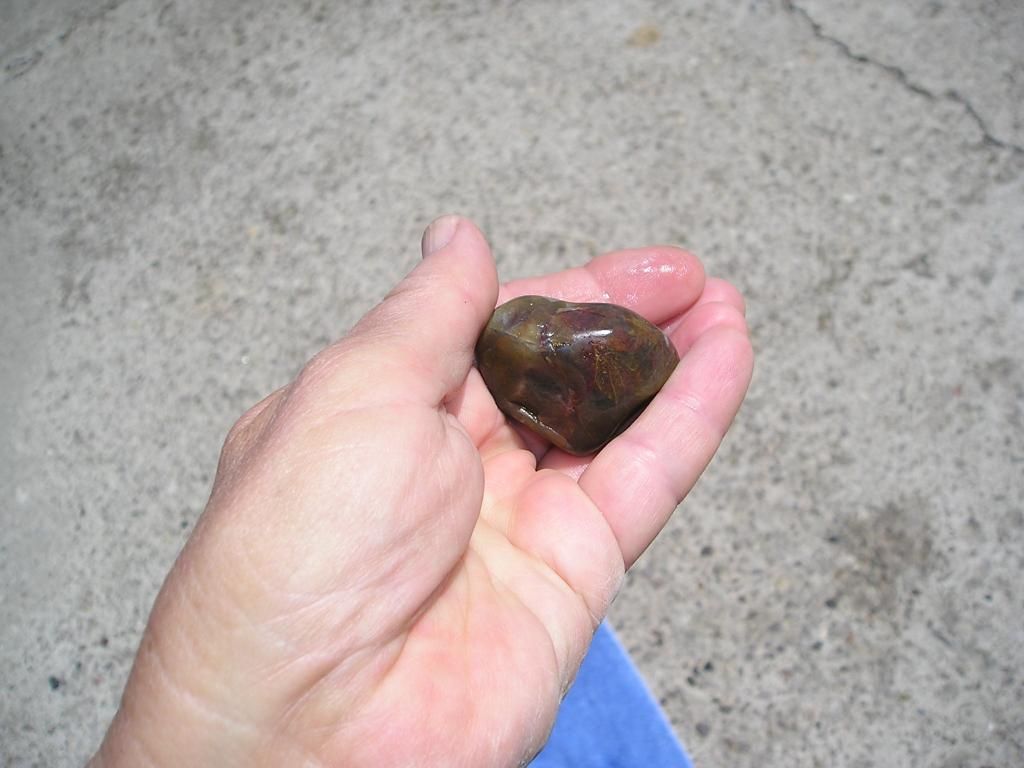 |
|
|
|
Post by connrock on Jul 28, 2014 8:41:09 GMT -5
I don't know where you live but processed stone (pea gravel) here in CT is mostly very soft material with a little quartz in it and gets eaten up fast in the Lot-O.Some parts of the Country the pea gravel and other processed stone is much harder and doesn't wear down as fast.I tried using it as a filler but it created a thick slurry way to fast. Most of the time I now use broken pieces of different types of obsidian.Obsidian is soft enough to not scratch other hard rocks but not nearly as soft as the pea gravel here. When doing pieces that you want to end up looking close as possible as they look naturally you have a LOT of areas that will hold grit and polish.You can see a lot of these areas in the piece of Arizona Petrified Wood I posted yet you don't see any signs of grit or polish in them.Once the grit/polish gets into those problem areas and dries,it's next to impossible to get it out and you end up with what could have been a beautiful piece but is loaded with grit and polish that you can not remove.This takes away from the natural beauty of the rock and is unacceptable to me. Beginning from the very first grit cycle,with the rocks wet and BEFORE I add any grit,I add 1 tablespoon of Dreft powdered laundry soap and let it run for about 15 minutes or more until the soap has a chance to get into those problem areas before any grit/polish has a chance to get there first.I then add grit/polish and about 1/2 hour before I take the rocks out I put in another tablespoon(or more) of Dreft Powdered Laundry Soap and add water accordingly to try to wash out anything left in the problem areas. Before I dump the rocks out I fill the barrel with cool water(NOT hot water) and put the cap on the barrel and shake the barrel for a minute or so.I dump the rocks into a calender and as fast as possible hit them with a spray of cold water.The key is to NOT let the rocks dry out.I now spray the rocks individually to make sure I don't have ANYTHING in those problem areas.Although this is a must during the entire cycle it is very important before the rocks go into polish. This isn't a rock that was intended to be left "naturally" but it does have some problem areas in it,,,This is shown after roughing,,,  This is the same rock after going through the entire cycle and after the polish stage.You can see that it still has the problem areas but you don't see any signs of grit or polish in them,,,,  connrock |
|
|
|
Post by snowmom on Jul 30, 2014 13:01:10 GMT -5
helpful, thank you.
|
|


 Al Falfa


