ttapp
off to a rocking start

Member since November 2013
Posts: 3 
|
Post by ttapp on Sept 1, 2014 8:25:12 GMT -5
I bought this bracelet for my mother, and I would like to find a tutorial for this type of copper work. I haven't seen anything like it before. I don't want to copy this one, but learn the technique for this type of work.  |
|
|
|
Post by snowmom on Sept 1, 2014 8:41:30 GMT -5
welcome to the forums, looks like it was done in several stages, a really pretty piece of work. I'm sure there are members here who will hook you up with links and some good explanations of the skills to develop to be successful in your endeavor (I'll be reading this thresd, I'd love to learn too!)
|
|
Don
Cave Dweller  He wants you too, Malachi.
Member since December 2009
Posts: 2,616
|
Post by Don on Sept 2, 2014 9:56:45 GMT -5
That was done with a well practiced hand. Basically, the elements are fabricated separately and then soldered together in stages to a back plate; the trick is getting everything to solder cleanly. I gave it a try, here's what I came up with. I ended up covering everything in silver solder...couldn't get quite enough heat on the piece to make the solder flow where I wanted it to. 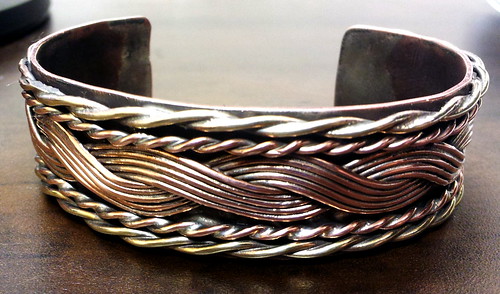 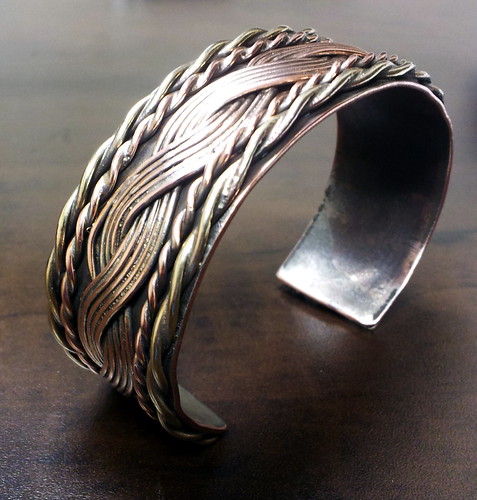 |
|
|
|
Post by connrock on Sept 3, 2014 9:17:09 GMT -5
Don I think you did fantastic with your bracelet!
How did you get all of the "face wires" to stay tight enough to the "back plate" to silver solder them? Did you form everything first or do it when everything was flat?
I hope you don't mind me asking but I REALLY want to try something like this with a brass back plate and copper wire accents but don't know where to start.
connrock
|
|
Don
Cave Dweller
He wants you too, Malachi.
Member since December 2009
Posts: 2,616
|
Post by Don on Sept 3, 2014 10:13:32 GMT -5
Thanks Connrock,
annealing the face wires first and pressing them flush to the back plate first helped; I worked with everything flat and then shaped after everything was soldered. I used binding wire to help keep all the elements in place during soldering. I soldered the braided wires first and then the twisted wires second, but I think you could do it all in one go if you have a hot enough torch. My acetylene torch with a #2 tip wasn't hot enough to heat the entire piece up all at once. maybe the #3 tip would.
If I were to to it again, I would:
1. make the braided and twisted wires, anneal and pickle
2. pickle the back plate to make sure it is clean
3. paste flux the back plate, put down your elements and bind together with binding wire, then put down your solder chips. I suggest easy solder.
4. heat the piece from underneath with your biggest torch tip until the solder flows.
5. remove the binding wire and then pickle; inspect to make sure the elements are secured to the back plate.
6. shape on a mandrel using a rawhide mallet to assist in shaping.
7. patina with liver of sulfur.
8. polish.
|
|
Don
Cave Dweller
He wants you too, Malachi.
Member since December 2009
Posts: 2,616
|
Post by Don on Sept 3, 2014 10:22:07 GMT -5
I forgot to mention, I soldered the ends of the braided wire together to keep it from coming apart while working with it. I used tape to keep the wire bundles together while doing the actual braiding like I do with wire wrapping, but when I was finished with the braiding I went ahead and soldered those bundles together so they would be easier to work with afterwards. I used hard solder on the ends.
|
|
jamesp
Cave Dweller
Member since October 2012
Posts: 36,155
|
Post by jamesp on Sept 3, 2014 15:36:38 GMT -5
Don, could you buff w/say rouge on a powerful buffing wheel and buff the outside solder to expose the colors of the wires ?
Soldering something like that w/gaps is difficult. You did well.
I have a 1 HP grinder with a 8 inch buff pad and have used the buff pad up on about one piece.
Piece gets hot, and I hold it with leather welding gloves.
|
|
Don
Cave Dweller
He wants you too, Malachi.
Member since December 2009
Posts: 2,616
|
Post by Don on Sept 3, 2014 15:46:10 GMT -5
James, I was able to buff most of it off with Tripoli, the photos are just a bit washed out. Thanks for the compliments, I learned lots doing this piece.
|
|
jamesp
Cave Dweller
Member since October 2012
Posts: 36,155
|
Post by jamesp on Sept 3, 2014 21:28:32 GMT -5
James, I was able to buff most of it off with Tripoli, the photos are just a bit washed out. Thanks for the compliments, I learned lots doing this piece. Looks like that base was covered. project for a brave soul. |
|
|
|
Post by connrock on Sept 4, 2014 8:40:46 GMT -5
Thanks SOOOOOOOOOOOOOOOO much Don for explaining how you made your bracelet.
I have a few projects to work on right now but I am going to give this a shot down the road!
connrock
|
|
ttapp
off to a rocking start
Member since November 2013
Posts: 3
|
Post by ttapp on Sept 4, 2014 18:06:41 GMT -5
That is great! Thanks for your help and what a beautiful bracelet that is!!!
|
|
Tom
fully equipped rock polisher
 My dad Tom suddenly passed away yesterday, Just wanted his "rock" family to know.
Member since January 2013
Posts: 1,557
|
Post by Tom on Sept 4, 2014 21:38:02 GMT -5
Don that is freaking fantastic!!!!! Excellent work!
|
|
|
|
Post by pghram on Sept 5, 2014 12:28:32 GMT -5
Nice work & tut.
Rich
|
|
cman
starting to spend too much on rocks

Member since August 2009
Posts: 207
|
Post by cman on Sept 23, 2014 10:46:12 GMT -5
Very nice you are a great artist.
|
|
Fossilman
Cave Dweller
Member since January 2009
Posts: 20,681
|
Post by Fossilman on Sept 23, 2014 18:45:21 GMT -5
That is a very nice piece!
|
|
Don
Cave Dweller
He wants you too, Malachi.
Member since December 2009
Posts: 2,616
|
Post by Don on Sept 25, 2014 10:35:10 GMT -5
Thanks SOOOOOOOOOOOOOOOO much Don for explaining how you made your bracelet. I have a few projects to work on right now but I am going to give this a shot down the road! connrock You're welcome, Connrock. When you decide to try it, I'd love to see how it turns out. |
|
Don
Cave Dweller
He wants you too, Malachi.
Member since December 2009
Posts: 2,616
|
Post by Don on Sept 25, 2014 10:37:22 GMT -5
James, I was able to buff most of it off with Tripoli, the photos are just a bit washed out. Thanks for the compliments, I learned lots doing this piece. Looks like that base was covered. project for a brave soul. Ahh, I see what you are saying now; you're right, the back of the base is covered in silver solder. I could spend the time to buff it off, but I'm not sure it's worth it. I'll let this one go at the next show for cheap and do another one. |
|
Don
Cave Dweller
He wants you too, Malachi.
Member since December 2009
Posts: 2,616
|
Post by Don on Sept 25, 2014 10:39:02 GMT -5
That is great! Thanks for your help and what a beautiful bracelet that is!!! Your welcome, and thanks for posting; it inspired me to try something new. Thanks for the nice compliments. |
|
|
|
Post by connrock on Sept 26, 2014 7:24:08 GMT -5
Don,
In the past week I've tried to silver solder a fine silver bezel wire to a piece of copper (3 times) to make a pendant for a friend.In all 3 attempts I melted the bezel wire and am pretty disgusted with myself right now.
I've done this many,many times in the past with no problems and have even taught others how to do it through e-mail and photos.
I don't know what's going on in my head but I don't think I can even attempt the bracelet right now so I'll just put it on hold for the time being.
connrock
|
|
Tom
fully equipped rock polisher
My dad Tom suddenly passed away yesterday, Just wanted his "rock" family to know.
Member since January 2013
Posts: 1,557
|
Post by Tom on Sept 26, 2014 7:49:06 GMT -5
I know the frustration of soldering, it can drive you nuts one day and for a week go great. Just a crazy thought here but if silver solder is not working well for copper to silver, how about trying using copper solder? If you don't mind a bit of silver on the copper when using silver solder maybe a bit of copper on the silver would not hurt. I guess if would depend on the piece you are making. Another thought is that crappy copper solder Rio sells, it solders well but looks silver when melted.
Just throwing out idea's
|
|


