|
|
Post by Pat on Oct 17, 2015 10:48:33 GMT -5
When I am drilling a slab on my drill press, I am holding it steady with my fingers. However, I need to use both hands for that, and a third hand to gently bounce the drill to permit water to flow into the hole.
I am wondering how you hold your slabs down, so they don't move at all while you bounce the drill.
I've been trying to rig up something with C-clamps, but haven't yet found a C-clamp that bends over the water container and down far enough to hold the slab. Wampidy had a photo on here that showed his C-clamp setup for coring rings, and that is what I am following. Can't find the tute now. All the C-clamps I've seen are more U-shaped.
Thanks.
|
|
|
|
Post by rockpowell on Oct 17, 2015 11:28:42 GMT -5
I use molding clay,and put a big glob on either side I want to drill Do this dry in you drilling pan Press it down in tray hard so it don't move then add water and I change water often as it get's merkey and you cant see what your doing. dump water when done and mold the clay back up and put it in the box for next time, At first I was looking for another clay but couldn't find it so decided to try molding clay So far it's working good.
|
|
|
|
Post by jakesrocks on Oct 17, 2015 13:21:14 GMT -5
I'll bet mineral tac would work too. I'm kickin an idea around in my head for a slab drilling clamp. If i decide to make one, I'll post detailed pics.
|
|
|
|
Post by Pat on Oct 17, 2015 15:02:48 GMT -5
rockpowell that sounds workable. Do you also put the clay between the container and the wood the slab is sitting on? I need to hold the entire assembly down.
|
|
|
|
Post by Pat on Oct 17, 2015 15:04:23 GMT -5
jakesrocks Never heard of mineral tack. I was thinking dos wax, but there wouldn't be any cleanup with the right clamp.
|
|
|
|
Post by jakesrocks on Oct 17, 2015 15:42:22 GMT -5
Pat, it's also known as Geo-tac, Museum Tac & Earthquake tac. It's an oiless, non staining, non hardening putty that's used to hold valuables from moving around in displays. I buy the stuff by the kilo for my minerals, but it can be bought a few grams at a time too. I'll find a link to one of the sellers if you want to try it.
|
|
|
|
Post by Pat on Oct 17, 2015 15:54:31 GMT -5
jakesrocks Oh! I have earthquake tack. Use it around the house. Thanks!
|
|
|
|
Post by jakesrocks on Oct 17, 2015 16:33:15 GMT -5
Maybe they should rename it San Andreas Tac. LOL
|
|
|
|
Post by rockpowell on Oct 18, 2015 11:06:16 GMT -5
rockpowell that sounds workable. Do you also put the clay between the container and the wood the slab is sitting on? I need to hold the entire assembly down. I just use it between the bottom of the container and stone, dry to start with, if the one side is domed I usually put that face down and drill from the back side where it is flat, but am careful not to drill to fast and chip out the front side and use a lot of clay so I don't drill through the container. |
|
Deleted
Deleted Member
Member since January 1970
Posts: 0
|
Post by Deleted on Oct 18, 2015 12:17:09 GMT -5
On a piece of sacrificial plywood trap the slab between 1 x 2 strips screwed into the plywood, right against the edges of the slab.
The pressure of the drill pressing down will hold the slab down and the 1 x 2 will keep the slab from rotating.
@broseph
|
|
|
|
Post by Pat on Oct 19, 2015 8:51:26 GMT -5
I'm still working on the clay idea. I gobbed the bottom of the slab, and it held well. Cut through the stone with a 2" core drill. Lopsided! Today will put the clay on the slab sides as well. To hold the bucket steady, I put clay on the outside of the bucket bottom and the drill press table. Gotta solve the uneven cutting.
|
|
iwannarock
starting to shine!

Member since April 2015
Posts: 35
|
Post by iwannarock on Oct 20, 2015 13:36:44 GMT -5
or another simple idea with your sacrifice piece of wood/plywood. use rubber bands to strap the slab to the wood, sometimes the easiest solutions are the hardest to come up with
cheers
|
|
|
|
Post by cobbledstones on Oct 20, 2015 15:23:35 GMT -5
Rio grande sells a reusable playable plastic for this purpose, explained in a video here
I have never used it, but it looks like a plausible solution.
I just cut a flat spot on the bottom of the stone so that it rests securely, then hold with fingers and go for it
|
|
|
|
Post by Peruano on Oct 20, 2015 16:43:36 GMT -5
|
|
|
|
Post by Pat on Oct 21, 2015 19:10:26 GMT -5
rockpowell by modeling clay, do you mean kids red, yellow etc clay, or do you mean something like Jett Sett, the thermoplastic granules that need to be heated in water? I tried the kid clay. Worked to a point. Held well, but my rock disk was cut unevenly since the clay was uneven. Tried rolling out the clay with a rolling pin. Nice and flat. Didn't hold anything! Peruano Tried Jett Sett. Good stuff. Now working on a secure setup for cores up to 2". Thanks.
|
|
|
|
Post by rockpowell on Nov 1, 2015 7:59:26 GMT -5
Yes.! use the kids clay, could not find the clay like he uses in the video. I guess I could find if I went on line
|
|
|
|
Post by Pat on Nov 1, 2015 11:22:44 GMT -5
rockpowellI just bought some Jett Sett from riogrande.com Lots of the jewelry supply websites have it. Works well and is re-usable. Will post photo when I have the entire setup set up.
|
|
|
|
Post by rockpowell on Nov 1, 2015 12:00:05 GMT -5
rockpowellI just bought some Jett Sett from riogrande.com Lots of the jewelry supply websites have it. Works well and is re-usable. Will post photo when I have the entire setup set up. Thank's for the info. will be waiting for your post on it. Is that the clay in the video >?? |
|
|
|
Post by Pat on Nov 1, 2015 14:16:42 GMT -5
Yes. It's the clay in the rio video. Good stuff!
|
|
|
|
Post by Pat on Nov 4, 2015 14:15:36 GMT -5
Friend and I have been working on this problem. We both like to solve problems. Our setup works. Wonder if there is an easier way that is just as effective. In the rio video, the teacher is holding the Jett Sett with one hand while drilling a very small hole. We did not want to hold the setup at all, and we want to use core drills up to 2"-3". Some of the material is very hard, so takes a long time. Too long to hold the slab steady. 1-This shows the basic setup. Sauce pan on the bottom. It is attached firmly to the drill press table via a screw and washer through the central round hole in the drill press. A pan of the perfect diameter has the three copper pegs epoxied to the bottom. The pegs hold the wood steady. The red clamp is holding the two pans together. Sauce pans from charity store (Savers, Goodwill et al). 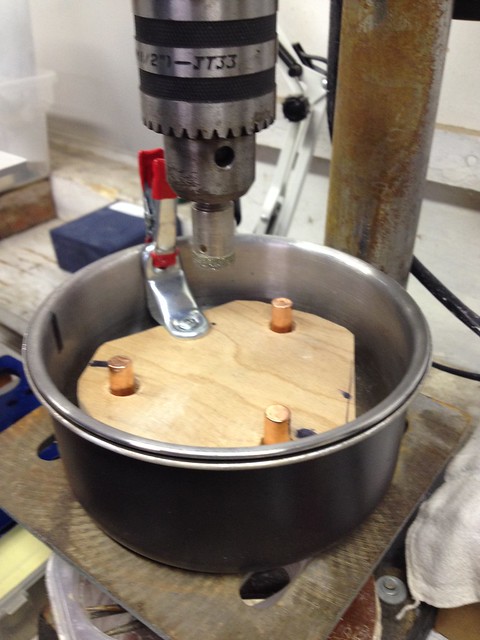 IMG_3400 IMG_3400 by Pat, on Flickr 2-The foil covers the pegs to keep the Jett Sett out of that area, AND to easily remove the slab attached to the Jett Sett. In photo 2, showing the foil: I wanted to add that the Jett Sett sticks to the wood, so the foil prevents that as well. Also, the wood shown is actually plywood --- because that is what we had. We are in the market for a piece of teak. Read more: forum.rocktumblinghobby.com/thread/72511/hold-slab-water-more-info?page=2&scrollTo=834222#ixzz40vrPXAQ0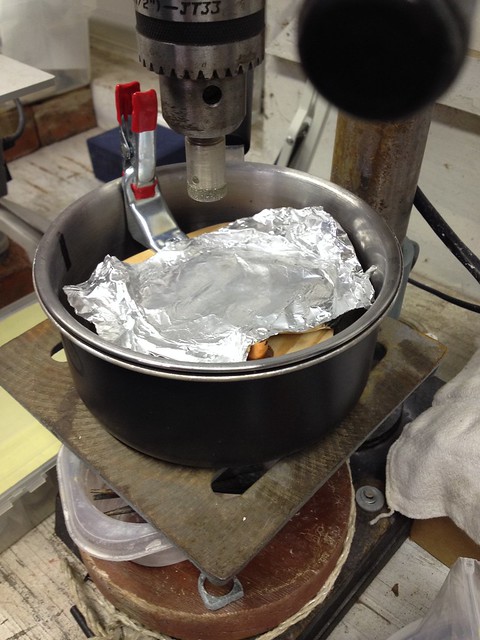 IMG_3401 IMG_3401 by Pat, on Flickr 3- Before we go any further, the small circle is lined up with the core drill. This is where we discovered that the table can not only go up and down, but can be turned. 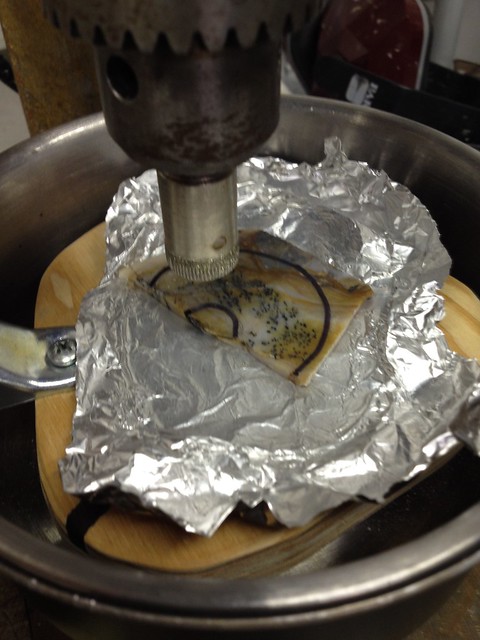 IMG_3403 IMG_3403 by Pat, on Flickr 4- The white stuff is Jett Sett. It holds everything firmly in place. 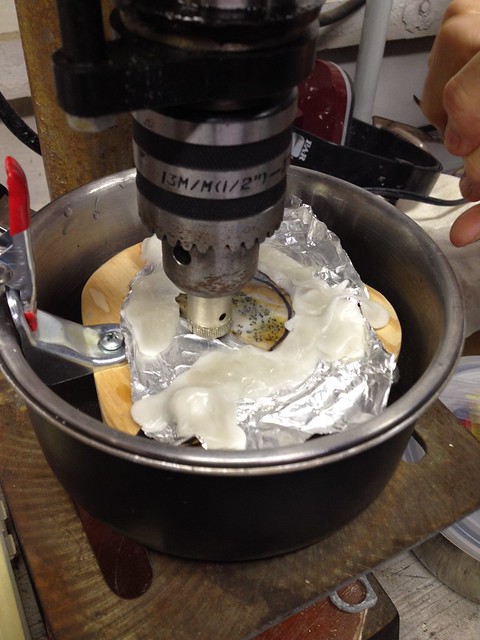 IMG_3405 IMG_3405 by Pat, on Flickr 5- Pouring in the water to completely cover the entire setup. The wood is teak and is flat. OOPS! This wood is plywood. Because it warped, we are going to get a piece of teak. 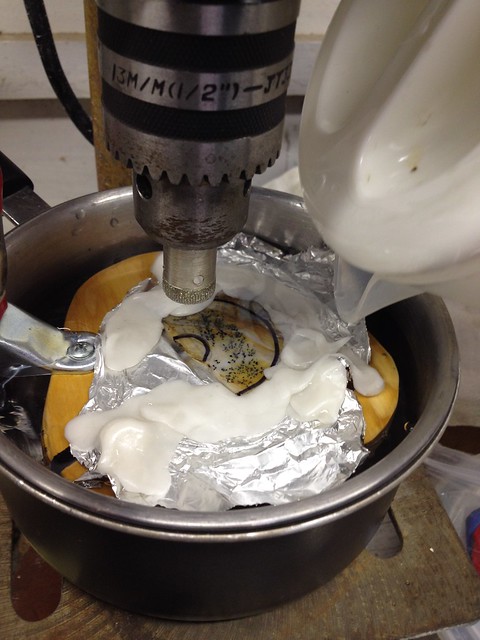 IMG_3407 IMG_3407 by Pat, on Flickr 6- Here it is in action. One hand : ) 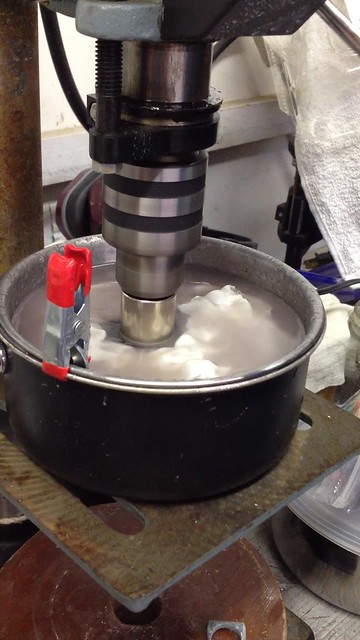 IMG_3408 IMG_3408 by Pat, on Flickr We did this to cut circles for pendants etc. |
|