|
|
Post by Drummond Island Rocks on Jul 21, 2016 6:41:41 GMT -5
Just don't use it anymore, lol Silver is so much nicer to work with. Psilomelane. Not perfect but getting better each time. This one had a small pinch in the bezel right under the bail. 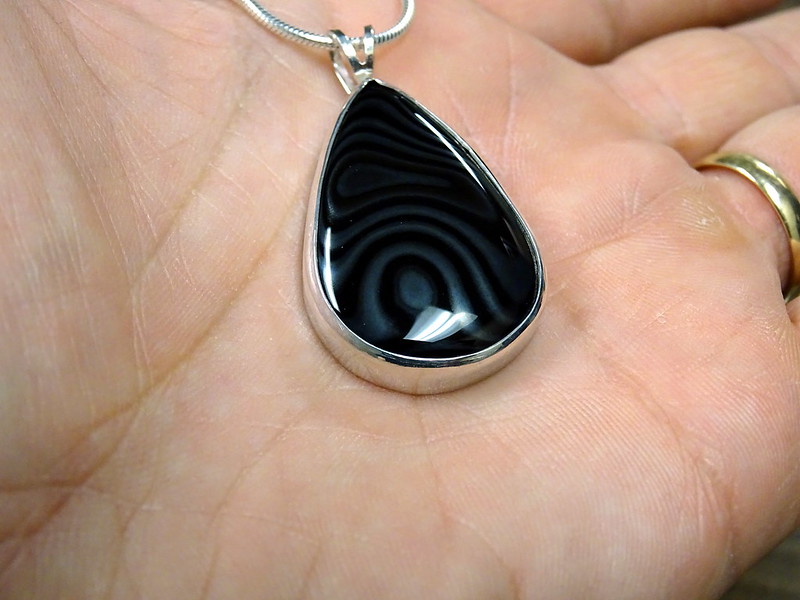  black sharpie dot in the bezel is where the bezel wire is joined  Chuck |
|
|
|
Post by vegasjames on Jul 21, 2016 7:04:47 GMT -5
Great looking piece. Would not have looked good in copper anyway.
|
|
|
|
Post by Drummond Island Rocks on Jul 21, 2016 7:17:56 GMT -5
Great looking piece. Would not have looked good in copper anyway. Thanks - Would never put psilomelane is copper I was just referencing back to a post I made earlier in the week about struggling with soldering on copper. I do not like copper much to begin with so now if a stone really requires copper I will just wire wrap it. Chuck |
|
|
|
Post by drocknut on Jul 21, 2016 11:13:33 GMT -5
Great job on that piece.
|
|
Deleted
Deleted Member
Member since January 1970
Posts: 0
|
Post by Deleted on Jul 21, 2016 12:04:09 GMT -5
Clean work as expected.
14k Gold would look awesome too!
|
|
|
|
Post by Drummond Island Rocks on Jul 21, 2016 13:00:15 GMT -5
Clean work as expected. 14k Gold would look awesome too! Thanks Scott. Going to need an investor if we start talking gold. Just got another order of sterling in yesterday. This hobby has to stay self supporting and has to this point so hopefully I can get to a point where I feel comfortable selling these soon. This piece is close. I have certainly seen better for sale and I have certainly worse for sale. Chuck |
|
|
|
Post by Jugglerguy on Jul 21, 2016 13:11:13 GMT -5
That's beautiful, Chuck. Can you do it in under five hours yet?
|
|
metalsmith
Cave Dweller 
Member since October 2012
Posts: 1,537
|
Post by metalsmith on Jul 21, 2016 13:12:23 GMT -5
Lovely work; great stone too.
Regarding the pinch at the point, it's going to isn't it. Think about it.
The only way this wouldn't happen is
a) you file out the point so the two sides lap towards one another, but there's no point of conflict, caught in the middle
b) the bezel doesn't so much wrap over, but secures the curved edge, again negating a point of conflict
HTH
|
|
|
|
Post by Drummond Island Rocks on Jul 21, 2016 13:51:30 GMT -5
That's beautiful, Chuck. Can you do it in under five hours yet? Thanks Rob Three hours from start to pictures. Probably a solid two hours of actual labor. Chuck |
|
jamesp
Cave Dweller
Member since October 2012
Posts: 36,159
|
Post by jamesp on Jul 21, 2016 15:48:39 GMT -5
Now you playing with the big guys.
|
|
|
|
Post by Drummond Island Rocks on Jul 21, 2016 16:26:47 GMT -5
Now you playing with the big guys. I am not even in the same zip code as the big boys. All kidding aside I am super excited about this piece. It is always a risky move using a high quality cab in a beginner piece but I could not resist. This really is one of my all time favorite cabs. You might like the fact that is a tumble cab out of loto too. Chuck |
|
|
|
Post by Pat on Jul 21, 2016 17:05:23 GMT -5
Beautiful piece!!
|
|
|
|
Post by radio on Jul 22, 2016 16:24:05 GMT -5
Fantastic progress! Next time try folding the point of the bezel first, then work it around the rest of the stone. If the girdle around the point on the cab is even a tiny bit lower than the rest of the stone, it will give you fits every time!
|
|
|
|
Post by Drummond Island Rocks on Jul 22, 2016 17:14:06 GMT -5
Fantastic progress! Next time try folding the point of the bezel first, then work it around the rest of the stone. If the girdle around the point on the cab is even a tiny bit lower than the rest of the stone, it will give you fits every time! Thank you radio - I have been correcting each stones girdle before I start to make sure they are as even as possible. Points on cabs do tend to get thinner. I had read somewhere to start with north south east west pushing on the girdle and then to work out the rest so I have been trying to use that. I am having a difficult time marring the bezel while applying force. Even with the burnishing tools I seem to be digging in or leaving an uneven surface. One of my other big time consumers is filing down the back plate to meet the bezel. I am using shears to trim and if I try to cut right to the intersection the shears leave marks on the bezel so I am leaving stock all the way around and having to hand file. Do you use a jewelers saw for that or doe's a foredom attachment speed up the stock removal over hand filing? Chuck |
|
|
|
Post by radio on Jul 22, 2016 17:39:17 GMT -5
Fantastic progress! Next time try folding the point of the bezel first, then work it around the rest of the stone. If the girdle around the point on the cab is even a tiny bit lower than the rest of the stone, it will give you fits every time! Thank you radio - I have been correcting each stones girdle before I start to make sure they are as even as possible. Points on cabs do tend to get thinner. I had read somewhere to start with north south east west pushing on the girdle and then to work out the rest so I have been trying to use that. I am having a difficult time marring the bezel while applying force. Even with the burnishing tools I seem to be digging in or leaving an uneven surface. One of my other big time consumers is filing down the back plate to meet the bezel. I am using shears to trim and if I try to cut right to the intersection the shears leave marks on the bezel so I am leaving stock all the way around and having to hand file. Do you use a jewelers saw for that or doe's a foredom attachment speed up the stock removal over hand filing? Chuck Don't try to "push" the bezel to the stone, but referencing the pic I posted earlier, pull the burnishing tool toward your thumb in a smooth motion while applying downward pressure. This is more of a clinching of your fingers on the burnisher handle than "pulling". The thumb holds the piece and allows that ""clenching" to pull the burnisher toward the thumb. Is that clear as mud? Move the piece slightly counter clockwise and repeat all the way around. It may take several trips around the stone before the bezel lays down with no gaps. Dexterity and strength play a big part in the technique I described. I use 22 ga as a backing, lay the stone surrounded by the bezel on the sheet silver and mark a line around the stone, then use my jewelers saw and bench pin to cut out the rough shape of the backing. Shears bend the metal backing and make it a PITA to flush fit the bezel. Also, I mentioned earlier to seat the stone in the bezel and run the bottom edge over a file or emery cloth to level the bottom of the bezel for a good join. I solder to the backing from inside the bezel, not outside. I'll try to get the wife to record a short vid of the process if you thing a visual reference would help  |
|
|
|
Post by Drummond Island Rocks on Jul 22, 2016 18:52:52 GMT -5
Don't try to "push" the bezel to the stone, but referencing the pic I posted earlier, pull the burnishing tool toward your thumb in a smooth motion while applying downward pressure. This is more of a clinching of your fingers on the burnisher handle than "pulling". The thumb holds the piece and allows that ""clenching" to pull the burnisher toward the thumb. Is that clear as mud? Move the piece slightly counter clockwise and repeat all the way around. It may take several trips around the stone before the bezel lays down with no gaps. Dexterity and strength play a big part in the technique I described. I use 22 ga as a backing, lay the stone surrounded by the bezel on the sheet silver and mark a line around the stone, then use my jewelers saw and bench pin to cut out the rough shape of the backing. Shears bend the metal backing and make it a PITA to flush fit the bezel. Also, I mentioned earlier to seat the stone in the bezel and run the bottom edge over a file or emery cloth to level the bottom of the bezel for a good join. I solder to the backing from inside the bezel, not outside. I'll try to get the wife to record a short vid of the process if you thing a visual reference would help I have been leveling the back of the bezel and I have been soldering from the inside using pallions and that whole process is going great. I just need practice on seating the stone. You would think I would have more patience after 4 years of heavy duty rock tumbling. I really appreciate the pointers. I am using my ingersoll rand air die grinder that has collets that accept the foredom and dremel bits but at 20,000 RPMS it can only run for about a minute before the 30 gallon compressor kicks on. I am finding I need to let the compressor refill about 10 times just for doing the tripoli and red rouge steps. That means I buff for a minute then stop for 5 minutes and repeat over and over. I really need to get a foredom. Any comments about the SR series vs the TX series? I see there is a horsepower and RPM difference but is the TX worth the extra money? Chuck |
|
|
|
Post by radio on Jul 22, 2016 19:46:22 GMT -5
Don't try to "push" the bezel to the stone, but referencing the pic I posted earlier, pull the burnishing tool toward your thumb in a smooth motion while applying downward pressure. This is more of a clinching of your fingers on the burnisher handle than "pulling". The thumb holds the piece and allows that ""clenching" to pull the burnisher toward the thumb. Is that clear as mud? Move the piece slightly counter clockwise and repeat all the way around. It may take several trips around the stone before the bezel lays down with no gaps. Dexterity and strength play a big part in the technique I described. I use 22 ga as a backing, lay the stone surrounded by the bezel on the sheet silver and mark a line around the stone, then use my jewelers saw and bench pin to cut out the rough shape of the backing. Shears bend the metal backing and make it a PITA to flush fit the bezel. Also, I mentioned earlier to seat the stone in the bezel and run the bottom edge over a file or emery cloth to level the bottom of the bezel for a good join. I solder to the backing from inside the bezel, not outside. I'll try to get the wife to record a short vid of the process if you thing a visual reference would help I have been leveling the back of the bezel and I have been soldering from the inside using pallions and that whole process is going great. I just need practice on seating the stone. You would think I would have more patience after 4 years of heavy duty rock tumbling. I really appreciate the pointers. I am using my ingersoll rand air die grinder that has collets that accept the foredom and dremel bits but at 20,000 RPMS it can only run for about a minute before the 30 gallon compressor kicks on. I am finding I need to let the compressor refill about 10 times just for doing the tripoli and red rouge steps. That means I buff for a minute then stop for 5 minutes and repeat over and over. I really need to get a foredom. Any comments about the SR series vs the TX series? I see there is a horsepower and RPM difference but is the TX worth the extra money? Chuck I would recommend getting away from the shears for cutting the back and use the jewelers saw. I buy sheet in 4x6 sections and by laying the formed bezel on the sheet, tracing the outline and cutting the shape with the saw, I have very small pieces that go in the recycle box. I have two Foredom TX units and love them dearly. I've never used an SR, but would think it should perform just fine for you. if you are on a tight budget, Harbor freight has a flex shaft machine for cheap. Oh, and beware when ordering a Foredom! Some places include the handpiece and some do not! |
|
|
|
Post by Pat on Jul 22, 2016 20:26:35 GMT -5
Hmmmm, you are trimming bezel to meet back plate?? Like something is off kilter?
We hold the bezel that is already soldered to itself to a very flat piece of fine-ish sand paper that had been glued onto s board. Then recheck to see if bezel wire sits flat on back plate.
|
|
|
|
Post by Drummond Island Rocks on Jul 22, 2016 21:54:13 GMT -5
Hmmmm, you are trimming bezel to meet back plate?? Like something is off kilter? We hold the bezel that is already soldered to itself to a very flat piece of fine-ish sand paper that had been glued onto s board. Then recheck to see if bezel wire sits flat on back plate. Bottom photo of this the original post shows my bezel soldered to my back plate. I sand the back of the bezel perfectly flat then solder it to a nice flat rectangle piece of 24 gauge. The trimming I was talking about was the excess back plate. I have not had any issues with gaps this way and the solder joins have been good. I will try a few of the other ideas mentioned above though. Chuck |
|
|
|
Post by Pat on Jul 22, 2016 22:16:14 GMT -5
Hmmm, misunderstood what was getting trimmed. Glad I was wrong!
|
|


 Al Falfa


