vayank5150
starting to spend too much on rocks

Member since January 2017
Posts: 118 
|
Post by vayank5150 on Jan 22, 2017 19:33:02 GMT -5
We bought our daughter the National Geographic 1 pound rock tumbler for Christmas. We have now gone through all 4 stages of tumbling. However, the rocks are not "shiny", which I anticipated they would be. Is there another step that we have not done yet?
|
|
|
|
Post by Jugglerguy on Jan 22, 2017 20:04:21 GMT -5
Hi Vayank5150 (is that a Van Halen reference?), You'll need to give us some more details before we will be able to help you much. In the meantime, I'll give you a few guesses. The National Geographic tumbler is a toy tumbler. They tend to be noisy and only last for a batch or two before wearing out. I don't have any experience using one. Most of us use Lortone, Thumlers or Lot-O tumblers here. If you're serious about doing many batches of rocks, I'd recommend looking into a Lortone 33B tumbler. The Rock Shed sells them for a good price. It has rubber barrels so it's much quieter. It's also designed to last for years. Mine has been running nonstop for the past five years. Here's a batch I just pulled out of this tumbler the other day: 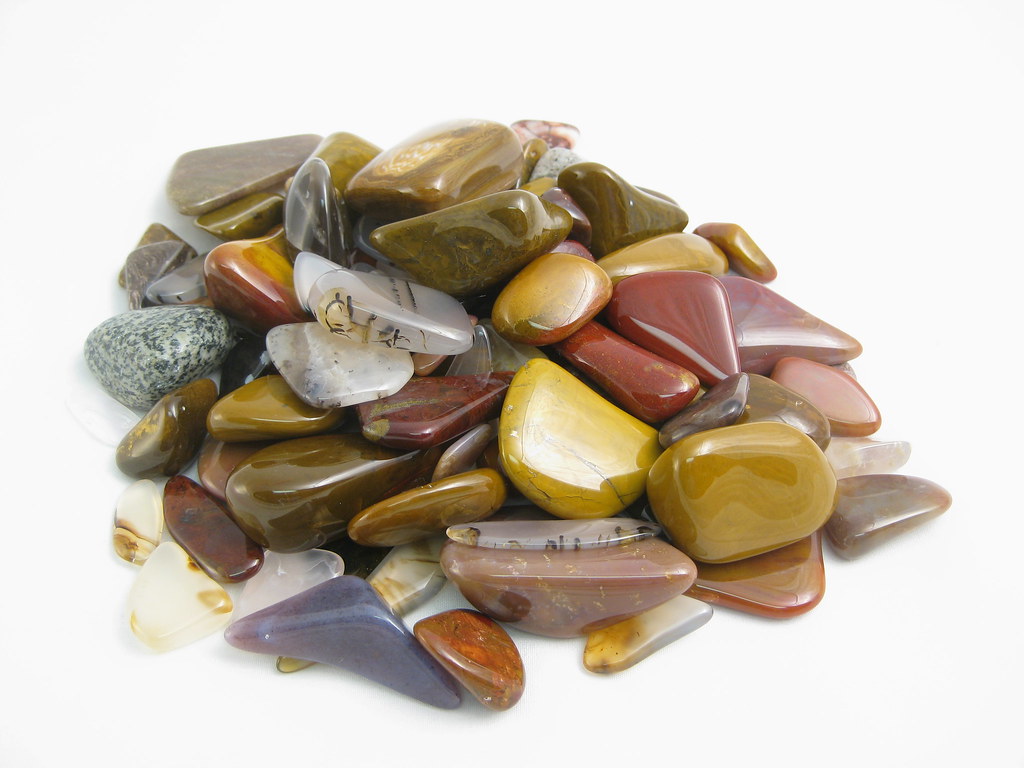 The other problem you're most likely having is that you've gotten a batch of rocks done that started on Christmas. I run just the first stage for several weeks to several months. Each week, I open my tumbler, rinse off the rocks and inspect every rock. I only remove rocks that are completely free of holes and cracks. The rest go back in along with more rocks to make up for volume lost by removing rocks and from wearing down the rocks. The rocks will not be done in one week. The rocks will not be done at the same time. When you've accumulated enough rocks to move to the next stage, then you move on to that stage. The rest of the stages can be done in a more consistent amount of time. Most people include plastic pellets or ceramic media for the remaining stages. Usually each stage takes about ten days. After the first stage, I do 120/220 grit, 500 grit, sometimes 1000 grit, and then polish. Your grits were probably just labeled as step 1, step 2, etc., so you may not know exactly what you were using. I ran the above rocks for three weeks in the polish stage just to make sure they were done. My method usually starts in a rotary tumbler, then I move the rocks to a Lot-O vibratory tumbler. My vibratory tumbler takes much, much less grit and finishes each stage in two days instead of ten days. There's not a great way to speed up that first stage though. I did the above rocks completely in a rotary tumbler just to try something different, so a vibratory tumbler is not necessary, it just speeds things up. If you'd like some more help, let us know what you did. Pictures are super helpful. If you post pictures here, you'll need a photo hosting site like Flickr or Photobucket. Host your pictures there, then copy the BBcode and paste it here. I'll give you more complete instructions if you need them. Here's what will help: Pictures of your rocks What kind of rocks were you tumbling? What were the steps you took? How much water did you add? How long were the rocks in each stage? I'm sorry if that's not the news you wanted to hear. The good news is that you've found the perfect place to get help. The bad news is, you might get hooked. I started with a tumbler for my son for Christmas. He's long since lost interest and I have four tumblers, four saws, a cabochon machine, a flat lap, a drill press, and a whole bunch of rocks in my basement. The house isn't going to tip over anytime soon. |
|
|
|
Post by Drummond Island Rocks on Jan 22, 2017 20:07:50 GMT -5
We bought our daughter the National Geographic 1 pound rock tumbler for Christmas. We have now gone through all 4 stages of tumbling. However, the rocks are not "shiny", which I anticipated they would be. Is there another step that we have not done yet? Welcome to the forum! My 1st piece of advice is to spend a little time going through some older posts here on RTH. I can guarantee without a doubt you will learn everything you need to know that way. My second piece of advice is to throw away any instructions that came with your tumbler. All tumbler manufactures want you to think rock tumbling can be done in 4 one week steps. As you found out it can be done but not with good results. The first stage is the roughest grit and in reality that stage gets repeated between 4 and 20 times depending on how hard your rocks are and how perfect you want them. You need to get that first step figured out and then we can help with the rest. Basically all of the big changes happen in the first step. If the rocks are rough and pitted after step one and you move them to step two they will not improve. Chuck |
|
vera
spending too much on rocks
Member since December 2016
Posts: 259 
|
Post by vera on Jan 22, 2017 20:22:46 GMT -5
I agree with Chuck. I would just only be changing to the the second step about now with that little tumbler. It would be cool to see pics of your results using the manufacturer's instructions.
|
|
vayank5150
starting to spend too much on rocks
Member since January 2017
Posts: 118
|
Post by vayank5150 on Jan 22, 2017 20:42:02 GMT -5
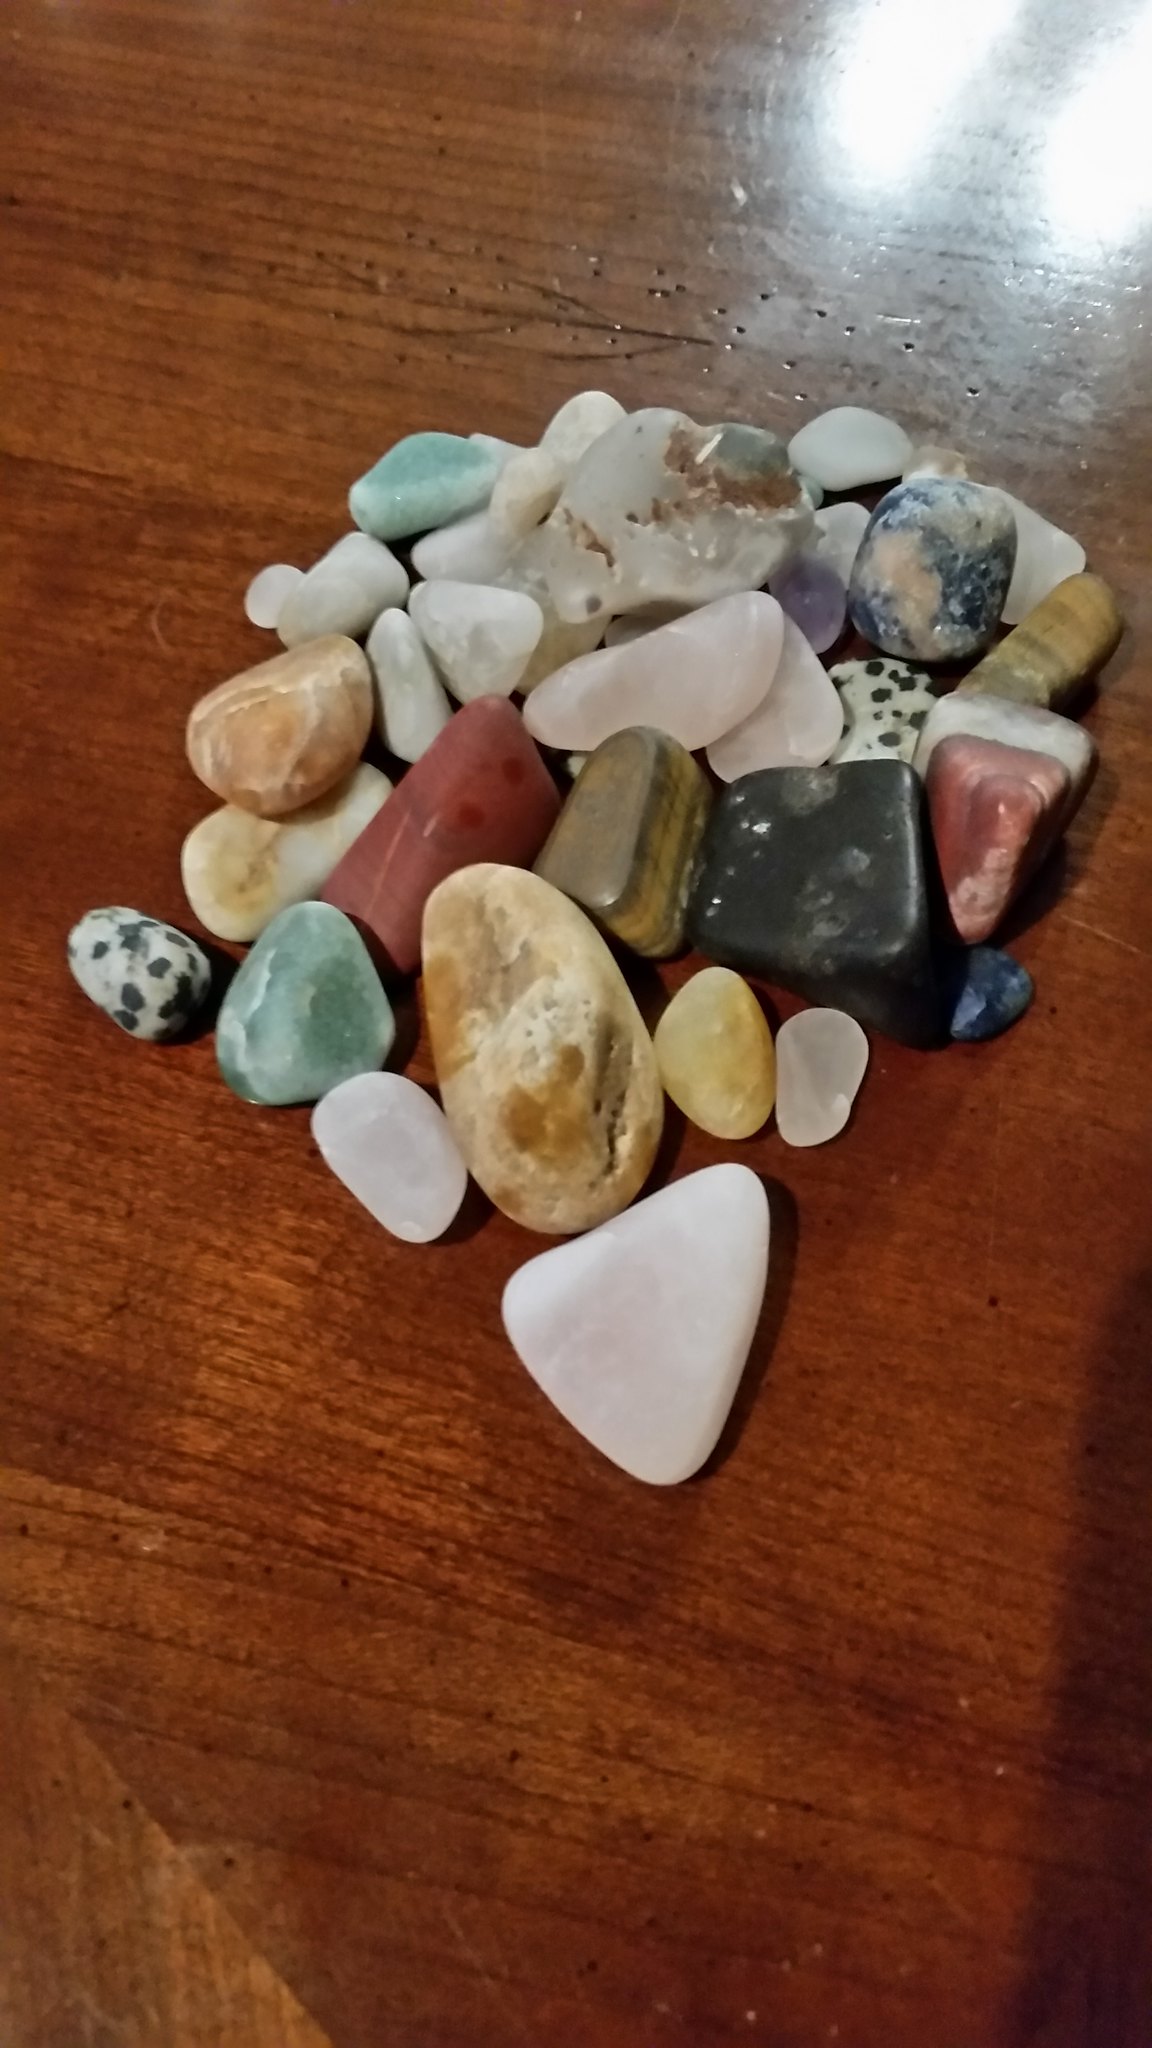
Thank you for the responses. While the National Geographic tumbler may be considered a toy, we felt it best to start there for an 8 year. With this in mind, her 48 year old Daddy is every bit into it as she is, if not more. You are correct in that the instructions had us basically run each packet of grit for 7 days. I am going to try to attach a picture showing the results after the final running. This batch is basically 50% rocks that came with the tumbler and 50% that she found elsewhere. While the rocks are nice and smooth, they are hazy and not shiny as I expected. www.flickr.com/photos/147786444@N06/shares/gM9rWhThe tumbler itself is made of rubber and not that noisy, so for now, I think it is satisfactory. I just need to learn more about the process, perhaps? |
|
|
|
Post by Jugglerguy on Jan 22, 2017 20:54:19 GMT -5
I tried to copy your picture here, but you must have some privacy settings turned on. Click on the little curved arrow near the bottom right of the picture. Choose "BBCode" from the menu and an appropriate size (800 or 1000 for the larger dimension). Then copy and paste that code here. I just looked at the tumbler you bought. I was thinking of another tumbler. The rubber barrel is a good sign.  I thought you were talking about this one: 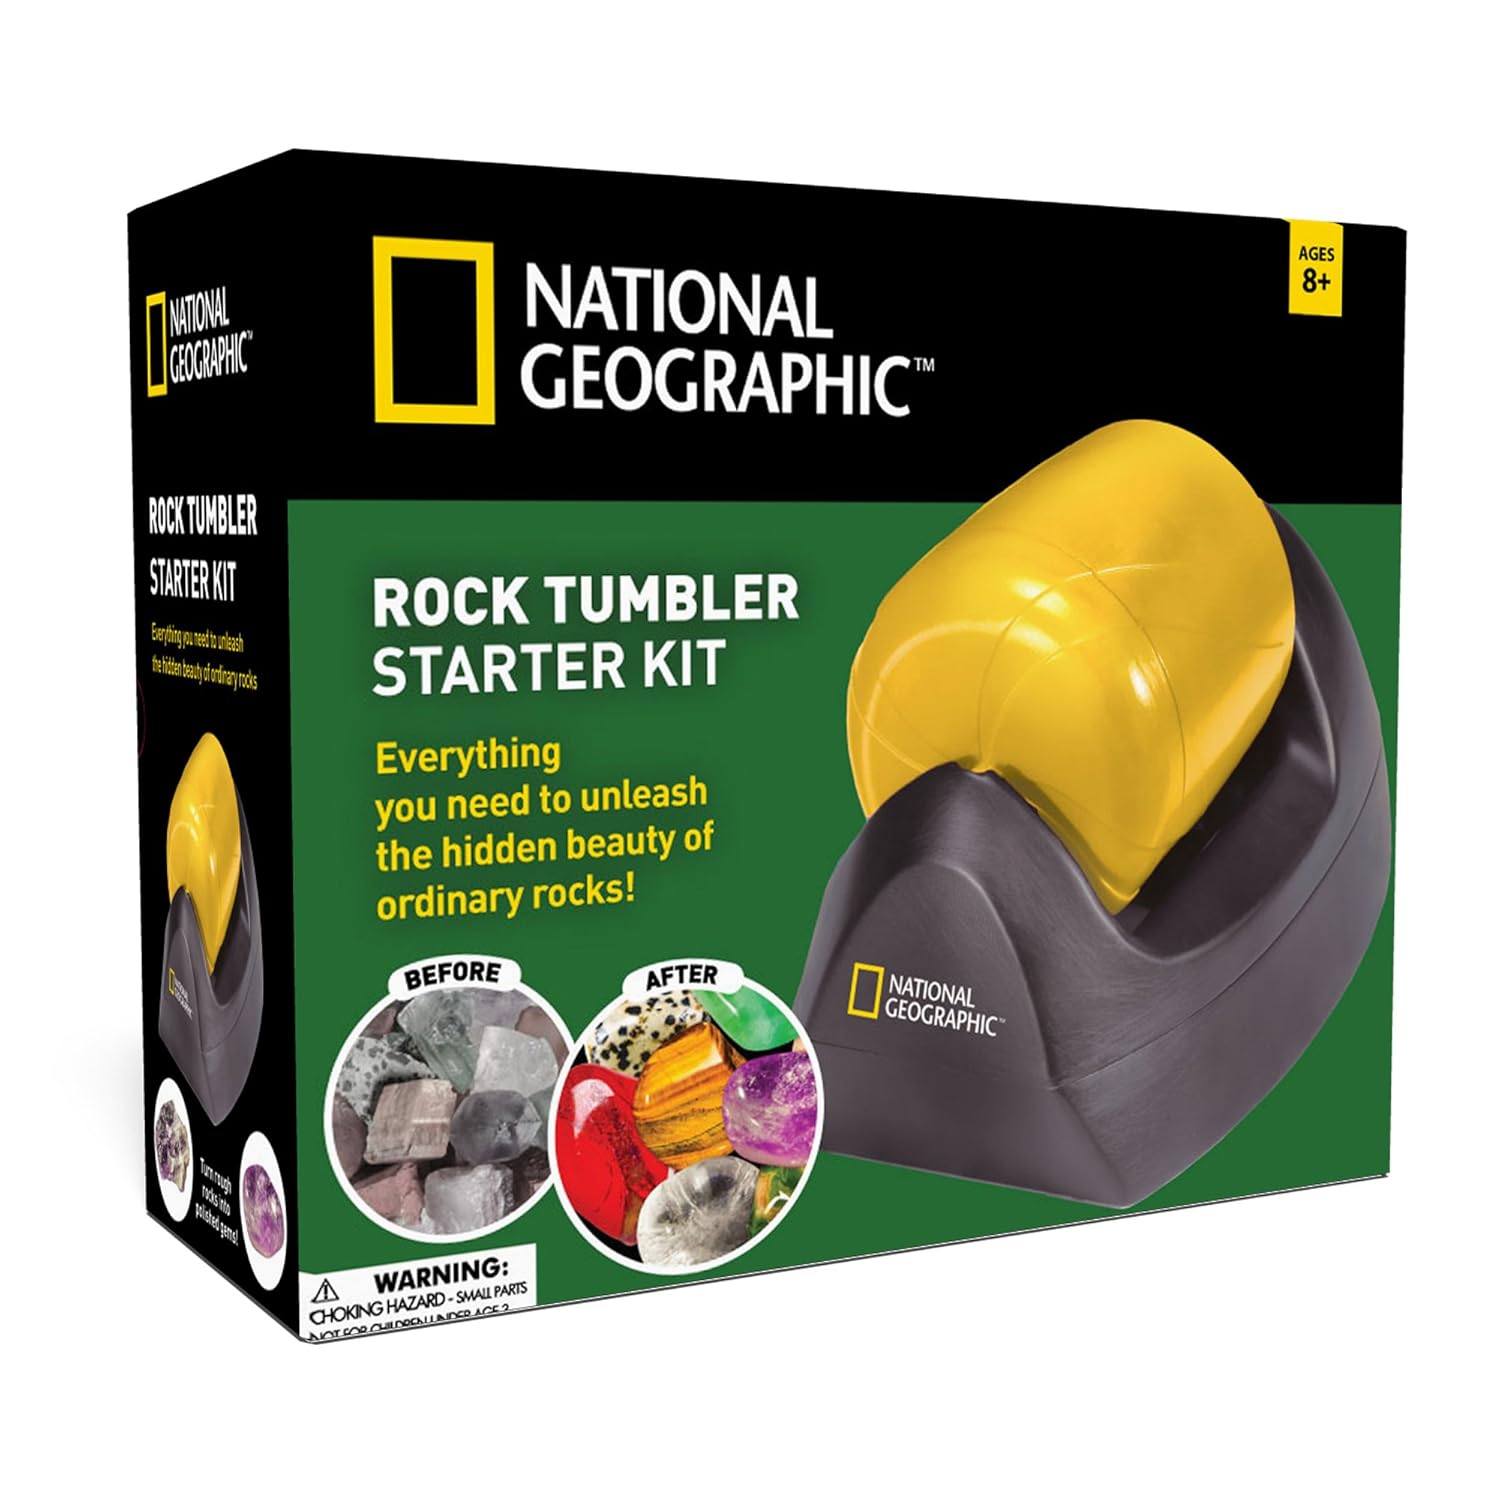 The big white rock at the top of your picture could be your problem. That rock has huge holes in it. It's not a good rock for tumbling. Those holes can trap grit and carry it on to the next stage. When that grit comes out in later stages, it will scratch up your rocks. If you are really determined to polish that rock, make sure that you get every little speck of grit out of those holes. That's one of the reasons that I make sure rocks are free of cracks and holes before moving them on to the next stage. The other reason is that I really like my rocks to be as perfect as possible. This is a great hobby to share with your daughter. You'll have fun this summer looking for rocks and fun all year long checking your tumblers together. Being active here adds a lot too. There are a bunch of great people here who can really help you out. Just ask lots of questions. Rob |
|
vayank5150
starting to spend too much on rocks
Member since January 2017
Posts: 118
|
Post by vayank5150 on Jan 22, 2017 21:01:37 GMT -5
|
|
vayank5150
starting to spend too much on rocks
Member since January 2017
Posts: 118
|
Post by vayank5150 on Jan 22, 2017 21:01:50 GMT -5
Better?
|
|
|
|
Post by Jugglerguy on Jan 22, 2017 22:05:41 GMT -5
|
|
vayank5150
starting to spend too much on rocks
Member since January 2017
Posts: 118
|
Post by vayank5150 on Jan 22, 2017 22:19:43 GMT -5
So, I want her rocks to look like "Rock God's".....need to figure out how to get there, please.
|
|
|
|
Post by spiceman on Jan 22, 2017 23:09:19 GMT -5
A good cleaning of barrel and rocks is important.
You tube shows some good techniques.
|
|
vayank5150
starting to spend too much on rocks
Member since January 2017
Posts: 118
|
Post by vayank5150 on Jan 22, 2017 23:10:51 GMT -5
OK...thank you, but I am not sure what that means?
|
|
|
|
Post by spiceman on Jan 22, 2017 23:24:31 GMT -5
The cleaning?
All traces of grit has to be removed before going to the next stage?
|
|
vayank5150
starting to spend too much on rocks
Member since January 2017
Posts: 118
|
Post by vayank5150 on Jan 22, 2017 23:26:31 GMT -5
OK, that is a good point. I am not sure my daughter and I were exact enough....
Now, I need to buy more grit!!
|
|
|
|
Post by wigglinrocks on Jan 22, 2017 23:28:29 GMT -5
KingsleyNorth.com is a good place to get grit
|
|
|
|
Post by spiceman on Jan 22, 2017 23:30:12 GMT -5
That's one item you never have enough.
|
|
vayank5150
starting to spend too much on rocks
Member since January 2017
Posts: 118
|
Post by vayank5150 on Jan 22, 2017 23:48:58 GMT -5
I cannot thank you all enough for the tips and tricks, but what do you recommend I do to make my daughter's rocks shiny, like the ones one in Rock God's picture?
|
|
|
|
Post by Pat on Jan 23, 2017 0:40:46 GMT -5
Welcome to RTH. I don't tumble rocks, but there are a lot of experts here. Have you reviewed the ROCK TUMBLING Sections found on the Home page?
Good luck. Enjoy.
|
|
jamesp
Cave Dweller 
Member since October 2012
Posts: 36,182
|
Post by jamesp on Jan 23, 2017 5:26:35 GMT -5
I cannot thank you all enough for the tips and tricks, but what do you recommend I do to make my daughter's rocks shiny, like the ones one in Rock God's picture? Sounds like you want to keep your rock tumbling hobby small and simple. For definition, you have a ROTARY TUMBLER. Tumbling can be a challenge if you do not follow the instructions real carefully. The type of rocks you tumble are important too. Lots of rocks we would like to tumble that just don't polish well. Looks like you have rounded your rocks well, according to photo. Which is done in step 1. The ones with pits in them like the big white one mentioned should be removed and replaced if needed to get your barrel 3/4 full. If I were just trying to get a polish on the ones in your last photo you might try Step 2-3-4 over again. Rock God probably ran those rocks for a couple of months in step 1. Adding step 1 grit every week....to make them shaped well. Most of yours are shaped close enough. He probably ran step 2-3-4 for one week each. Step 2-3-4 are the steps that polish the rocks. Do you have more step 2-3 and 4 grits and polish ? If not, order more from Nat Geo. Assuming Nat Geo tumbler uses 4 steps... Using the Nat Geo grits may be the simplest way. There are basic rules for your rotary tumbler: Keep barrel about 3/4 full of rocks. Fill with water to about one inch below rocks. After a week each in steps 2-3-4 wash rocks and barrel very well. Use the exact amount of grit as the instructions specify. Is this basically what your instructions say ? It is similar to a French recipe, you have to follow instructions carefully. Getting your first polish can be a fraternal order. Many fail the first time. |
|
|
|
Post by Garage Rocker on Jan 23, 2017 7:57:07 GMT -5
Welcome to tumbling 101, glad you and your daughter jumped in. That first batch is tricky, a lot is learned though. Hang in there and ask if you're not sure. Remember, it took Rock God years to reach World Tumbling Champion. And probably a week was spent getting those slick rocks to balance perfectly in a precarious pile for that picture.  |
|