Tommy
Administrator 
Member since January 2013
Posts: 12,881
|
Post by Tommy on Apr 21, 2017 15:02:16 GMT -5
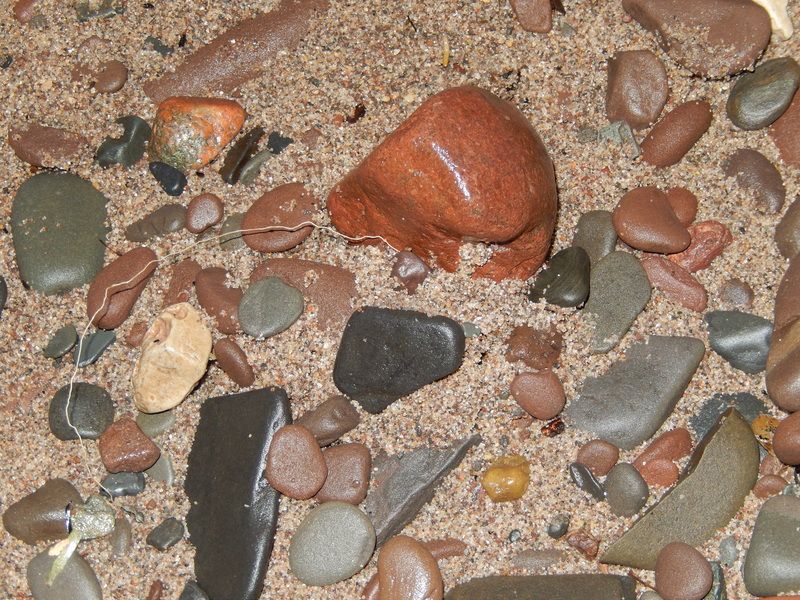
Has anyone here done - or are you familiar with methods of side drilling and more specifically keeping the hole path straight with the rock? Build a jig maybe? I'm using a foredom with the handheld unit. This is just a photo I borrowed for reference only:  |
|
|
|
Post by rockjunquie on Apr 21, 2017 15:15:38 GMT -5
I haven't done it, but I bet you can use that moldable plastic (thermoplastic) to keep it in place.
|
|
|
|
Post by youp50 on Apr 21, 2017 15:39:52 GMT -5
I have not done it. I would do it with out hesitation. I would leave the cab unfinished with flat spots where I wanted the hole. A little blow out would not matter. After the hole was through is when I would finish the cab. Waiting for these divets on my finger to heal before I cab again.
(Yea, plural, as in different fingers. If its worth doing, I guess its worth doing twice)
|
|
|
|
Post by vegasjames on Apr 21, 2017 15:44:29 GMT -5
If I was going to drill a side hole I would do it before cabbing. Cutting straight edges beyond the border of where the cab will be so the edge will keep the piece aligned properly. Then drill the hole and cut the preform afterward, which will also prevent blowout on the cab. Then cab the already drilled preform.
|
|
jeannie
spending too much on rocks

Member since January 2017
Posts: 266 
|
Post by jeannie on May 2, 2017 12:33:09 GMT -5
Has anyone here done - or are you familiar with methods of side drilling and more specifically keeping the hole path straight with the rock? Build a jig maybe? I'm using a foredom with the handheld unit. This is just a photo I borrowed for reference only: I'd love to learn how to do this! |
|
Tommy
Administrator
Member since January 2013
Posts: 12,881
|
Post by Tommy on May 2, 2017 14:38:47 GMT -5
I'd love to learn how to do this! I still haven't tried it but I think vegasjames had the right idea. Drill it then shape it and dome it. I think I would probably shape it, round the corners and just toss it in the vibe. |
|
gemfeller
Cave Dweller 
Member since June 2011
Posts: 4,019 
|
Post by gemfeller on May 2, 2017 17:33:40 GMT -5
I had a couple of free hours this morning and decided to give this method a try. I've intended to do it for ages but just never got around to it. This is purely a "proof of concept" trial and it's clear more refinements are needed to achieve acceptable results. But despite the "Uh-Oh," I'm pleased and now know what pitfalls to avoid in the future (hopefully!) First, the material. I chose a piece of Washington state Californite for the trial because it's fairly soft and easier to drill than hard agate or jasper. This combination of white grossular garnet and green vesuvianite (aka idocrase) is often misnamed Pulga Jade or Happy Camp Jade and it can make a pretty stone I think.  When I slabbed the material a month or so ago I cut a few pieces extra-thick with drilling in mind. This slab is about 8.3 mm. thick.  Next I ground it to a pear-shaped outline:  Then marked it for drilling: 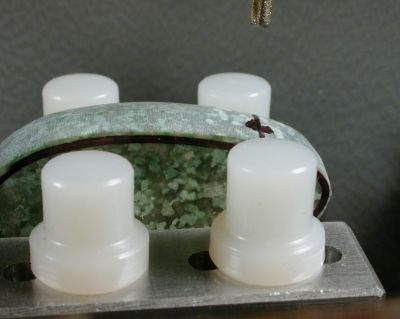 Some explanation is required at this point. First, I'm using a Dremel with a drill stand. To hold the preform I dug out a watchmaker's case holder I bought a couple of years ago with just this use in mind. I temporarily forgot the white neoprene studs are removable so I left them in place for this image. Here's a view of this device: 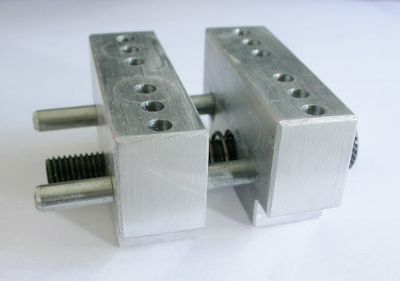 And a view of my cluttered workbench to show the overall view. I used a large tuna can to hold water for drilling (a mistake I'll explain below). I repositioned the preform to start drill holes from both sides before completing the hole to avoid big blow-outs. 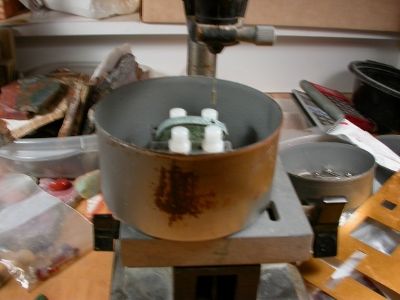 This is the drilled preform: 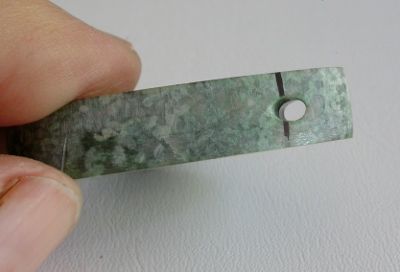 From this point I cut the stone as I would any cab. I made an obvious mistake when my improvised vise allowed the preform to slip and I drilled a starter hole in the wrong place. I thought it might be shallow enough to disappear when the stone was cabbed but no cigar. Here's the "Uh-Oh!) 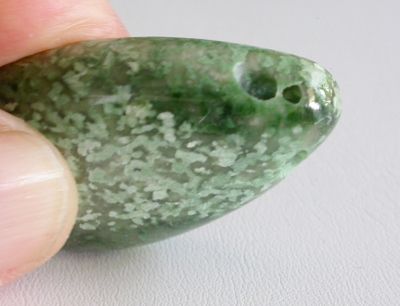 So what did I learn? First the tuna can. It has a ribbed bottom and is made of lightweight metal. I found the ribs compressed when drilling pressure was applied, throwing the alignment off. So I'm looking for a sturdier substitute for future projects. Second, the watchmaker's case holder. It's made of aluminum and has insufficient "grip" against the preform, even when tightened with pliers. I'm going to experiment by epoxying some rubber or other "grippy" material to the jaws before the next trial. Third, a lot of care has to be taken to mark the spot to be drilled accurately. Failure to do so can result in misalignent and/or the major problem of having the drill hole exposed when doming the cab. I'm sure other issues will become apparent in future projects but overall I consider this a successful experiment even though I'll have to recut the stone to eliminate the "Uh-Oh!." Comments and criticisms are welcomed. |
|
|
|
Post by melhill1659 on May 2, 2017 18:04:32 GMT -5
Tommy, gemfellerI also use my Dremel and Dremel Workstation for drilling holes. It's a mini drill press. I use the cat food can but 1 thing different. I make my own silicone mold to hold the piece in place securely. When the diamond drill bit passes through the endof the cab it hits the mold bottom not the can. I of course had to play around wth bit depth and mold thickness but it works every time.
|
|
gemfeller
Cave Dweller
Member since June 2011
Posts: 4,019
|
Post by gemfeller on May 2, 2017 19:25:28 GMT -5
melhill1659, I use essentially the same Dremel & drill press you do except mine's quite a few years older than yours. Both are in great shape, no need to upgrade. As for silicone molds, show us how you use them to side-drill. Looking forward to seeing some of your finished stones.
|
|
|
|
Post by melhill1659 on May 2, 2017 19:28:58 GMT -5
melhill1659, I use essentially the same Dremel & drill press you do except mine's quite a few years older than yours. Both are in great shape, no need to upgrade. As for silicone molds, show us how you use them to side-drill. Looking forward to seeing some of your finished stones. I've never tried side drilled. I'll do an experiment, video it and then we can review. |
|
|
|
Post by Pat on May 2, 2017 20:07:58 GMT -5
I made a tute on something that might help. I'll go look for it.
|
|
|
|
Post by Pat on May 2, 2017 20:11:22 GMT -5
Tute: HOLD THAT SLAB UNDER WATER.
It's in the Tutorial section.
Hope it helps.
|
|
unclesoska
freely admits to licking rocks
 All those jade boulders tossed in search of gold!
Member since February 2011
Posts: 934
|
Post by unclesoska on May 3, 2017 9:56:30 GMT -5
Have you tried using a small "A" clamp to hold the cab? "A" clamp lays on its side. I also would drill from both sides to avoid blowout. As others have mentioned, I would shape then drill and then cab.
|
|
gemfeller
Cave Dweller
Member since June 2011
Posts: 4,019
|
Post by gemfeller on May 3, 2017 10:55:56 GMT -5
Have you tried using a small "A" clamp to hold the cab? "A" clamp lays on its side. I also would drill from both sides to avoid blowout. As others have mentioned, I would shape then drill and then cab. I don't know what an A-clamp is I have a little C-clamp that might work as you suggest and I'll give it a try. I did drill from both sides -- no blow-out problems, just a misalignment issue. The method I posted will work, I think, when I figure out how to prevent slippage in the mini-vise. I have a couple of ideas. |
|
jeannie
spending too much on rocks
Member since January 2017
Posts: 266
|
Post by jeannie on May 3, 2017 17:42:14 GMT -5
I'd love to learn how to do this! I still haven't tried it but I think vegasjames had the right idea. Drill it then shape it and dome it. I think I would probably shape it, round the corners and just toss it in the vibe. Thanks! Walt manofglass said the same thing. |
|
|
|
Post by melhill1659 on May 3, 2017 18:11:05 GMT -5
melhill1659, I use essentially the same Dremel & drill press you do except mine's quite a few years older than yours. Both are in great shape, no need to upgrade. As for silicone molds, show us how you use them to side-drill. Looking forward to seeing some of your finished stones. Ok made a quick tutorial today. I'm including pictures and a link to the You Tube video:  ,  ,  ,  ,  ,  ,  ,  ,  This how I do it and no blow outs and holes match up. |
|
wampidytoo
has rocks in the head
Add 5016 to my post count.
Member since June 2013
Posts: 709
|
Post by wampidytoo on May 3, 2017 18:28:44 GMT -5
I use a 10" drill press, bottom 4" of a plastic bucket and a drill press vice. The bottom of the bucket has the flex like the can so I flipped it over and filled the bottom with stones and self leveling epoxy filler. When I first started I had problems with milky water so I set up a pump and an overflow so it would keep changing the water and I could see what I was doing. I have since switched to a stainless dog dish with a non skid rubber bottom that is nice and flat. I use wood in the vice to hold the cab and have made several pieces with different dips and dents to keep the cab from slipping. I don't like using rubber because it seems to wiggly unless you really crank it tight which adds other problems. Here is the bucket setup but the first photo is polishing rings and the other two are drilling slabs. I could not find the photos of the vice being used. Had to go way back just to find these.  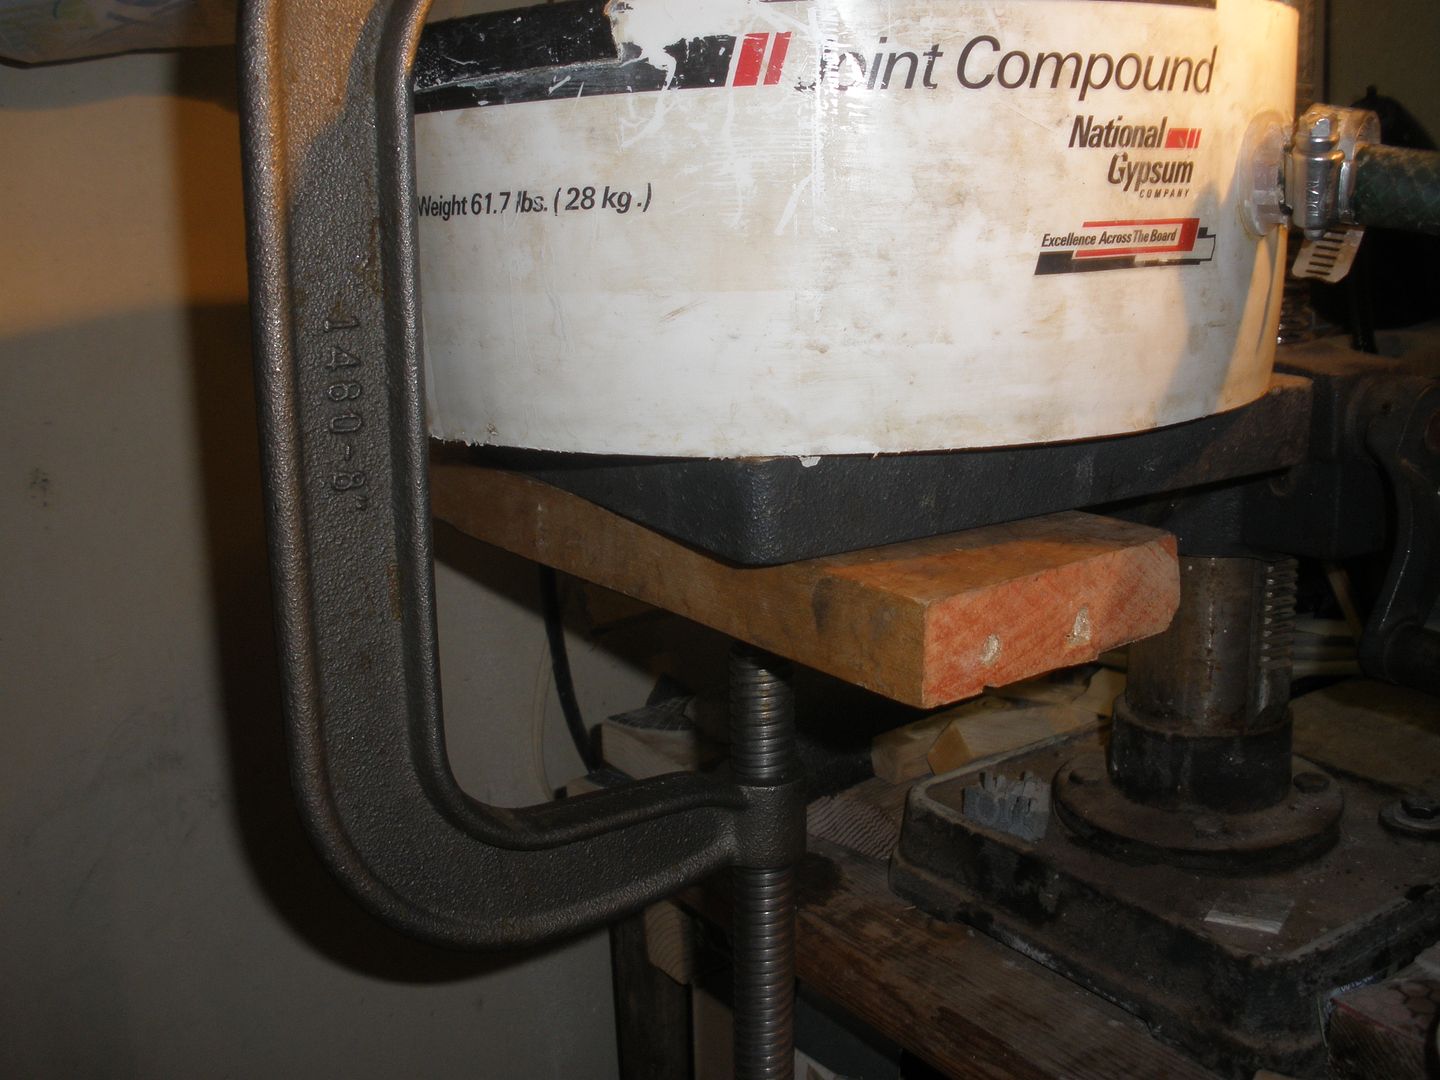 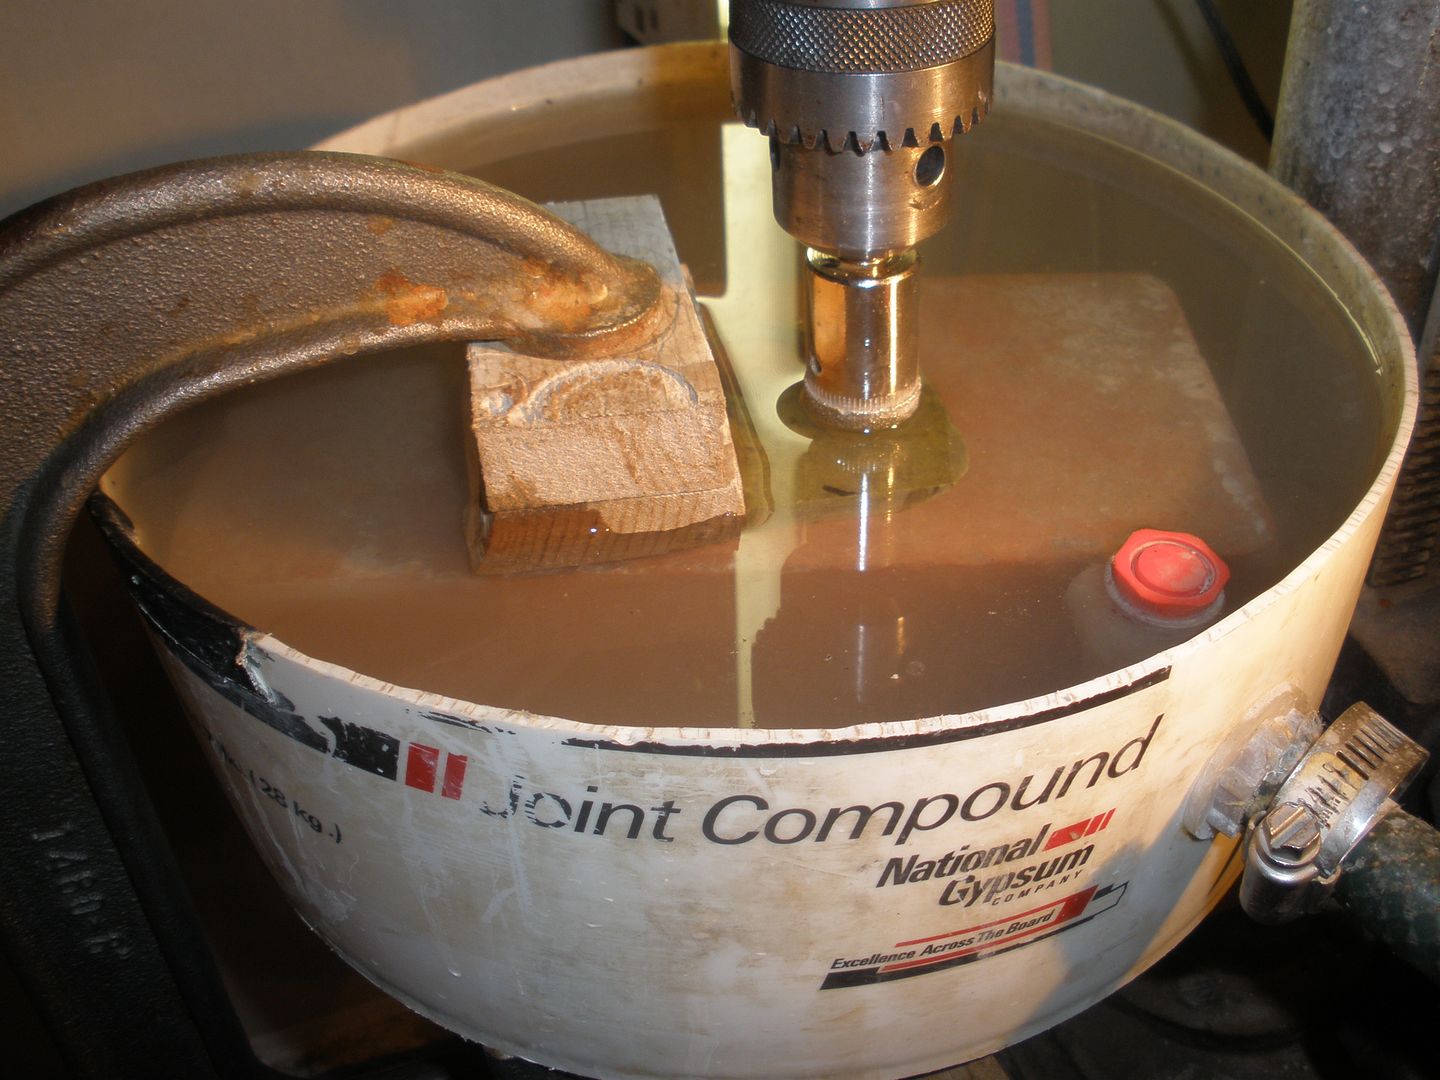 If anyone has any question or would like to see a photo of the vice let me know. The vice is just a plain drill press vice made of steel that should not be left in the water for long periods but if dried very little rust forms. Jim |
|
gemfeller
Cave Dweller
Member since June 2011
Posts: 4,019
|
Post by gemfeller on May 3, 2017 18:56:03 GMT -5
Neat techniques melhill1659 and wampidytoo . Since I work with small pieces only the Jet Sett approach is more my style than the big industrial method but both have their uses. I'll give it a try soon though I'm pleased with the way my own method is developing. I can see where the Jet Sett method would work better for oddly-shaped pieces and I have a couple of those to drill. What's the material in the lovely finished piece you posted melhill1659 ? I experimented more today with the side-drilling technique I posted about yesterday. Today’s project went smoothly due to some tinkering with my equipment. I padded my mini-vise jaws with some of the rubbery tape they use for refrigerator magnets to prevent slippage of the workpiece. And I found a plastic container with a nice flat bottom to hold the vise and workpiece while immersed in water. The tuna can I used before had a ribbed bottom that flexed and messed up alignment when drill pressure was applied. The new arrangement worked flawlessly. I used a small piece of the Californite slab left from the previous project to make a double-sided pendant. The entire project (equipment modification, sawing, preforming, drilling, cabbing and polishing) took a little less than 90 minutes. Of course future projects with harder materials will probably take longer. Anyhow, here’s the result: Overall View 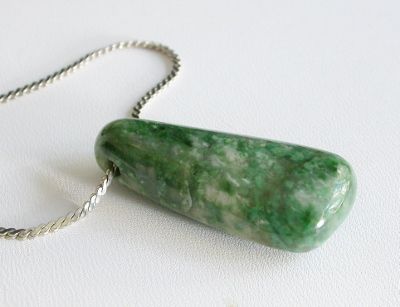 Side View 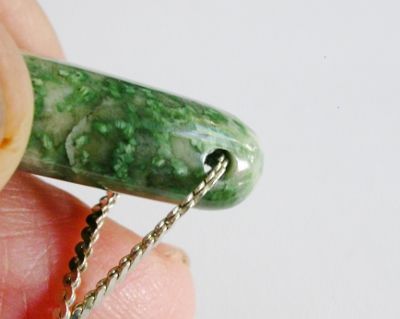 Face 1 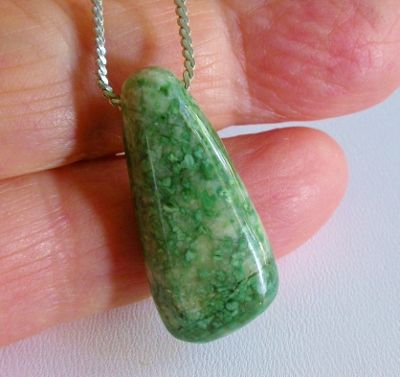 Face 2 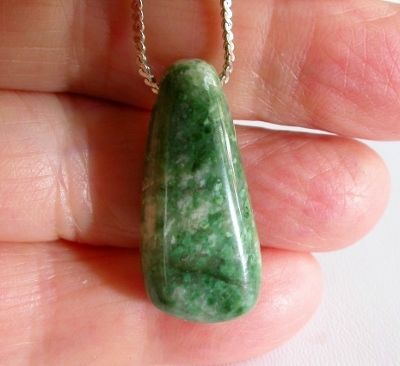 |
|
|
|
Post by Pat on May 3, 2017 19:07:59 GMT -5
|
|
|
|
Post by spiceman on May 3, 2017 19:28:33 GMT -5
A countersink or spot face is a option. If you do it on both sides it reduces the chance of blowout and the drill walking.
|
|