unclesoska
freely admits to licking rocks
 All those jade boulders tossed in search of gold!
Member since February 2011
Posts: 934
|
Post by unclesoska on May 3, 2017 20:30:07 GMT -5
|
|
gemfeller
Cave Dweller 
Member since June 2011
Posts: 3,870 
|
Post by gemfeller on May 3, 2017 20:37:25 GMT -5
unclesoska, got it! Guess I need to learn my ABC-clamps. I have some but they're made of plastic and I doubt they'd be strong enough to do the job. I'll look around the hardware store next trip. Thanks for the tip and the link.
|
|
wampidytoo
has rocks in the head
Add 5016 to my post count.
Member since June 2013
Posts: 709
|
Post by wampidytoo on May 4, 2017 4:32:56 GMT -5
I made a few of those after you posted it and I really like the look of them. I mostly give instead of sell so I got into the lazy habit of glue on's to save time. Do you have a method of cleaning the drillings out of the hole so the pin doesn't pull out? One of the problems I had with those. Jim |
|
wampidytoo
has rocks in the head
Add 5016 to my post count.
Member since June 2013
Posts: 709
|
Post by wampidytoo on May 4, 2017 4:46:30 GMT -5
Neat techniques melhill1659 and wampidytoo . Since I work with small pieces only the Jet Sett approach is more my style than the big industrial method but both have their uses. I'll give it a try soon though I'm pleased with the way my own method is developing. I can see where the Jet Sett method would work better for oddly-shaped pieces and I have a couple of those to drill. What's the material in the lovely finished piece you posted melhill1659 ? I experimented more today with the side-drilling technique I posted about yesterday. Today’s project went smoothly due to some tinkering with my equipment. I padded my mini-vise jaws with some of the rubbery tape they use for refrigerator magnets to prevent slippage of the workpiece. And I found a plastic container with a nice flat bottom to hold the vise and workpiece while immersed in water. The tuna can I used before had a ribbed bottom that flexed and messed up alignment when drill pressure was applied. The new arrangement worked flawlessly. I used a small piece of the Californite slab left from the previous project to make a double-sided pendant. The entire project (equipment modification, sawing, preforming, drilling, cabbing and polishing) took a little less than 90 minutes. Of course future projects with harder materials will probably take longer. Anyhow, here’s the result: Overall View  Side View 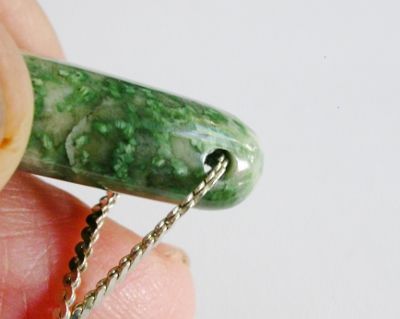 Face 1 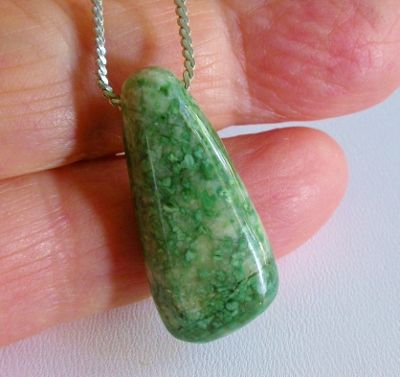 Face 2 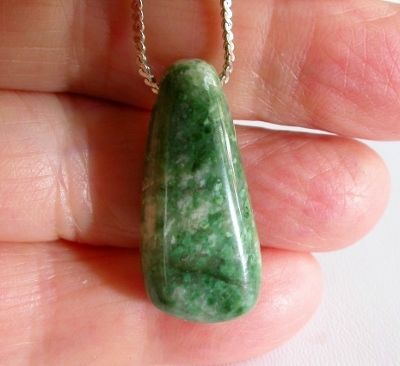 Looks like you definitely have things under control there. Sweet cab/focal bead and the hole looks flawless on the outside. I went big because it was what I had at the time. If I ever go back to cabbing and need a side hole I am quite sure I would step down and use the smaller tools that I now have. Pulling the drill press vice out of the water to reverse or change the cab can soak up a lot of towels in a hurry. |
|
|
|
Post by melhill1659 on May 4, 2017 6:18:52 GMT -5
Neat techniques melhill1659 and wampidytoo . Since I work with small pieces only the Jet Sett approach is more my style than the big industrial method but both have their uses. I'll give it a try soon though I'm pleased with the way my own method is developing. I can see where the Jet Sett method would work better for oddly-shaped pieces and I have a couple of those to drill. What's the material in the lovely finished piece you posted melhill1659 ? I experimented more today with the side-drilling technique I posted about yesterday. Today’s project went smoothly due to some tinkering with my equipment. I padded my mini-vise jaws with some of the rubbery tape they use for refrigerator magnets to prevent slippage of the workpiece. And I found a plastic container with a nice flat bottom to hold the vise and workpiece while immersed in water. The tuna can I used before had a ribbed bottom that flexed and messed up alignment when drill pressure was applied. The new arrangement worked flawlessly. I used a small piece of the Californite slab left from the previous project to make a double-sided pendant. The entire project (equipment modification, sawing, preforming, drilling, cabbing and polishing) took a little less than 90 minutes. Of course future projects with harder materials will probably take longer. Anyhow, here’s the result: Overall View Side View Face 1 Face 2 That's beautiful! Yeah you noticed that awesome raw cut piece huh 😂 I was just experimenting. Seems you got it though!! The mold really is simple and cheap to make. No clamps needed and is moldable to any shape. It's 100% silicone caulk, cornstarch an a drop of baby oil. |
|
unclesoska
freely admits to licking rocks
All those jade boulders tossed in search of gold!
Member since February 2011
Posts: 934
|
Post by unclesoska on May 4, 2017 8:30:23 GMT -5
I made a few of those after you posted it and I really like the look of them. I mostly give instead of sell so I got into the lazy habit of glue on's to save time. Do you have a method of cleaning the drillings out of the hole so the pin doesn't pull out? One of the problems I had with those. Jim Drilling under water and pulsing the drill up and down should keep the hole cleared out |
|
gemfeller
Cave Dweller
Member since June 2011
Posts: 3,870
|
Post by gemfeller on May 4, 2017 12:25:30 GMT -5
[quote author=" wampidytoo" source="/post/924383/thread" timestamp="1493890376 Do you have a method of cleaning the drillings out of the hole so the pin doesn't pull out? One of the problems I had with those. Jim[/quote] If I understand your question/problem correctly, I think an ultrasonic would do the job. |
|
wampidytoo
has rocks in the head
Add 5016 to my post count.
Member since June 2013
Posts: 709
|
Post by wampidytoo on May 5, 2017 3:20:51 GMT -5
[quote author=" wampidytoo" source="/post/924383/thread" timestamp="1493890376 Do you have a method of cleaning the drillings out of the hole so the pin doesn't pull out? One of the problems I had with those. Jim If I understand your question/problem correctly, I think an ultrasonic would do the job. [/quote] Wow, you made my day. Not sure why that did not cross my mind because I have a small ultrasonic jewelry cleaner that i have used quite a bit and my son has a very large one for his tattoo equipment. Set them in the basket up-side-down and shake them for a couple of minutes. Doesn't get any easier than that. Jim |
|
gemfeller
Cave Dweller
Member since June 2011
Posts: 3,870
|
Post by gemfeller on May 5, 2017 17:50:09 GMT -5
I'm very happy with my new side-drilling method described upthread, and I want to do some beads/pendants with standard-thickness slabs (about 6 mm or 1/4-inch). My first one, below, was made with Mary Ellen jasper I received Wednesday from Billy. Thank you Billy, very nice material. Drilling took a little longer than with the Californite due to the hardness difference but it went pretty fast (about 8-10 minutes). The hole is 2.5 mm. My wife now has accent pendants in green and red/orange and I know she'll be asking for more colors. Good practice for me! Mary Ellen Pendant/Focal Bead 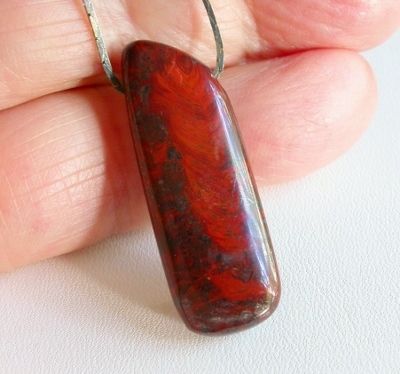 Wider View 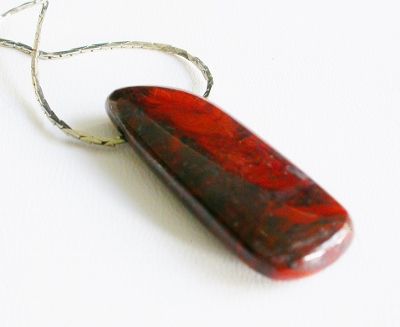 |
|
|
|
Post by pghram on May 6, 2017 17:49:10 GMT -5
Well done, that looks great.
Peace,
Rich
|
|


 Dog on a Hot Tin Roof
 A Raccoon on hot pavement