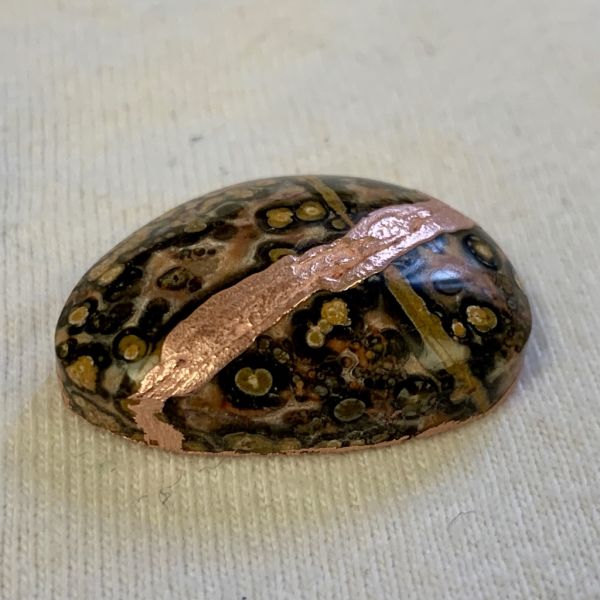
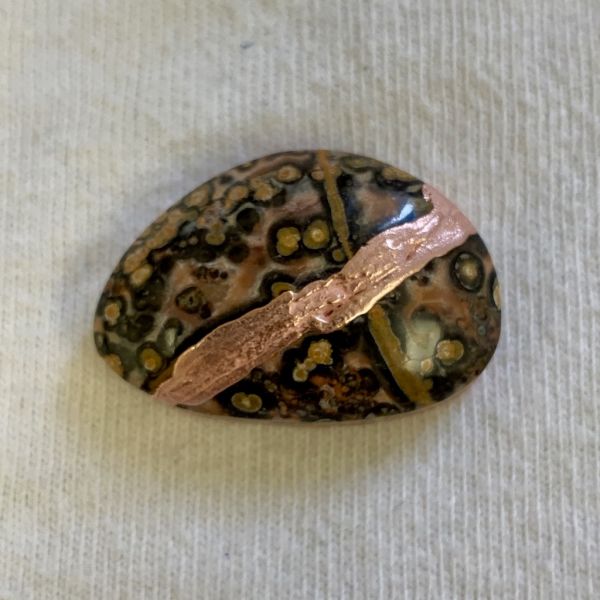
|
|
Post by earthandhammer on Jan 18, 2019 16:15:27 GMT -5
So I was really disappointed when I broke this leopard skin cab last week right as I was getting towards the finish line. I was looking at photos of Kintsugi pieces the other day (a Japanese art form involving repairing broken ceramic with gold leaf/laquer - wiki link) and had the idea to attempt my own electroformed copper version of the technique. I used copper conductive paint to coat both fractured surfaces and then fit them back together about 48 hours ago. This morning when I got up it went into the bath for about 3 hours letting the copper deposit slowly to try to get it even. The texture is from the brush strokes putting the copper paint on, I was going to smooth it out but had a feeling that the texture would add a little character so just went with it.
I think it came out pretty well! I have some more busted pieces that I'm going to experiment on going forward as this seems to have some promise.
|
|
|
|
Post by MsAli on Jan 18, 2019 16:29:41 GMT -5
Cool. Gives me ideas!
|
|
Deleted
Deleted Member
Member since January 1970
Posts: 0
|
Post by Deleted on Jan 18, 2019 16:32:10 GMT -5
It reminds me of those Cowrie shells that are made into trinket boxes with metal fittings. Very attractive!
Do post pics when you try this with other broken pieces.
|
|
|
|
Post by stonemon on Jan 18, 2019 16:42:58 GMT -5
Makes me wish I had kept a few of the stones I have destroyed. Really great save on that one!
|
|
|
|
Post by earthandhammer on Jan 18, 2019 17:12:25 GMT -5
I’m glad I could share the inspiration! The possibilities are so vast with electroforming, it’s so much fun! I was a little concerned that I would need to mix up a slightly more adhesive paint than the Midas stuff to make sure it was bonded well, but it seems to be pretty solid. If the next few come out this well I don’t think I’ll feel quite as bad about the ones that bust anymore! |
|
|
|
Post by rockjunquie on Jan 18, 2019 17:20:37 GMT -5
I like it! I do admit that I would love to see it polished, too.
|
|
|
|
Post by MsAli on Jan 18, 2019 18:19:14 GMT -5
I’m glad I could share the inspiration! The possibilities are so vast with electroforming, it’s so much fun! I was a little concerned that I would need to mix up a slightly more adhesive paint than the Midas stuff to make sure it was bonded well, but it seems to be pretty solid. If the next few come out this well I don’t think I’ll feel quite as bad about the ones that bust anymore! I make my own paint although I have heard the Midas is really good You could super glue it and then apply a thin line of copper and or use epoxy clay |
|
|
|
Post by earthandhammer on Jan 18, 2019 19:09:29 GMT -5
I’m glad I could share the inspiration! The possibilities are so vast with electroforming, it’s so much fun! I was a little concerned that I would need to mix up a slightly more adhesive paint than the Midas stuff to make sure it was bonded well, but it seems to be pretty solid. If the next few come out this well I don’t think I’ll feel quite as bad about the ones that bust anymore! I make my own paint although I have heard the Midas is really good You could super glue it and then apply a thin line of copper and or use epoxy clay I usually make my own with graphite powder and various solvents, mostly because the Midas stuff is expensive - I figured if any situation called for it though it was this one. I’ve had very good results with it every time I’ve used it, and it typically only takes one coat. Since the copper ions deposit ‘along’ the circuit, my idea had been to actually bond the fracture faces with the metal itself (super simplified for mobile there obviously). By painting each fracture face, going up onto the top a little on each side, and then painting the entire back the two pieces of stone should be held in place by a solid seam of copper along the fracture and there should be little chance of it breaking apart - assuming there was good contact across the faces. This is about as close to truly imitating the Japanese art that I could think of, but I will admit that I had my CA glue ready in case a second attempt was needed! |
|
|
|
Post by fernwood on Jan 18, 2019 19:18:28 GMT -5
That looks very good. Creative thinking saved the cab.
|
|
|
|
Post by hummingbirdstones on Jan 18, 2019 20:43:31 GMT -5
Necessity - the mother of invention!
Great save!
|
|
|
|
Post by MsAli on Jan 18, 2019 21:36:58 GMT -5
I make my own paint although I have heard the Midas is really good You could super glue it and then apply a thin line of copper and or use epoxy clay I usually make my own with graphite powder and various solvents, mostly because the Midas stuff is expensive - I figured if any situation called for it though it was this one. I’ve had very good results with it every time I’ve used it, and it typically only takes one coat. Since the copper ions deposit ‘along’ the circuit, my idea had been to actually bond the fracture faces with the metal itself (super simplified for mobile there obviously). By painting each fracture face, going up onto the top a little on each side, and then painting the entire back the two pieces of stone should be held in place by a solid seam of copper along the fracture and there should be little chance of it breaking apart - assuming there was good contact across the faces. This is about as close to truly imitating the Japanese art that I could think of, but I will admit that I had my CA glue ready in case a second attempt was needed! Brilliant idea How long was it in the bath for? |
|
|
|
Post by earthandhammer on Jan 18, 2019 21:59:44 GMT -5
I usually make my own with graphite powder and various solvents, mostly because the Midas stuff is expensive - I figured if any situation called for it though it was this one. I’ve had very good results with it every time I’ve used it, and it typically only takes one coat. Since the copper ions deposit ‘along’ the circuit, my idea had been to actually bond the fracture faces with the metal itself (super simplified for mobile there obviously). By painting each fracture face, going up onto the top a little on each side, and then painting the entire back the two pieces of stone should be held in place by a solid seam of copper along the fracture and there should be little chance of it breaking apart - assuming there was good contact across the faces. This is about as close to truly imitating the Japanese art that I could think of, but I will admit that I had my CA glue ready in case a second attempt was needed! Brilliant idea How long was it in the bath for? It was about 3.5 hours total. I started at 9am and pulled it out between 12:30 and 12:45. Started at .05 amps and ended up at .11 (I’ve been playing with constant voltage instead of constant current lately to compare results). |
|


 ... to the New Guys from The ChatBox V.2 Crew