nik
spending too much on rocks

Member since May 2019
Posts: 315
|
Post by nik on Jun 28, 2019 5:47:07 GMT -5
This project started as a desire to go back to a vertical wheel grinder after getting rid of my old Lortone arbor because I thought it was too big to ship from Maine to Guam. Long story short, I'm not too fond of the flat lap machine that I got to replace it. With that said, here we go...  IMG_20190626_081953[1] IMG_20190626_081953[1] by nik hintz, on Flickr All of the machined parts, shaft, spacers, bushings, and flanges. The shaft is 27' of 1" 1144 TG&P shafting, which is some of the nicest steel to machine that I have ever worked with. 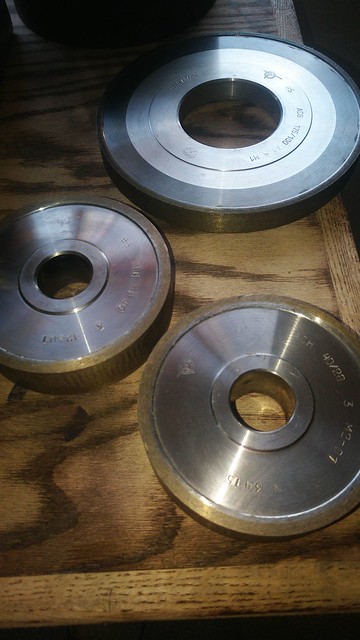 IMG-20190610-WA0002[1] IMG-20190610-WA0002[1] by nik hintz, on Flickr A few of the sintered hard wheels. The sequence of wheels will be a double stack of 8 x .75" 100 grit, 8 x 1.5 220 grit, 5 x 1.25 400 and 600 grit, an 8 x 2 280 soft wheel, an 8 x 3 expanding drum with diamond belts from 220 to 50,000, and provisions on the right end of the shaft for flat laps with 0.5" bore  IMG-20190610-WA0006[1] IMG-20190610-WA0006[1] by nik hintz, on Flickr the beginnings of the pan and hood, the hood is 0.090" aluminum sheet, and the pan is a 4 mm thick stainless griddle plate that I picked up at a local Asian market for less than I could buy the materials.  IMG_20190626_092052[1] IMG_20190626_092052[1] by nik hintz, on Flickr here is the first mock up of the rotating assembly, minus the 220 soft wheel that will go inboard of the RH bearing. Mostly, I wanted to see it all together and get a sense of what it all weighed as an assembly (turns out almost 70 pounds). Power will be coming from a 1 hp washdown rated 3450 rpm motor with the shaft running half motor speed |
|
|
|
Post by stardiamond on Jun 28, 2019 14:25:46 GMT -5
That should work really well. I'm having a difficult time matching the description to the last picture. I prefer recirculating water to drip.
A plastic tray that can slide under the wheels and geysers with aquarium pumps. No work and flexible.
I spent 15 months between 72-73 stationed at Anderson AFB. Where are you getting your slabs?
|
|
nik
spending too much on rocks
Member since May 2019
Posts: 315
|
Post by nik on Jun 28, 2019 16:51:42 GMT -5
The plan is to run a single pass drip system. Mostly just because it is what I have used in the past, and won't require many more parts.
As far as slabs, I will be using a bunch of the material that I already have for now, or ordering online from various sources. There isn't really much to be found locally, the finds so far are some nice banded arragonite, and a fist sized chunk of petrified wood that has no business being here. I have heard there is a spot to find banded white agate and calcedony not far from the house, but I have not checked it out yet. Perhaps this weekend
|
|
quartz
Cave Dweller  breakin' rocks in the hot sun
Member since February 2010
Posts: 3,341
|
Post by quartz on Jun 28, 2019 20:26:55 GMT -5
It looks like a really good start there, well thought out. I used to make hydraulic and air cylinder rods using chromed and polished 1144, great stuff to work with, and due to a bit more flexibility of the material, our rod breakage dropped substantially from using 1045.
|
|
|
|
Post by Peruano on Jun 29, 2019 7:01:37 GMT -5
The southern half of the island is supposed to be of volcanic origin, whether agates have formed or not is worth exploring. I seem to recall too much red ash (= mud). You have good mail service so rocks will come your way if you seek them.
|
|
nik
spending too much on rocks
Member since May 2019
Posts: 315
|
Post by nik on Jun 29, 2019 13:45:52 GMT -5
Definitely volcanic. Looking at the article a bit more closely, I figured out that the agates should be in the same river drainage basin that produced that lump of petrified wood. I think that today is the time to go exploring.
|
|
nik
spending too much on rocks
Member since May 2019
Posts: 315
|
Post by nik on Jul 5, 2019 17:04:53 GMT -5
Making a bit more progress, the final wheel is here, so now I need to locate and drill the holes through the base tray. I like working with stainless less and less with every hole that I need to put through it. At least it's easier than titanium. If I manage to stay focused on the project, it may have some rock snot on it by the end of the weekend.  IMG_20190706_074212[1] IMG_20190706_074212[1] by nik hintz, on Flickr |
|
|
|
Post by Rockindad on Jul 5, 2019 19:01:50 GMT -5
Making a bit more progress, the final wheel is here, so now I need to locate and drill the holes through the base tray. I like working with stainless less and less with every hole that I need to put through it. At least it's easier than titanium. If I manage to stay focused on the project, it may have some rock snot on it by the end of the weekend. www.flickr.com/photos/182276465@N04/48207928426/in/dateposted-public/Cutting fluid will make your life much easier, and your drill bits will love you. Al |
|
nik
spending too much on rocks
Member since May 2019
Posts: 315
|
Post by nik on Jul 5, 2019 19:23:27 GMT -5
Making a bit more progress, the final wheel is here, so now I need to locate and drill the holes through the base tray. I like working with stainless less and less with every hole that I need to put through it. At least it's easier than titanium. If I manage to stay focused on the project, it may have some rock snot on it by the end of the weekend. www.flickr.com/photos/182276465@N04/48207928426/in/dateposted-public/Cutting fluid will make your life much easier, and your drill bits will love you. Al I'm using boelube, both liquid and solid. It's just a particularly gummy sheet of stainless. The bits are cutting well and spitting out nice even curls of swarf, but 4.7 mm is way thicker than most of the airplane parts I'm usually drilling |
|
|
|
Post by Rockindad on Jul 5, 2019 19:33:41 GMT -5
Cutting fluid will make your life much easier, and your drill bits will love you. Al I'm using boelube, both liquid and solid. It's just a particularly gummy sheet of stainless. The bits are cutting well and spitting out nice even curls of swarf, but 4.7 mm is way thicker than most of the airplane parts I'm usually drilling Gotcha, carry on. 4.7mm = 3/16" +/- Built to last, love it! Al |
|
nik
spending too much on rocks
Member since May 2019
Posts: 315
|
Post by nik on Jul 11, 2019 14:03:41 GMT -5
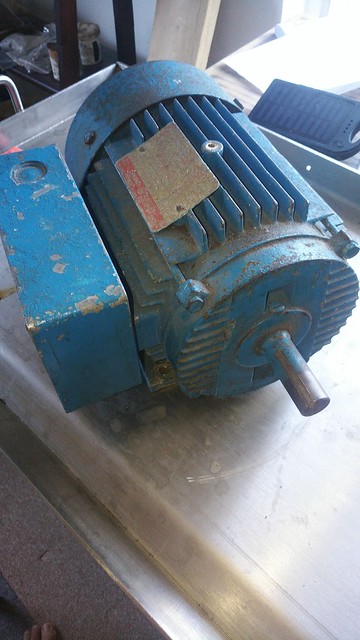 66433523_732592047159902_3494783488249298944_o 66433523_732592047159902_3494783488249298944_o by nik hintz, on Flickr The free 1.5 HP motor to drive this beast, I just need to figure out if the wiring is set up for 110 or 220 volt. Not a today project though, I'm off to Saipan to chase down a fuel leak on one of the company planes. Work is getting in the way of hobbies yet again. |
|
nik
spending too much on rocks
Member since May 2019
Posts: 315
|
Post by nik on Jul 15, 2019 2:40:52 GMT -5
|
|
Tommy
Administrator 
Member since January 2013
Posts: 12,665
|
Post by Tommy on Jul 15, 2019 9:02:30 GMT -5
Nice project and result nik! We will definitely enshrine this thread in the DIY Projects Page as soon as possible.  |
|
nik
spending too much on rocks
Member since May 2019
Posts: 315
|
Post by nik on Jul 15, 2019 19:24:43 GMT -5
Thanks, I'm honored. I will say that it is really nice to use, quiet and solid feeling. I guess there is really no substitute for mass.
|
|
|
|
Post by Rockindad on Jul 15, 2019 20:55:34 GMT -5
Thanks, I'm honored. I will say that it is really nice to use, quiet and solid feeling. I guess there is really no substitute for mass.Agree 100%. When I had my woodworking business I would grab old cast iron machinery any time I had the chance. The shear mass of these machines eliminated much of the vibration making accuracy and repeatability a breeze. That link belt you used also takes care of quite a bit of vibration, great looking machine! Al |
|
nik
spending too much on rocks
Member since May 2019
Posts: 315
|
Post by nik on Jul 17, 2019 5:29:32 GMT -5
|
|
|
|
Post by fernwood on Jul 17, 2019 5:37:13 GMT -5
That is ex exceptional. Did you know you can share the actual photo here, not just the link? Click on the share arrow. Select BBC Code. I chose medium size for this. Copy the link and paste. You might want to delete all of the HTML to the right of the word by.  IMG_20190716_084842 IMG_20190716_084842 by nik hintz, on Flickr |
|
nik
spending too much on rocks
Member since May 2019
Posts: 315
|
Post by nik on Jul 17, 2019 7:04:58 GMT -5
I finally figured out how to get the pictures to post directly. Thanks to all who helped.
|
|
|
|
Post by fernwood on Jul 17, 2019 8:46:41 GMT -5
Yes, the photos are there.
|
|
nik
spending too much on rocks
Member since May 2019
Posts: 315
|
Post by nik on Dec 18, 2019 4:09:18 GMT -5
After using the grinder for a few months, the urge to change a few things has come up.
First off, it is really messy to use, so the plan is to build a set of splash guards for the ends and what is basically a neoprene mud flap to mitigate the mud shower I get while it's running.
Secondly, the two small wheels in the center are being replaced with a pair of 8" soft wheels, 600 and 1200. That will put my sequence of fixed wheels at 120 and 220 sintered, then 280, 600, and 1200 soft. The right end of the shaft will either have the expanding drum, one of the 5" sintered wheels (400 or 600), a 6" 60 sintered wheel, or the 5 x 5/16 radius wheel that is on its way here from Ukraine. Plus the selection of flat laps on the end.
I have decided to move the polishing to a separate machine that lives on the other side of the shop.
I'll put up a couple photos once it is all together.
|
|


 Al Falfa


