Bob
fully equipped rock polisher
 Rotary only
Member since May 2015
Posts: 1,265 
Member is Online
|
Post by Bob on Feb 17, 2021 11:42:28 GMT -5
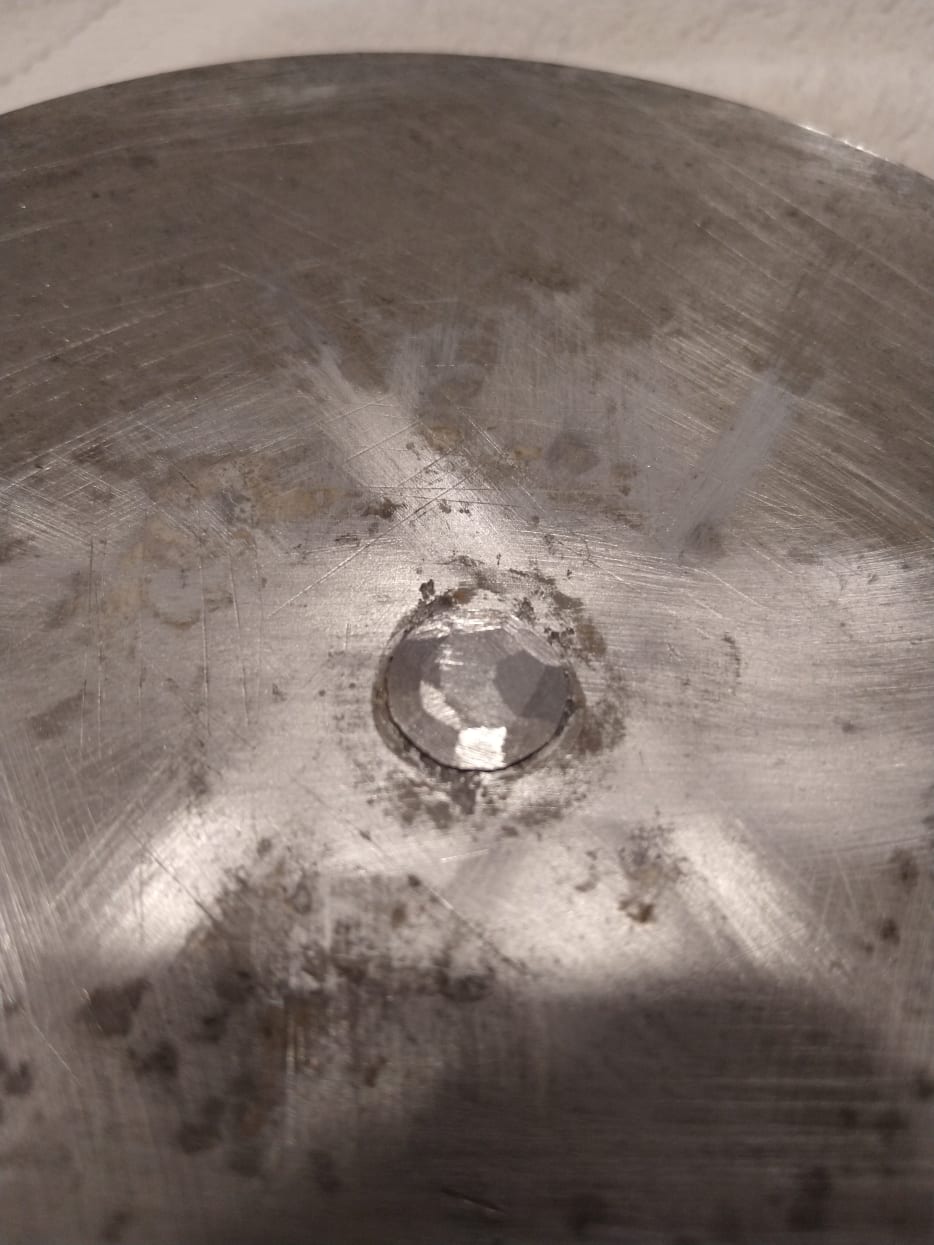
I get a lot of private messages about technique and tricks but felt answering this one should be shared to all. I have to manage about 20 inner lids because I keep each one color coded for grit level, and each has a gasket on it, so I've fine tuned this over some years. The big problem is the wear in the middle due to the protruding carriage bolt head against the gasket.
Grind down the carriage bolt head flat to perhaps 1mm using a grinder, trying to taper edge a bit also w/o hitting any of the aluminum lid of course. I actually probably end up with .5mm of the head left which takes a bit of care and is easiest on a grinder with wheels no larger than 6". Now, smear that with epoxy with your finger evening out and tapering to nothing over maybe a circle the size of a half dollar. Now there is no edge to wear against and my gaskets now last about 3-5 years in continuous hard use 24/7.
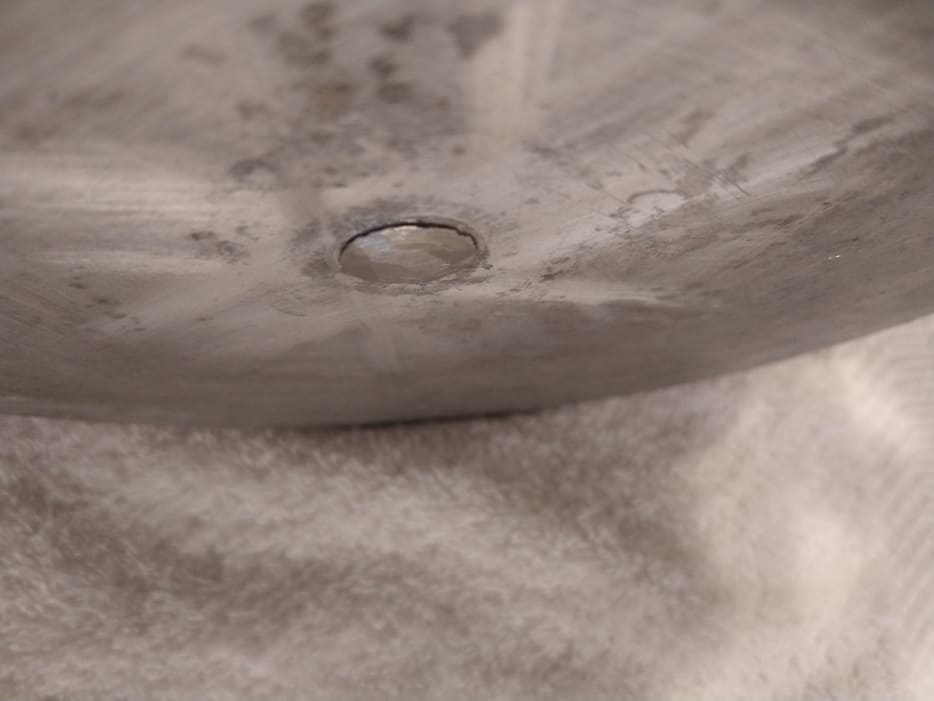
But, even then, they eventually wear too thin overall and have to be tossed. But they usually wear too thin in the middle and with the following repair can go another year or two. One can make repair patches from new gaskets or old ones by cutting a circular piece to over the middle problem area--maybe 3" in diameter but whatever you want. I glue it on with the common, cheap, but incredible adhesive E6000 sold about everywhere.
If anything about this isn't clear, just let me know and good luck to all on this.
|
|
|
|
Post by greig on Feb 17, 2021 12:27:46 GMT -5
Good advice. I have a couple of gasket spares because they are cheap and I don't like to wait for a new one to be shipped. I don't grind down the bolt head. I do cover it with a x of rubber tape, so the gasket doesn't back onto a hard point.
|
|
|
|
Post by oregon on Feb 17, 2021 13:01:27 GMT -5
Never understood why Lortone doesn't dimple the Al plate and put a flat head bolt in there. Guess they wouldn't sell as many replacement liners...
|
|
Bob
fully equipped rock polisher
Rotary only
Member since May 2015
Posts: 1,265
Member is Online
|
Post by Bob on Feb 17, 2021 13:59:04 GMT -5
Never understood why Lortone doesn't dimple the Al plate and put a flat head bolt in there. Guess they wouldn't sell as many replacement liners... My thoughts too. |
|
quartz
Cave Dweller  breakin' rocks in the hot sun
Member since February 2010
Posts: 3,341
|
Post by quartz on Feb 18, 2021 0:19:39 GMT -5
I've made lots of them from pond liner material, the thicker, softer stuff works better.
|
|
agatemaggot
Cave Dweller
Member since August 2006
Posts: 2,195
|
Post by agatemaggot on Feb 18, 2021 9:42:19 GMT -5
Would the old timey inner tube patches work for reinforcing the wear area ?
Maybe a little RTV Silicone rubber around the edges of the patch to prevent lifting ?
Rust-oleum spray on truck bed liner ? Comes in small cans .
|
|
Bob
fully equipped rock polisher
Rotary only
Member since May 2015
Posts: 1,265
Member is Online
|
Post by Bob on Feb 18, 2021 15:21:31 GMT -5
The patches have to be 100% adhered on, with no gaps around the edges or even under, to provide for no chance of grit contamination as they wear. But, this is not why I have color-designated inner lids (with gaskets that always remain on). I do it to minimize the chance that I screw up a batch processing and put in the wrong grit.
To explain, I have my log sheets in a clipboard in the garage by the tumblers. If it says I have 220 grit 12lb barrel due tonight, when I pull off the cover I will see a orange spray-painted inner lid. That orange matches the orange of my 220 supplies, the grit container (5 lb protein containers from Walmart after using protein powder), the brush to clean the barrel inner groove, the cup to pour water, the strainer, the container that stores rocks ready for 220 next, the container with plastic pellets for 220, etc. All those are spray painted orange for 220 and are all kept together on one shelf with only large grits on shelves below so gravity can't cause grit contamination. Because I see the inner lid as orange, it helps me to spot a screwup. If, for instance, my logbook says 220 was used but I remove the cover and I see red, whoa, I've know that barrel has 80 grit in it and I've got to slow down and figure out what's going on and where I made a mistake. Black = 50-70 grit, red = 80, orange 220, yellow 600, tan 1,000, beige 1,200 (rarely used) and pure white codes everything for polish.
If I'm processing more than 1 barrel per evening, I do the finer grits first, so I don't have to bother changing the newspaper cover I have on my workbench for the next barrel.
If I adhere to this system, I don't have to worry about potential cross contamination even if the liner or patches have crevices in which to carry grit. For polish, I won't even pour water from a water container that was used for anything else other than polish or burnish.
When a new liner lid is purchased, I first fix the carriage bolt problem as mentioned. Then I lightly sandpaper the hard cut outside edge to soften it. I then spray paint the color on it.
|
|
Benathema
has rocks in the head
 God chased me down and made sure I knew He was real June 20, 2022. I've been on a Divine Mission.
Member since November 2019
Posts: 703
|
Post by Benathema on Feb 18, 2021 15:45:37 GMT -5
The patches have to be 100% adhered on, with no gaps around the edges or even under, to provide for no chance of grit contamination as they wear. Alright, so this brings up a clarification question of what side of the gasket gets patched? The side that faces the bolt, or the side that faces the inside of the barrel? If the gasket already has a hole in the center and the patch is on the bolt side, then grit/slurry could still get into that hole. Patching the side facing the inside of the barrel would, as you said, have to be completely adhered on. |
|
Benathema
has rocks in the head
God chased me down and made sure I knew He was real June 20, 2022. I've been on a Divine Mission.
Member since November 2019
Posts: 703
|
Post by Benathema on Feb 18, 2021 15:48:03 GMT -5
Would the old timey inner tube patches work for reinforcing the wear area ? Maybe a little RTV Silicone rubber around the edges of the patch to prevent lifting ? Rust-oleum spray on truck bed liner ? Comes in small cans . This is the direction I'm considering, but more towards the liquid flex seal that can be poured from a can. I am curious if anyone has tried this yet, and if so, could please chime in. |
|
|
|
Post by greig on Feb 18, 2021 16:03:59 GMT -5
The patches have to be 100% adhered on, with no gaps around the edges or even under, to provide for no chance of grit contamination as they wear. Alright, so this brings up a clarification question of what side of the gasket gets patched? The side that faces the bolt, or the side that faces the inside of the barrel? If the gasket already has a hole in the center and the patch is on the bolt side, then grit/slurry could still get into that hole. Patching the side facing the inside of the barrel would, as you said, have to be completely adhered on. When I had a hole in a gasket and was waiting for a new one to get shipped, I put rubber tape on the tear on the outside of the gasket (facing the lid). That tape isn't especially sticky, but hung in for 10 days until that tumble was done and the new one(s) arrived. |
|
Bob
fully equipped rock polisher
Rotary only
Member since May 2015
Posts: 1,265
Member is Online
|
Post by Bob on Feb 18, 2021 18:09:29 GMT -5
The patch is on the side toward the load in the barrel, which directs the main wear against the patch. In addition to patch material already mentioned...
If you go to an auto supply store like Napa, and buy one of the thinnest mudflaps they sell which are cheap, you will end up with some material that can be cut with tin snips or very heavy shears. It has threads reinforcing in it, and is very hard rubber, and boy does it last. But due to the threads which will get exposed after wear, you must not use it in any finer grit stage or contamination will occur. This patch will end up being about 1/8" thick, and I don't worry about the rough edge of it and suspect that rough edge helps turn the rocks and grind them. The E6000 adhesive remains flexible which is key to it working well.
In my 40lb tumbler, I buy much thicker mudflaps (1/4" or 5/16" I think they are) and make barrel gaskets from them. One is in its 5th year, which is hard to believe given the size and the roughness of the rocks that are often beat against it. I use one for rough grind up to 80 grit, another for 220, another for each finer grit after that and one only for polish (not that I've ever yet done a 40lb polish load). But I also do these for a 20lb barrel too. One of these finally got about 1mm thin in the middle. I patched the mudflap with a mudflap patch of the same thickness. It's pretty ugly looking with that huge patch that is maybe 6" in diameter, but the patched one is now in its 3rd year I think for the 220 grit stage.
|
|
Benathema
has rocks in the head
God chased me down and made sure I knew He was real June 20, 2022. I've been on a Divine Mission.
Member since November 2019
Posts: 703
|
Post by Benathema on Mar 4, 2021 2:10:50 GMT -5
I had grabbed some flex seal just because I did want to see if it could be used to repair a gasket and/or be included as a preventative maintenance step. I noticed a second gasket was about razor thin in the center, and a third one isn't too far behind. That means I'm out of backups and was the push to just go ahead and try this. This is more of an experiment than a tutorial since there's no telling if it'll last a week, a month, or a year just yet. I scuffed up the inside of the boot gasket with 80 grit sandpaper and cleaned it up. Then I used a bucket lid with a concave shape and lined it with a piece of parchment paper to set the gasket in. This created a little bowl to keep the liquid flex seal in the center and keep it away from the edges where all the sealing geometry is. I sort of eyeballed an amount into each of the two that I did, then smeared it around a bit with a wooden stick. I'd say it's about 1/8 - 3/16" thick, and somewhere between $1.00 - $1.50 worth of flex seal in each. This if for the Lortone 6/12lb barrels if I haven't said that yet, which are currently listed on therockshed for $7.25 for reference. (dammit Ben, quit being cheap and just buy a new gasket! nooooo, can't make me)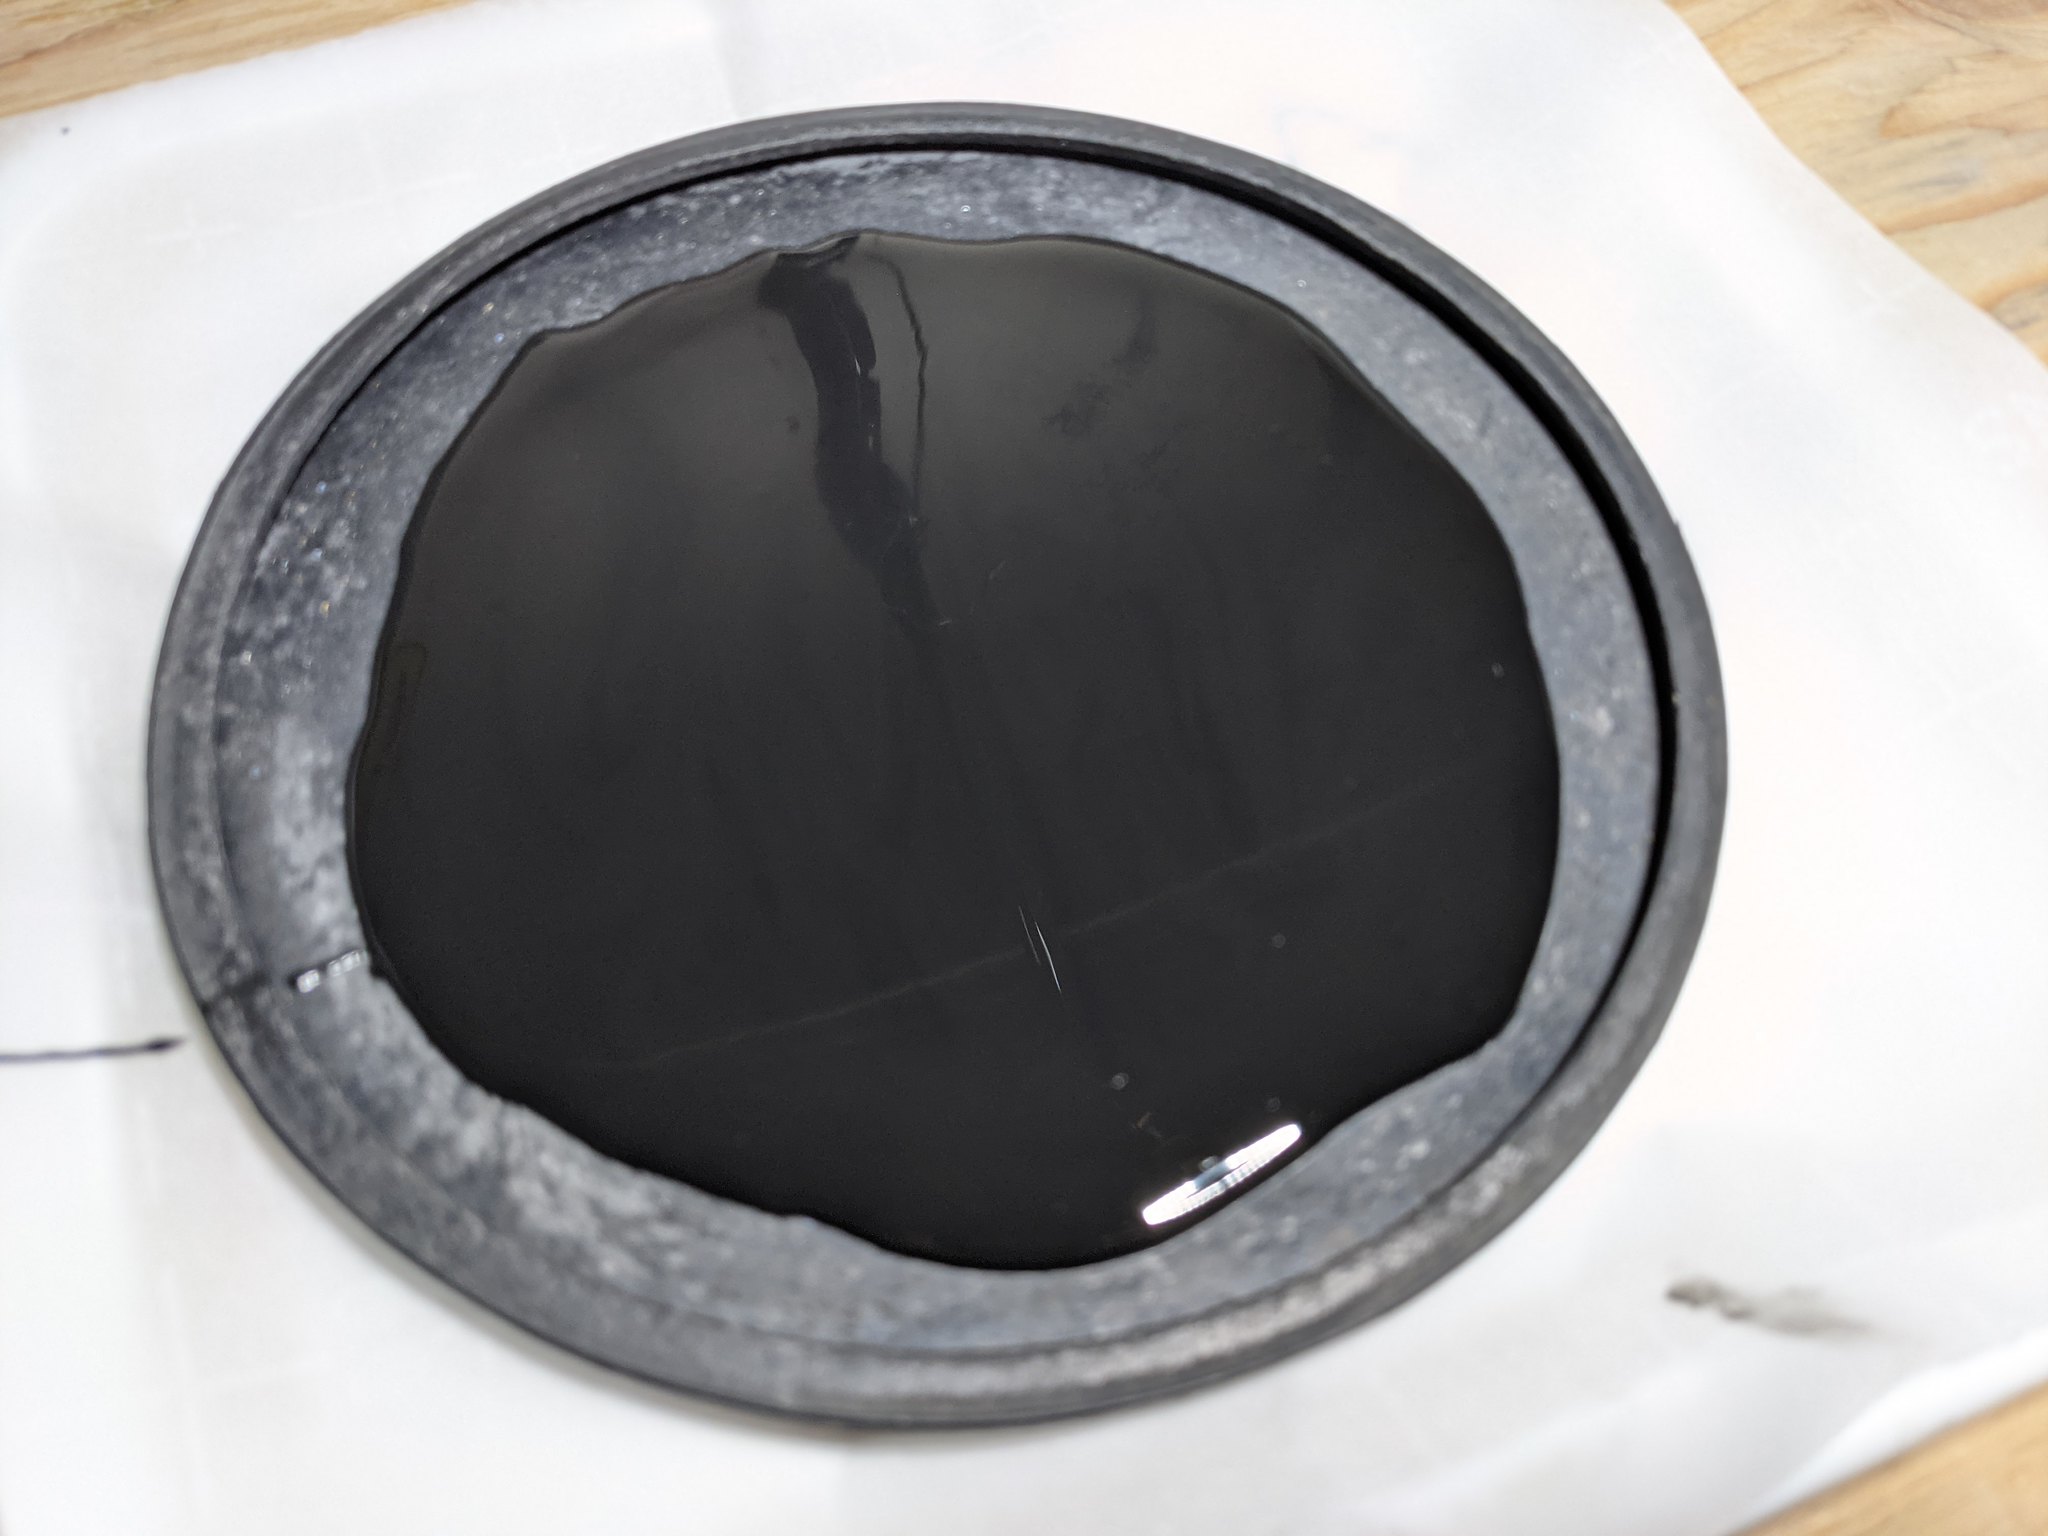 For the sake of science (and laziness) I'm going to hold off on grinding the bolt head down like Bob described. For now the bolt head has a few layers of duck tape on it and I want to see how this works as is. I do think combining the two ideas (flex seal + bolt grind and epoxy) could go a long ways towards making a bulletproof boot gasket. (provided the flex seal doesn't immediately crap out) |
|
Bob
fully equipped rock polisher
Rotary only
Member since May 2015
Posts: 1,265
Member is Online
|
Post by Bob on Mar 4, 2021 19:45:10 GMT -5
Nice job on what you did!
|
|
|
|
Bob
fully equipped rock polisher
Rotary only
Member since May 2015
Posts: 1,265
Member is Online
|
Post by Bob on Mar 17, 2021 15:40:53 GMT -5
|
|
stefan
Cave Dweller
Member since January 2005
Posts: 14,095
|
Post by stefan on Mar 17, 2021 17:41:01 GMT -5
I used to have the same issue with the Chicago Electric lids. I bought up inner tube patch kits by the gross to patch, re-patch and patch the patches. I would patch the inside and the outside. Some of my lids were more patch than lids. Most patches would last for a couple months. Then the motors headed south and I added a few more Thumlers to the mix and retired the CE untis.
|
|
SirRoxalot
freely admits to licking rocks
Member since October 2003
Posts: 790
|
Post by SirRoxalot on Apr 21, 2021 16:19:52 GMT -5
You guys are awesome. Lortone needs to see this and fix their product. But then they’d need to make better belts, and motors, and lid knobs too, sigh, lolol.
|
|
Bob
fully equipped rock polisher
Rotary only
Member since May 2015
Posts: 1,265
Member is Online
|
Post by Bob on Apr 23, 2021 14:20:27 GMT -5
You guys are awesome. Lortone needs to see this and fix their product. But then they’d need to make better belts, and motors, and lid knobs too, sigh, lolol. That's pretty harsh. When I really got into a tumbling a lot a few years back, I had many visits about this or that with the owner of Lortone. He cares about the company and product in my opinion. I've had 2 of their 12lb tumblers going 24/7 now for about 60,000 hours total each. They are each now on their 2nd replacement set of shaft bearing ends, a part that is made to be replaced when worn. They are on the 1st replacement set of shafts, because of shaft cover wear. The barrels are still originals. The motors are still originals. The lid knobs have been replaced about 2 times I think. All replacement parts that I've had to purchase I think are fairly priced and easy to find. My gaskets last 2-3 years, not bad for an $8-9 part that is banged on for thousands of hours by rough, sharp rocks. I don't patch them out of dissatisfaction or money, but just because it's easy to do and works. I'm sure the company deals with pros/cons of selling price vs. features. I currently have 4 Lortone tumblers. |
|